Aberystwyth University's Micro:Bit Workshop Series
We have adapted the material created for our Robotics Club for anyone to work through at home or in school.
Each of the below sessions include a video lesson from one of our staff and a set of exercises to assess your understanding. As this page is for independent learners, answers are included.
Please select a session heading to get started.
Video Lesson:
Exercises:
We have created three levels (bronze, silver, and gold) of challenge for learners to start investigating and creating programs in Microsoft Makecode.
All learners should start with the bronze level and work their way up as far as they can.
Click on each challenge heading to expand.
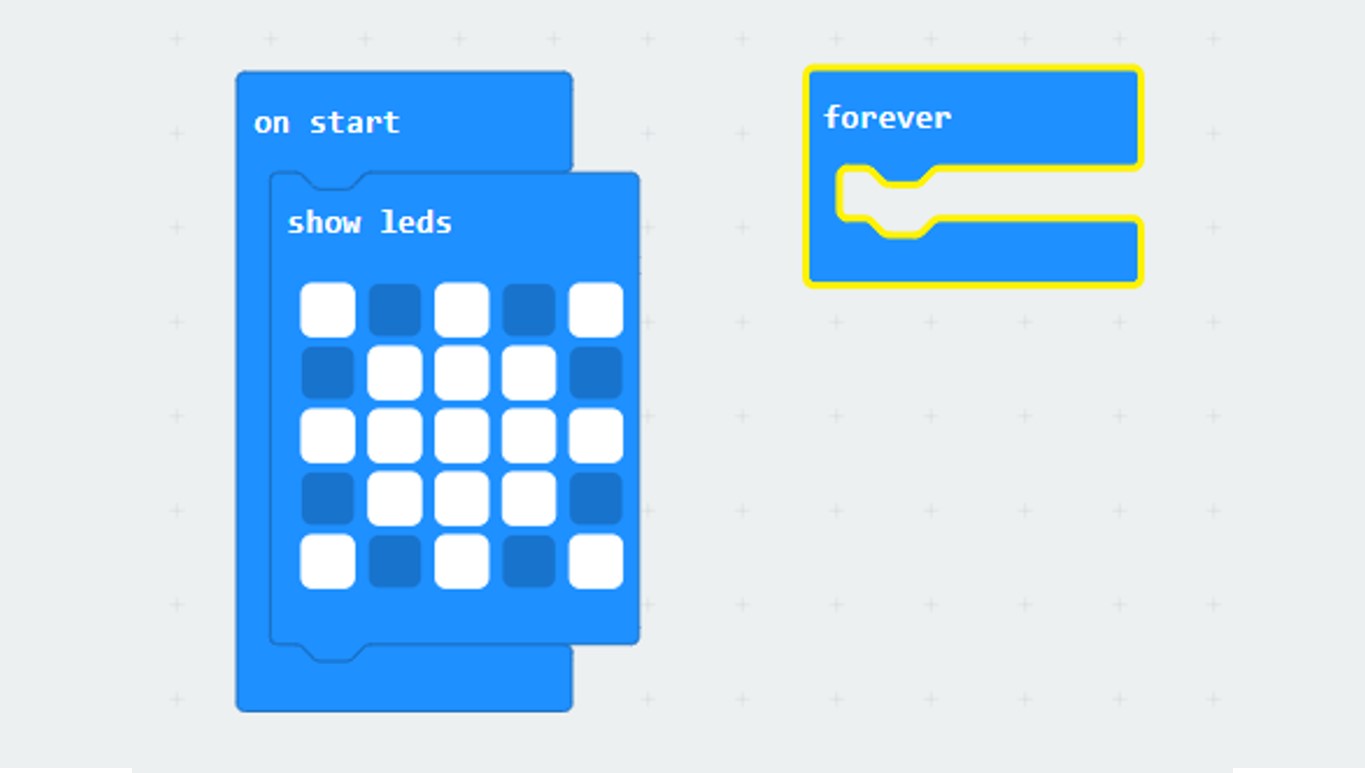
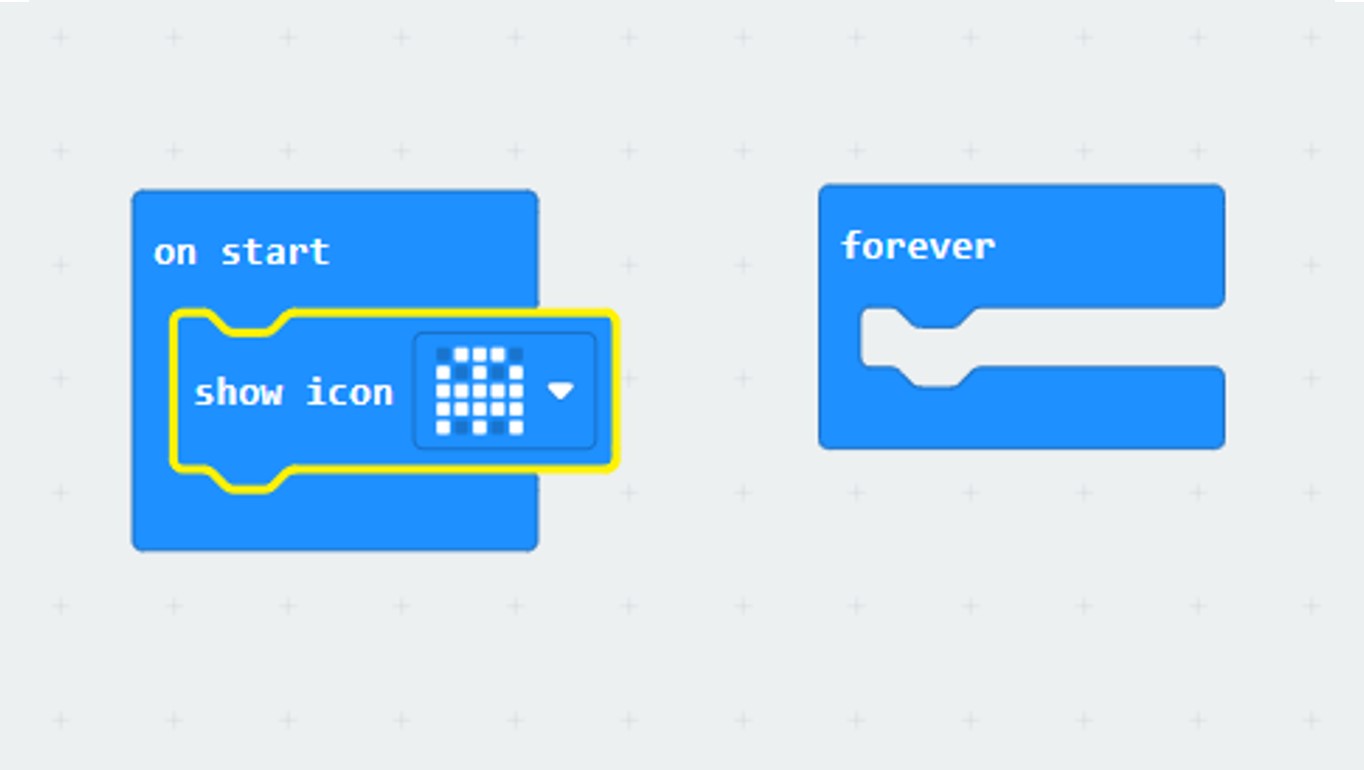
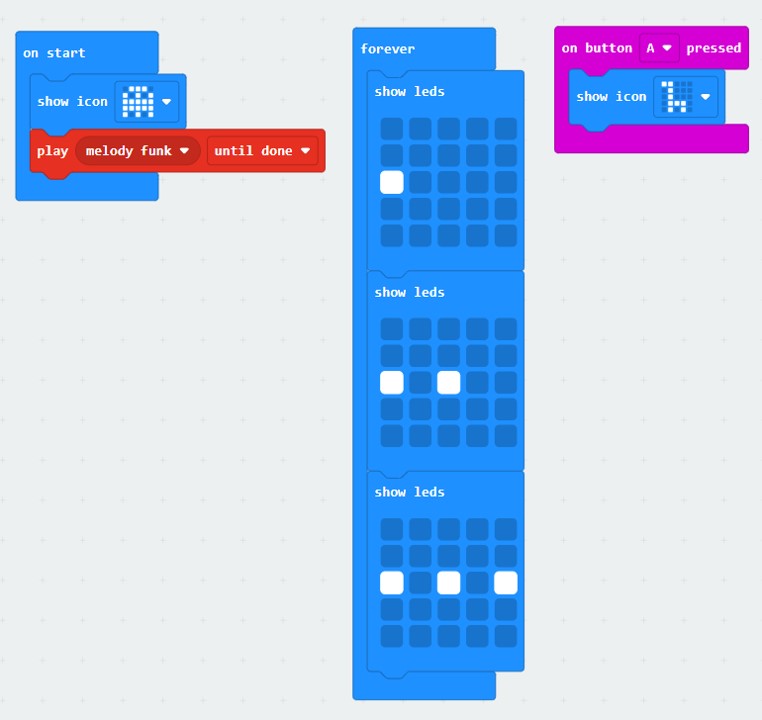
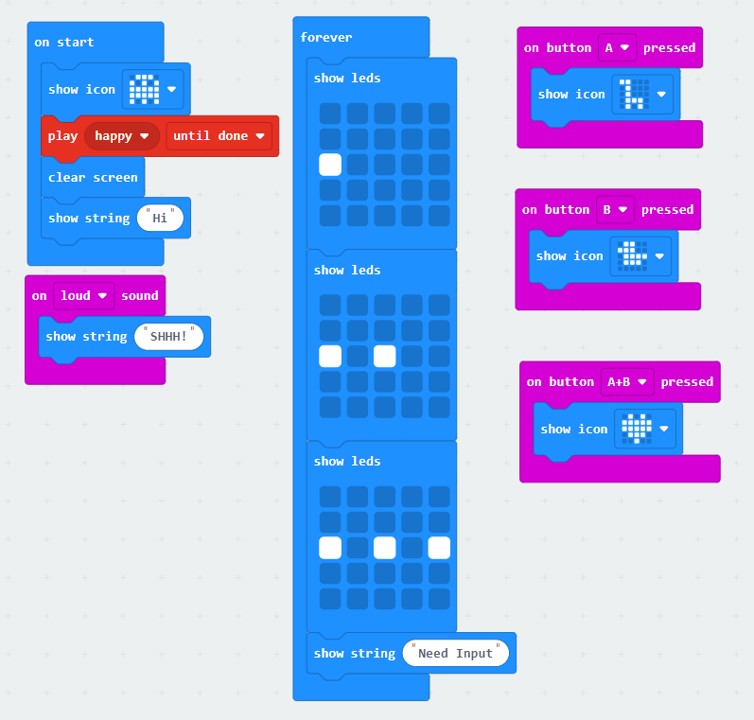
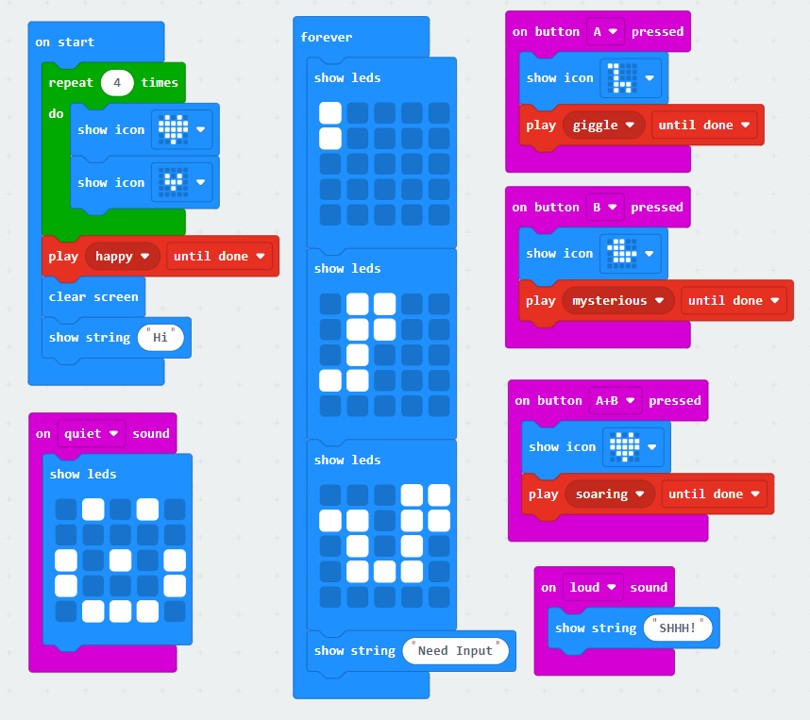
Create a program (in Makecode) that does the following:
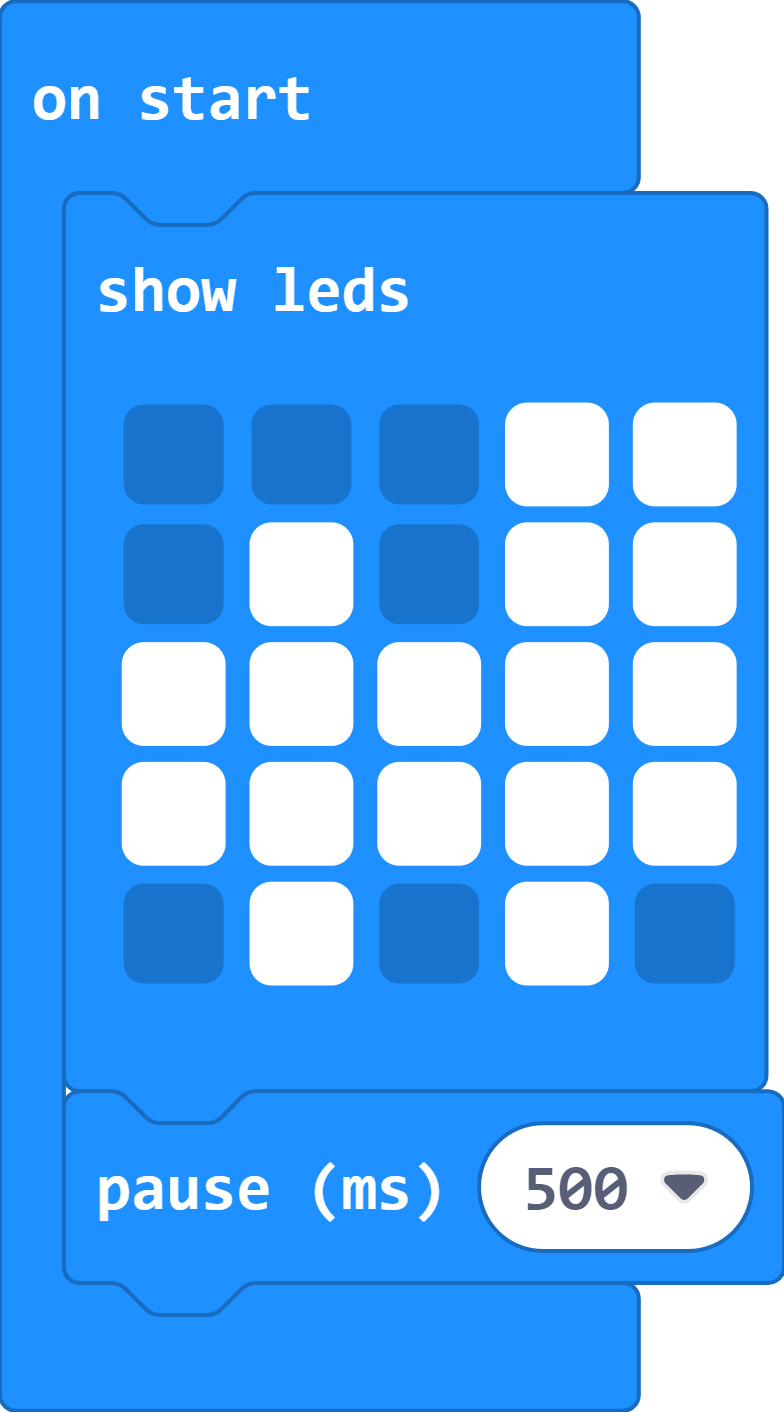
When the program starts, have the LEDs show an image of your choice.
Tip: To delete blocks press delete on your keyboard or drag them back into the menu.
You can use an existing image with the 'show icon' block or create your own image using the 'show leds' block.
If you are using the 'show leds' block, you can click on the squares to select if they are lit or not.
As you only want this to show up when the program starts, you should put it inside the 'on start' block.
If you are still stuck, use the answer button below.
Using the 'show leds' block:
Using the 'show icon' block:
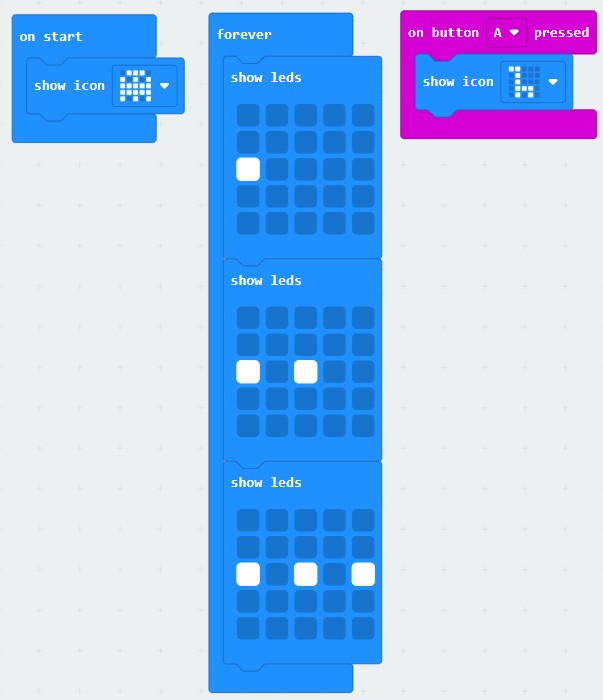
After the start-up is complete, have your program play an animation over and over until you stop the program.
Tip: An animation is a series of images that makes an object look like it is moving.
You will need to use the 'forever' block for this.
A basic animation could be produced using only two images.
As an example, try using the show icon block for the large heart followed by the small heart. This will create an animation that looks like a beating heart.
A series of images making an animation do not need pauses unless you wish to slow the motion down.
You can use the 'show leds', 'show icon', or a mix of the two.
If you are still stuck, use the answer button below.
This shows that you don't need to use that many LEDs to produce an animation.
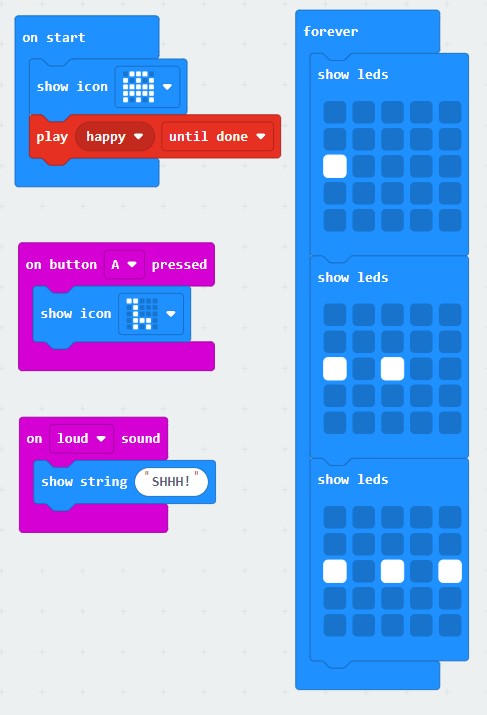
Have a different image appear on your Micro:Bit when button A is pressed.
Tip: Button A is an input so look for the menu that will have the block you need.
Tip: To test the program, button A does not mean the A button on your keyboard. It means the A button on the Micro:Bit inside the simulator which can be clicked on with your mouse cursor.
The block you will need is in the Input block menu.
This block does not go inside the 'on start' or 'forever' blocks. Instead, it starts a new section of code blocks.
If you are still stuck, use the answer button below.
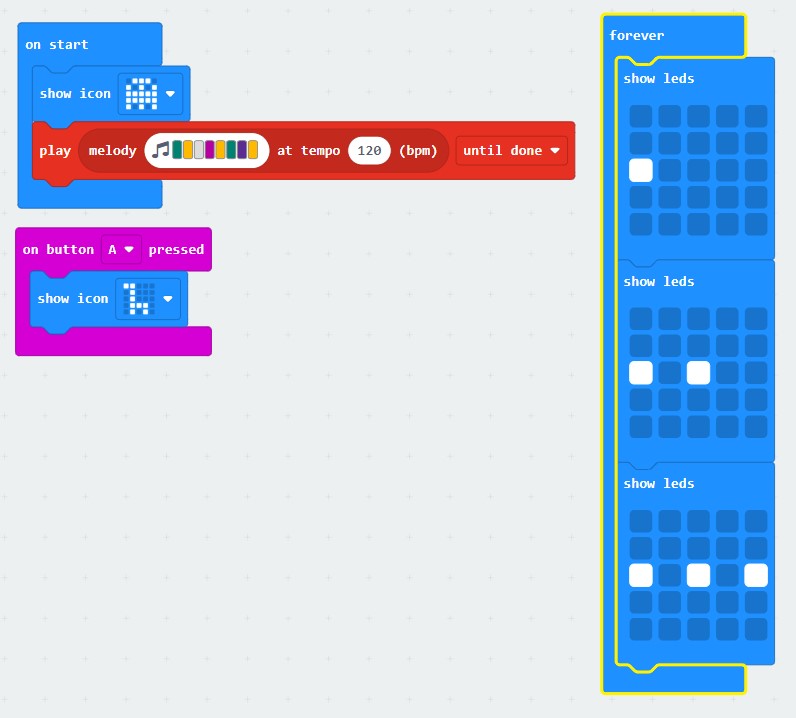
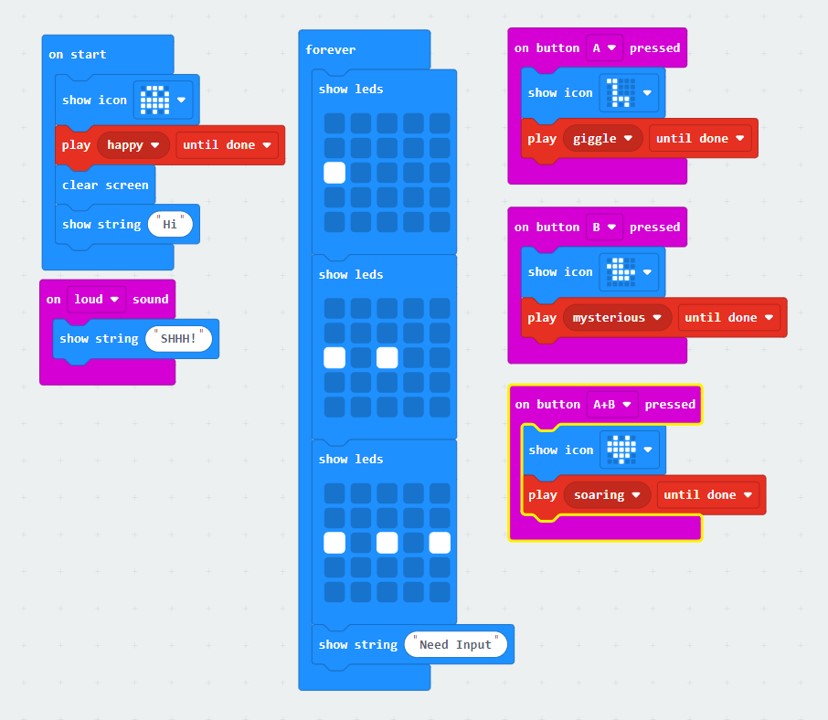
Add sound or music to your start-up sequence.
Tip: Check your computer volume is low before adding sound. You can adjust it during testing to a level of your choosing.
Tip: If using music, keep the tune short and only play once, or you'll have a long wait for this to complete during each test.
Tip: If you don't want to create your own tune, scroll down the Music menu to find ready-made melodies and sounds.
If using the 'play melody' block from the top of the Music menu, you can create your own tune by clicking on the musical note symbol in the block, then highlight the boxes to produce different notes.
If using the 'play melody' block with preset tunes, change the 'in background' option to 'until done' using the drop-down arrow.
If you are still stuck, use the answer button below.
Using your own tune:
Using preset melody:
Using sound effect:
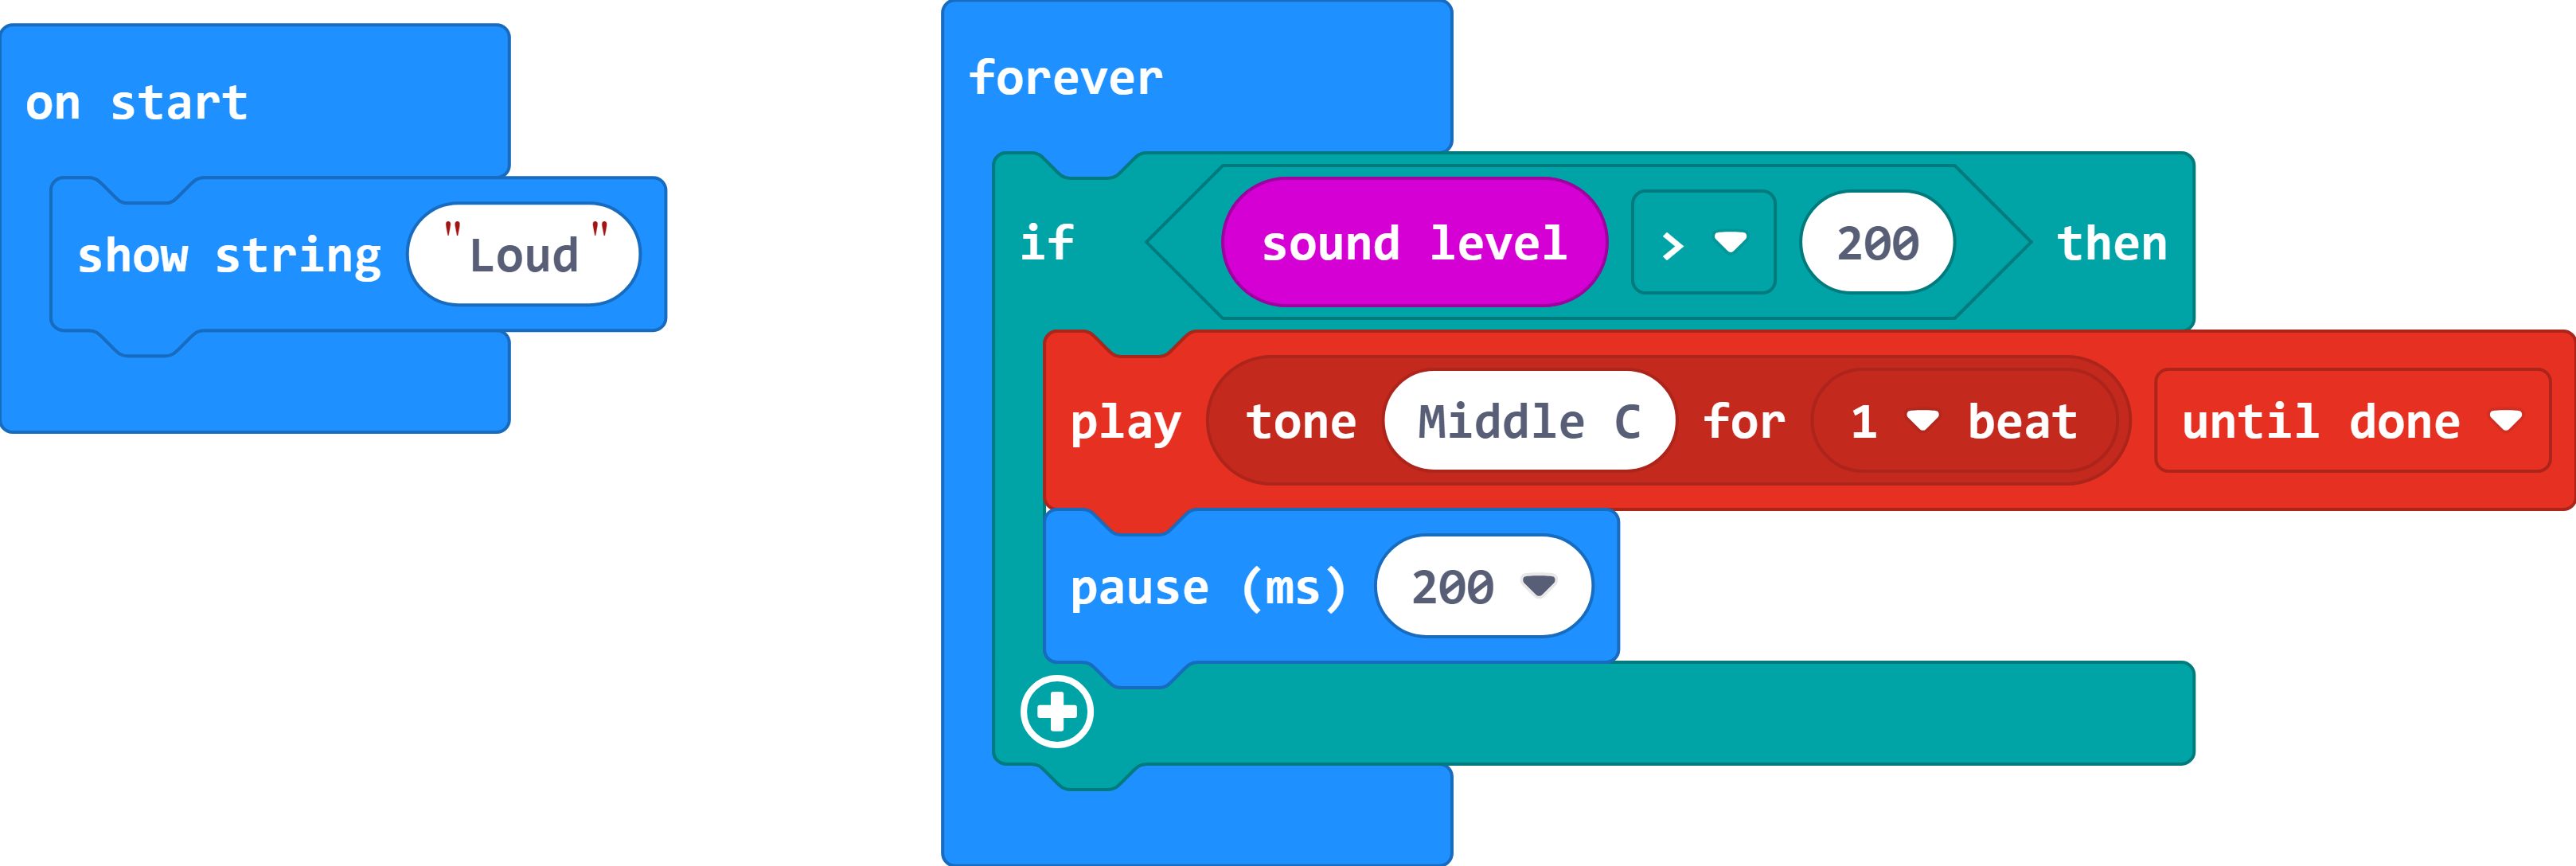
Have the Micro:Bit react when it hears a loud sound.
Tip: If you remember from the video, the microphone acts as a sound sensor and is an input device.
Tip: You could use an image, text, music, or sound as the reaction.
Tip: A loud sound in this program is any value over 170.
The block you need is in the Input blocks menu.
Look under micro:bit (V2). It is in this section because there are now two versions of the BBC Micro:Bit and only version 2 has a microphone.
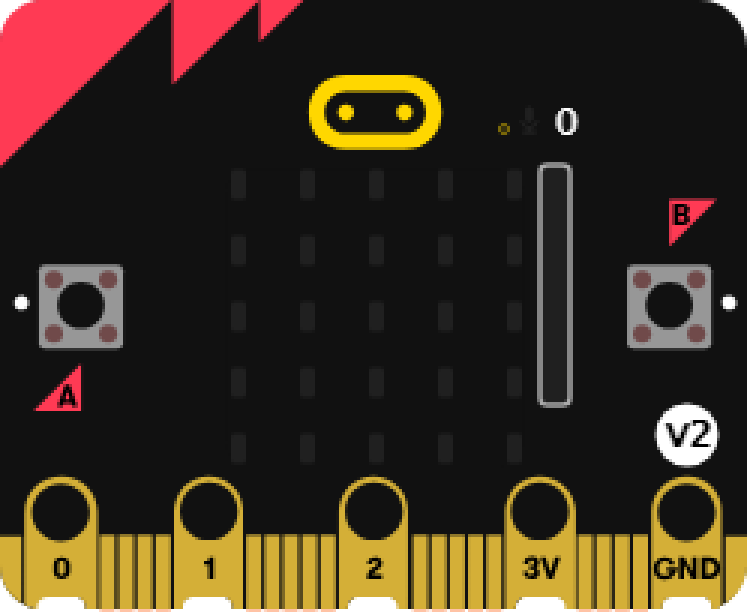
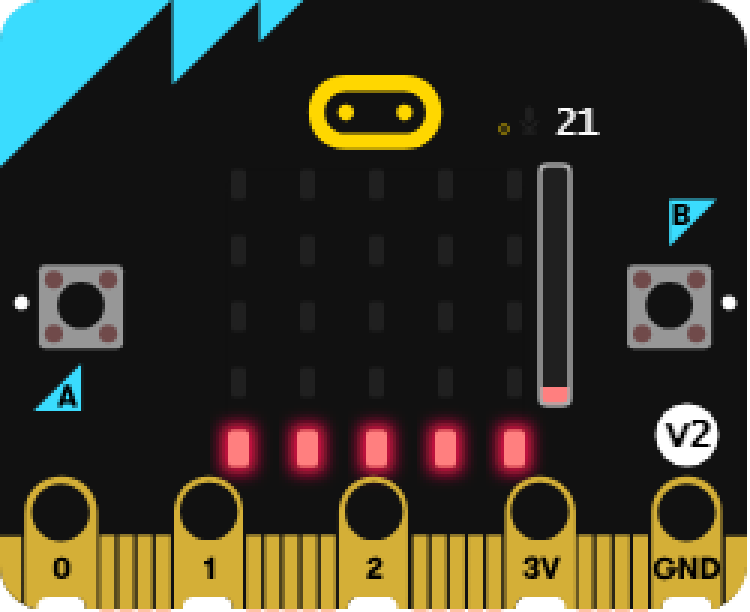
You will need to re-watch the video if you are unsure how to create a loud sound in the simulator.
If you are still stuck, use the answer button below.
This solution has the Micro:Bit show a message when it hears a loud sound.
Inside the same program, create the following:
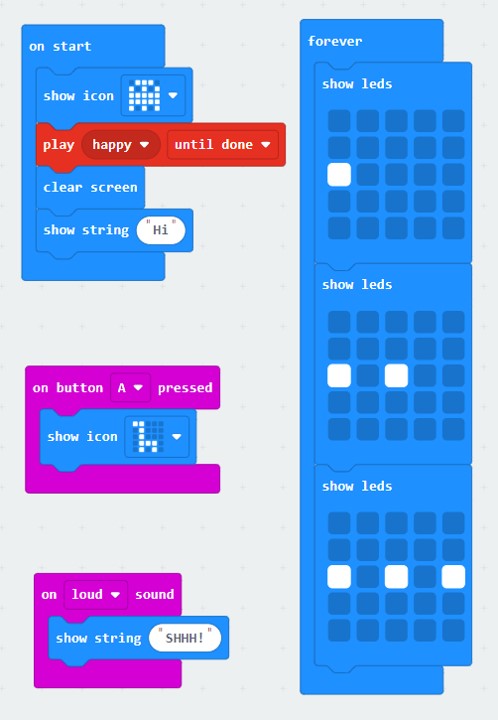
At the end of your start-up sequence clear the screen and add a welcome message.
Tip: Keep the message short as you'll have to wait for it to complete every time you test your program.
Tip: Both blocks needed for this are in the Basic menu.
In programming we use the word string to describe any series of symbols.
You will need to find the 'show string' block and then you can change the word "hello" to a word/message of your choosing.
If you are still stuck, use the answer button below.
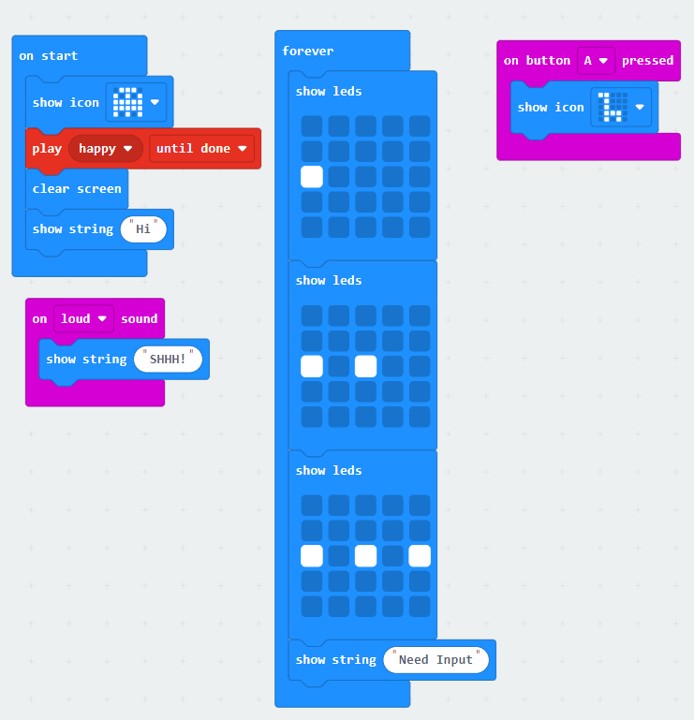
Add a message into your forever loop that says 'Need Input'.
Tip: Think of this as a waiting screen.
You will use the same block as we used for the welcome message above.
If you are still stuck, use the answer button below.
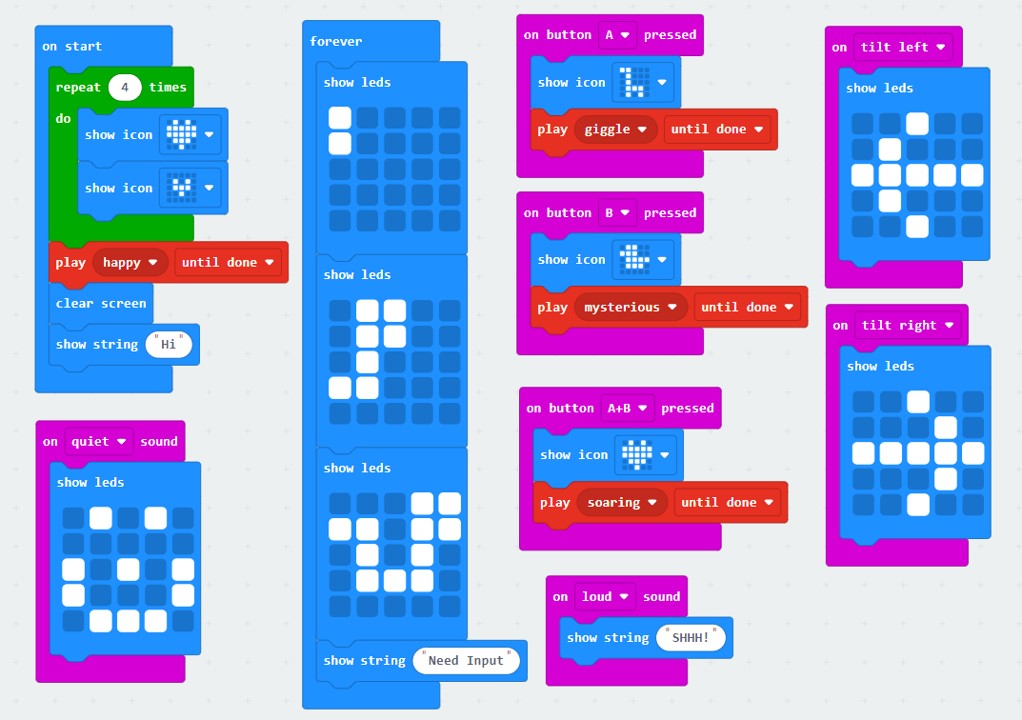
Have the Micro:Bit display different images for when the B button is pressed and when both buttons are pressed.
Tip: The 'on button A pressed' block has a drop-down arrow on it that allows you to change the A to B or A+B.
Remember that the button blocks can be found in the Input menu.
You will need three of these blocks in your program, one for each button combination.
To test this, the simulator should now have a new button labelled A+B, this allows you to mimic the effect of pressing both buttons using the mouse.
If you are still stuck, use the answer button below.
Add different sound effects depending on which button is pressed.
Tip: You may start to see some unwanted behaviours in your tests as we add more blocks to the button programs. We shall cover why and how to avoid this later in the series.
If uncertain, refer to step 4 in the bronze challenge.
If you are still stuck, use the answer button below.
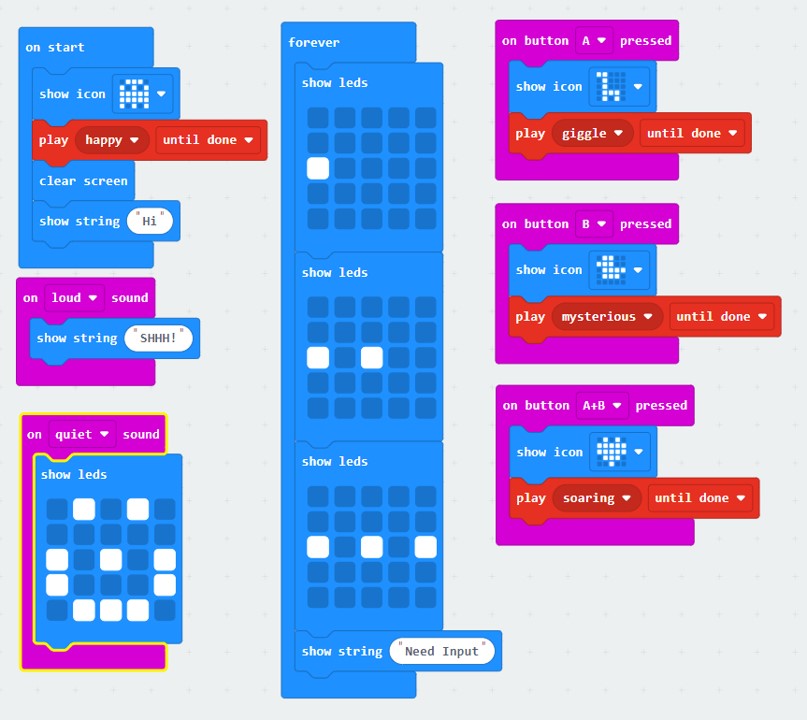
Add a reaction for when the Micro:Bit detects it is quiet.
Tip: A lot of blocks include drop down menus that allow you to change key words.
Tip: For the Micro:Bit, quiet is any noise level below 90.
Remember that sound detection is an input.
The 'on loud sound' block can be changed.
A reaction could be a sound, image, icon, or message.
If you are still stuck, use the answer button below.
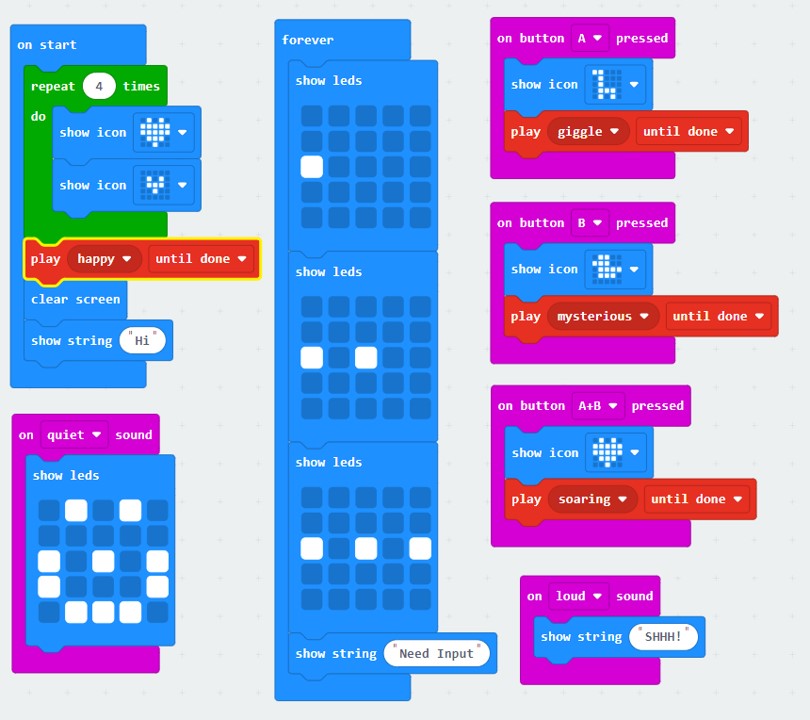
Continue building your program by adding the following:
Replace the image on start-up with an animation.
Tip: You could use repeating images, or you may want to use a block from the Loops menu to help with this.
There is a 'repeat 4 times' block in the Loops menu that can be set to any number of repeats. This means you only need to use each image once.
If you are still stuck, use the answer button below.
This program's start-up animation is a beating heart.
Change your forever loop animation to show a person or animal moving onto the screen.
Tip: Choose or create a full image of your person/animal first. Then you can create the animation more easily.
Have your animal/person appear from the left of your screen one column of lights at a time and then move them all the way across the screen.
If you are still stuck, use the answer button below.
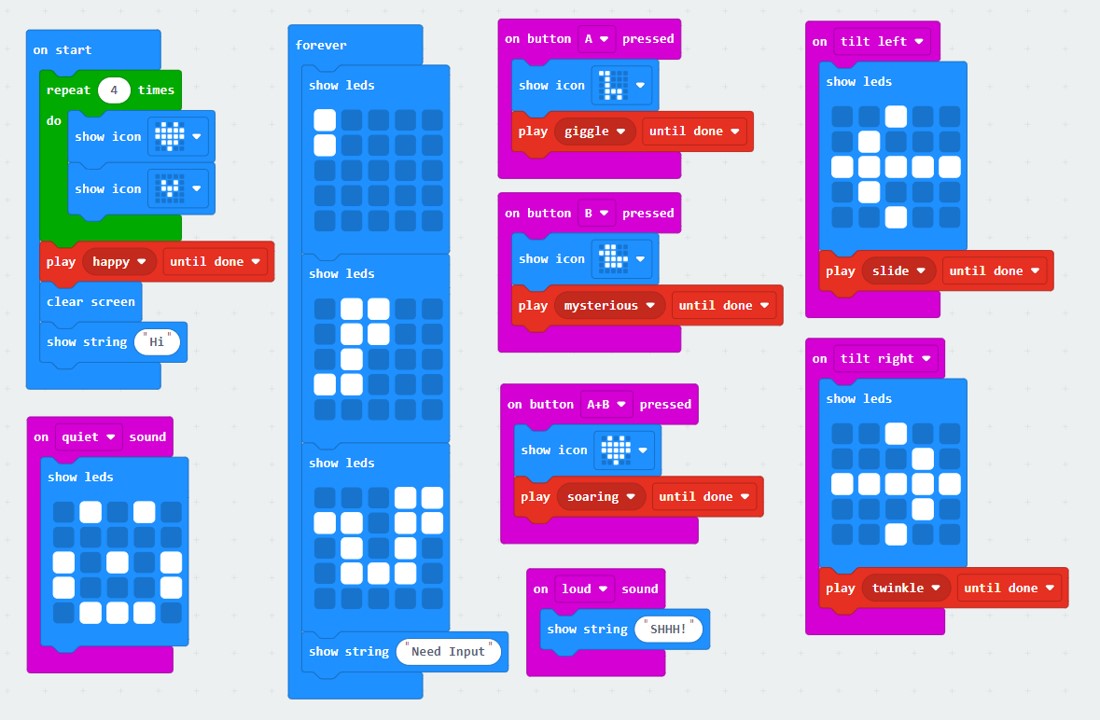
Have the Micro:Bit react differently when tilted left and when tilted right.
Tip: Some blocks have drop down menus to change a key word.
Tip: The Micro:Bit is using its accelerometer for this which is a movement sensor. Is this an input or an output?
You will need to use a block from the Input menu.
Is there a movement-based block you can use? What options does it have for the key word?
If you are still stuck, use the answer button below.
Add sound effects to being tilted left and right.
This is the same as when we added sound effects to the button inputs.
If you are still stuck, use the answer button below.
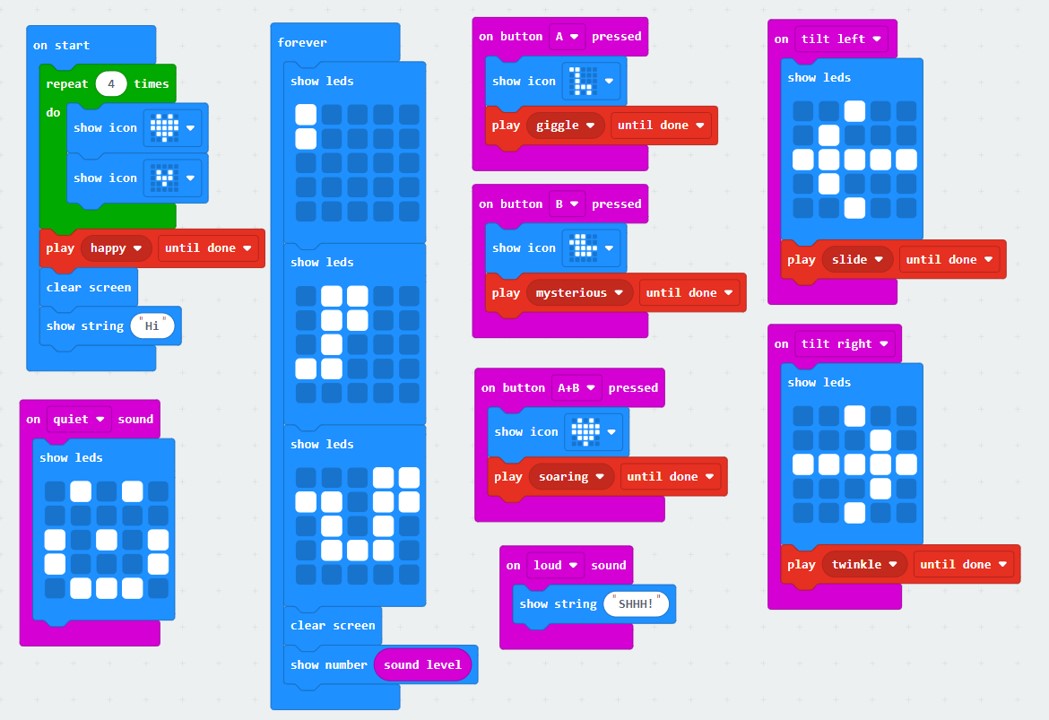
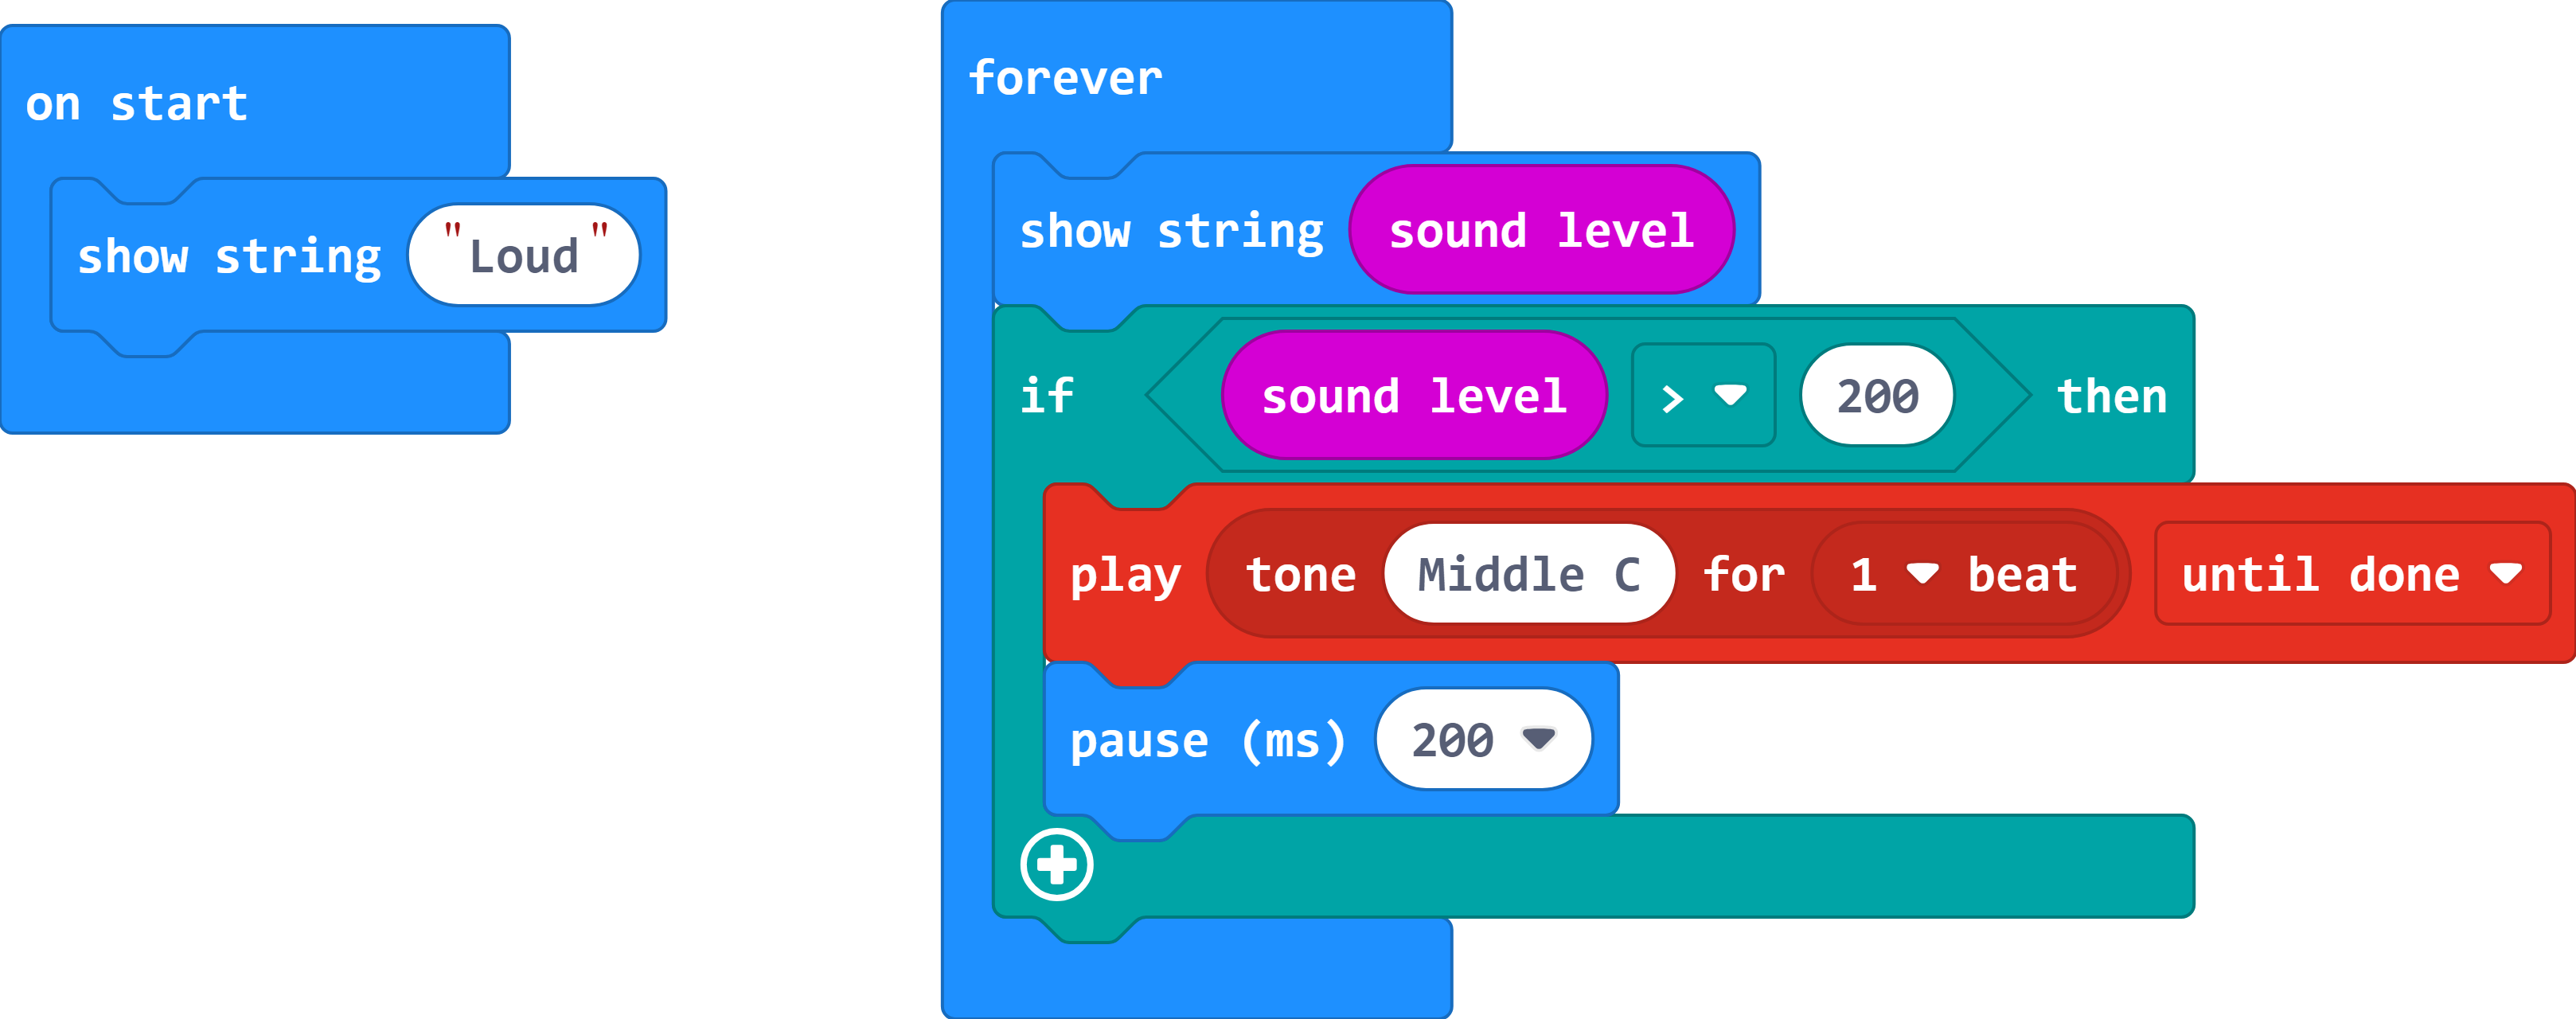
At the end of your forever loop replace the 'show string Need Input' block with a clear screen block and then show the value of the sound level instead.
Tip: The sound level on a Micro:Bit is measured as a number.
Tip: You will need to merge two blocks together to make this instruction.
There is a 'show number' block in the Basic menu.
The sound sensor is an input device, so you will need to look in the Input menu for the block that will fit inside your 'show number' block.
If you are still stuck, use the answer button below.
Video Lesson:
Exercises:
For this session we shall be creating a program to turn your BBC Micro:Bit into a virtual pet.
As with all our exercises, they are designed for learners to complete a level before moving to the next. Otherwise, you may miss information or skip a crucial step that stops your program from working.
Click on each challenge heading to expand.
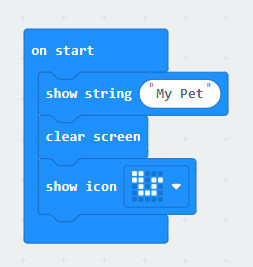
Start a new Micro:Bit program on Makecode and work your way through the following stages.
Have a message and/or image appear on start to help identify the program.
Tip: Remember that the clear screen block can be used to create a break between an image and a message.
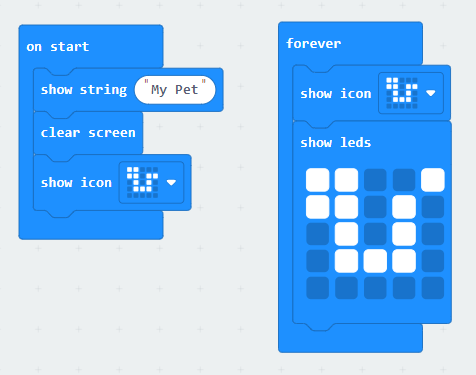
Create a little animation of your pet waiting inside the forever loop.
Tip: You may be able to use one you created in Session One.
Remember, you only need two images to make an animation.
You can use the pre-made icons to get you started.
The more images you use, the longer the forever loop will take to complete - this could cause problems as we build the program.
If you are still stuck, use the answer button below.
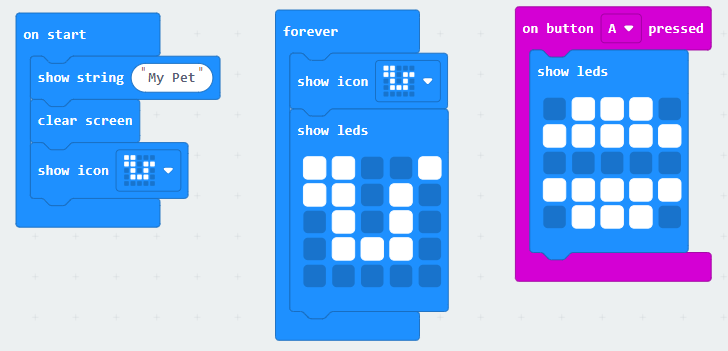
Use one of the inputs (like button A) to feed your pet - have it show an image of a food item on the screen.
You may need to clear the screen before showing your food image.
Remember, the button A control block is in the Input menu.
If you are still stuck, use the answer button below.
This answer includes my attempt at drawing a burger for my pet.
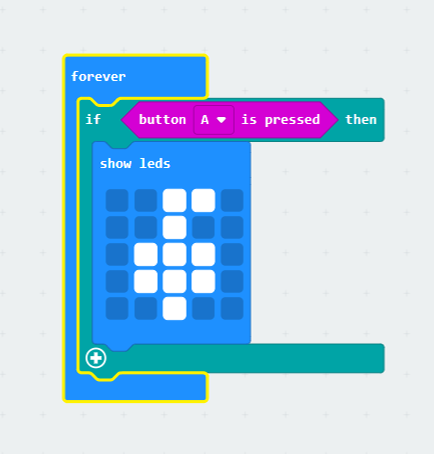
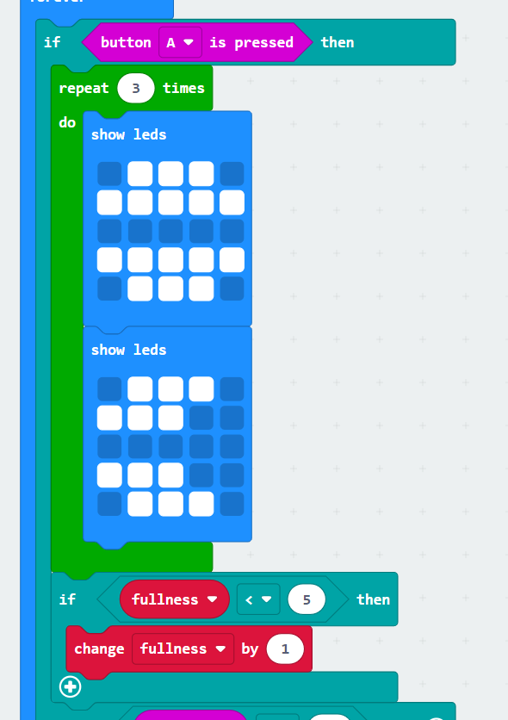
Have an animation to show the pet eating.
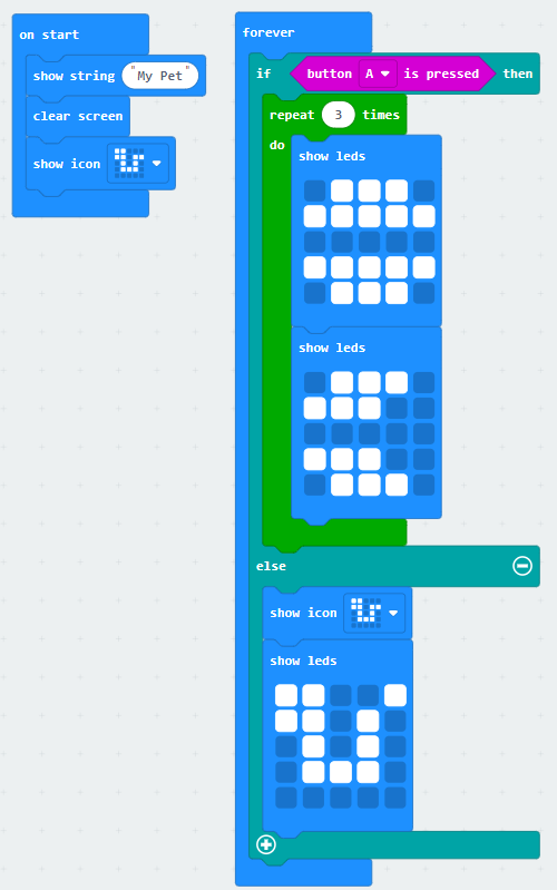
Important: You may start to see some unwanted behaviours with your animations clashing. By using our new if statement blocks, we can correct the issue and have the whole program stored inside a single forever loop. The below image shows how to include button A as a condition in an if statement inside the forever loop.
Please note: The longer your forever loop, the more time it will take for the program to react to an input. You may need to hold down the inputs for longer to register.
Remember: You should only have one forever loop in your program.
Tip: Use the else section on this if statement block as a new home for your pet waiting animation.
You can animate either the pet or the food for this effect.
A repeat block from the Loops menu will help with the animation.
If you are still stuck, use the answer button below.
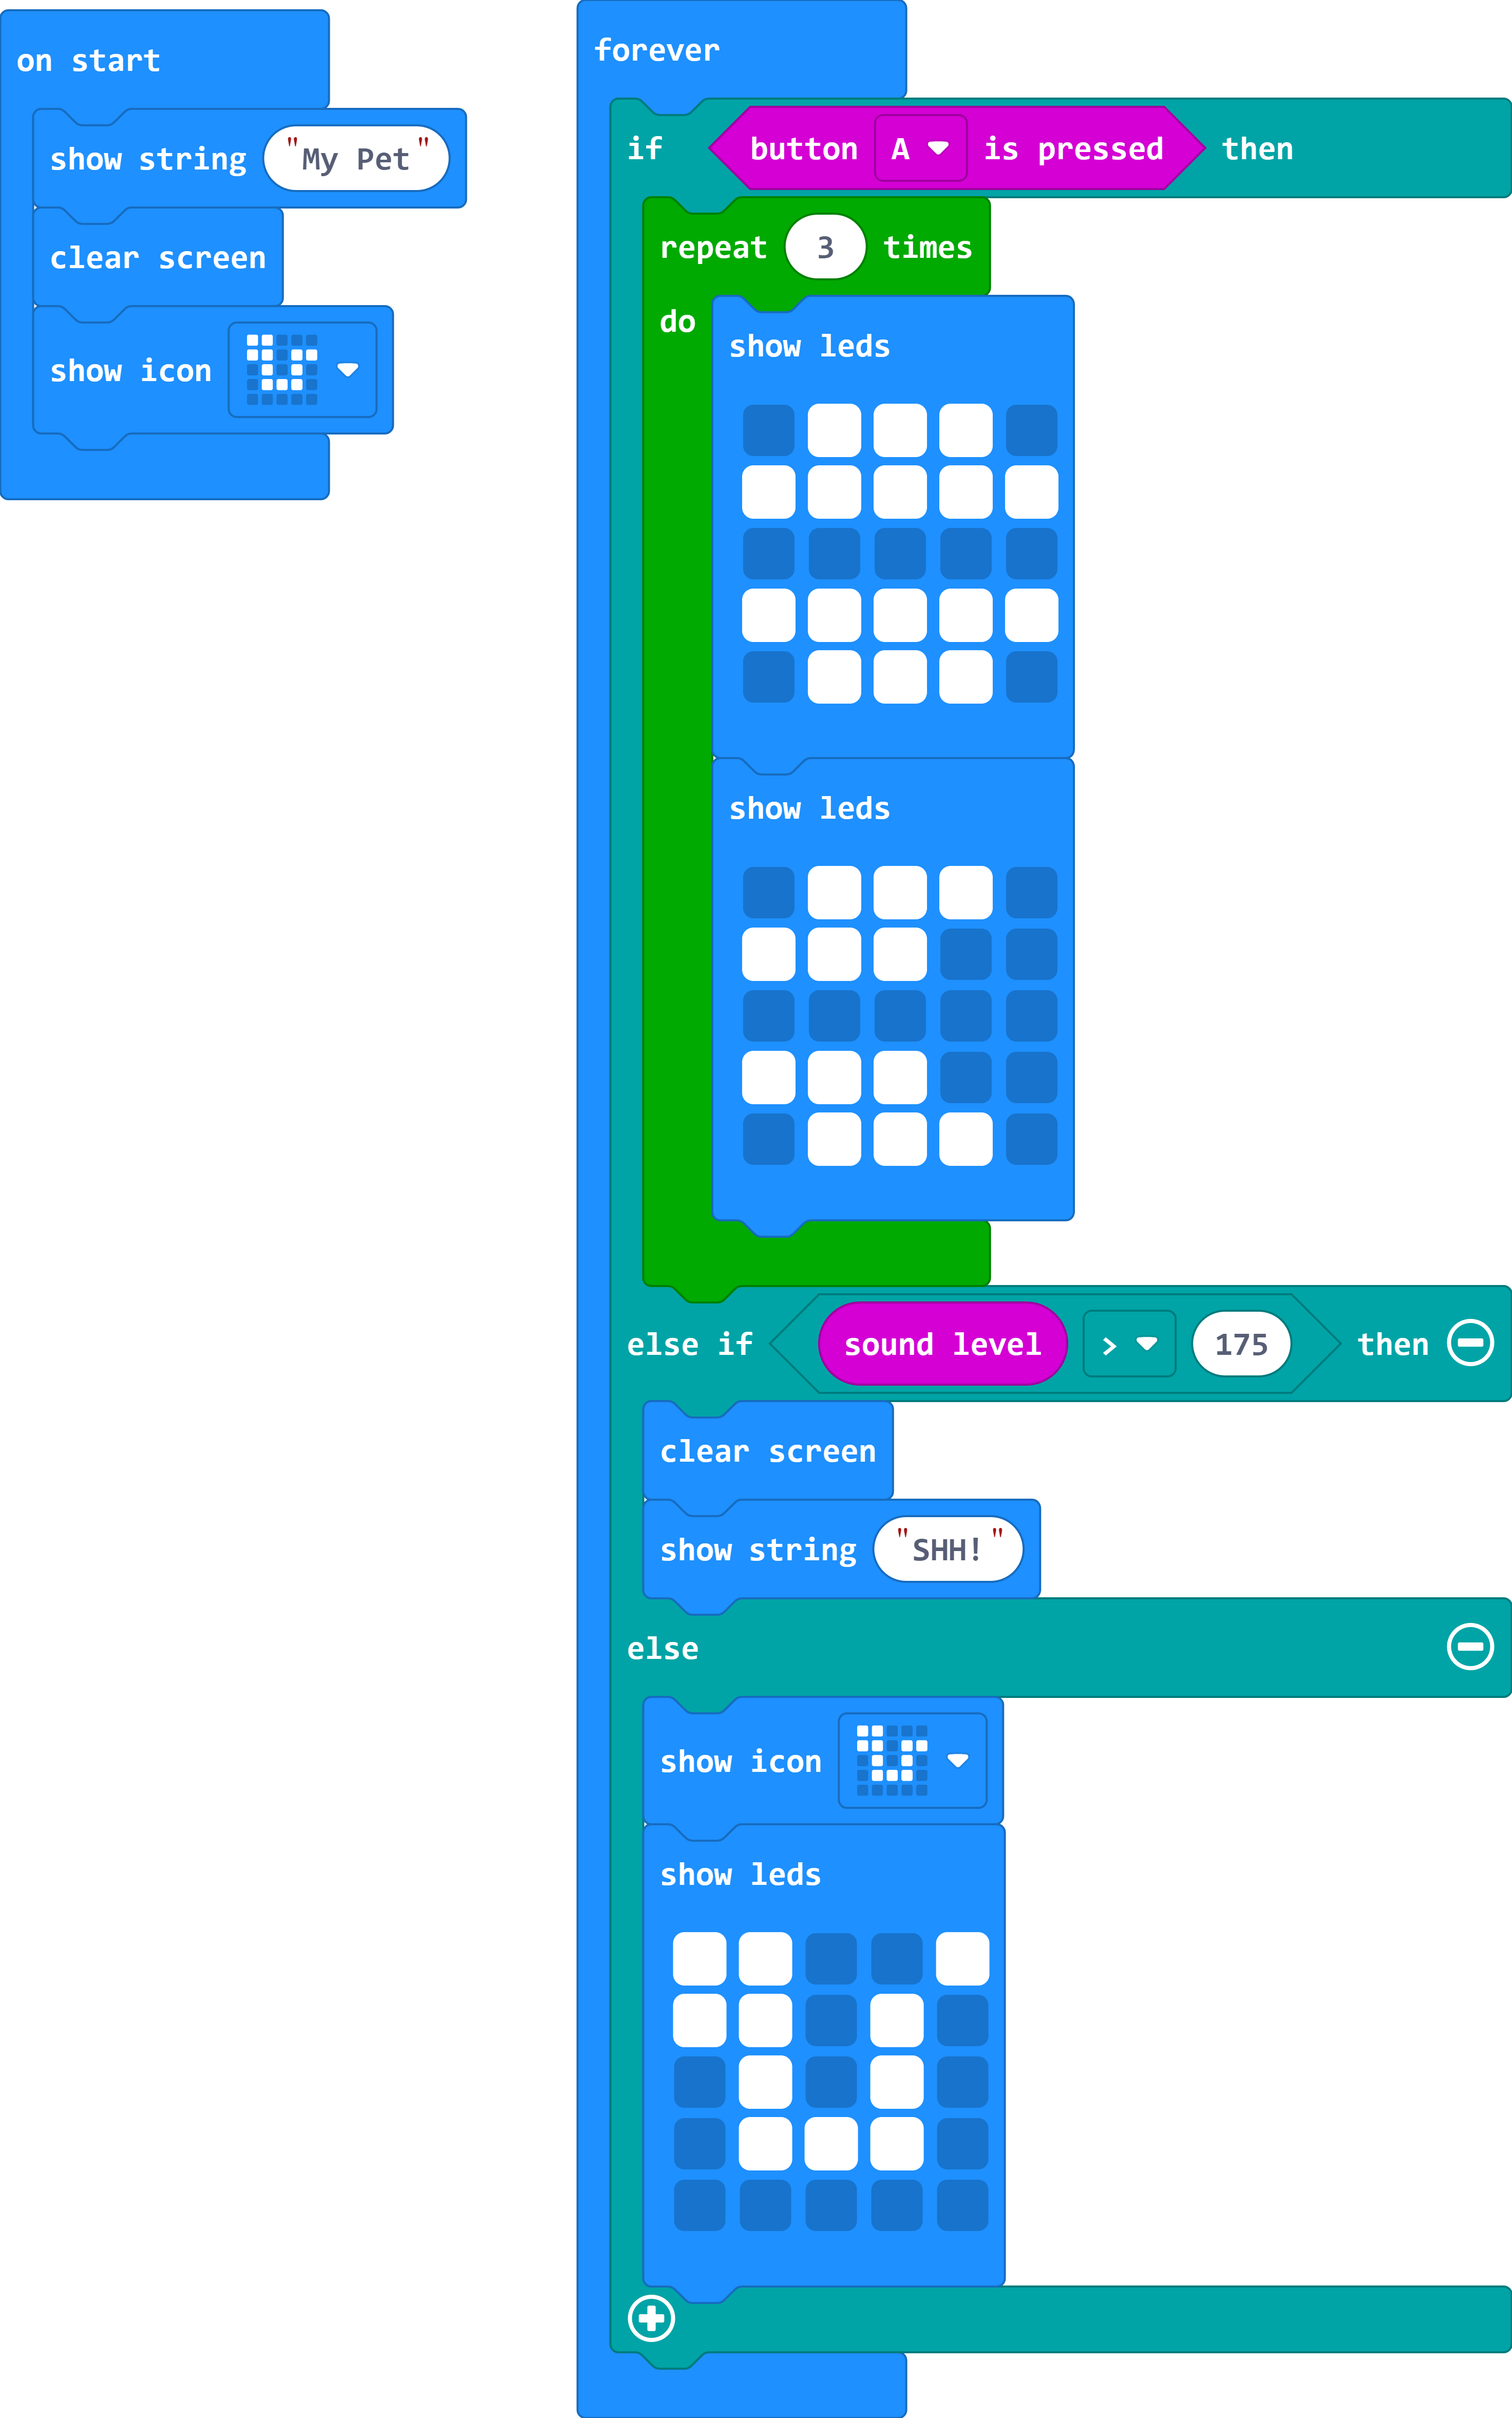
Have your pet react badly (you can use an image, animation, and/or sound) when it hears a loud noise.
Tip: Instead of using the 'on loud sound' block, use an else if statement inside your forever loop for when the sound level is > 175.
You can expand an if statement by clicking on the plus sign. You can do this for as many else ifs as you need.
You can find the greater than comparison block in the Logic menu.
To test your program, use the new microphone volume bar on your simulated Micro:Bit to adjust the value. When you go above 175 you should see the program - there might be a slight delay.
If you are still stuck, use the answer button below.
Continuing with the same program, continue with the below additions.
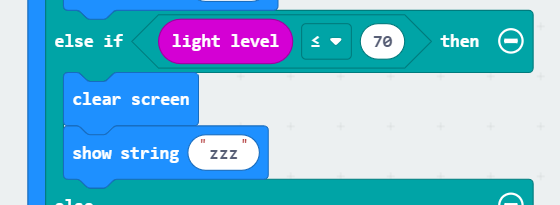
Have your pet fall asleep when it gets dark (use less than or equal to 70 for this value).
Tip: You can have as many else if statements as you need in a Micro:Bit program.
Use the plus button at the bottom of your if statement to add another else if statement to your program.
Check which symbol you are using for the comparison. It should look like ≤.
You could just use a string of 'zzz' to indicate your pet has fallen to sleep.
Don't forget to clear the screen first.
If you are still stuck, use the answer button below.
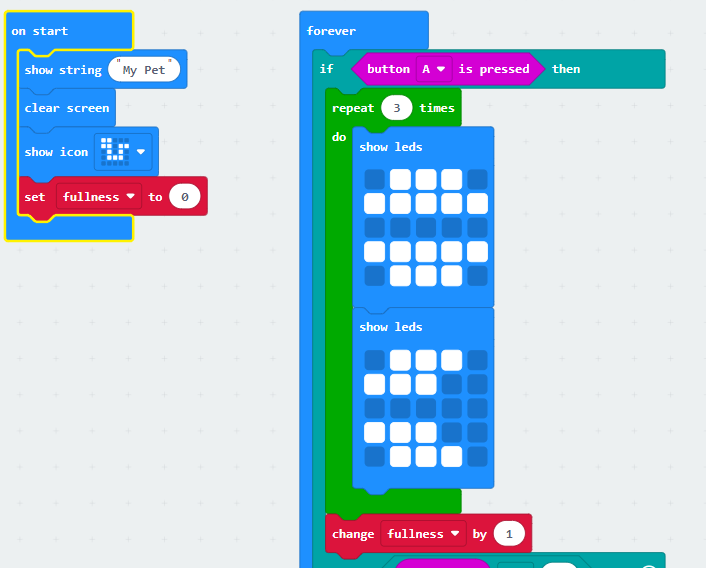
Create a variable for 'fullness' which goes up by one every time your pet is fed.
Tip: It is always good practise to set a new variable to zero on start.
There is a change variable by 1 block which does what we need.
Which section of the code does it need to go into?
Make sure you do not put it inside an animation's repeat loop.
If you are still stuck, use the answer button below.
Use an input (perhaps button B) which will show the user the value of 'fullness'.
You can put a variable inside a show string block.
If you are still stuck, use the answer button below.
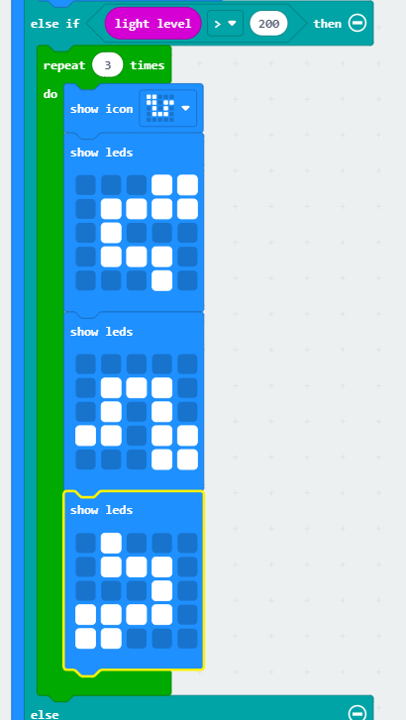
Have your pet react happily to bright light (use greater than 200 for this value).
If you've chosen to do an animation, don't forget about the repeat block in the Loops menu.
Check your comparison symbol is >.
If you are still stuck, use the answer button below.
I chose to have my snake celebrate bright light with a somersault animation.
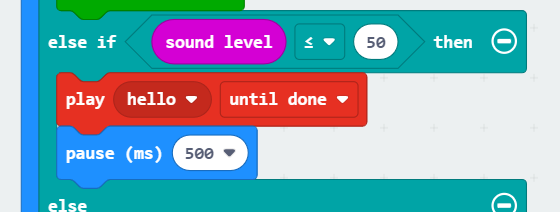
Have your pet make a noise to get attention if the sound level is less than or equal to 50.
Tip: Have a pause block (at least 500 milliseconds) after your sound has played - trust me.
Make sure that whatever noise you've chosen to use in the program only plays until done or once.
If you are still stuck, use the answer button below.
Now, let us build up the program further with the following tasks.
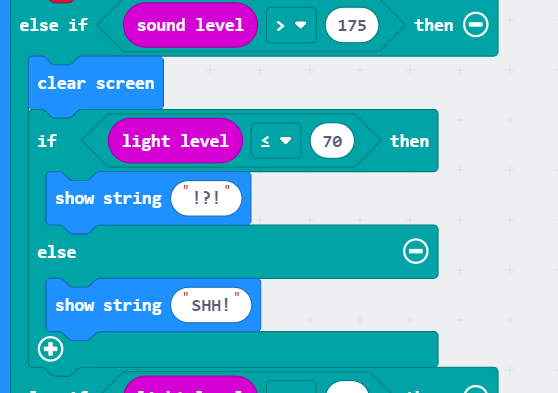
If your pet is asleep when it hears a loud sound, it must react more angrily/scared/surprised than when it is awake.
Tip: You can put if statements inside each other, making a stacked if statement.
Important: Your program will work its way down the list of if and else if statements in the forever loop, it will run the first bit of code where the conditions are met, and skip the rest.
Think of it like a check list where once something has been checked you return to the top of the list and start again.
This means that you need to check which of the conditions (loud sound or darkness) comes first in your program and insert the new if statement into that one.
Use an if and else statement for this to determine which loud sound reaction is shown.
As we want to clear the screen before both options, we can just use this command once before the new if/else statement.
Alternatively, you could look at using advanced logic blocks that allow multiple conditions in an if/else if statement.
If you are still stuck, use the answer button below.
In our answer program, the loud sound condition is above the dark condition, so the new if statement goes there.
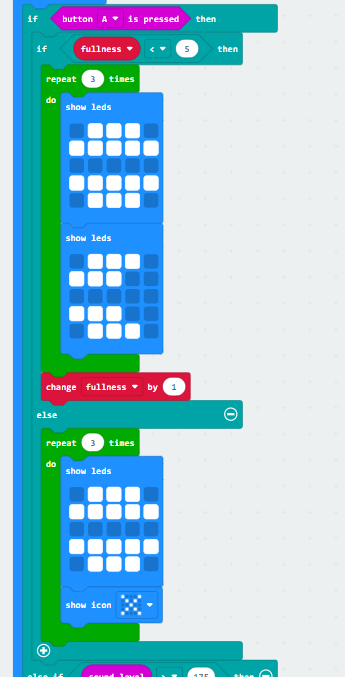
Your 'fullness' variable needs to have a maximum value of 5.
Tip: This means you only want to add one to the fullness value when it is less than 5 (or less than and equal to 4).
You need an if statement for when the fullness is less than 5 to only add to the value when true.
Currently, this does not require an else statement as there is no action for when the if statement is not true.
Remember to keep this if statement outside of any repeat loops used for the feeding animation.
If you are still stuck, use the answer button below.
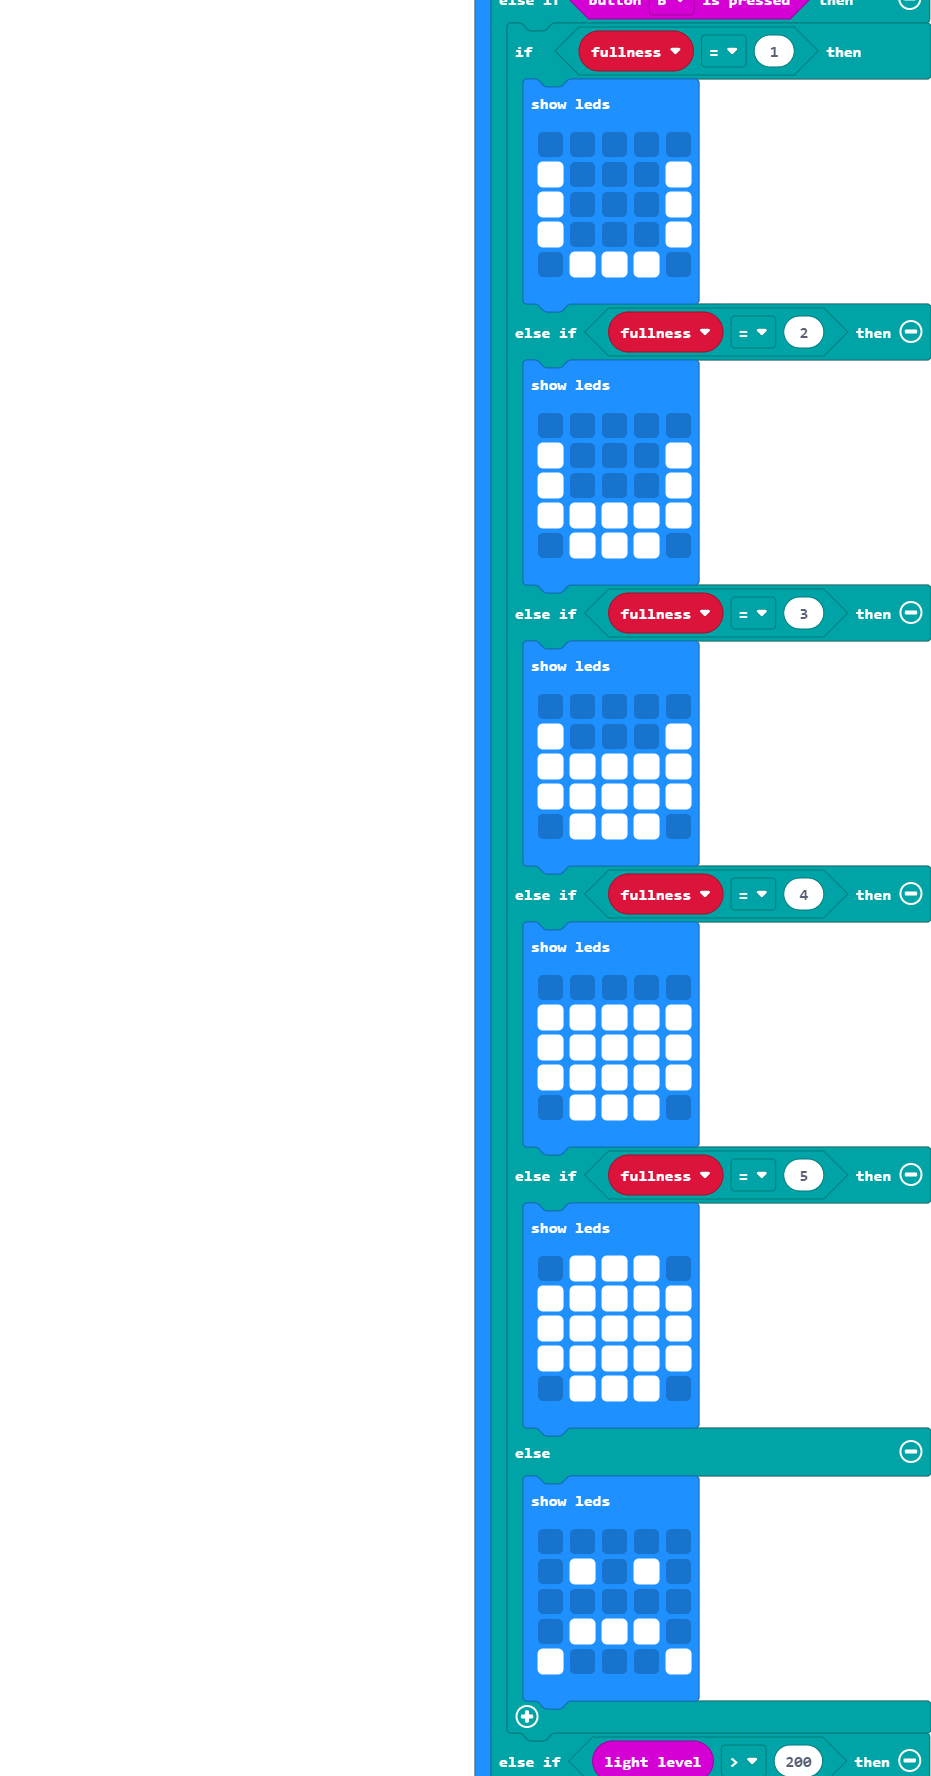
Instead of showing the user the value of fullness using the input chosen in the silver challenges, have it show a meter level.
Tip: You can also put else if statements inside another if / else if / else statement.
This will require an image for each fullness level to create the effect of a meter/gauge.
In this sort of statement list, you want to include an else statement to capture the 0 and/or any unexpected values. This then can act as an error screen for us.
If you are still stuck, use the answer button below.
We went for a round meter shape that gets more complete the higher the fullness level.
The pet should refuse to eat if it is full (fullness = 5).
Tip: It might help to move the eating animation into the same if statement as when the fullness variable increases, then you can have a different animation for when full in an else statement.
Remember that repeat loops are required inside these statements for repeating animations.
When building up a program we often have to re-shuffle the locations of code sections to include new features.
This requires an else attached to our if fullness < 5 statement.
If you are still stuck, use the answer button below.
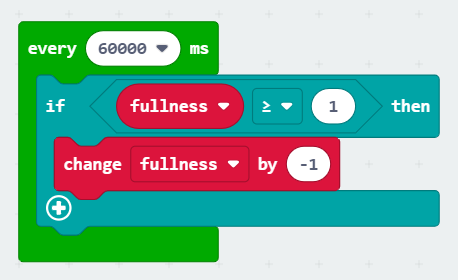
The fullness value should slowly drop down over time as your pet starts to get hungry again.
Tip: As this is a background process that will not suffer interference from the forever loop, you can use a separate timer loop to do this.
You can find a timer block in the Loops menu.
The default time is 500 ms - this is every half a second - you will need to change this (we found a minute - or 60000 ms - to work well for this).
We want to take one away from the fullness so we can use the change fullness by block with a -1 instead of 1.
We don't want negative values, so we only want to take away from the fullness value if it's over 0 (or greater than and equal to 1).
If you are still stuck, use the answer button below.
You now have a virtual pet. Here are some ideas of further additions and features you may want to have a go at adding. These are for you to investigate and explore - there are no answers provided.
Having the pet show when it is very hungry (fullness ≤ 1).
Tip: This can be done by adding another else if statement to your forever loop.
Adding a happiness level and play inputs into the program. The more you play with the pet, the happier it is.
Tip: You may want to move the hunger meter to show automatically after feeding to free up button B for this.
Setting a maximum value and a cool-down time for the happiness value. How will your pet react when the happiness value drops too low?
Tip: This will use the same framework as our fullness meter.
Have the pet grow over time if it is looked after correctly.
Tip: You could create a score variable for this and have the pet improve as the score reaches certain goals.
Video Lesson:
Exercises:
For this session we shall be creating a two-player dice duelling game using two BBC Micro:Bits. We recommend using the multi-editor for these exercises. Name the program on the left Player One and the other Player Two.
As with all our exercises, they are designed for learners to complete a level before moving to the next. Otherwise, you may miss information or skip a crucial step that stops your program from working.
Click on each challenge heading to expand.
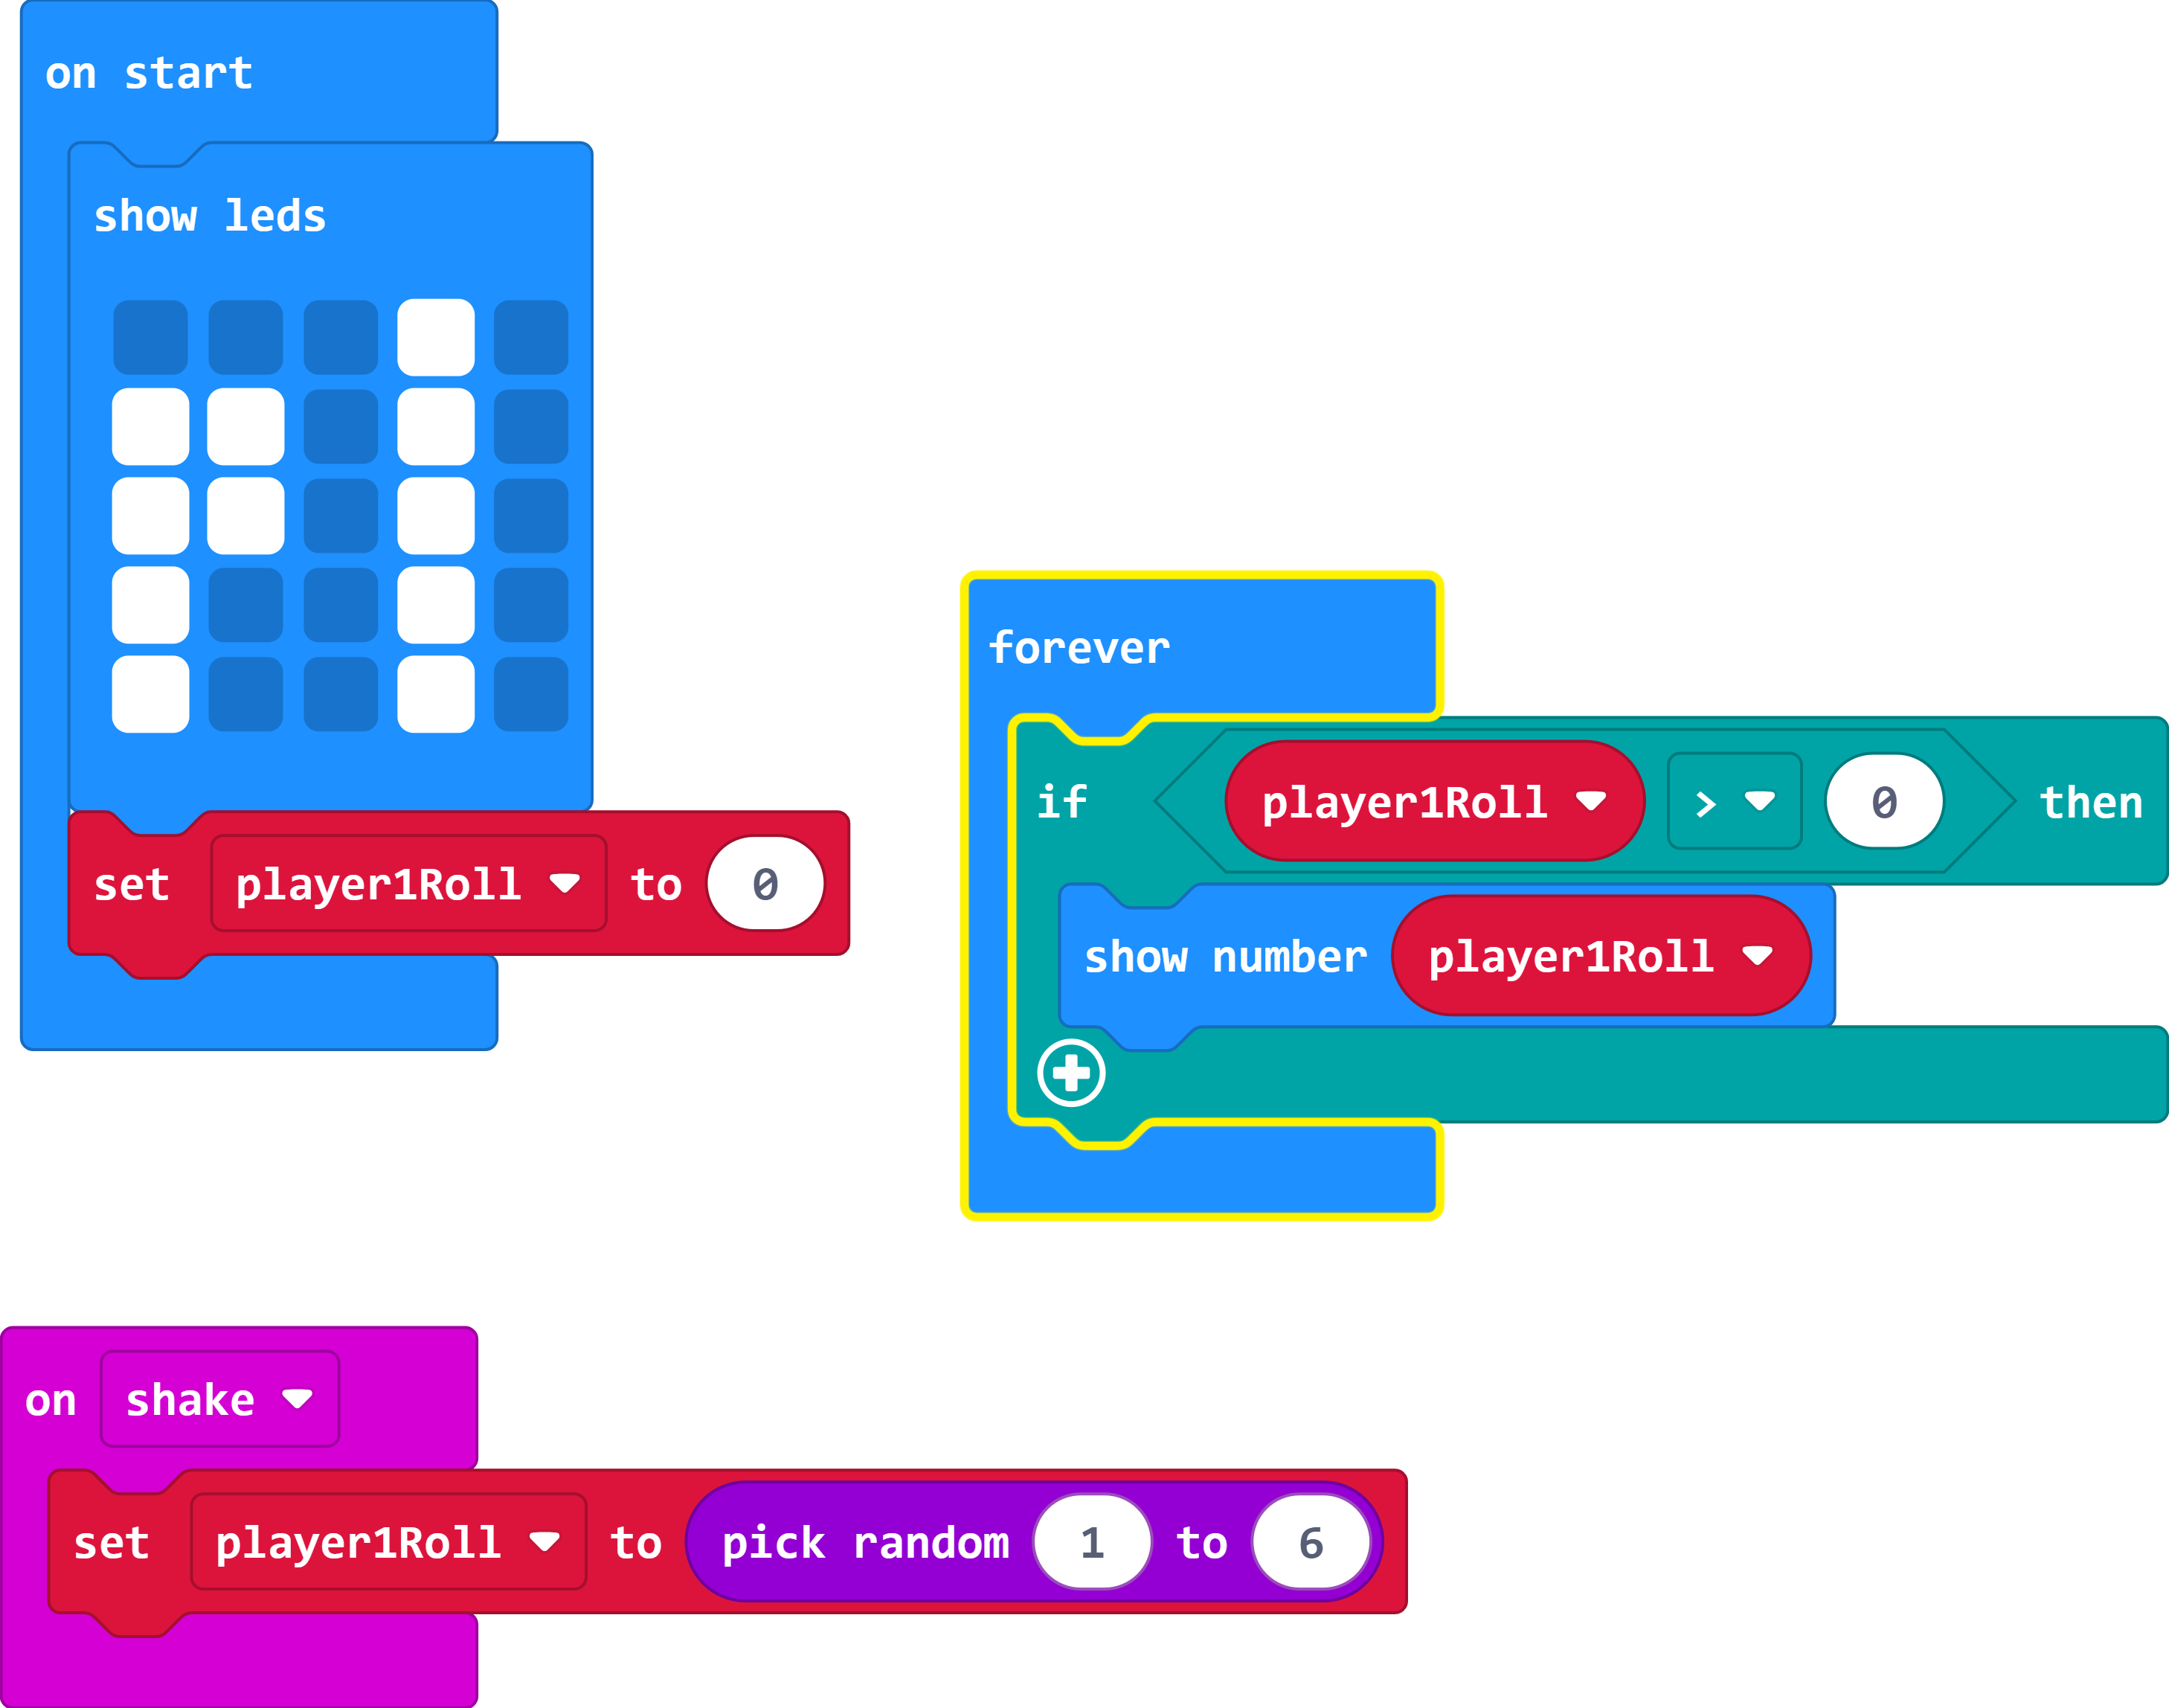
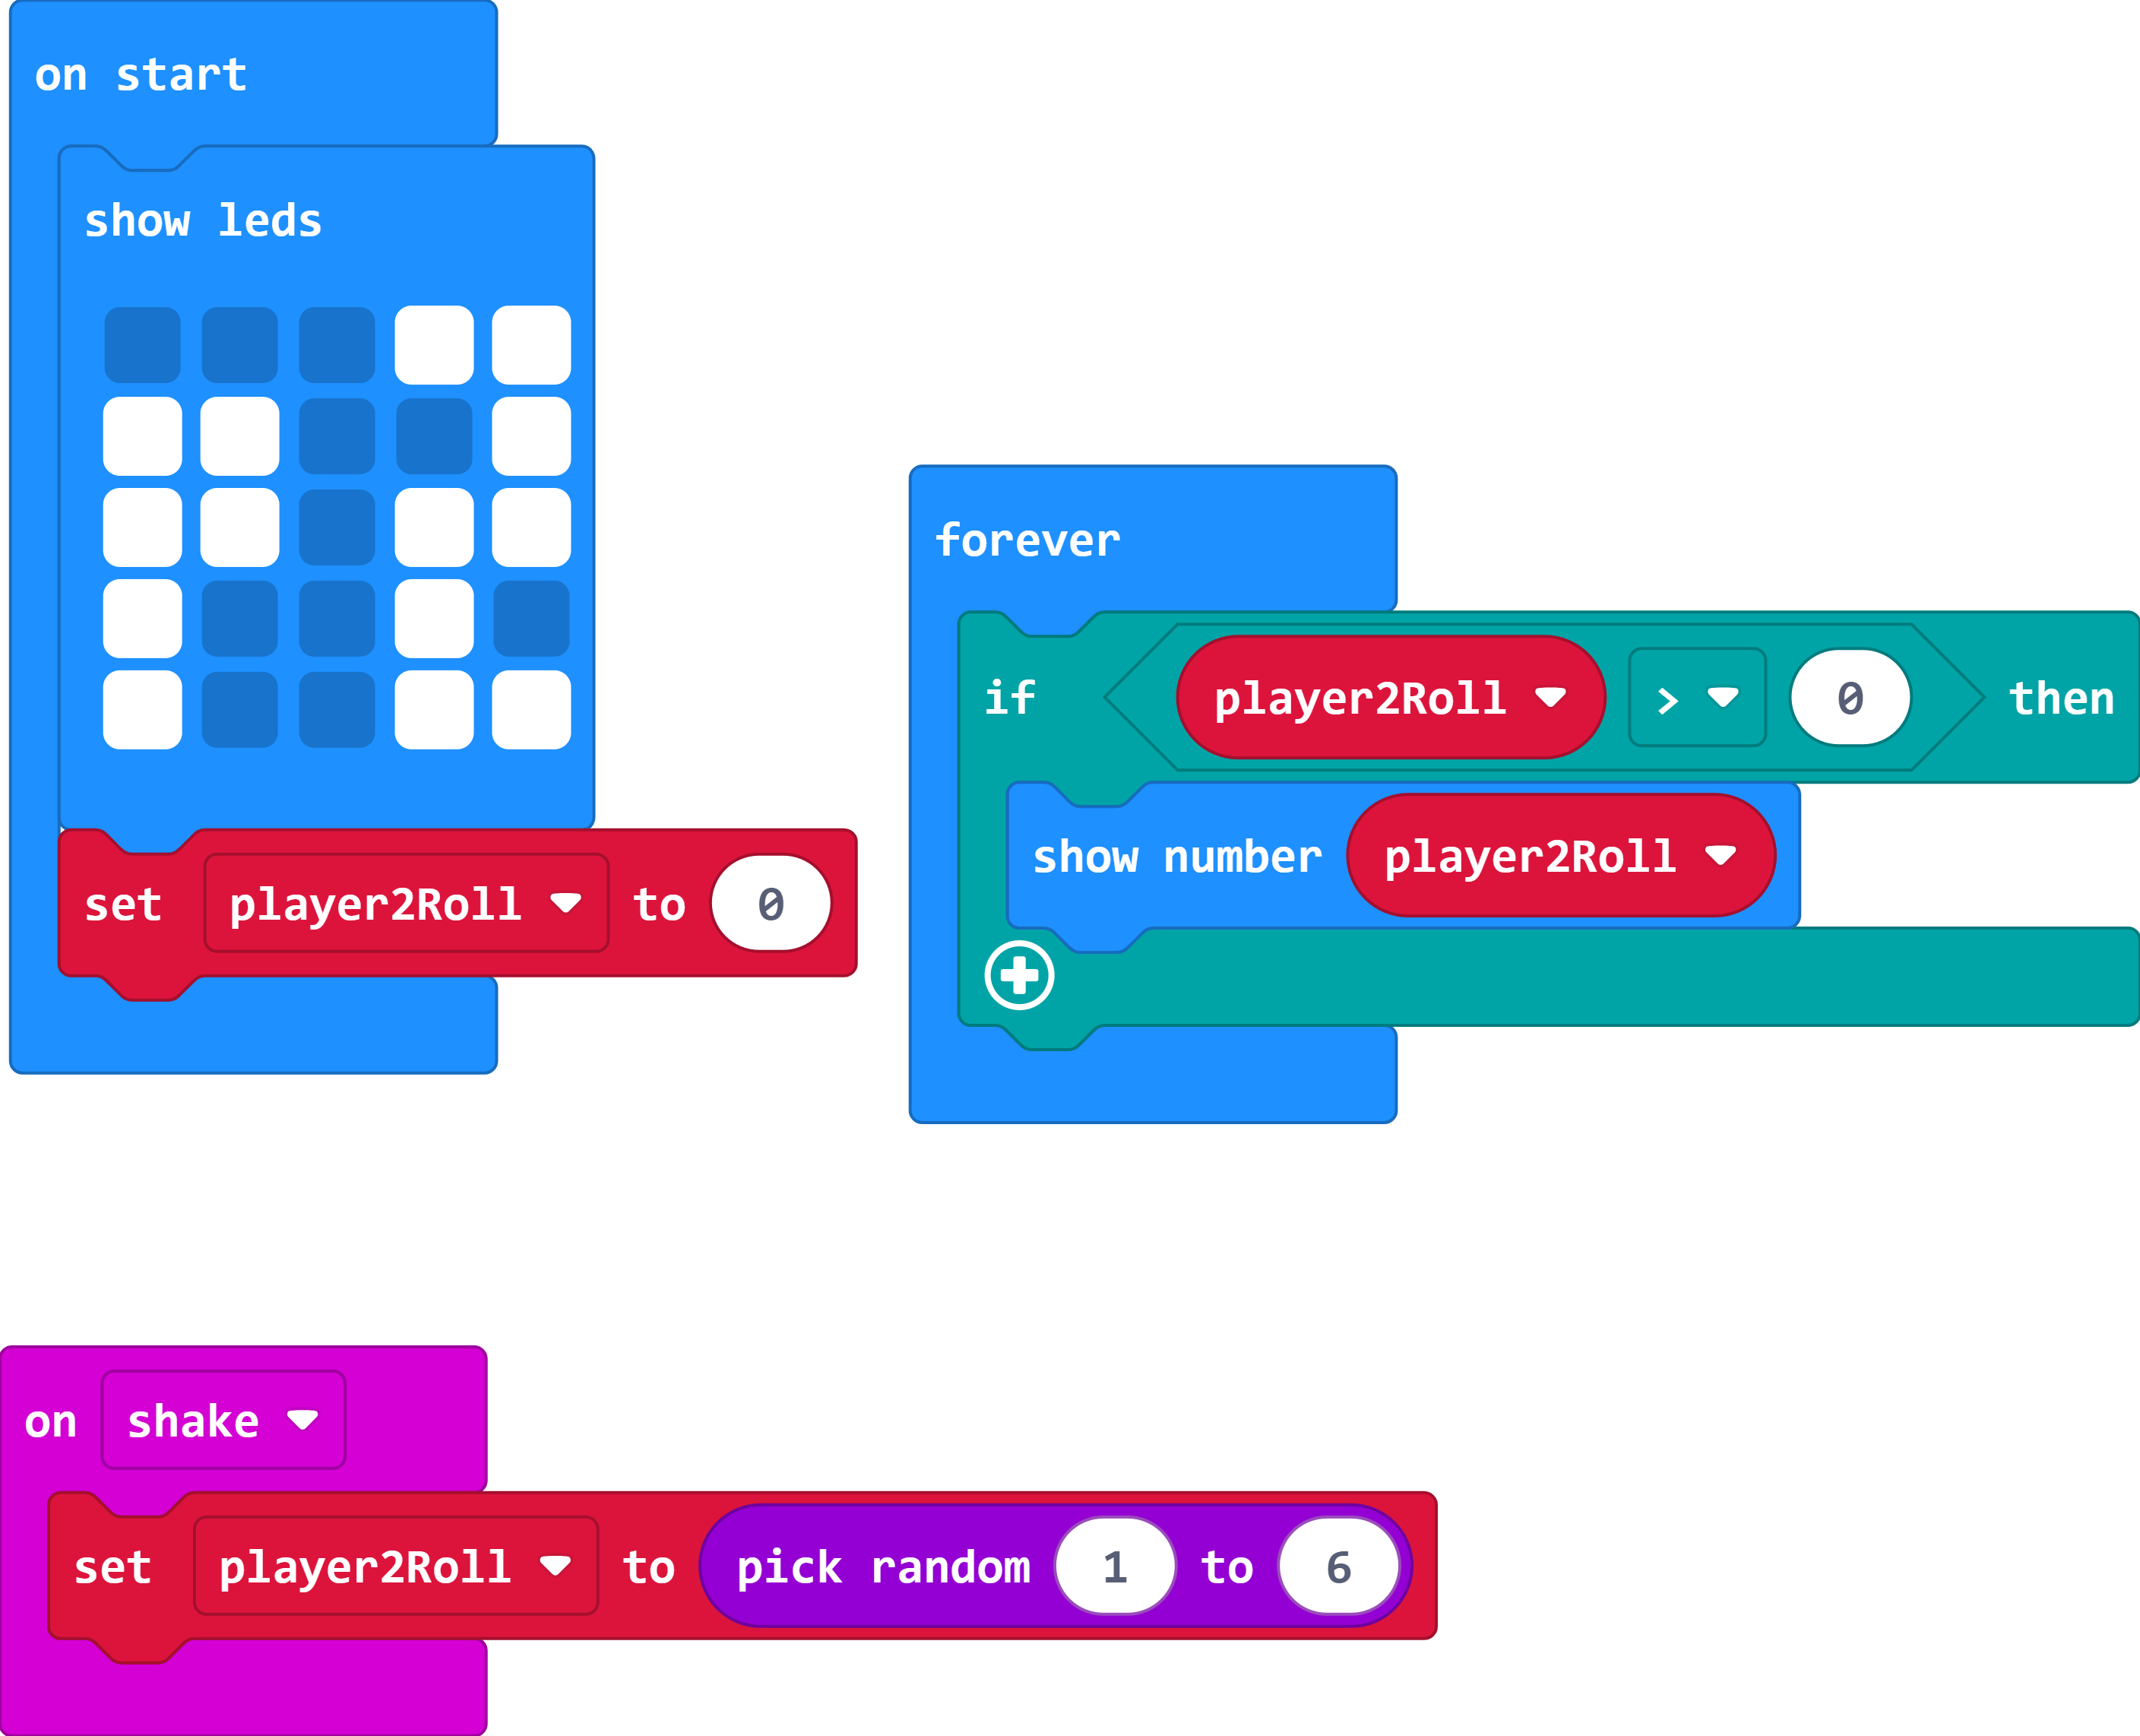
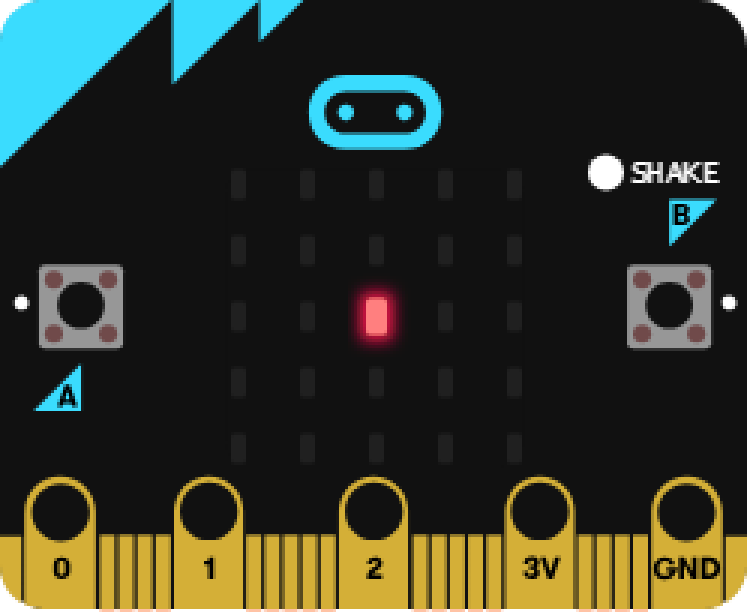
Have both Micro:Bits programmed to show a random number between 1 and 6 every time it is shaken - like a dice roll.
Tip: To avoid interference between loops, all outputs need to be inside the forever loop.
The video for Session Two included a walk-through on creating a basic dice program.
Use a different dice roll variable name for each player - this will reduce confusion later.
You only want the dice roll value to start showing after the first roll (so when the variable is no longer 0)
Player One
Player Two
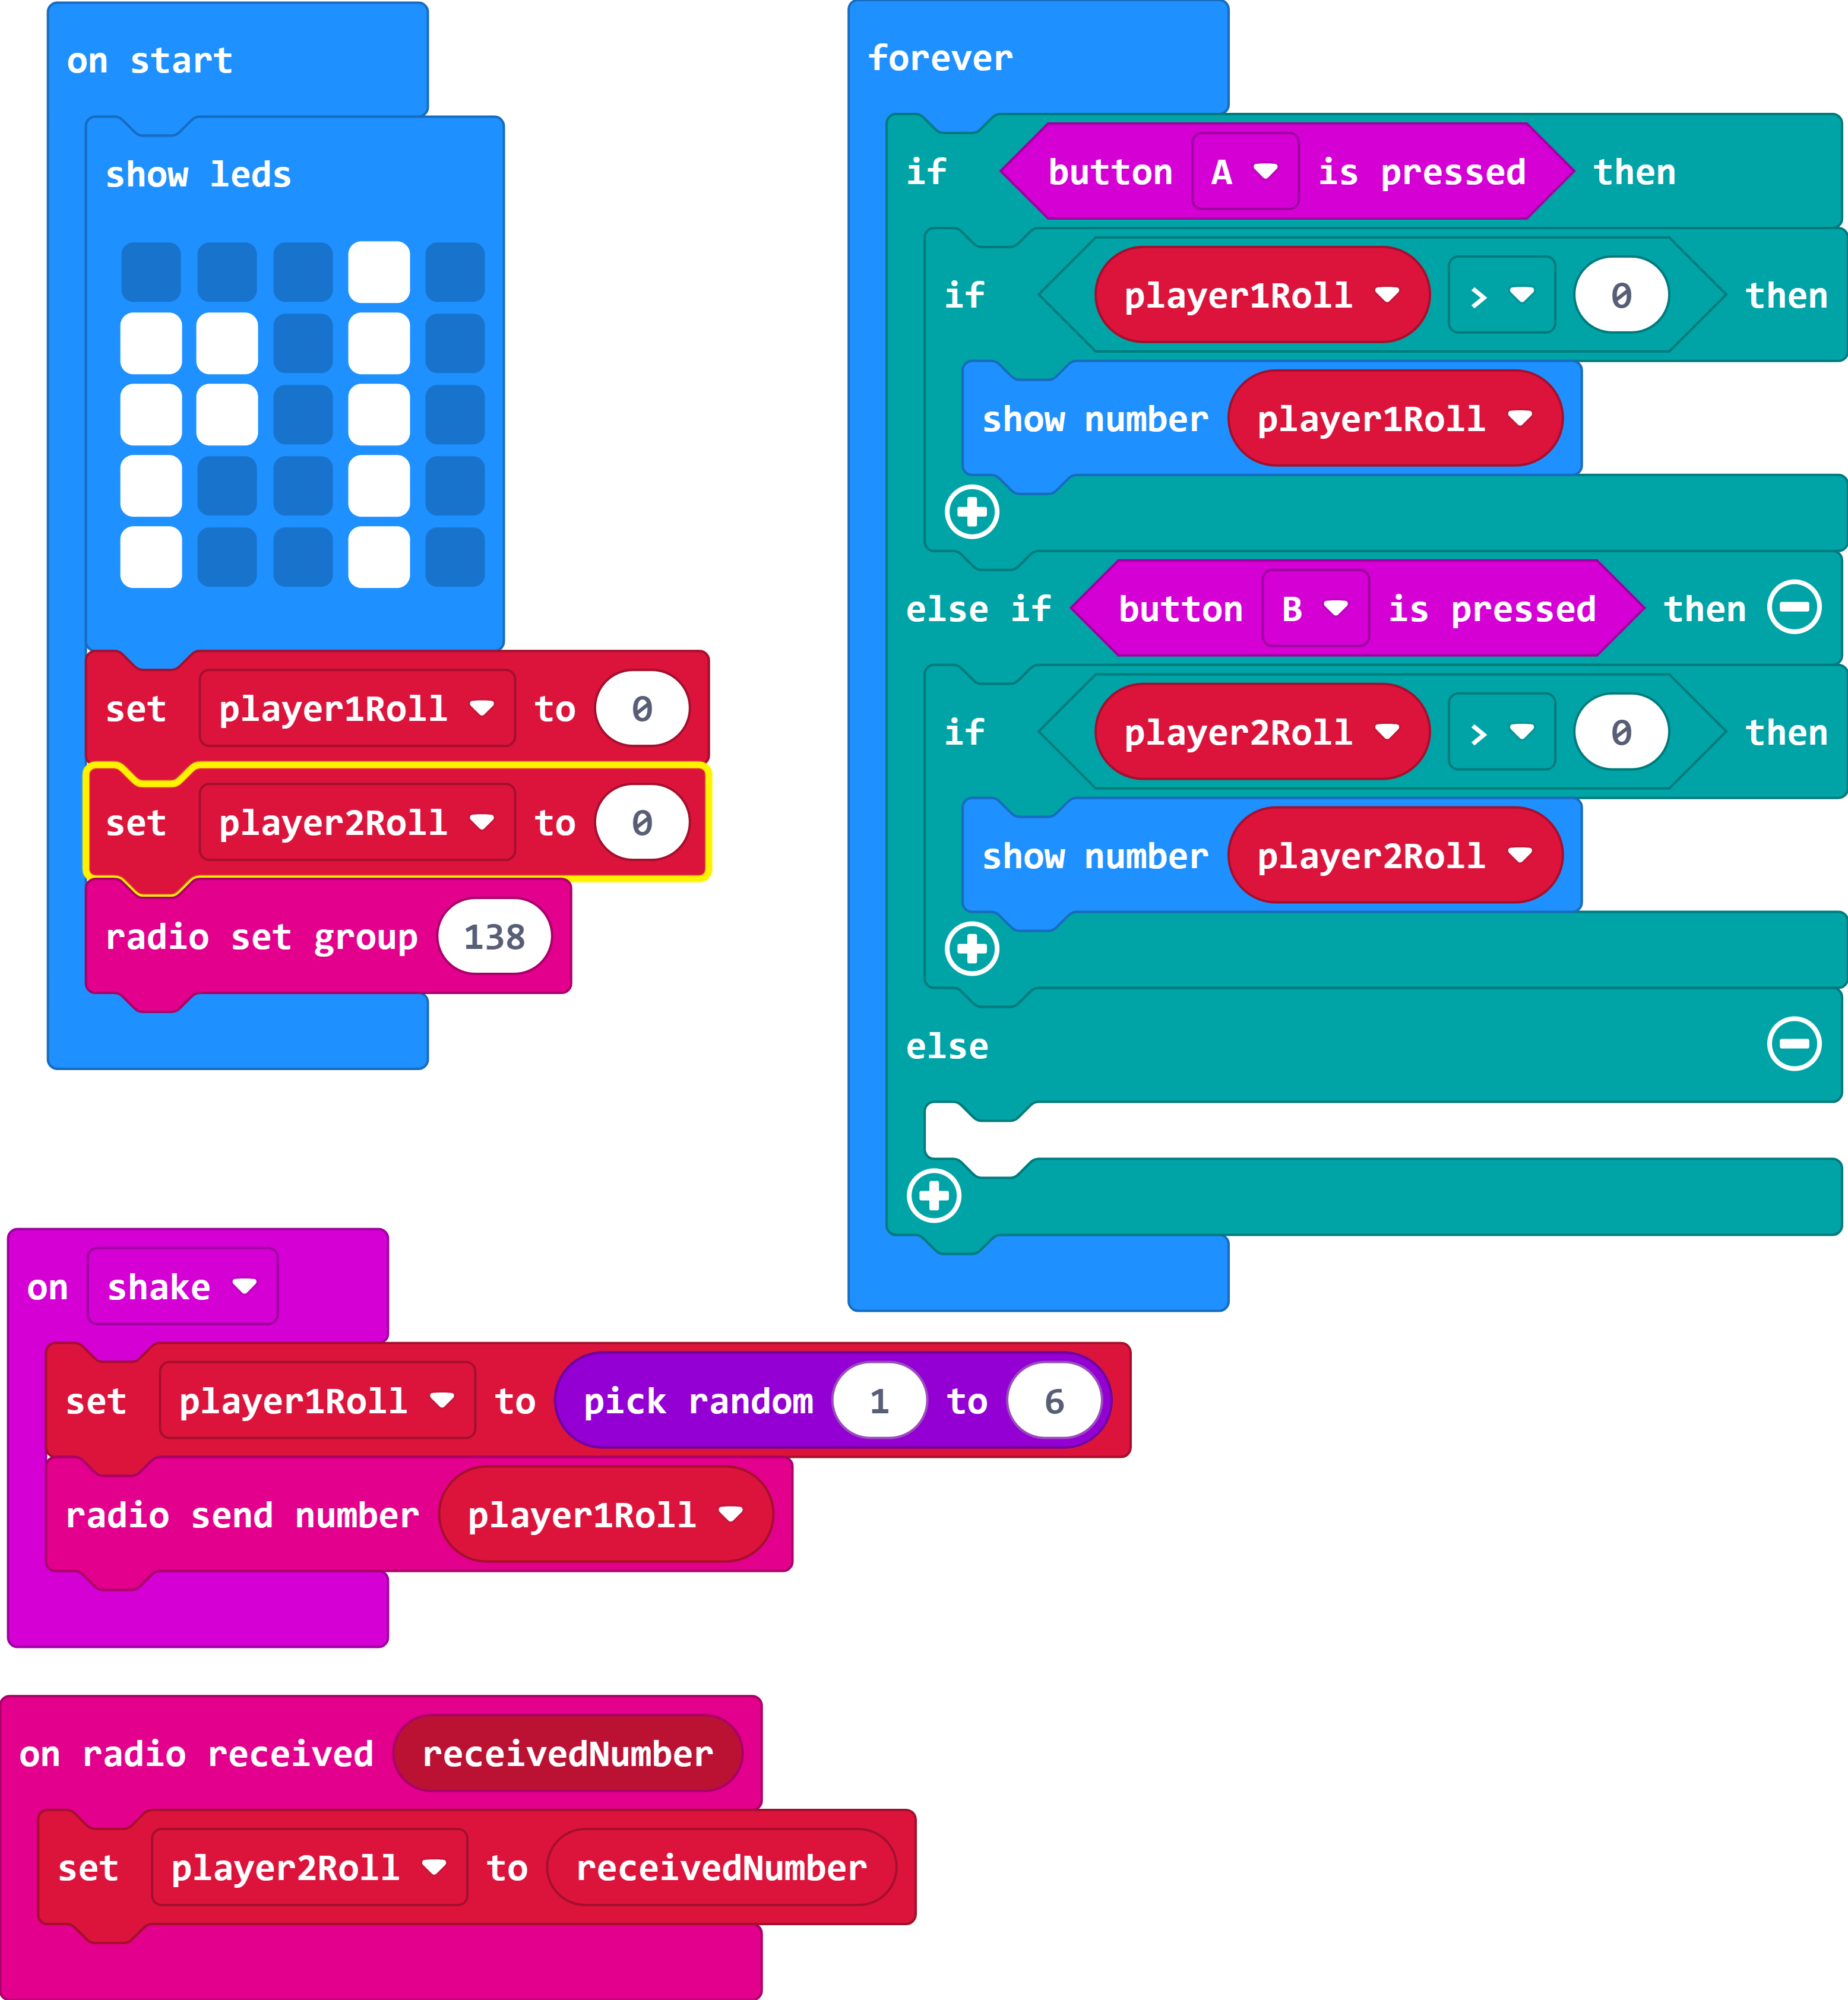
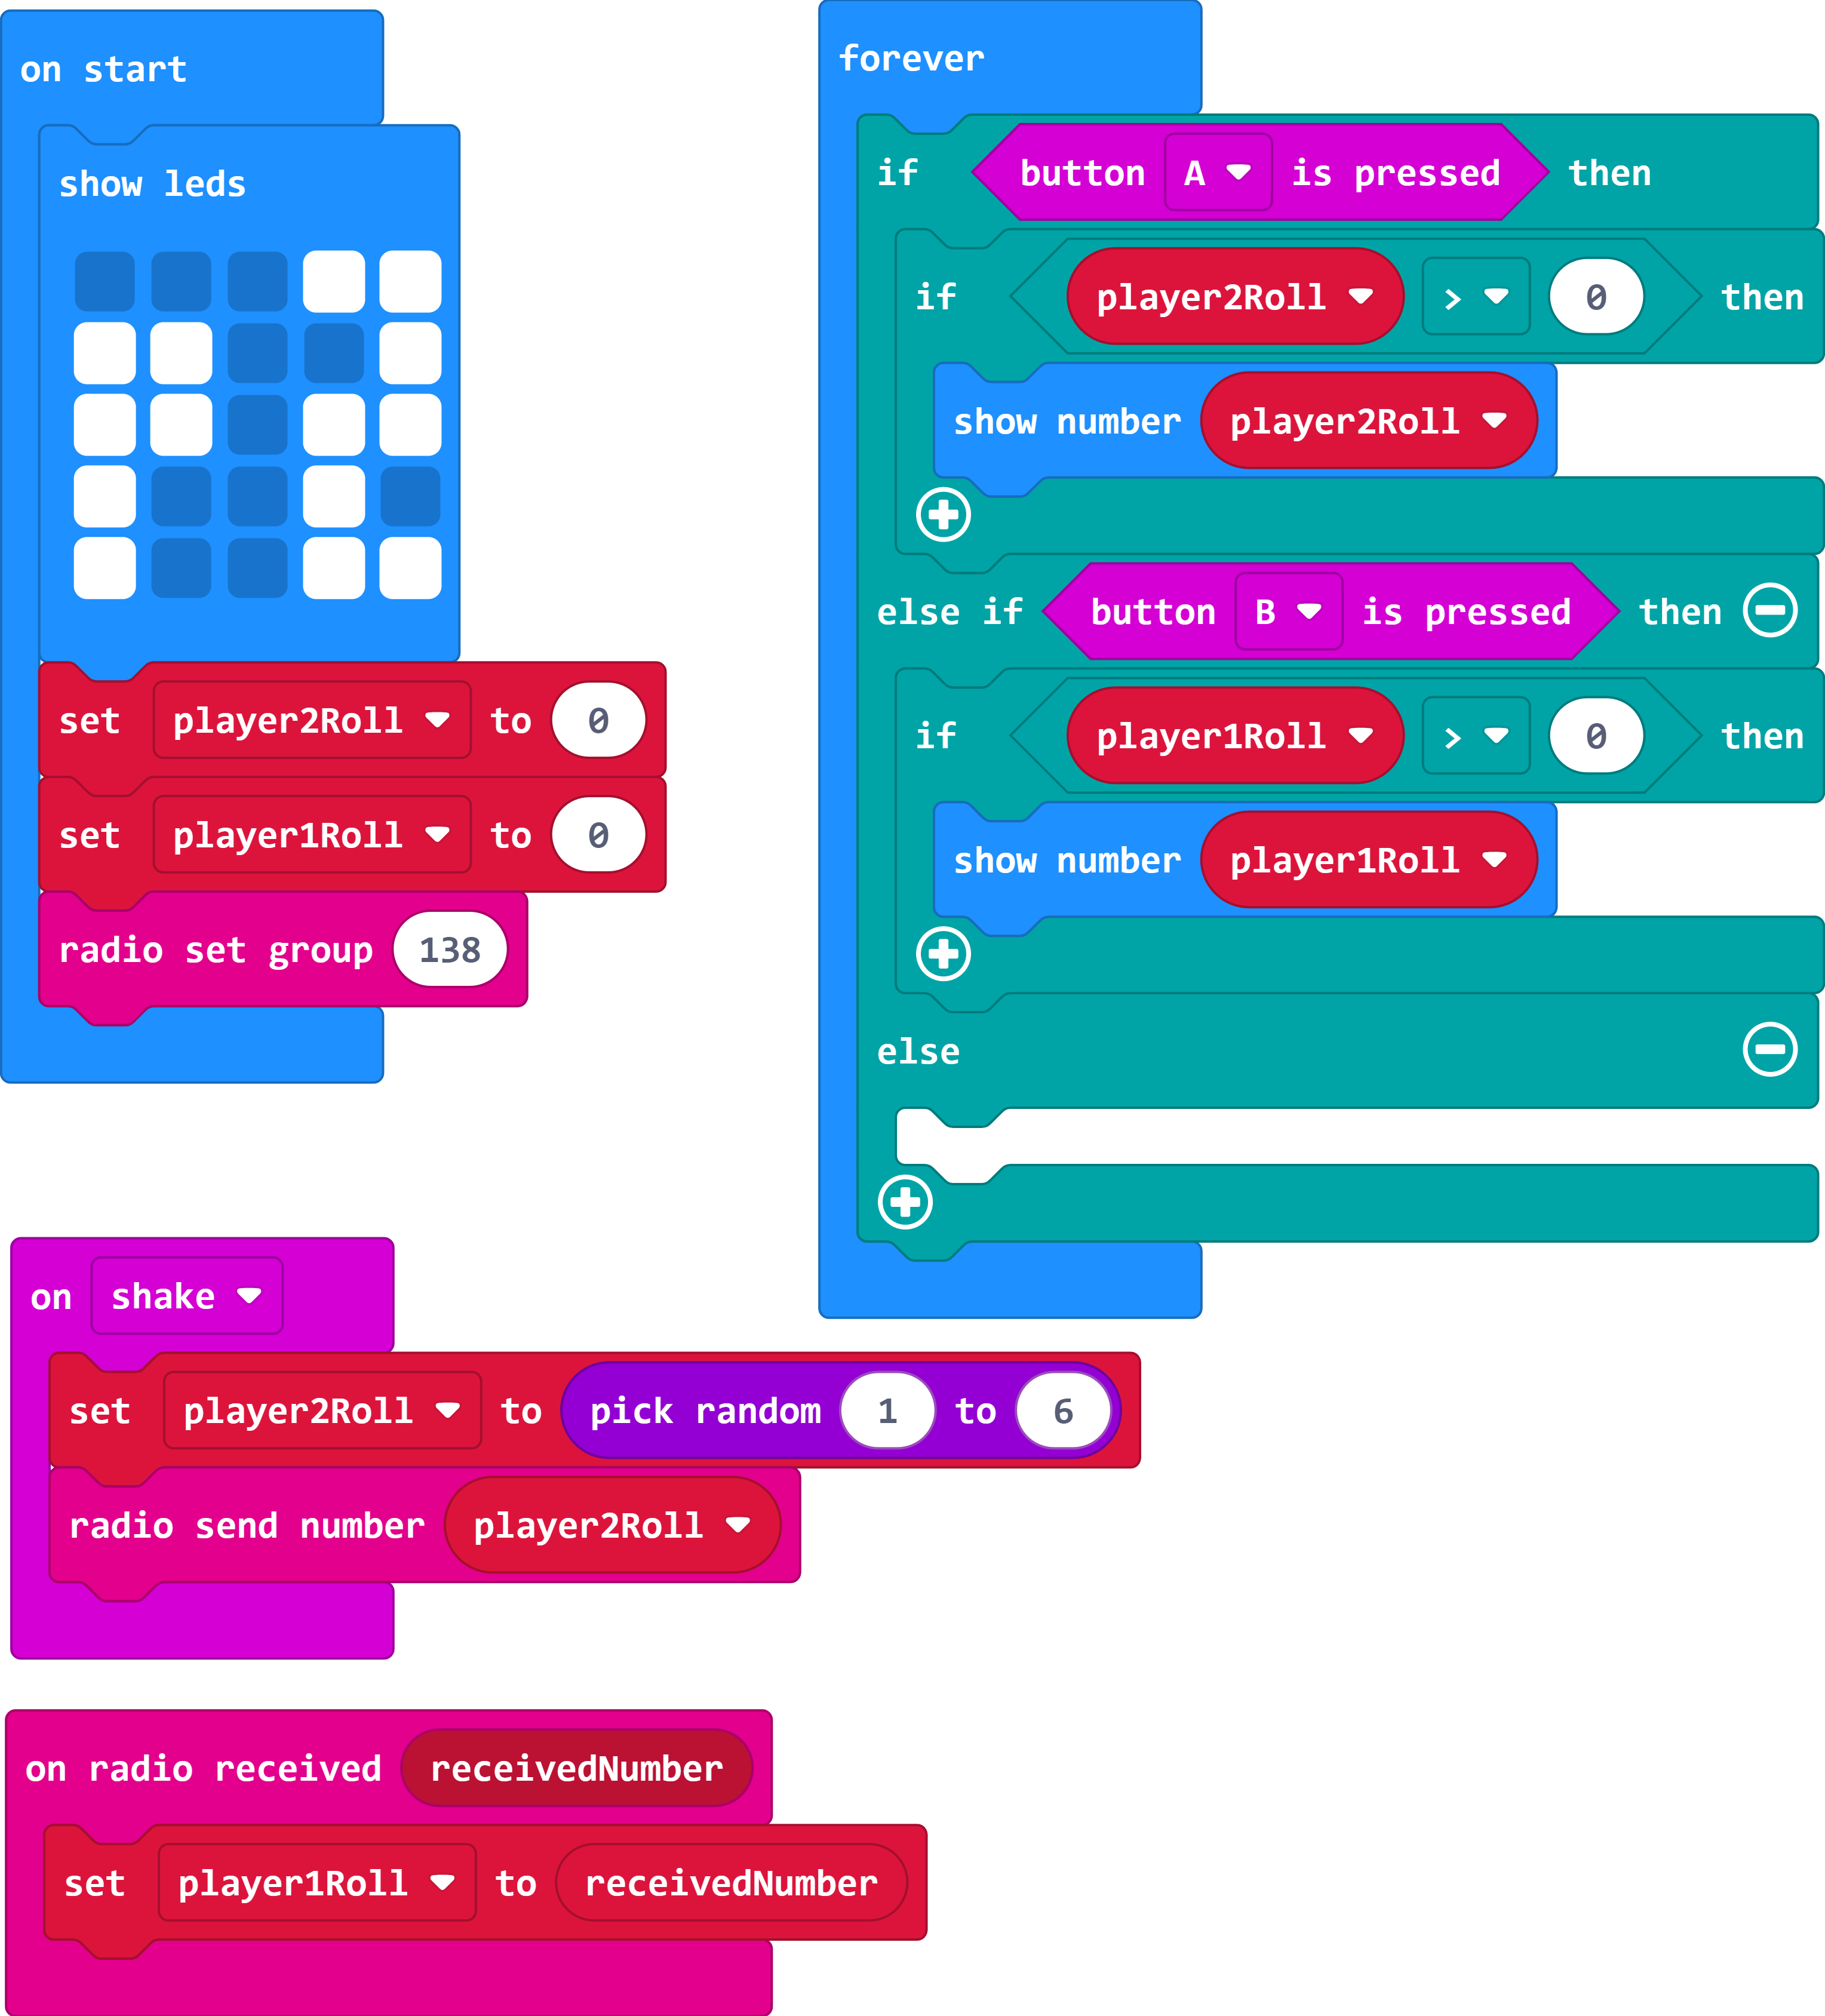
For Player One, have button A show your last roll whilst button B shows the other player's last roll. Do the same for Player Two.
Tip: Don't forget to set both Micro:Bits into the same radio group so they can talk to each other - this should be done during the start-up sequence.
Use if statements inside the forever loop for button pressing, not the separate 'on button A pressed' or ' on button B pressed' blocks.
Remember, you can stack if statements inside each other.
You can have an else statement that contains nothing, or you can use it to report an error.
Player One
Player Two
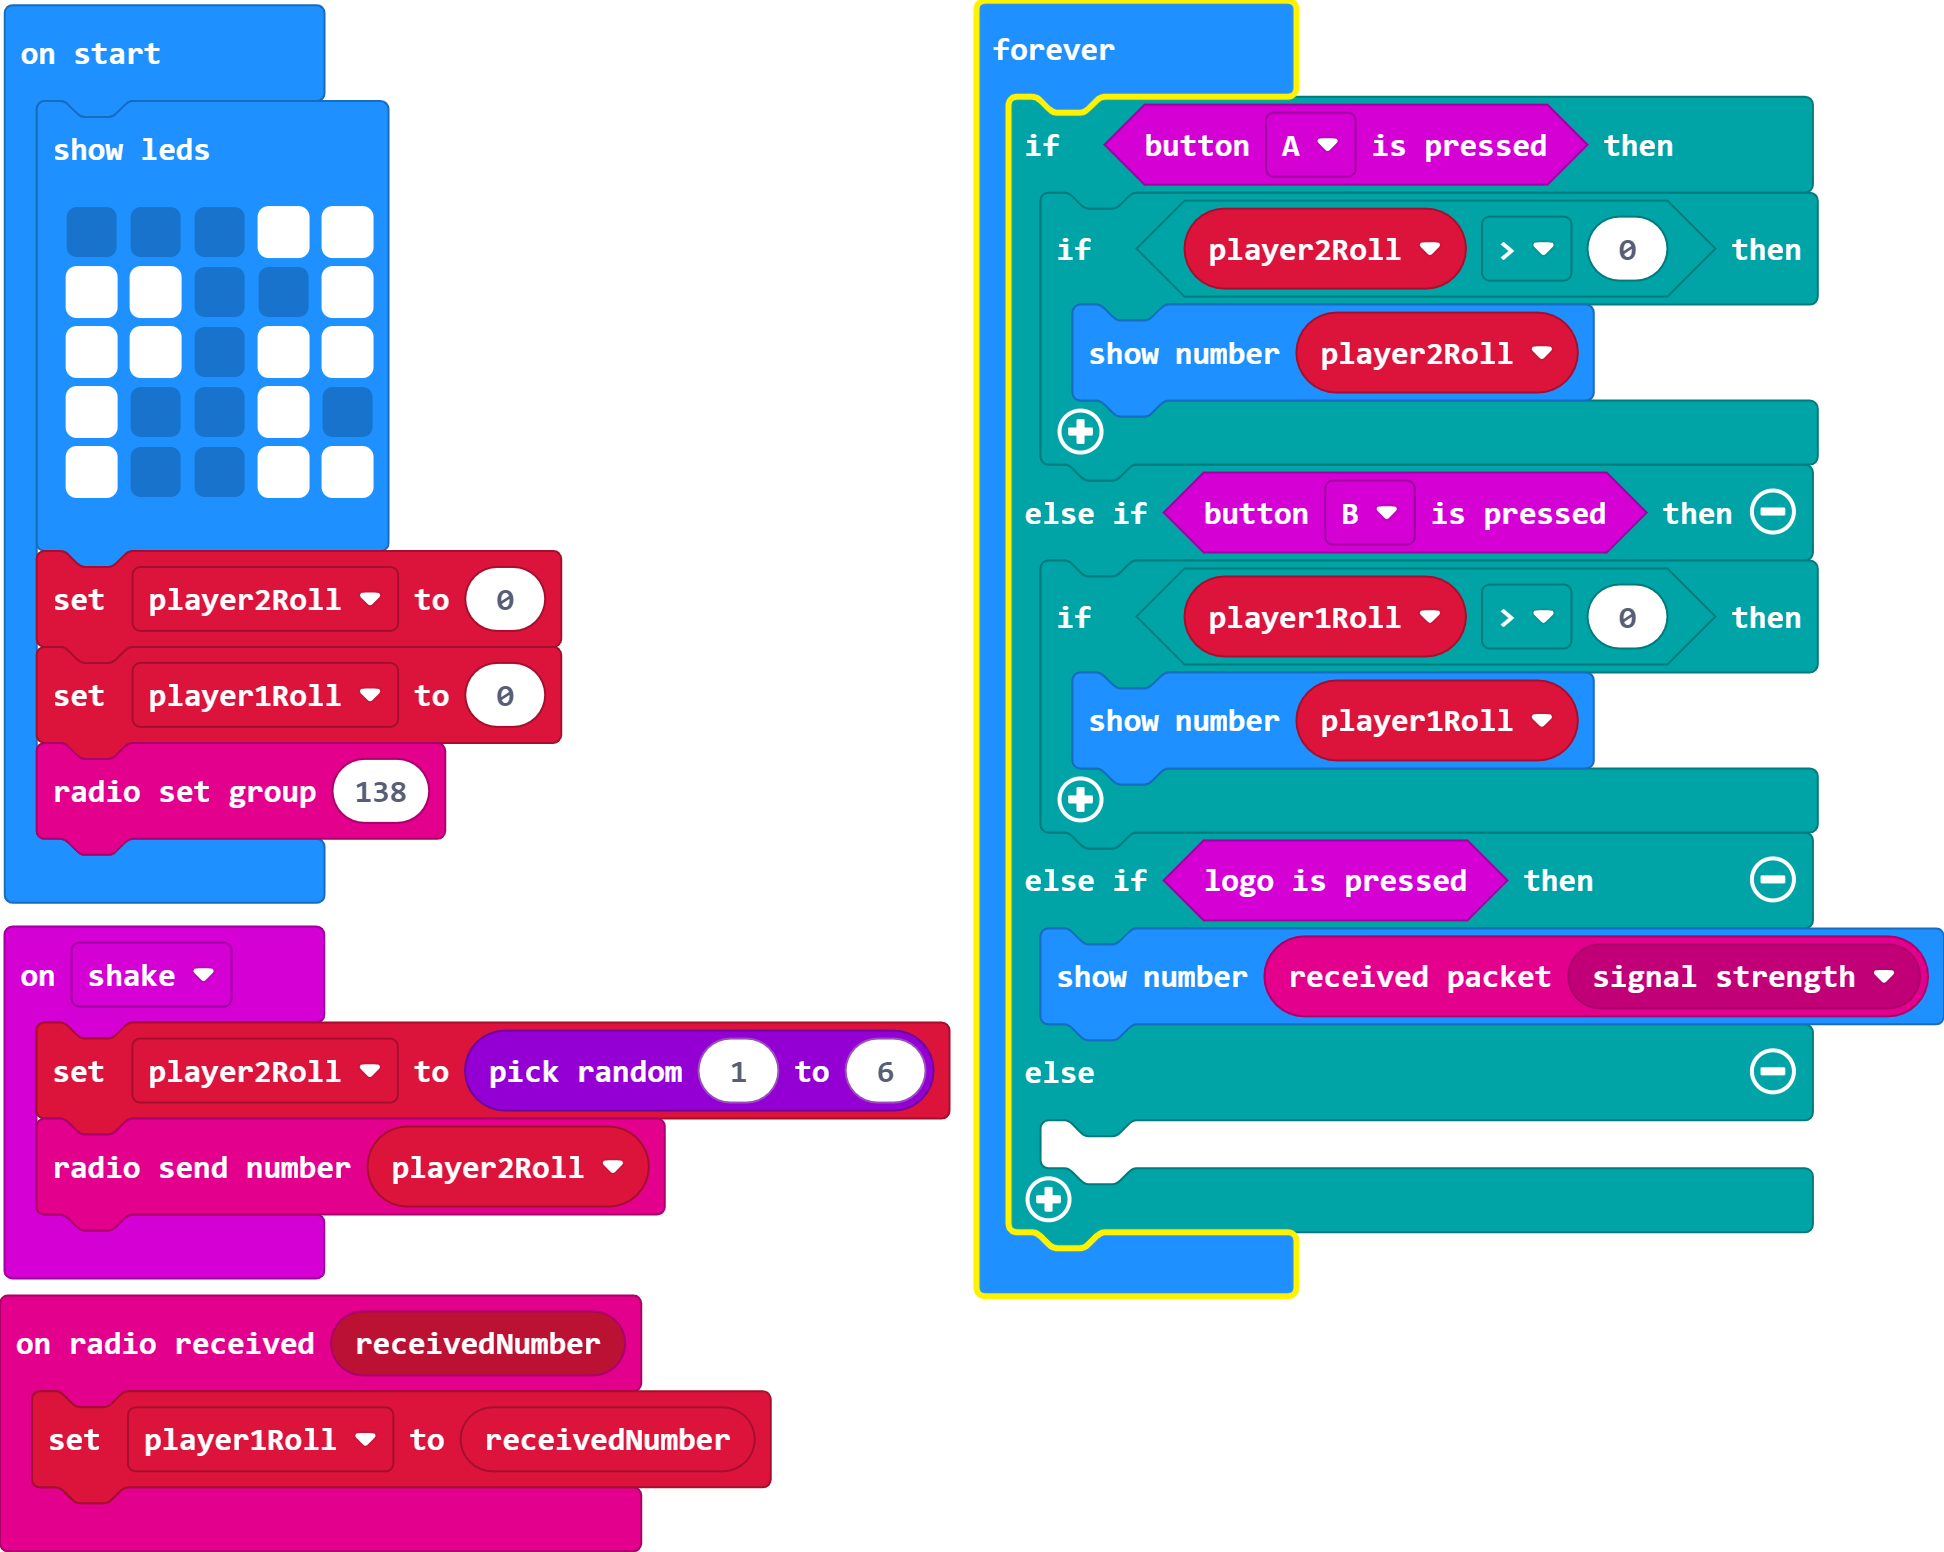
When either player presses the touch logo, have the screen show the signal strength.
The touch logo is only available on Micro:Bit V2 - so check the V2 section of the input menu.
This one is hard to test in the simulator because you can only alter the signal strength when it is sending information (in this case when we shake it).
Player One
Player Two
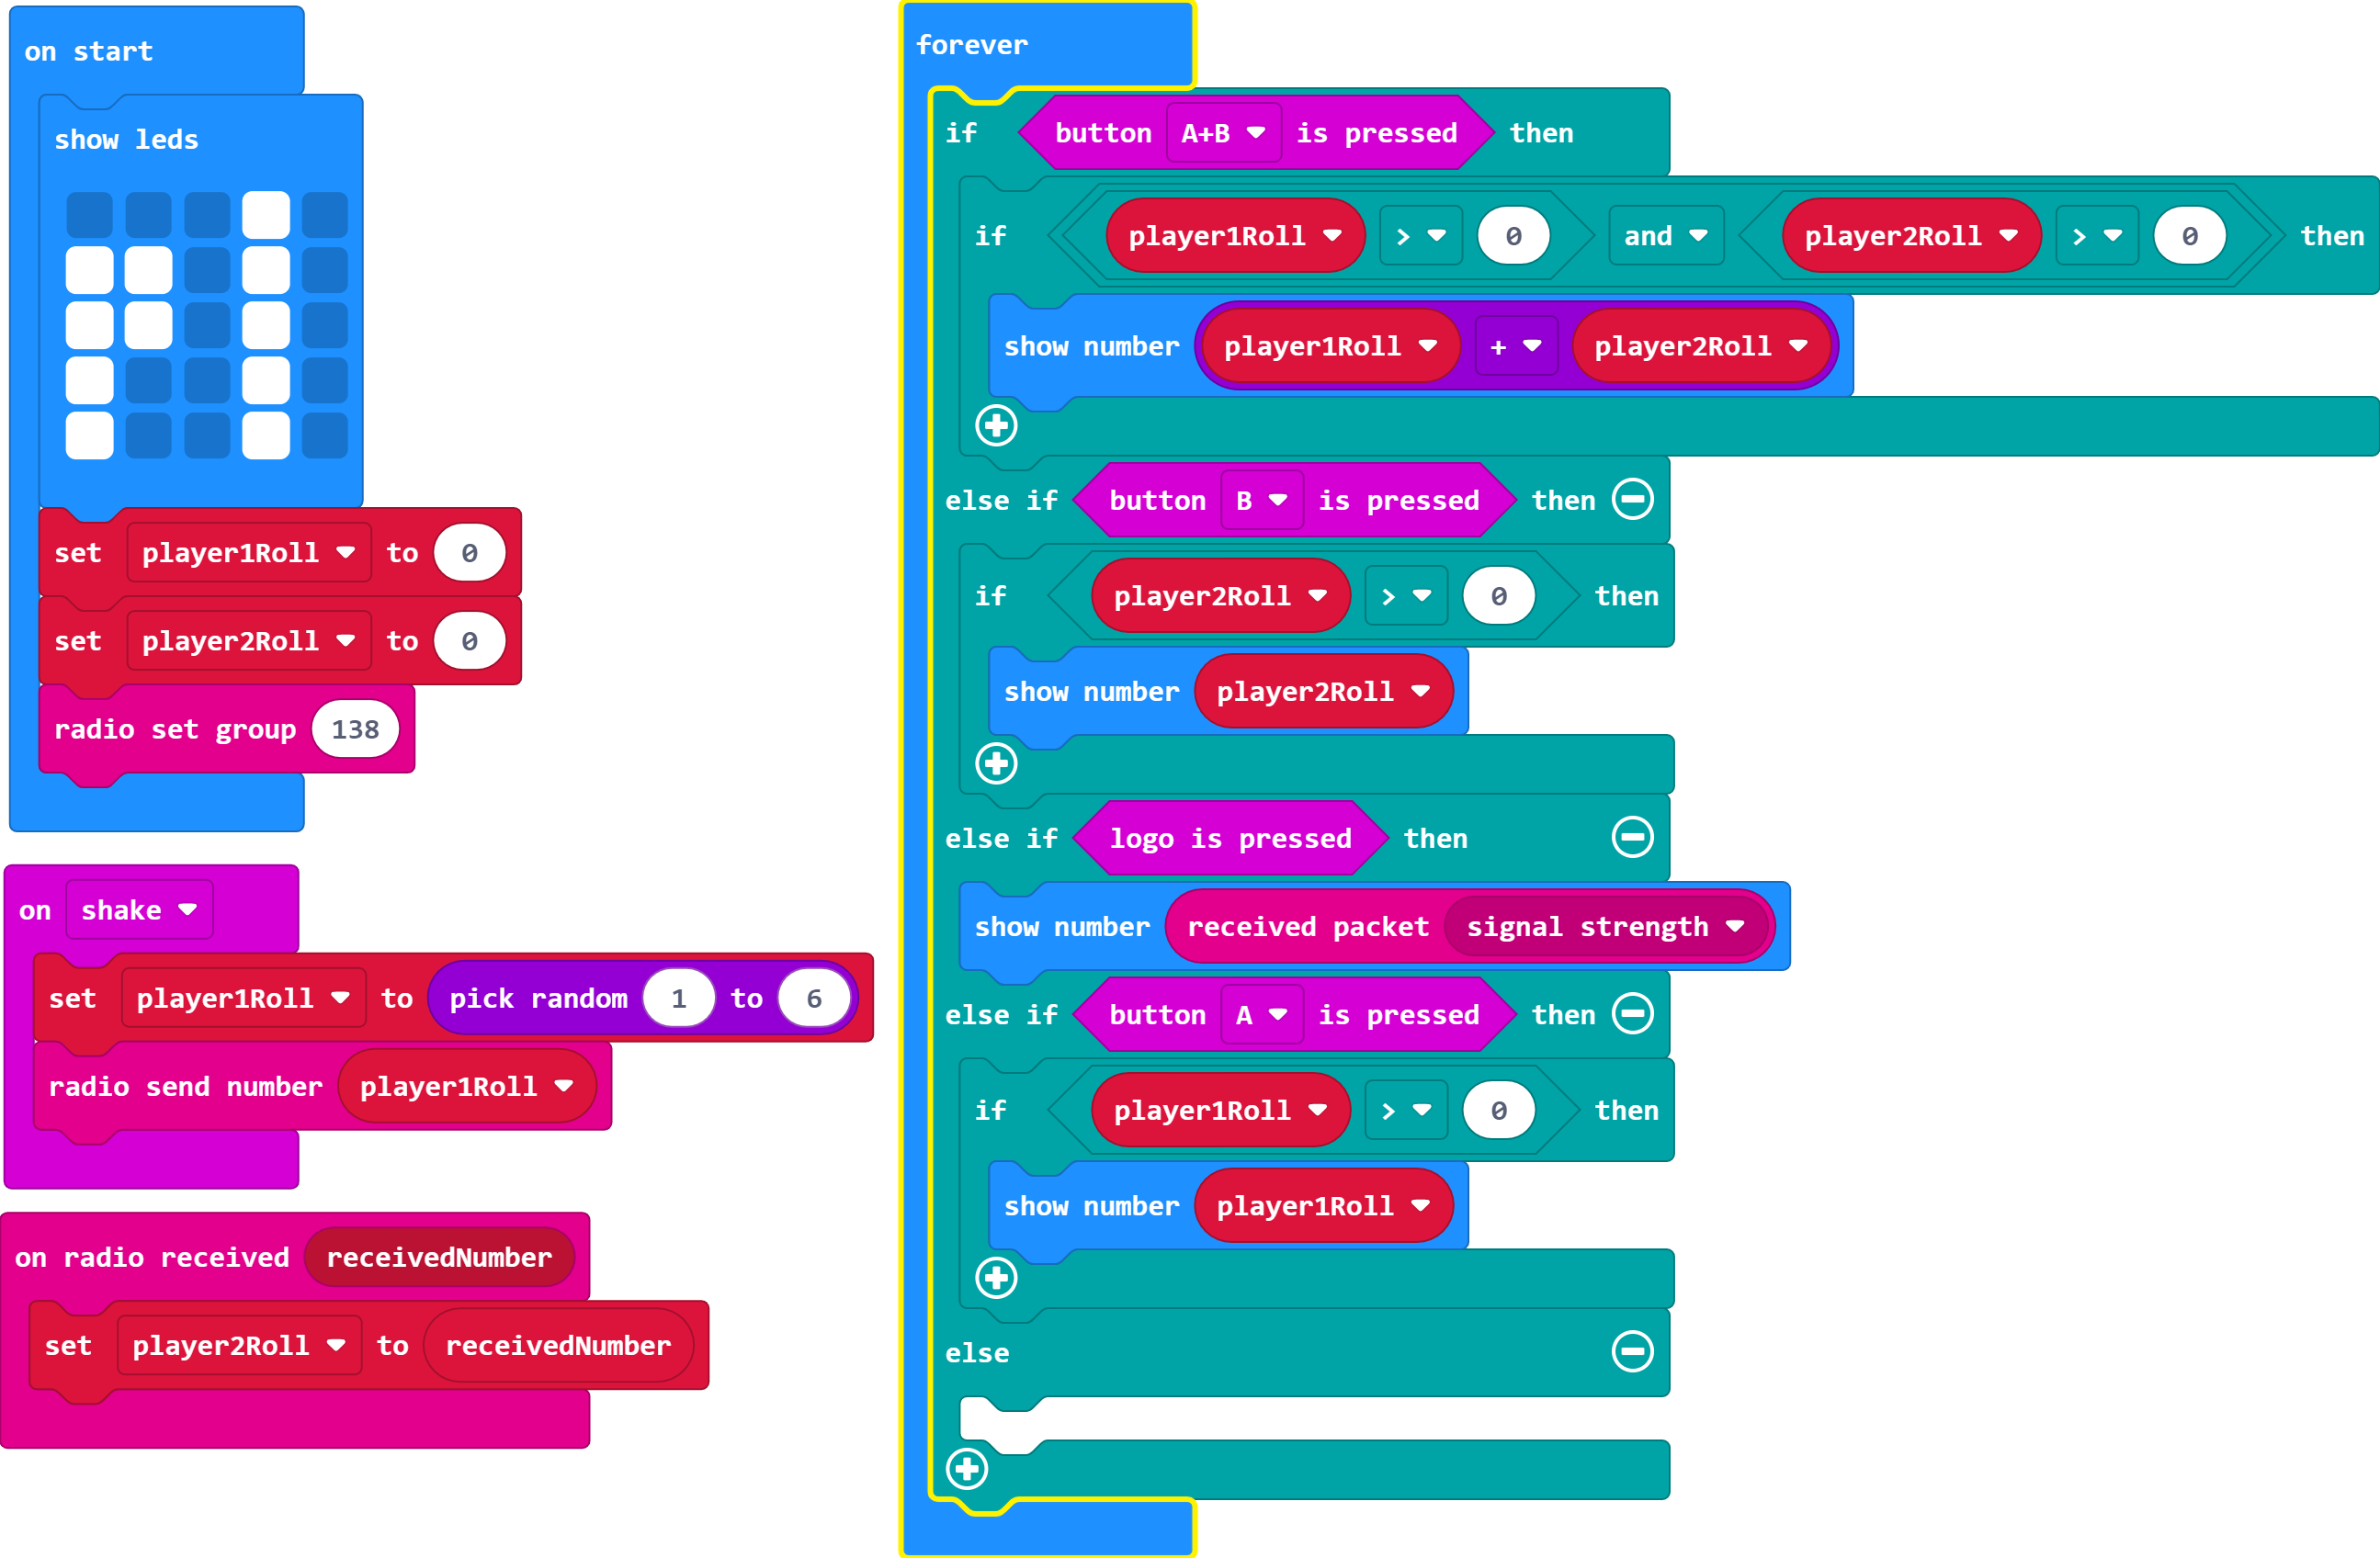
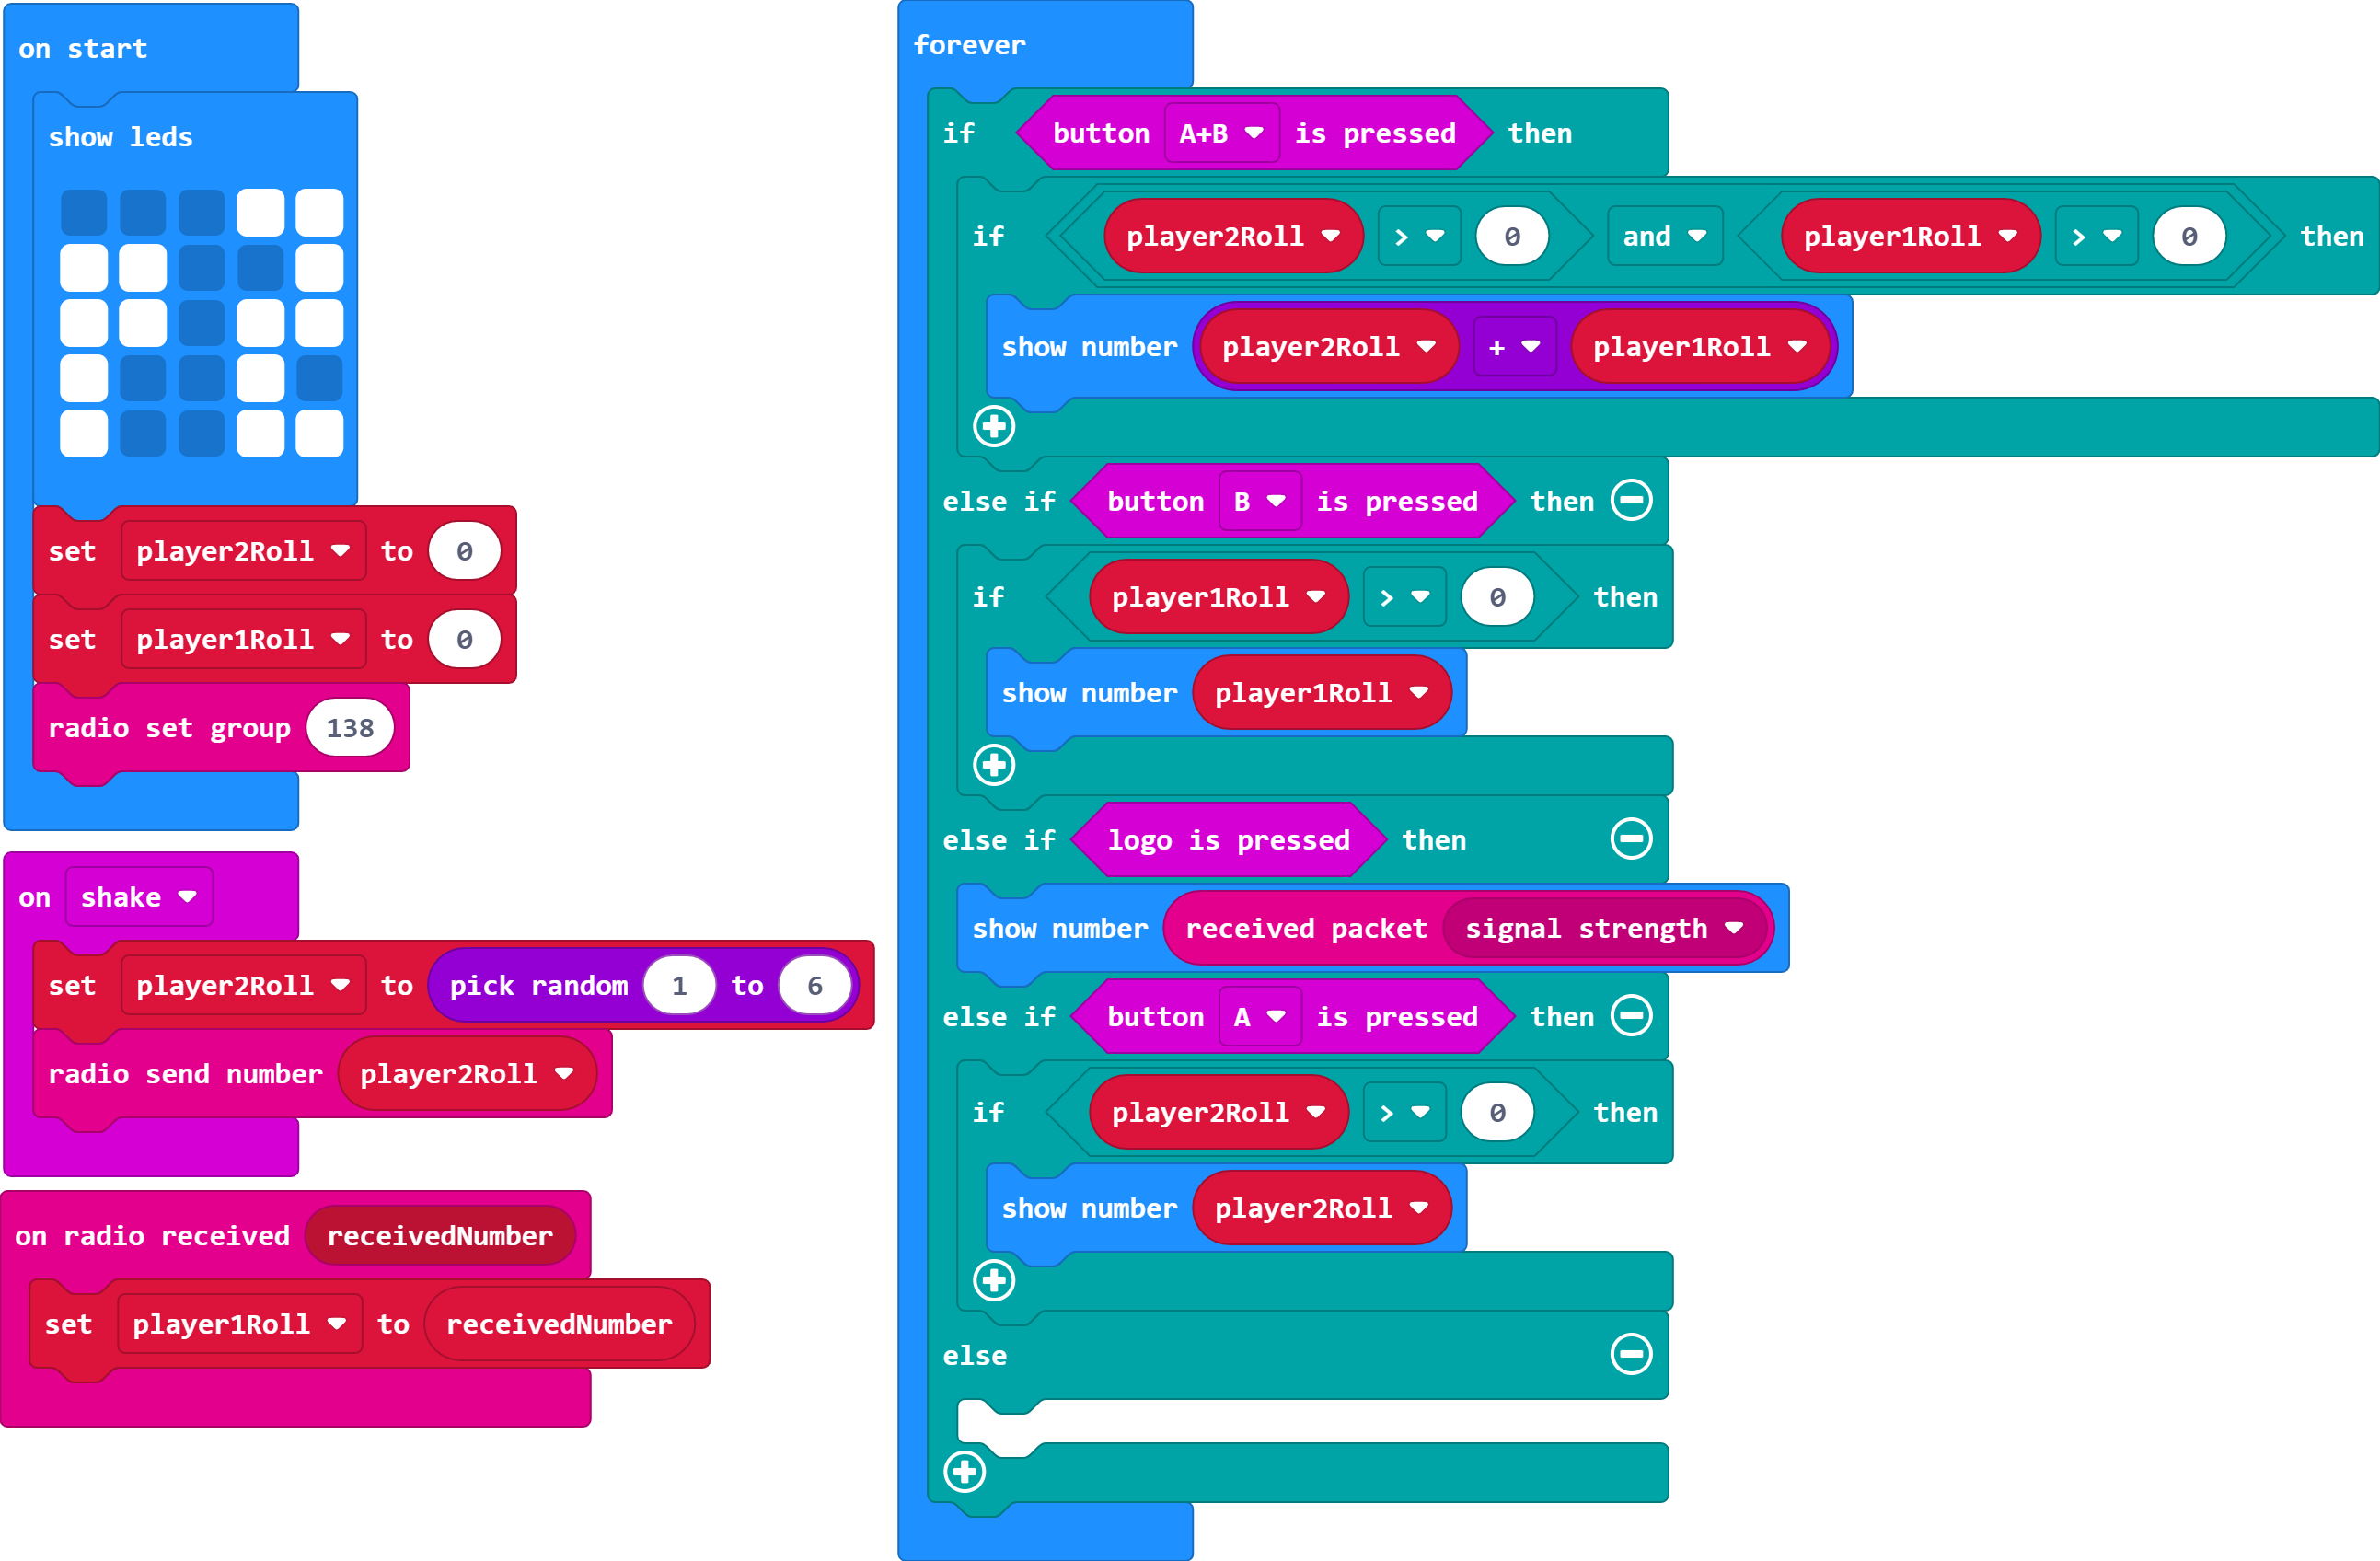
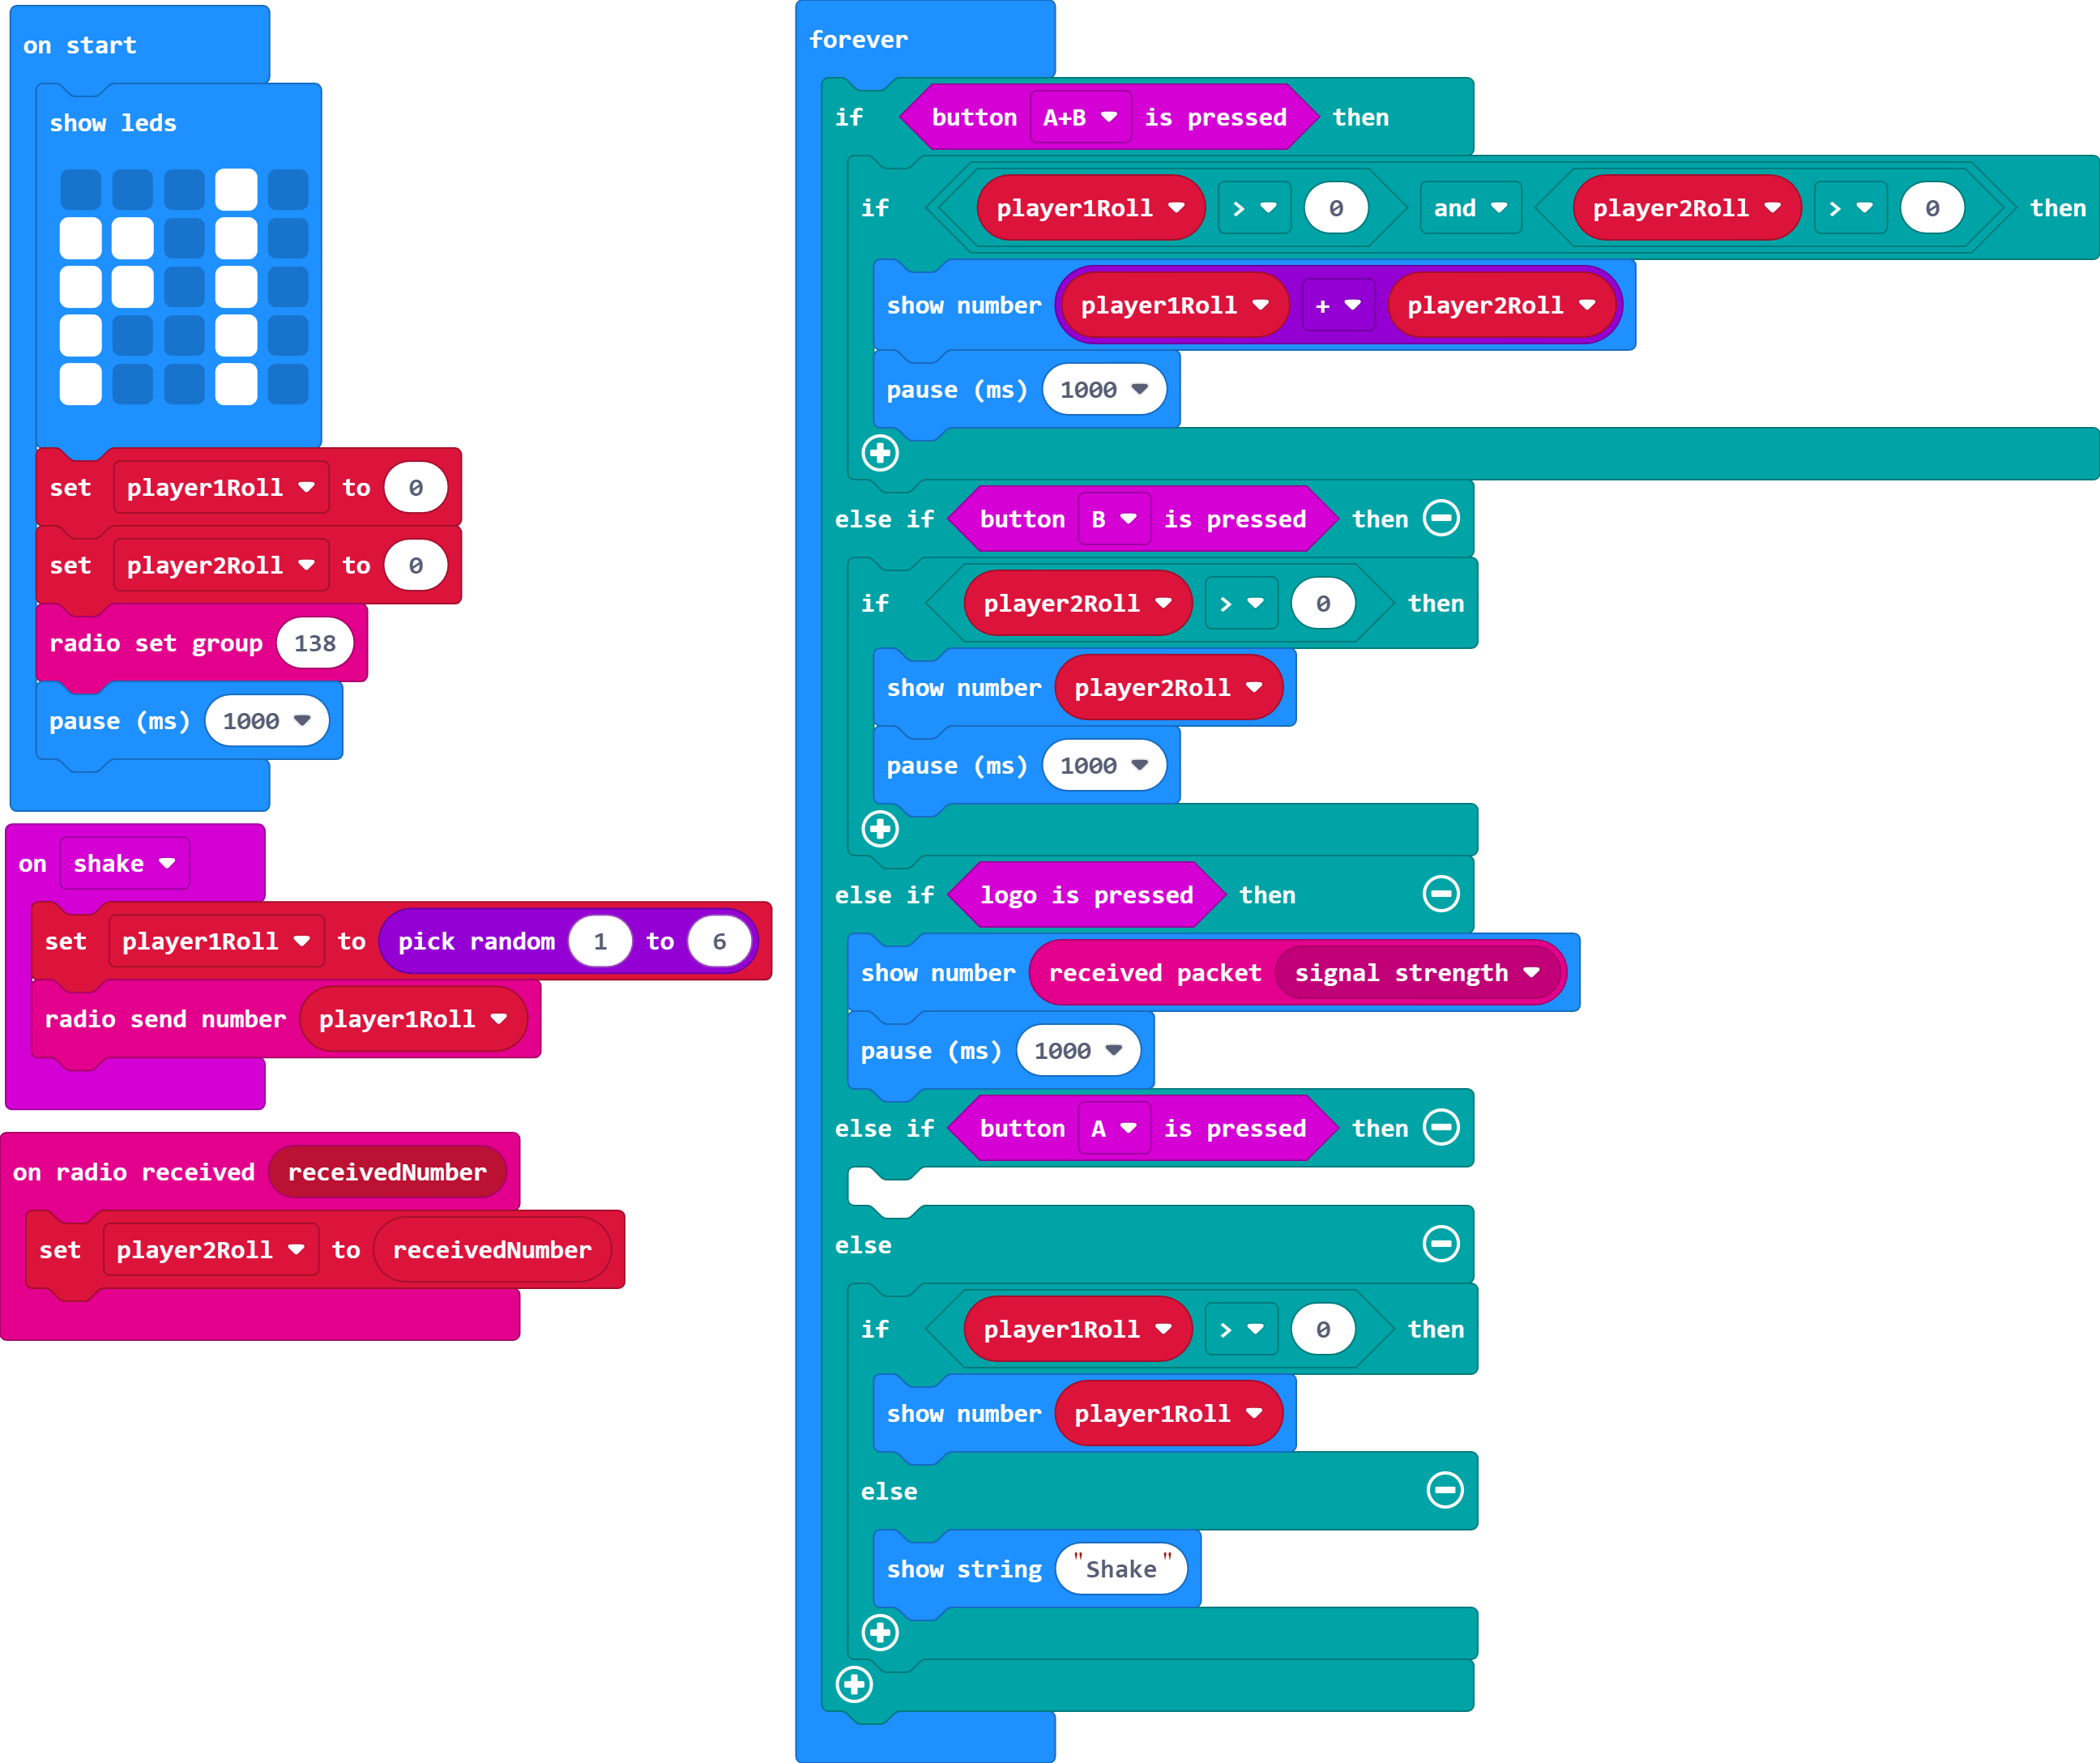
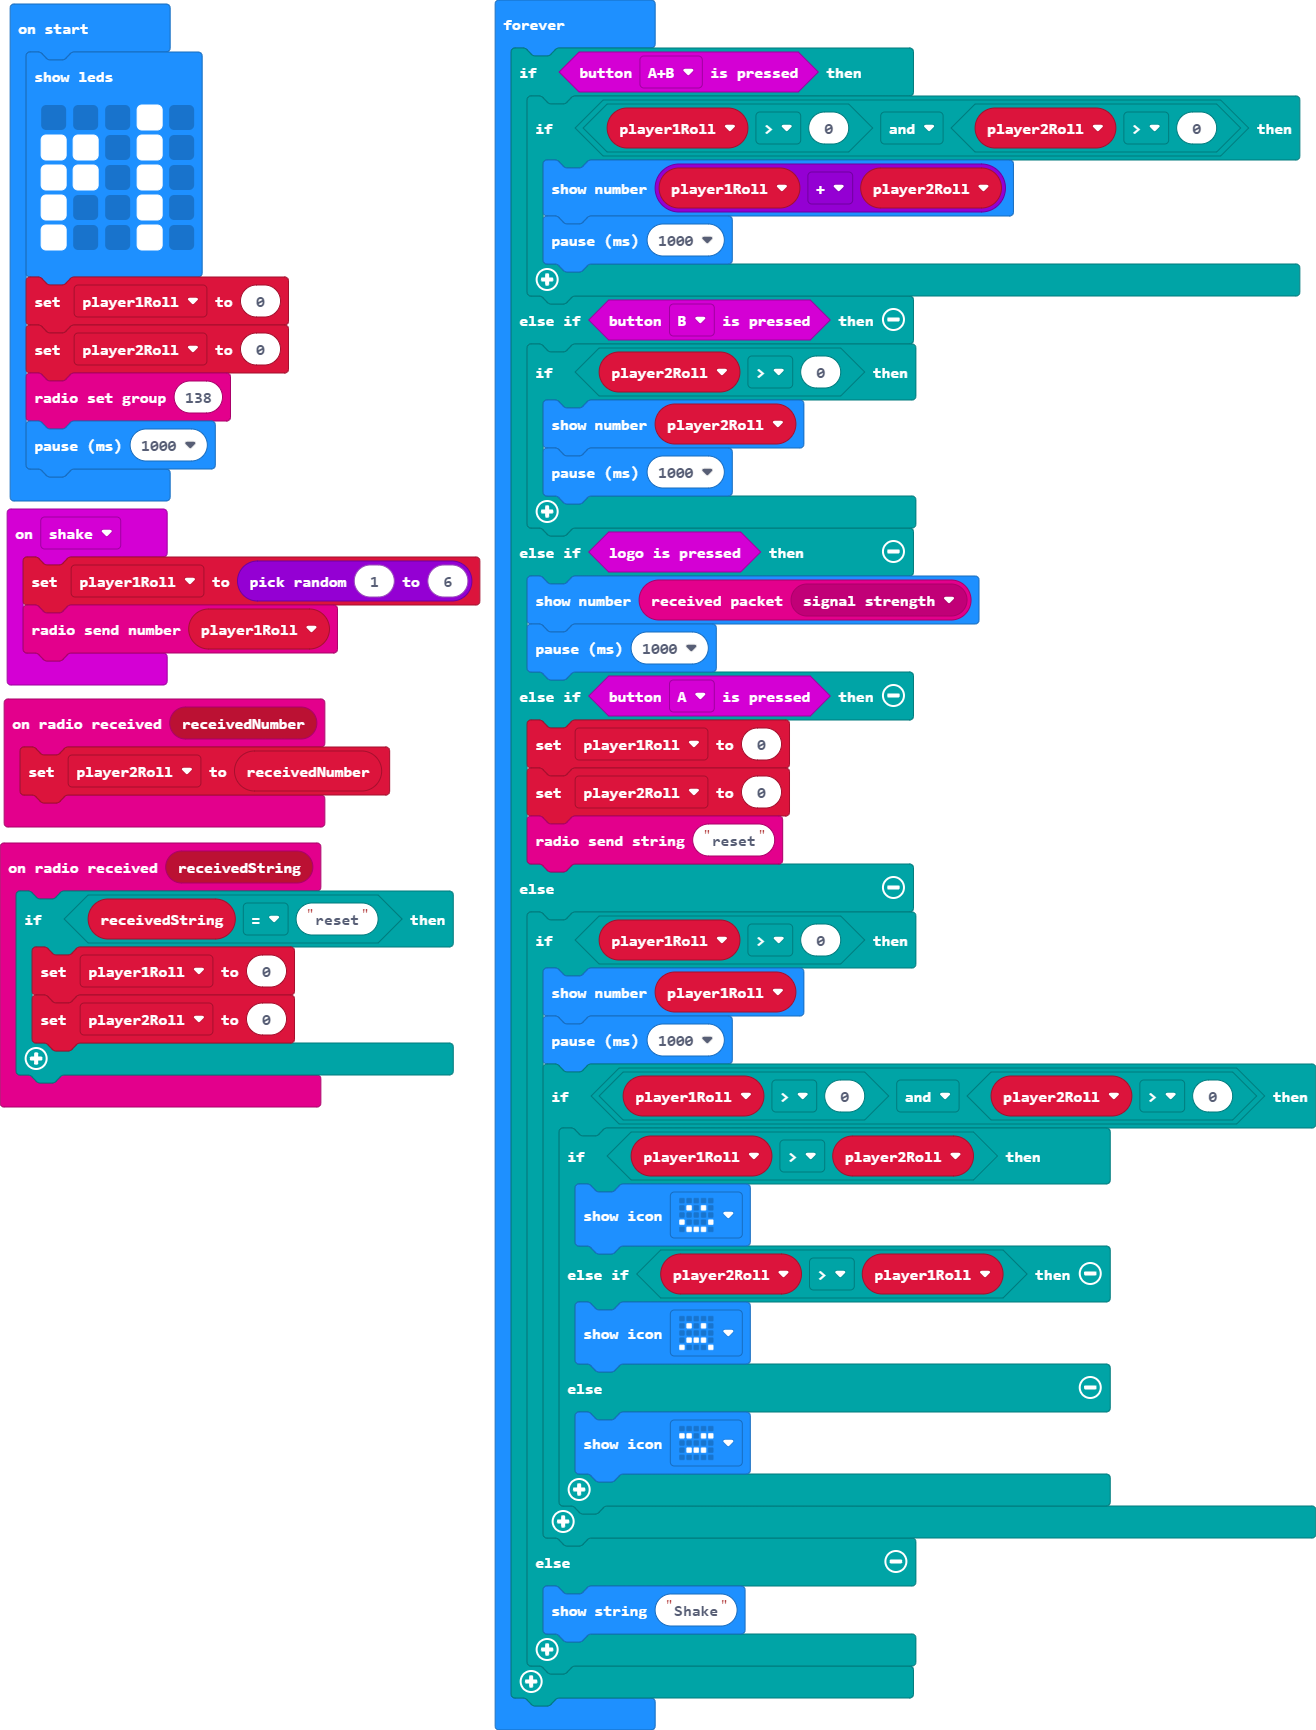
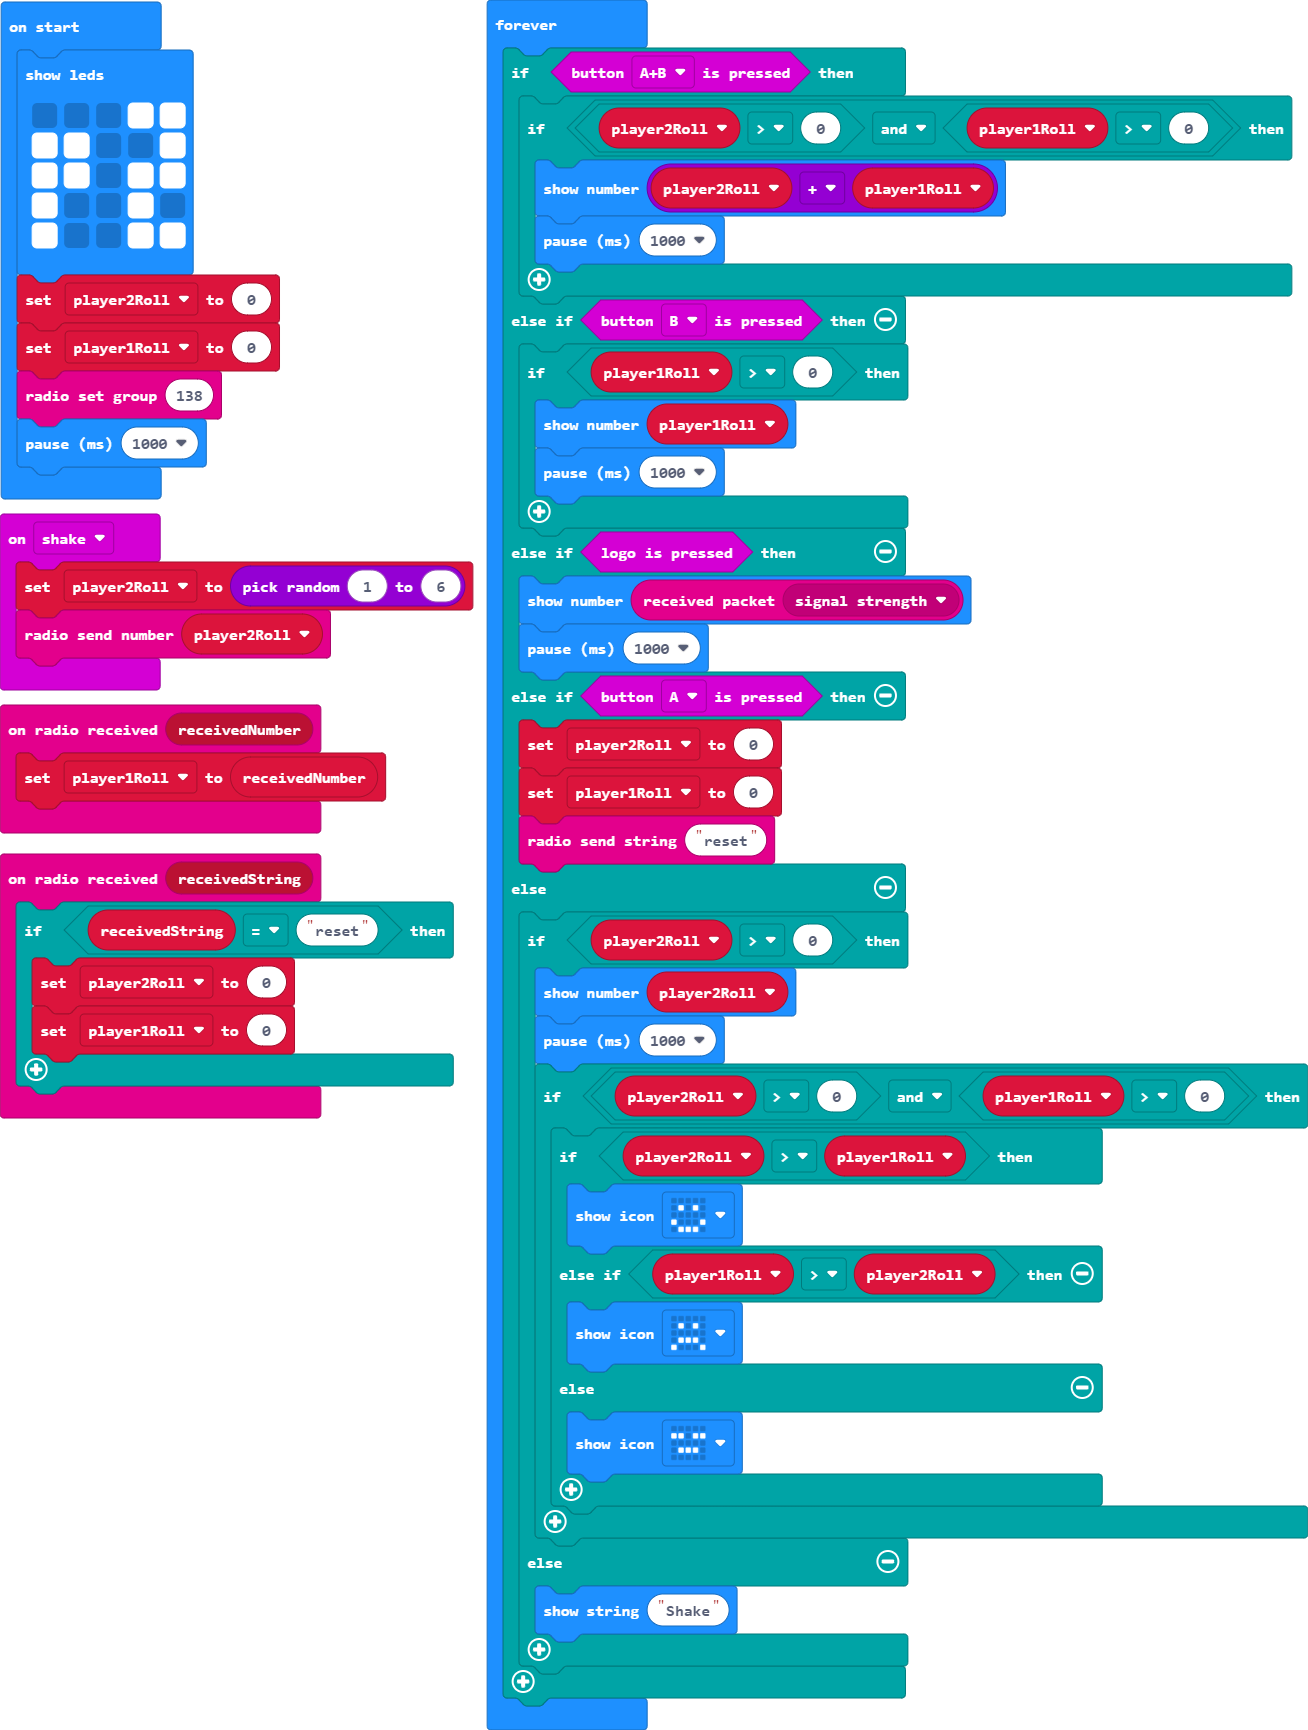
Pressing button A and B at the same time should give players the total of both players dice rolls.
Tip: You will need to have something to check both players have rolled.
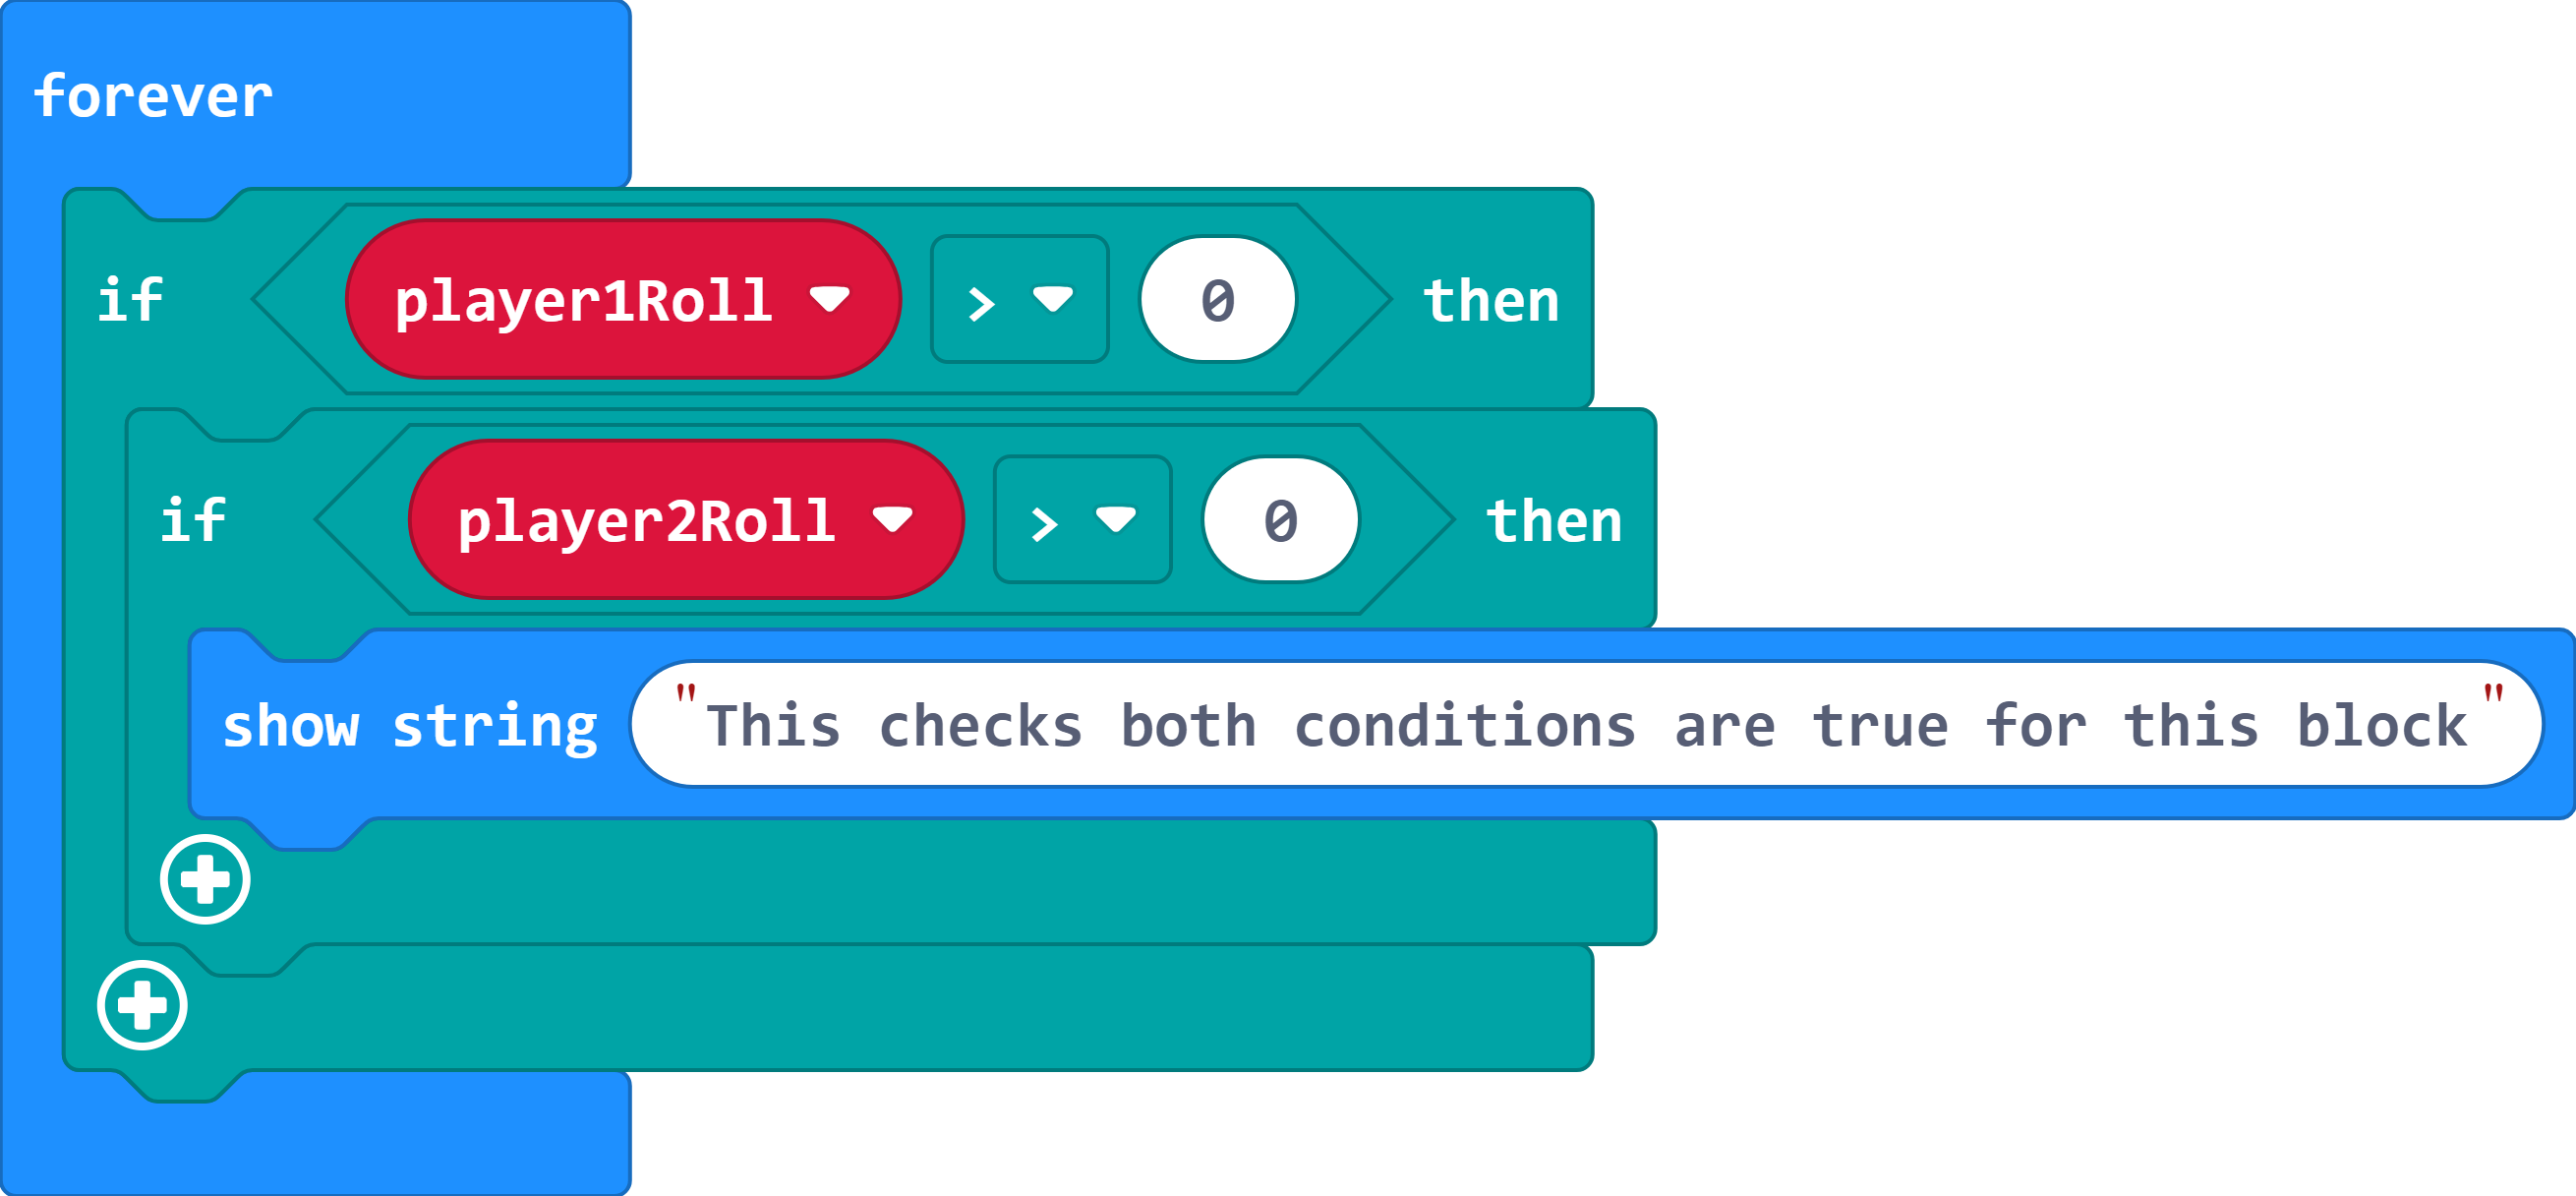
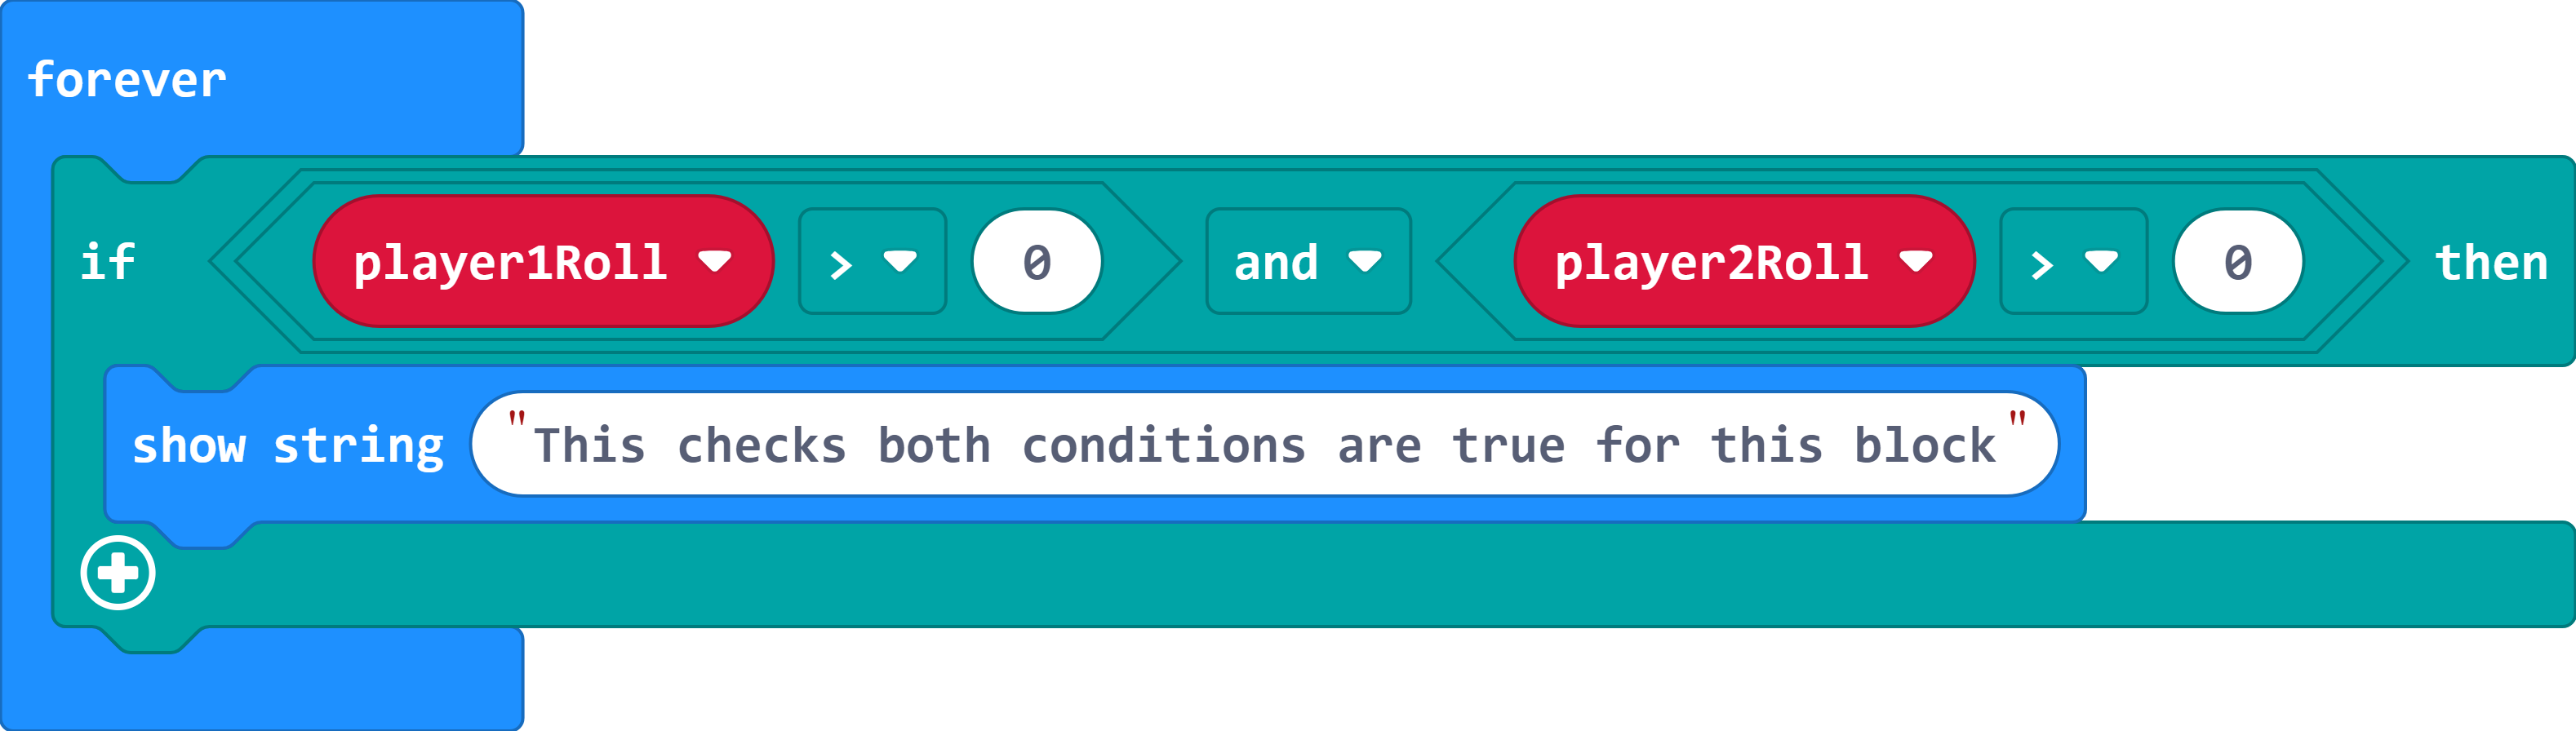
Important: To check against two conditions (in this case, that both players have rolled), you could stack the if statements or you could use an 'and' block.
Stacked Conditions
The 'and' Boolean Operator
Note: A Boolean value is true of false. A Boolean Operator compares two inputs to produce a single true or false output.
Tip: The if button A and B pressed statement needs to be put in the forever loop above the if statements for button A and button B.
Important: When using else if statements, the program goes down the list of conditions and stops at the first one that is true. It will then skip the rest. When using the if button A and B pressed, any conditions checking if either of those buttons is pressed becomes true. So, 'if button A is pressed' will be true, 'if button B is pressed' will be true and 'if button A+B is pressed' will be true. This highlights the importance of the ordering of conditions.
There are blocks that do the calculations for us in the Maths menu.
You may want to add an else statement to this to show that not all players have rolled yet.
Player One
Player Two
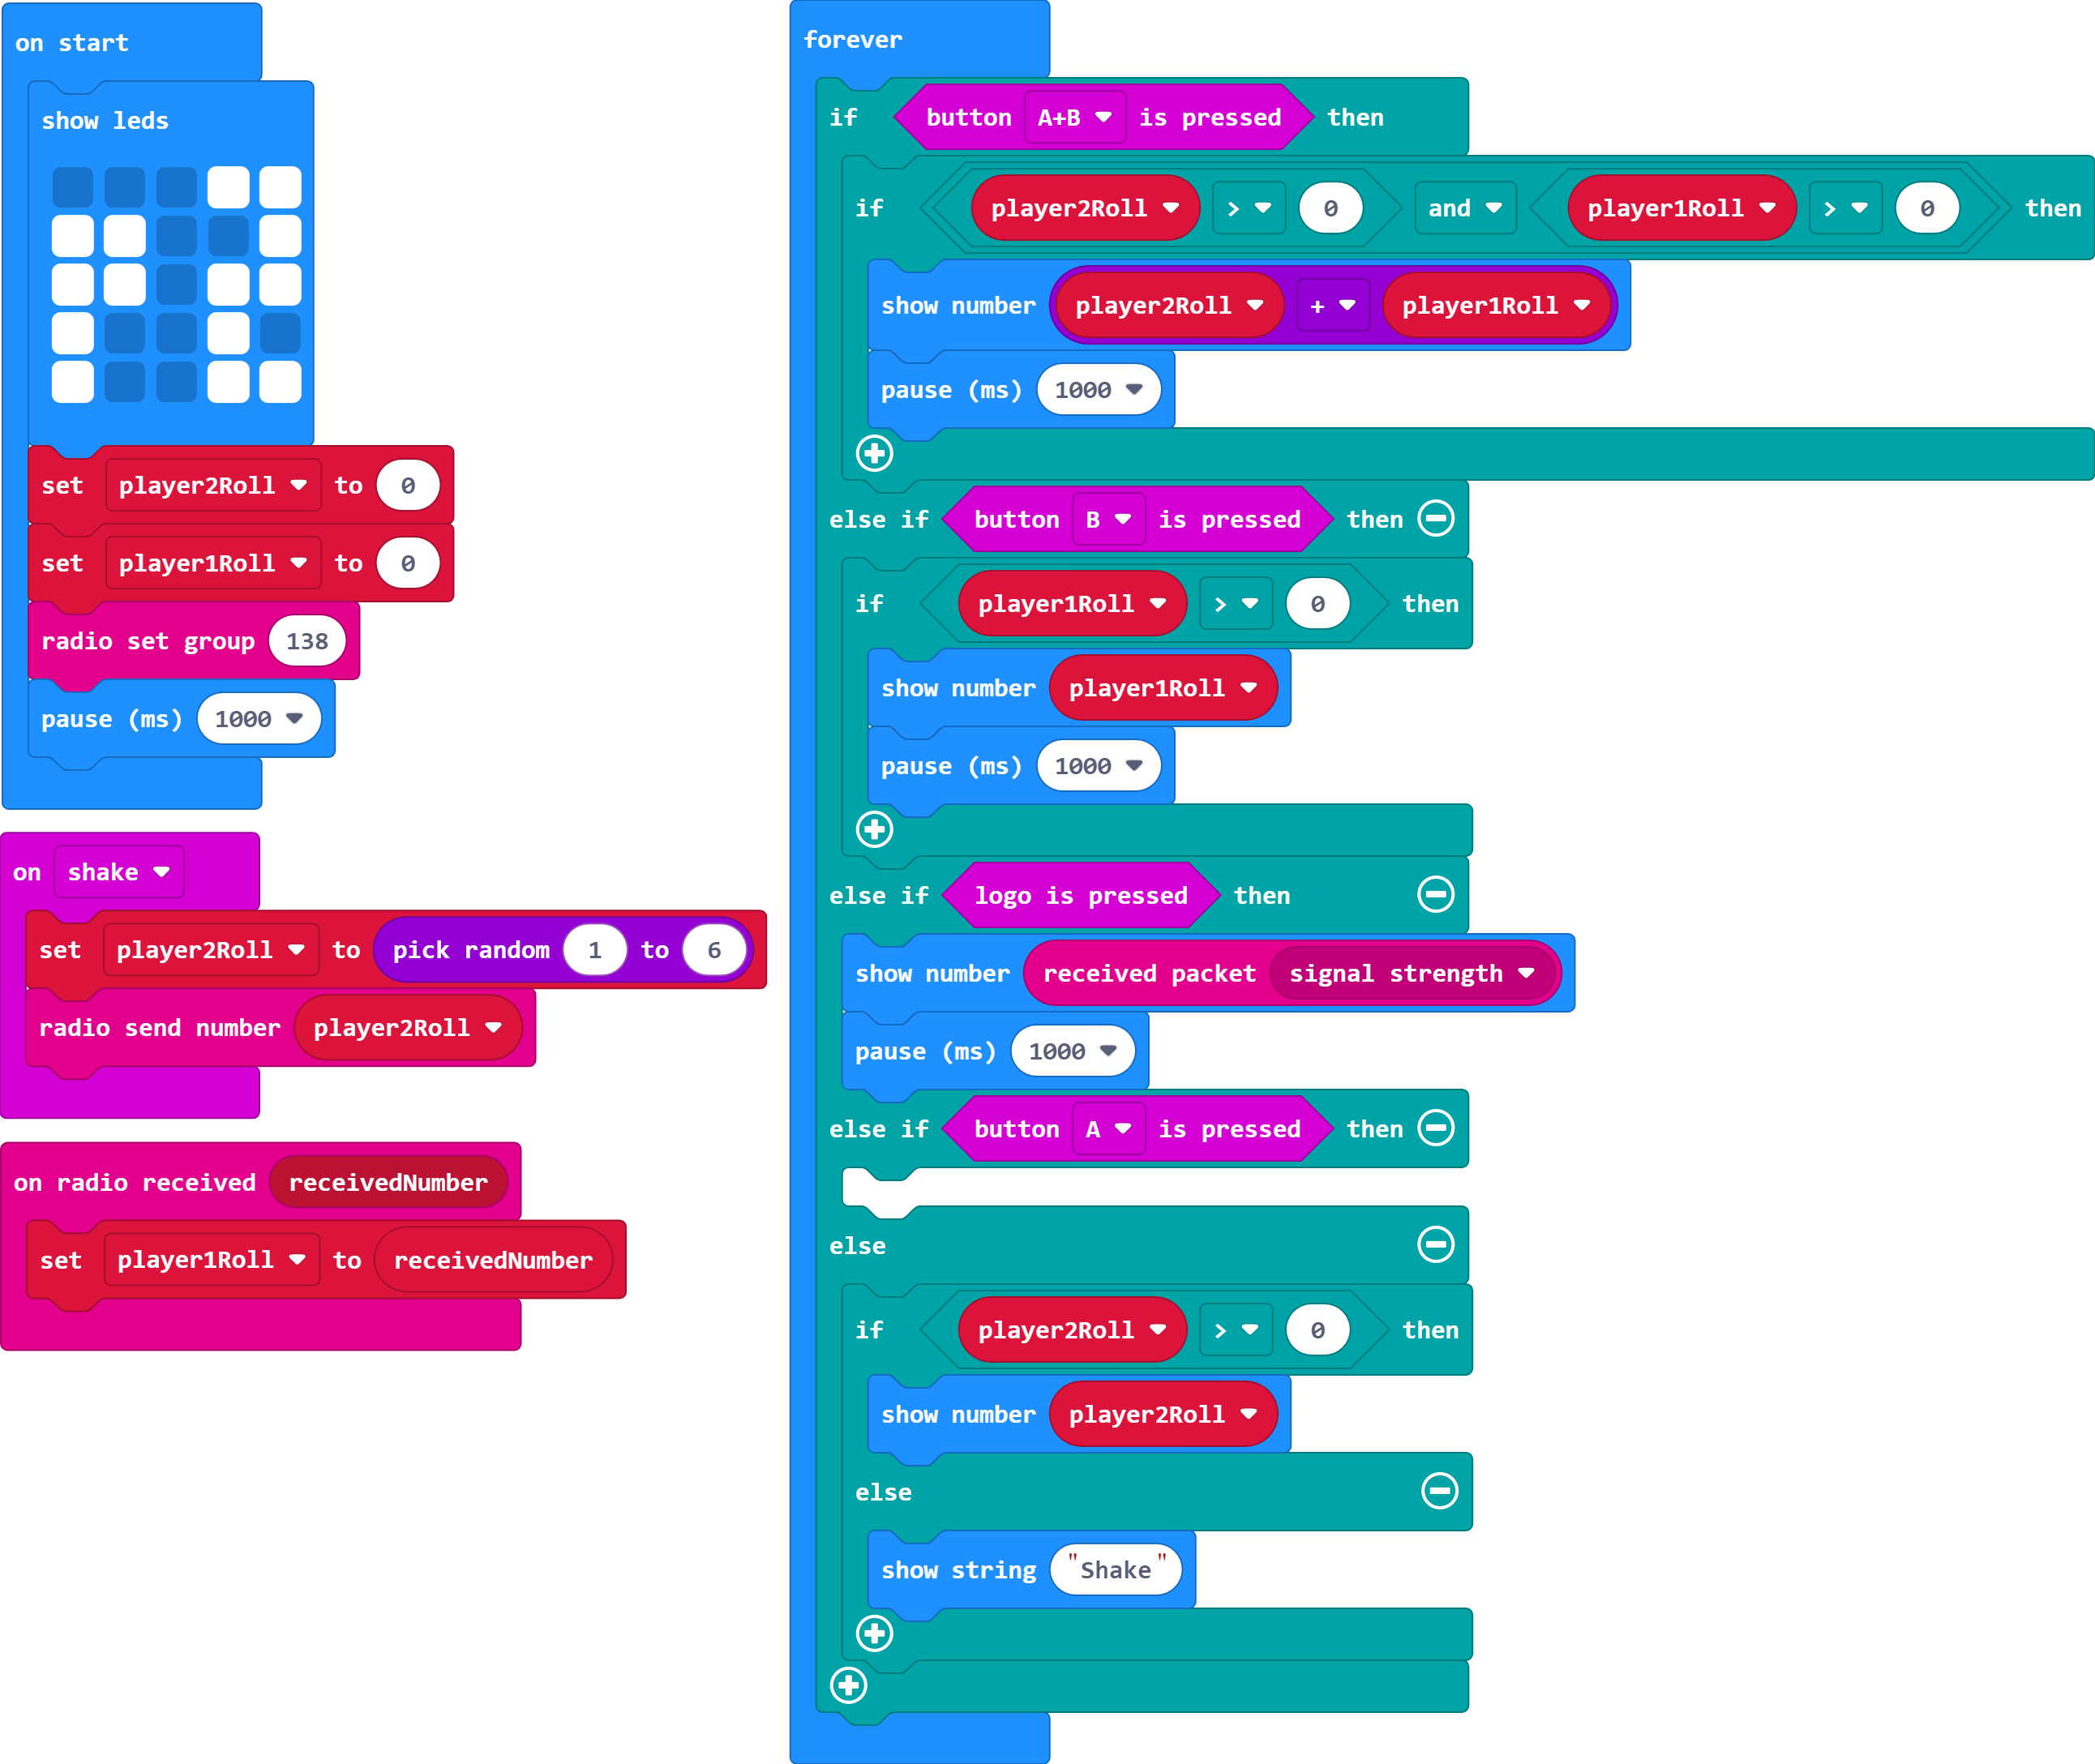
Move the program for button A so as the Micro:Bit will show the roll on the screen automatically, include an else statement for when the dice roll value is zero. This could be a waiting animation, image, or message/instruction.
Tip: Now you will need pauses to keep values other than the player's own roll on the screen longer.
You can move the show player's own roll program into the else statement for this.
Use 1 second (1000ms) pauses where needed.
You may need to hold down buttons for slightly longer when testing. Especially if you are using a string to show a message as it will not listen for buttons until the message has finished scrolling.
Leave the 'else if button A is pressed then' statement empty for now.
Player One
Player Two
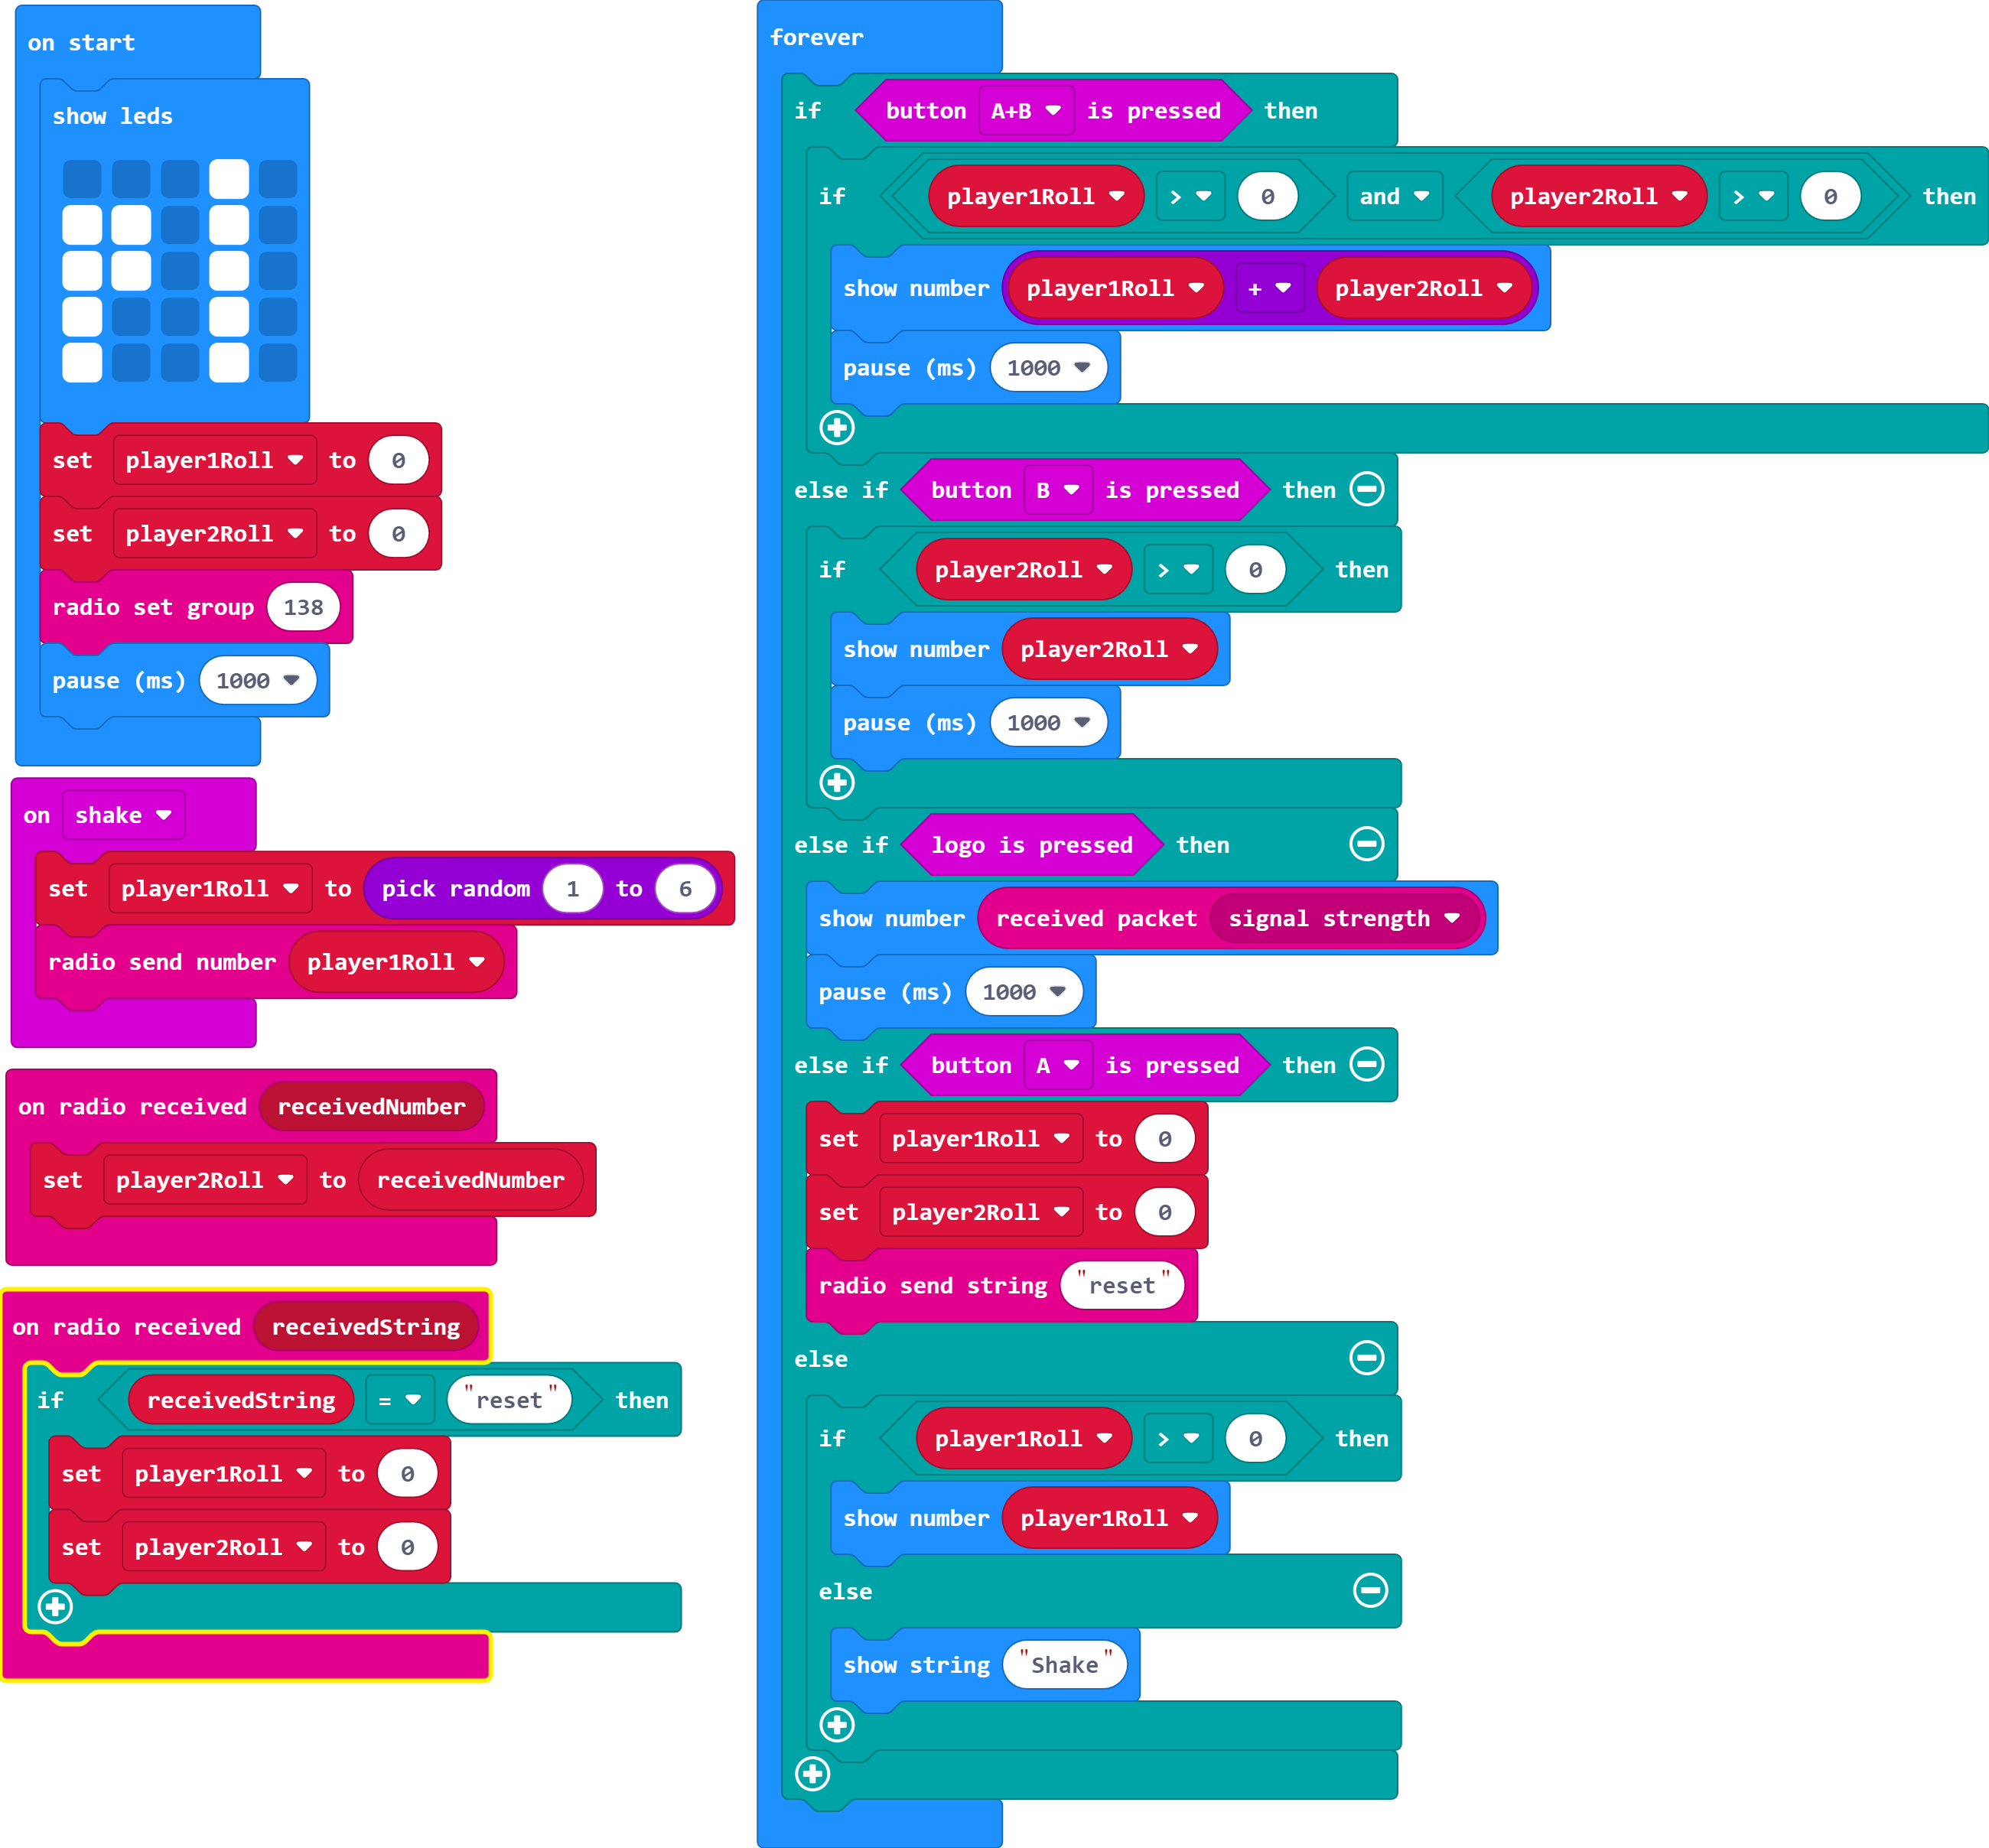
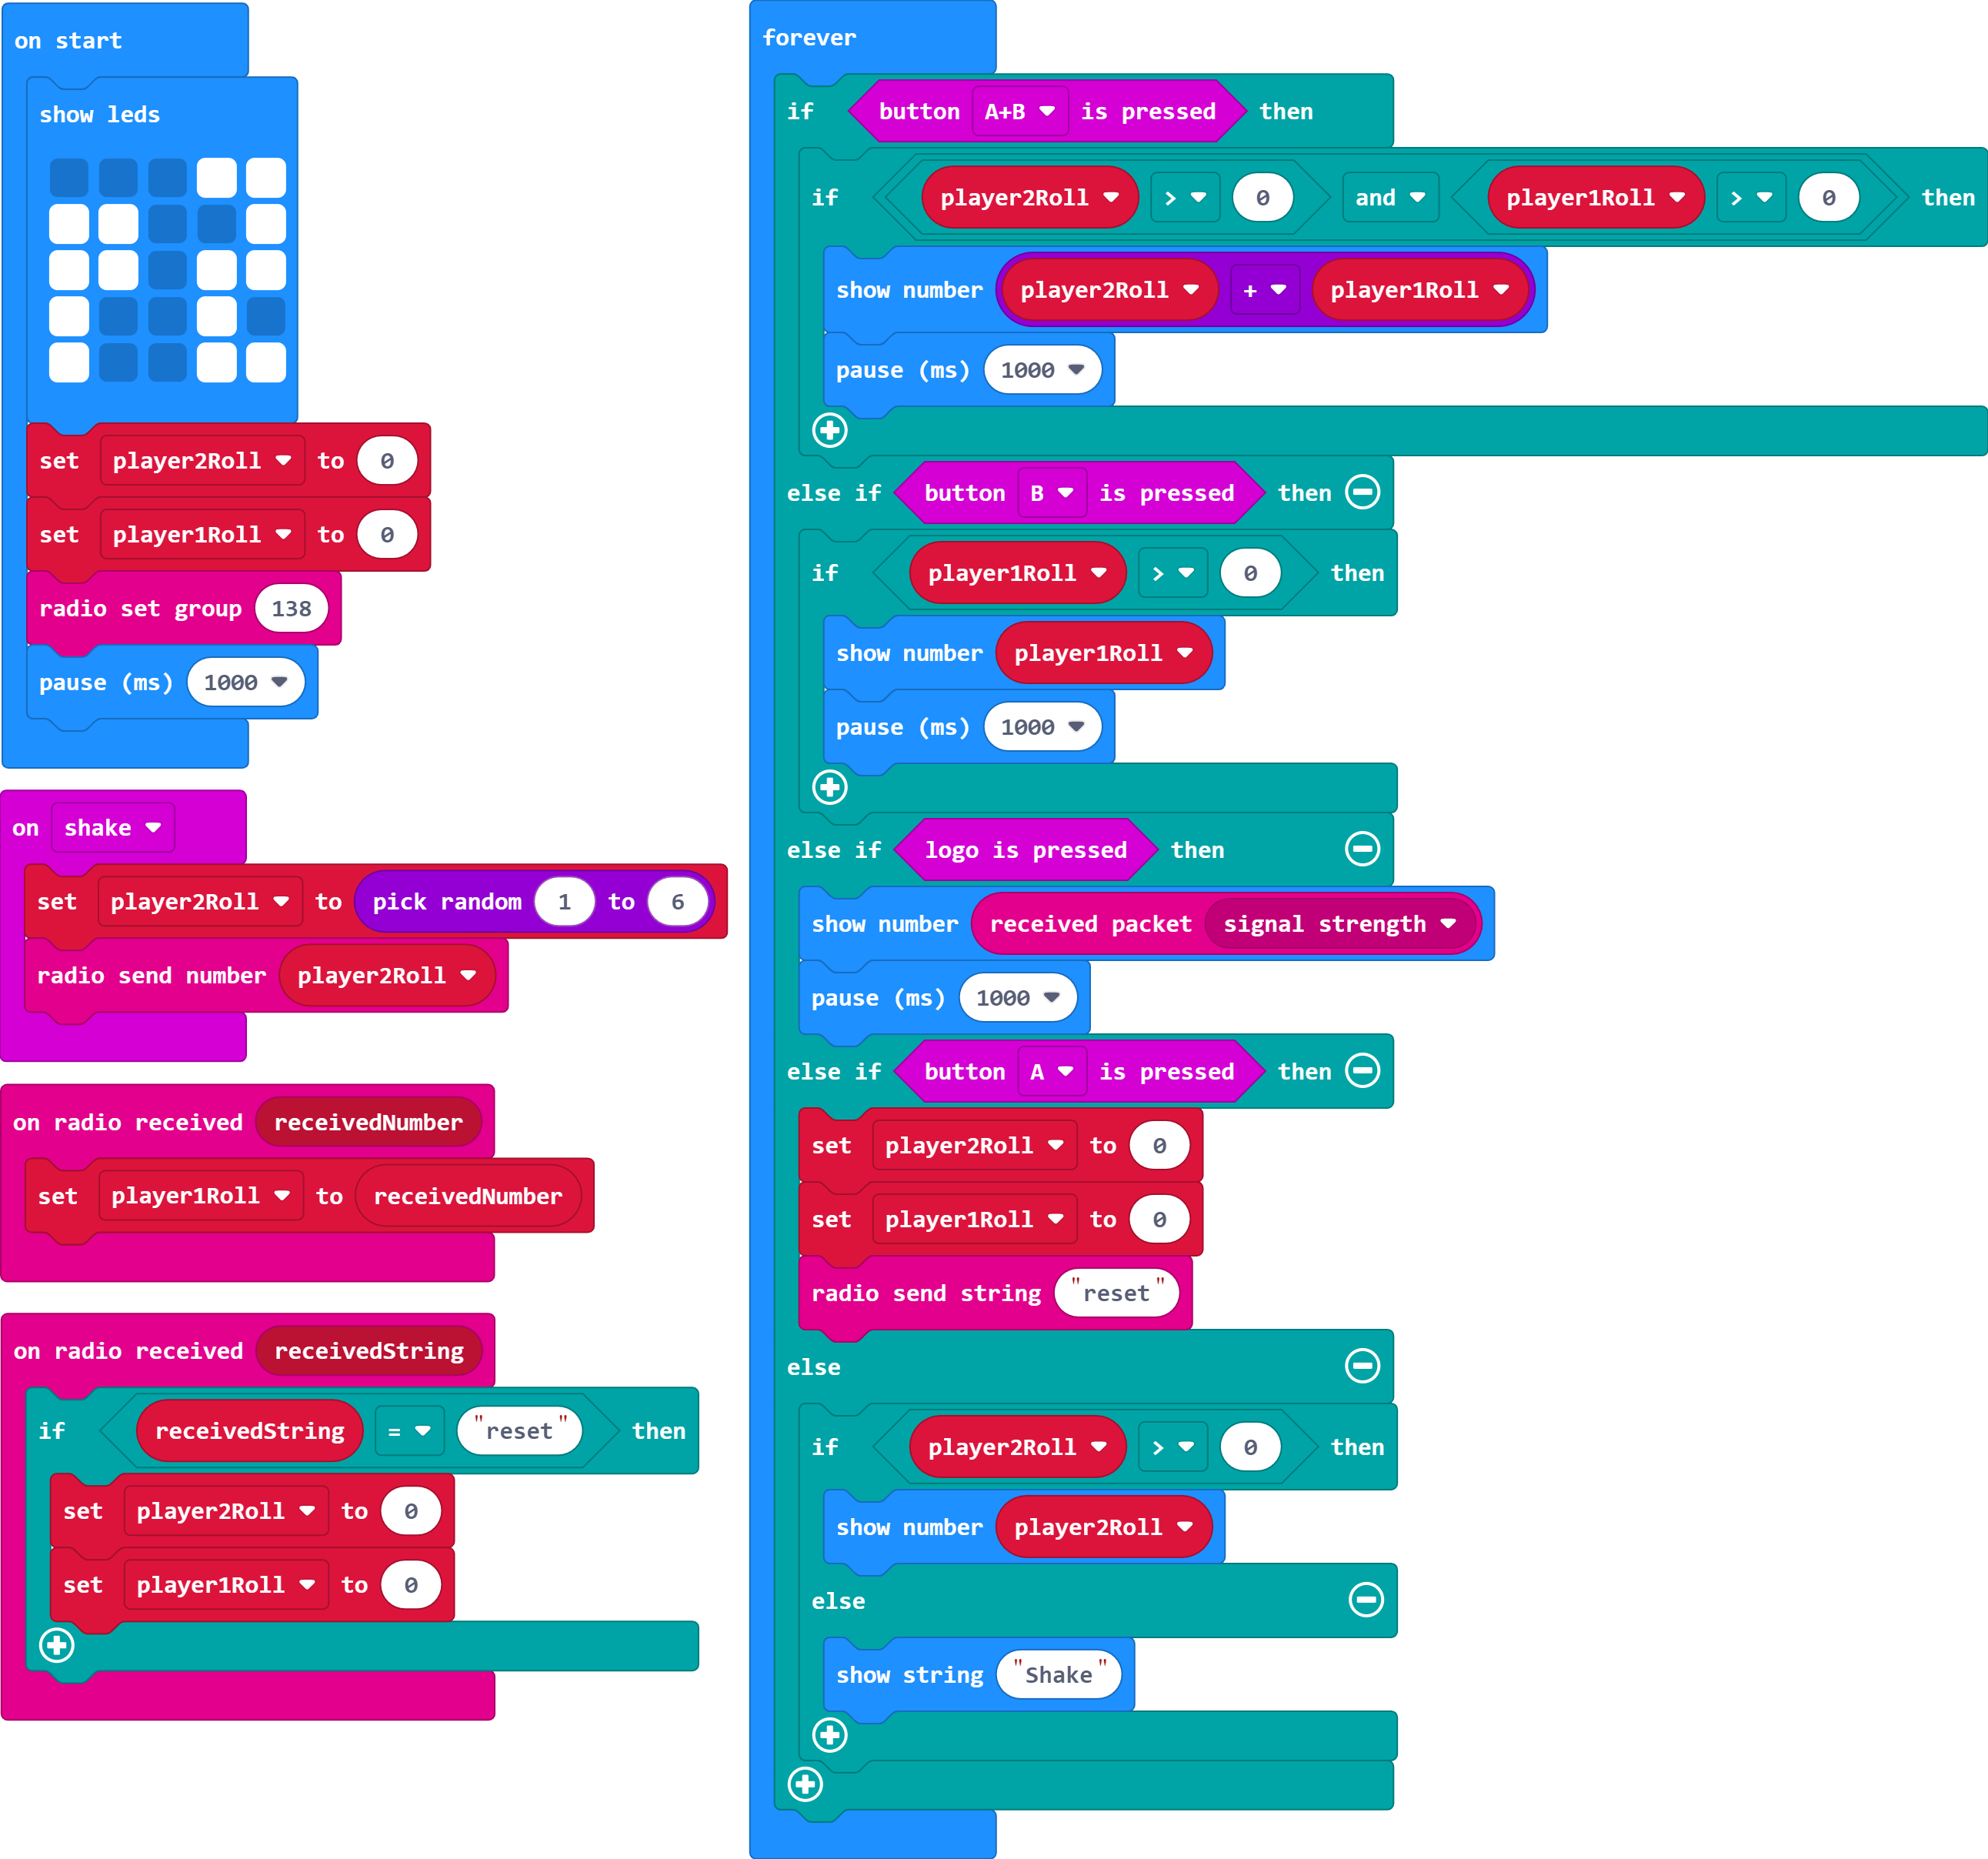
Now use Button A to reset the game.
Tip: You will need to also send the reset command to the other player's Micro:Bit.
You can send a string, such as a word, over the radio group.
If using a string for this, you need to use the string comparison block - this is the one with quotation marks inside the value boxes.
Alternatively, you could send a different number which triggers the reset.
Check you are using the correct receiving blocks for the type of information you are sending.
Player One
Player Two
Let us now have the players duelling. Whichever player rolls the highest number wins. Have the Micro:Bits show whether their player won or lost.
Tip: You can use the 'and' Boolean operator here to make sure both players have rolled before checking to see who won.
You need to work out where to put this in your program.
Compare the two players dice rolls to work out which is higher.
What happens when the players both roll the same number?
You can use images, strings, and/or animations for these.
Add pauses where you think they are needed.
Player One
Player Two
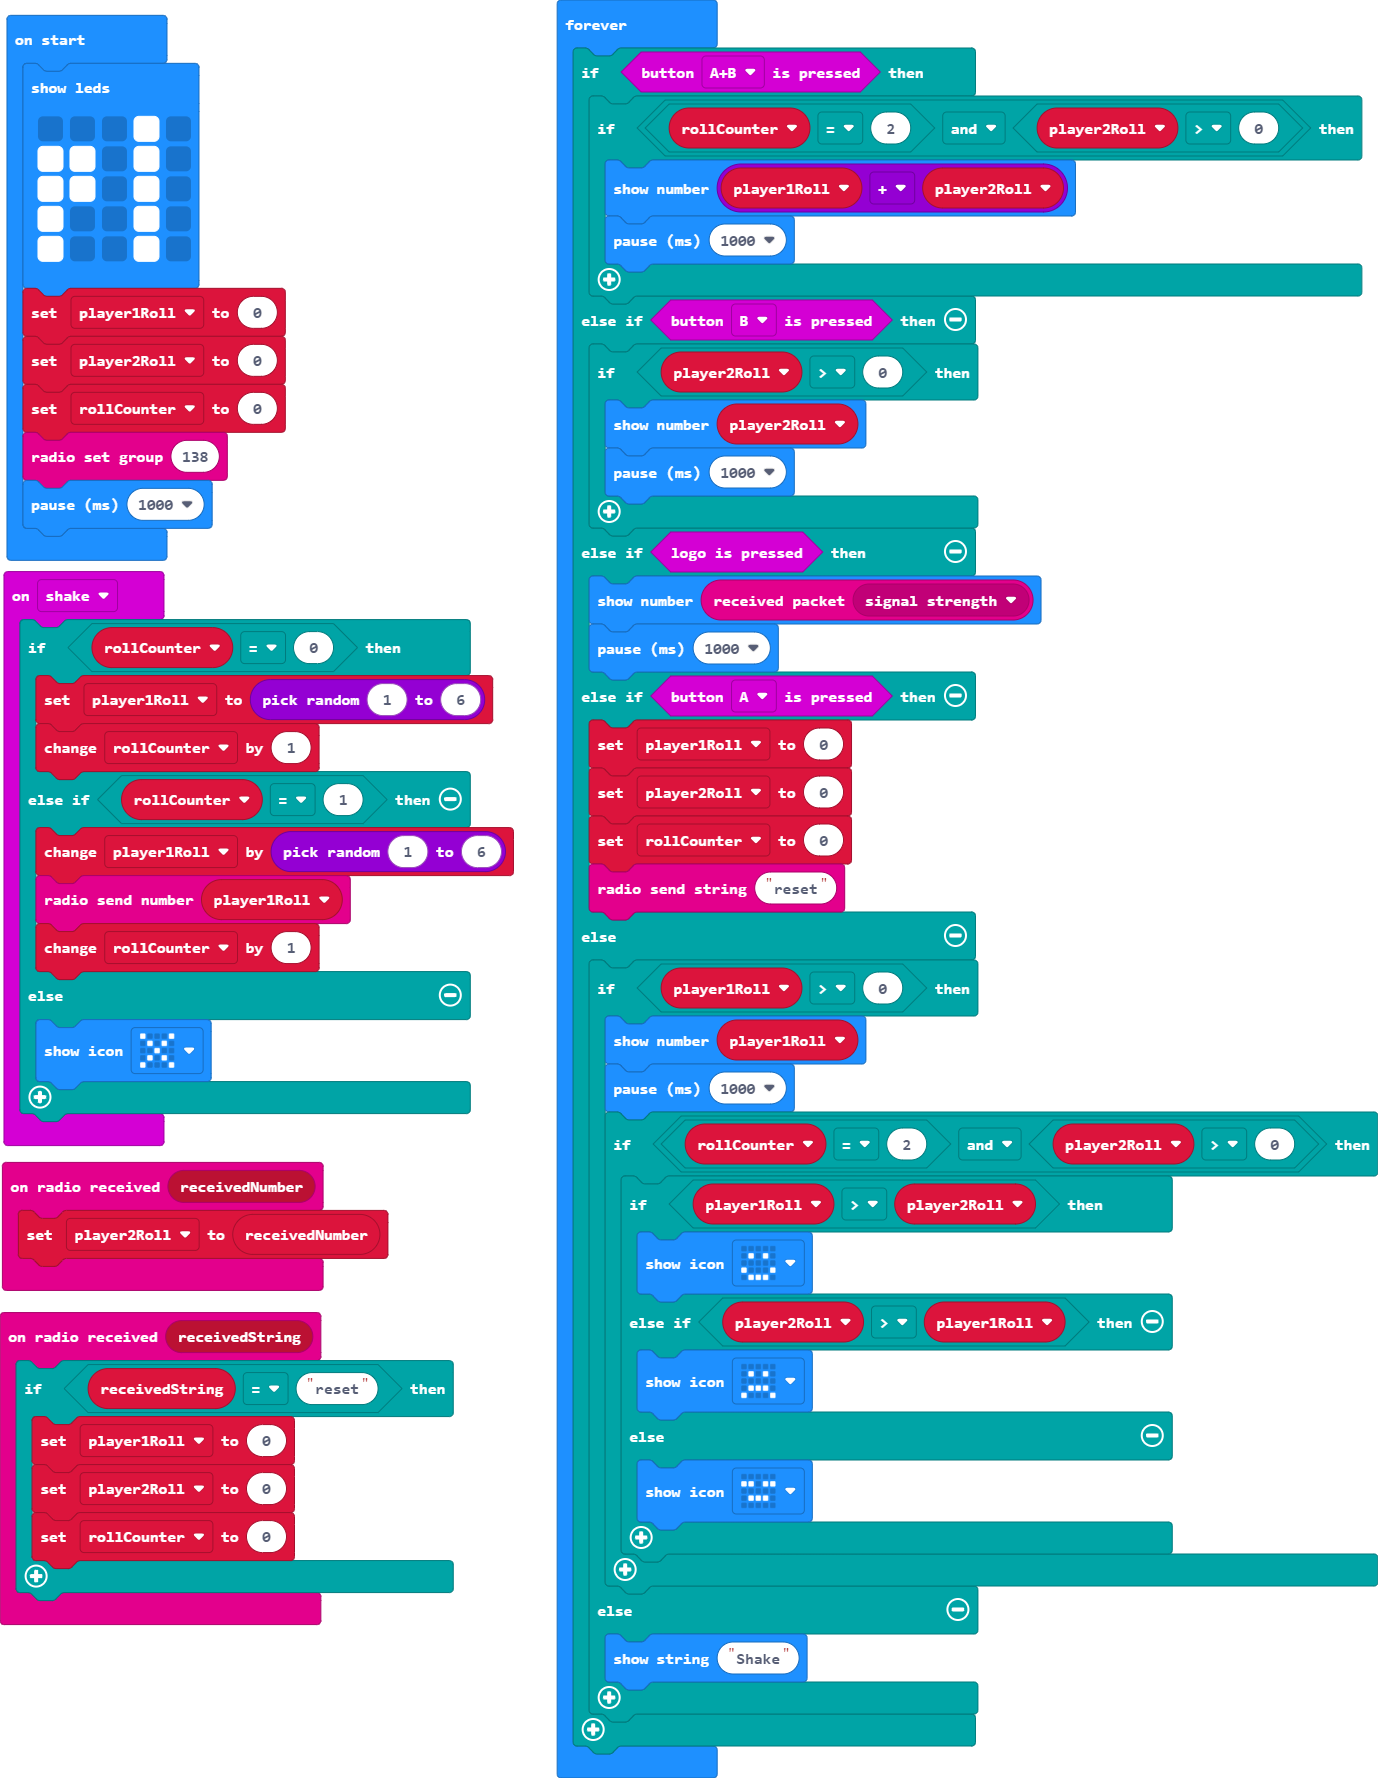
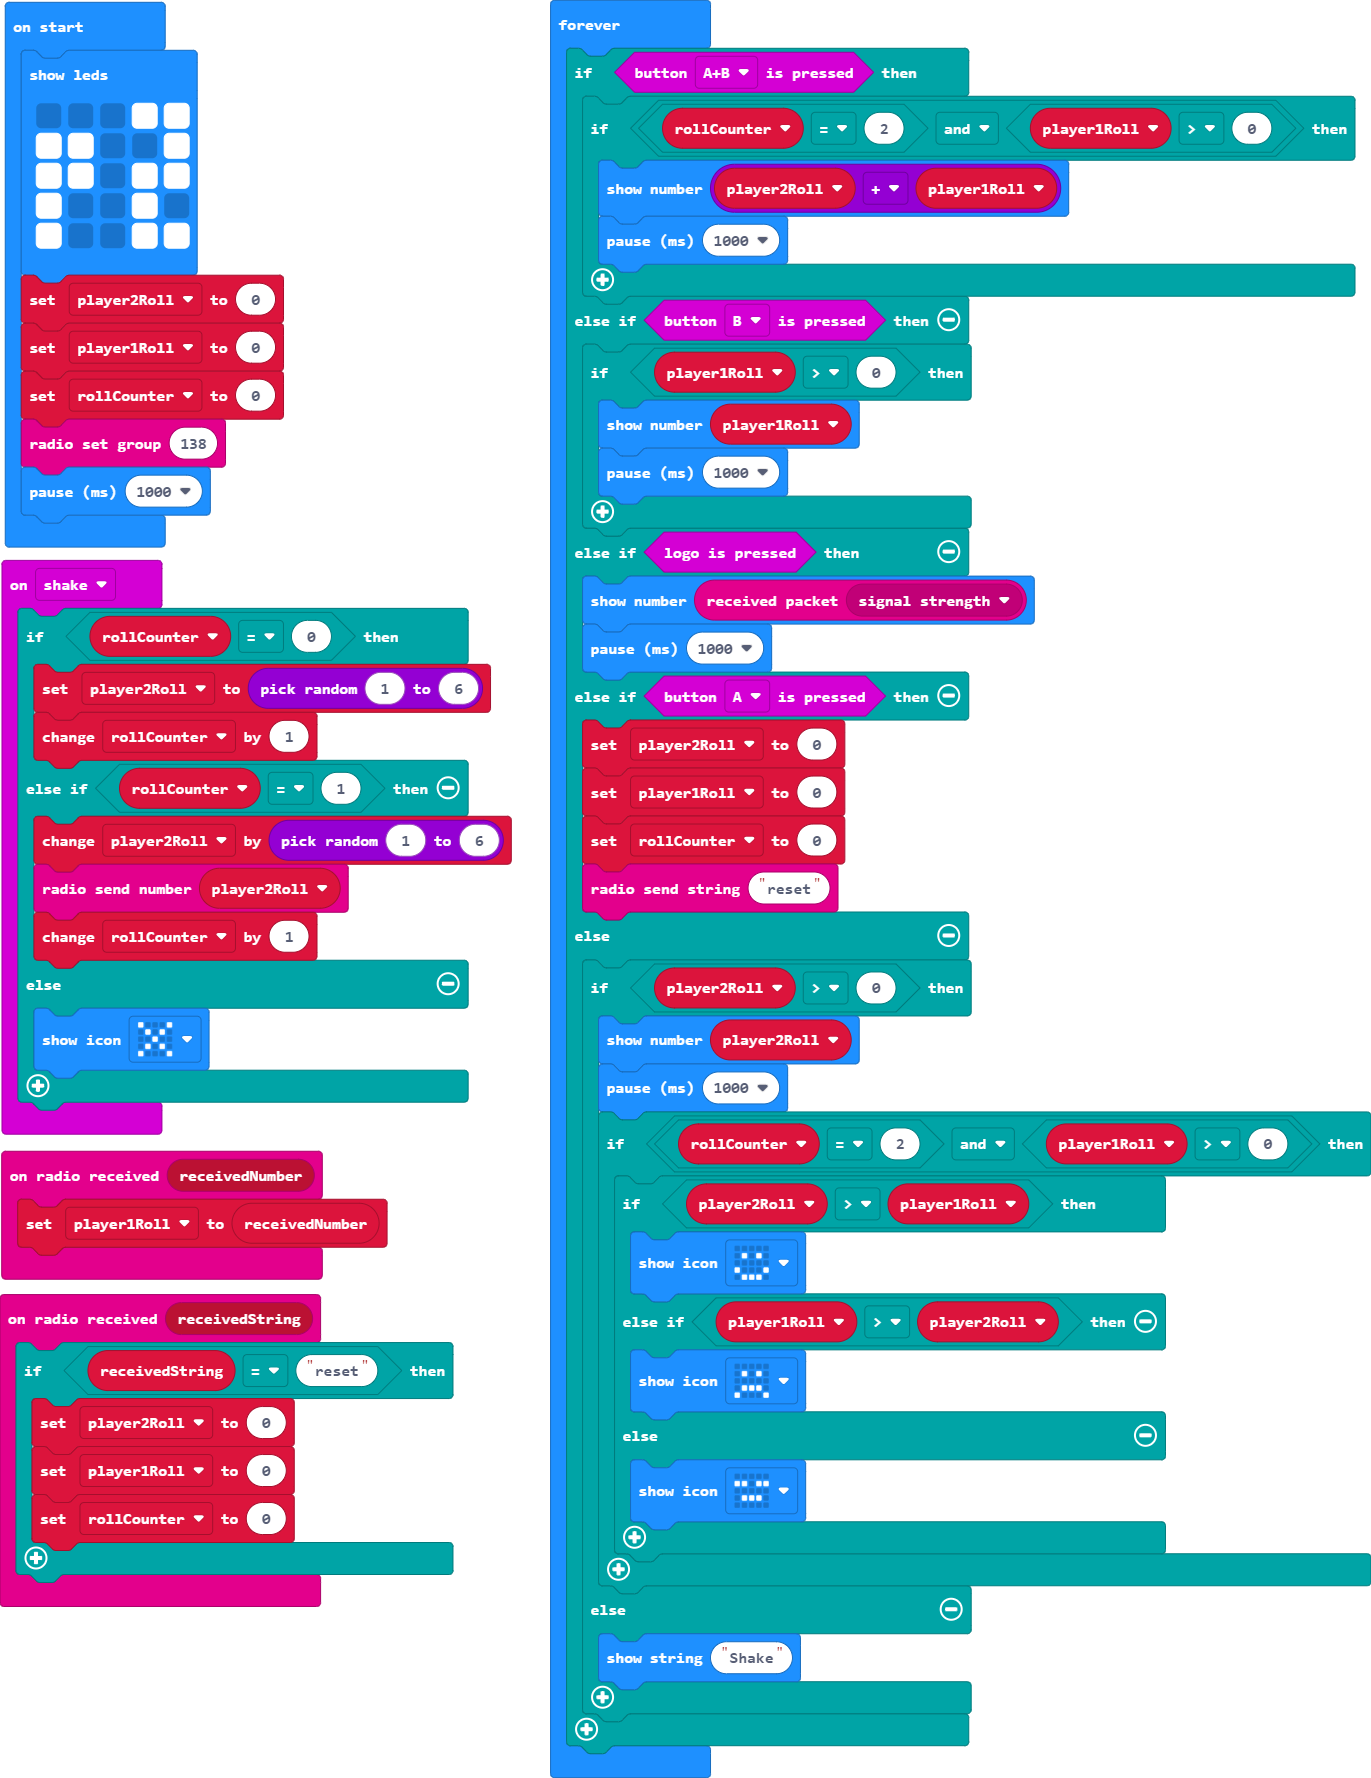
Upgrade the program so both players must roll twice before comparing their totals to determine the winner. Players should not be able to roll more than twice reset.
Tip: You will need a new variable for the number of dice rolls.
Your new counter variable will need to be used in place of all conditions that currently check if the player's own roll value is over 0.
Have a message or image come up if a player tries to roll more than twice - this makes it easier to test.
The use and changing of the counter variable can be done in the 'on shake' loop.
You will need to set this new variable to zero both on start and during the reset process.
Changing the random number to be between 1 and 12 or multiplying the initial roll by two will not match the same probabilities as using two separate dice rolls - therefore, you will need to use a roll counting variable. For more information regarding probabilities of dice rolls, you can check out our Dice Duelling activity.
Player One
Player Two
Here are some extra features you can add to your dice duelling game. These are for you to investigate and explore - there are no answers provided.
Adding instructions to player screens.
Tip: Try to keep instructions short or in picture form.
Have a score system that tracks how many times each player has won or lost.
Tip: You can replace the programs for a button or use the touch sensor.
Let the players know if they are shaking the Micro:Bit too hard.
Tip: This requires measuring the acceleration of the Micro:Bit, anything over a strength value of 1700mg is too much.
Add animations to the dice rolls.
Can you design a version of this game for two players using only one BBC Micro:Bit?
Tip: This will not need any radio communications.
Video Lesson:
Exercises:
For this session we shall be creating a traffic light program using a Neopixel strip.
As with all our exercises, they are designed for learners to complete a level before moving to the next. Otherwise you may miss information or skip a crucial step that stops your program from working.
Click on each challenge heading to expand.
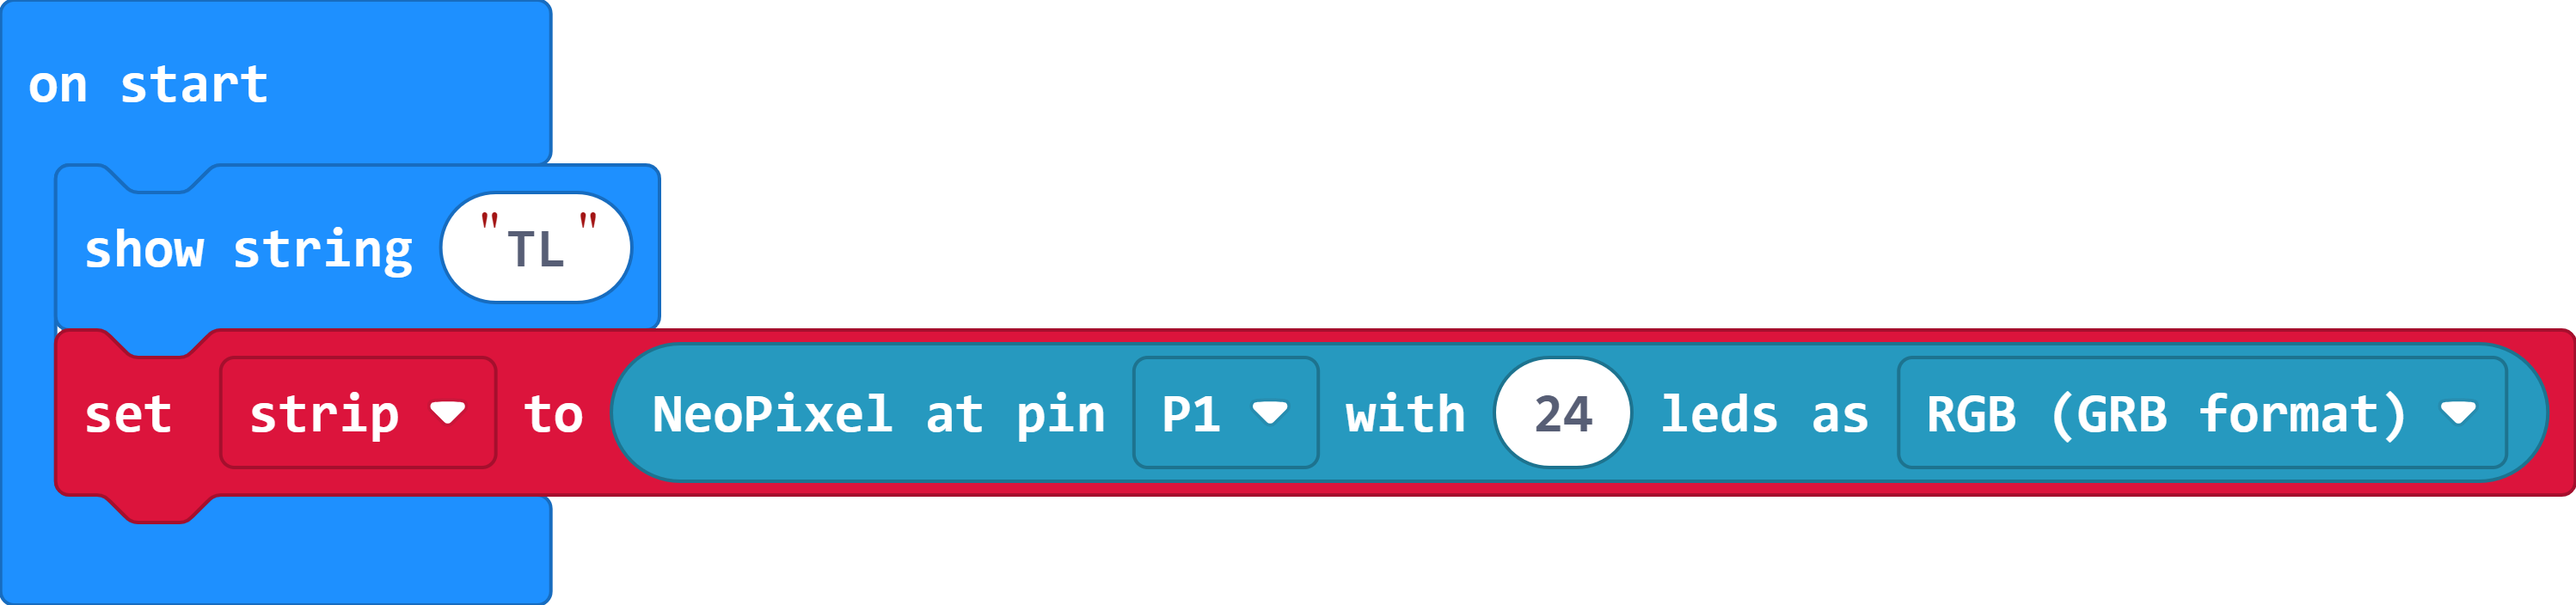
Use the blocks provided by the Neopixel extension to connect a 24 LED strip to pin 1.
Tip: Don't forget to create your own start-up for this new program to identify it.
This is part of the set-up for your program, so should be done in the 'on start' block.
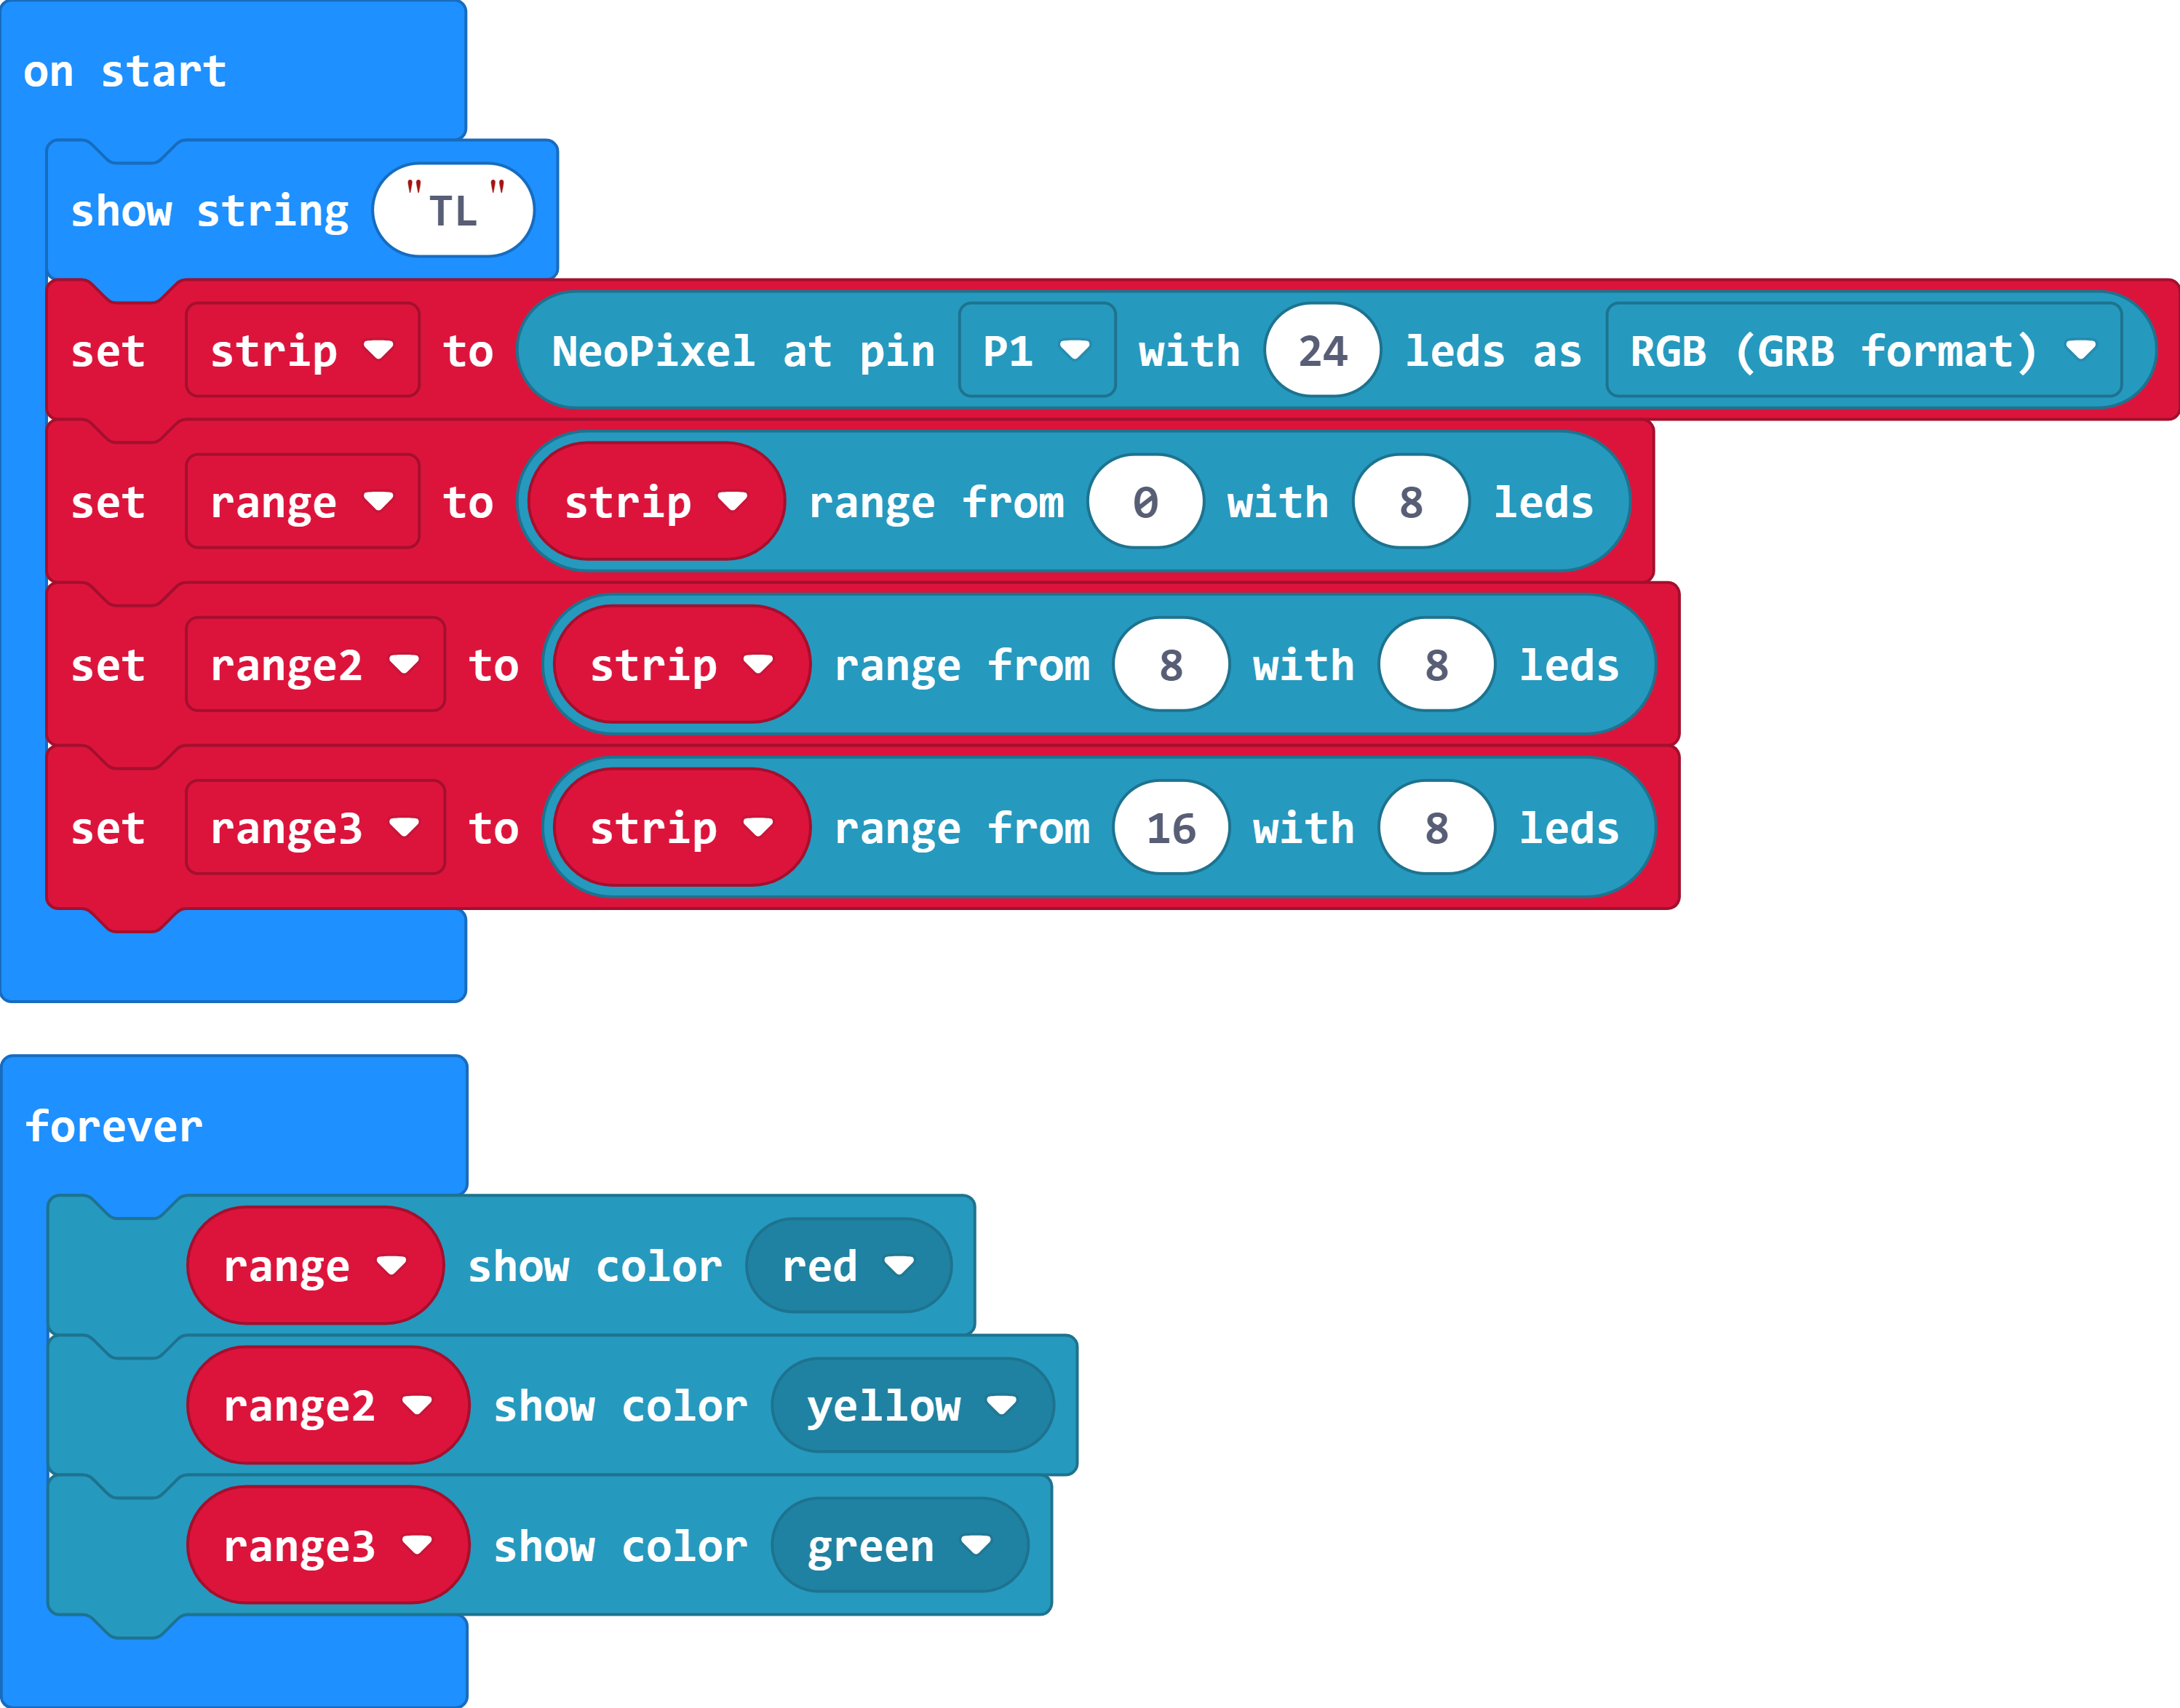
Set up 3 equal size ranges to recreate a traffic light with red at the top, yellow in the middle, and green at the bottom.
Tip: The LED strip numbering starts at 0.
24 is dividable by 3, meaning you'll need to have the ranges cover 8 LEDs each.
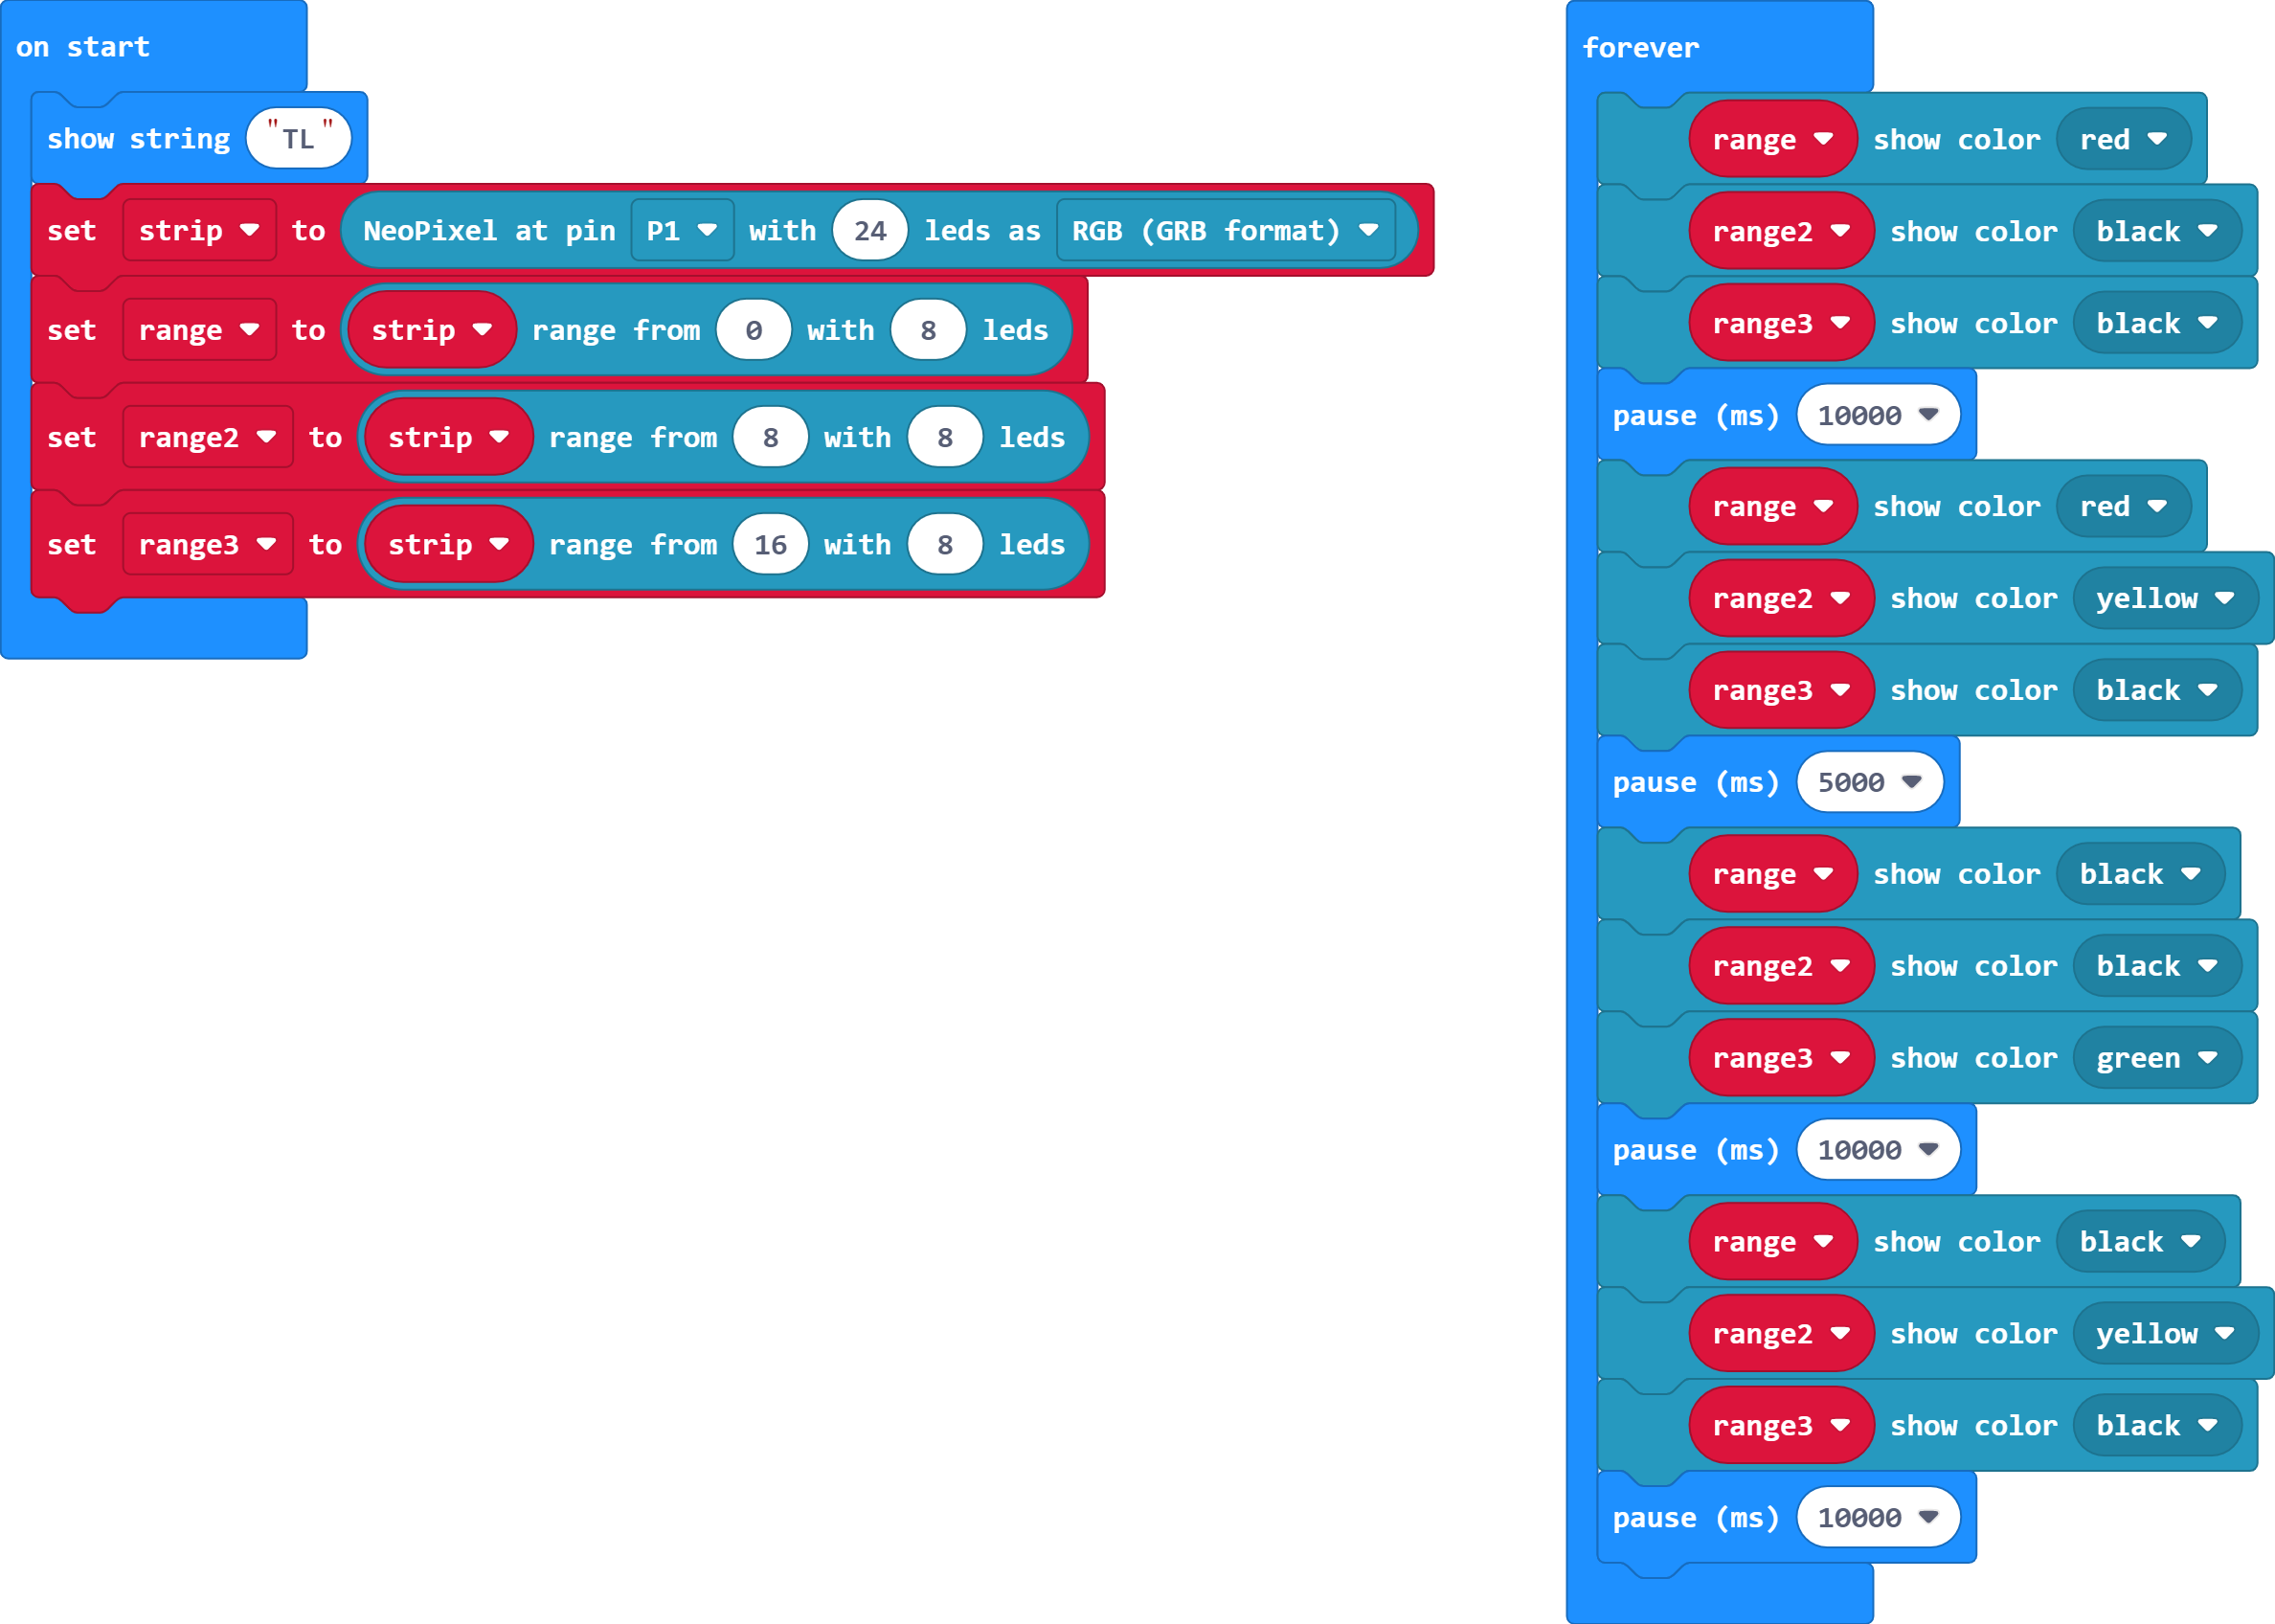
Have the traffic light repeatedly cycle through a crossing sequence - that is red for 10 seconds, red and yellow for 5 seconds, green for 10 seconds, and then yellow for 5 seconds.
Putting this sequence in the 'forever' loop will ensure it repeats continuously.
Remember to turn off the un-needed colours each time (set them to black).
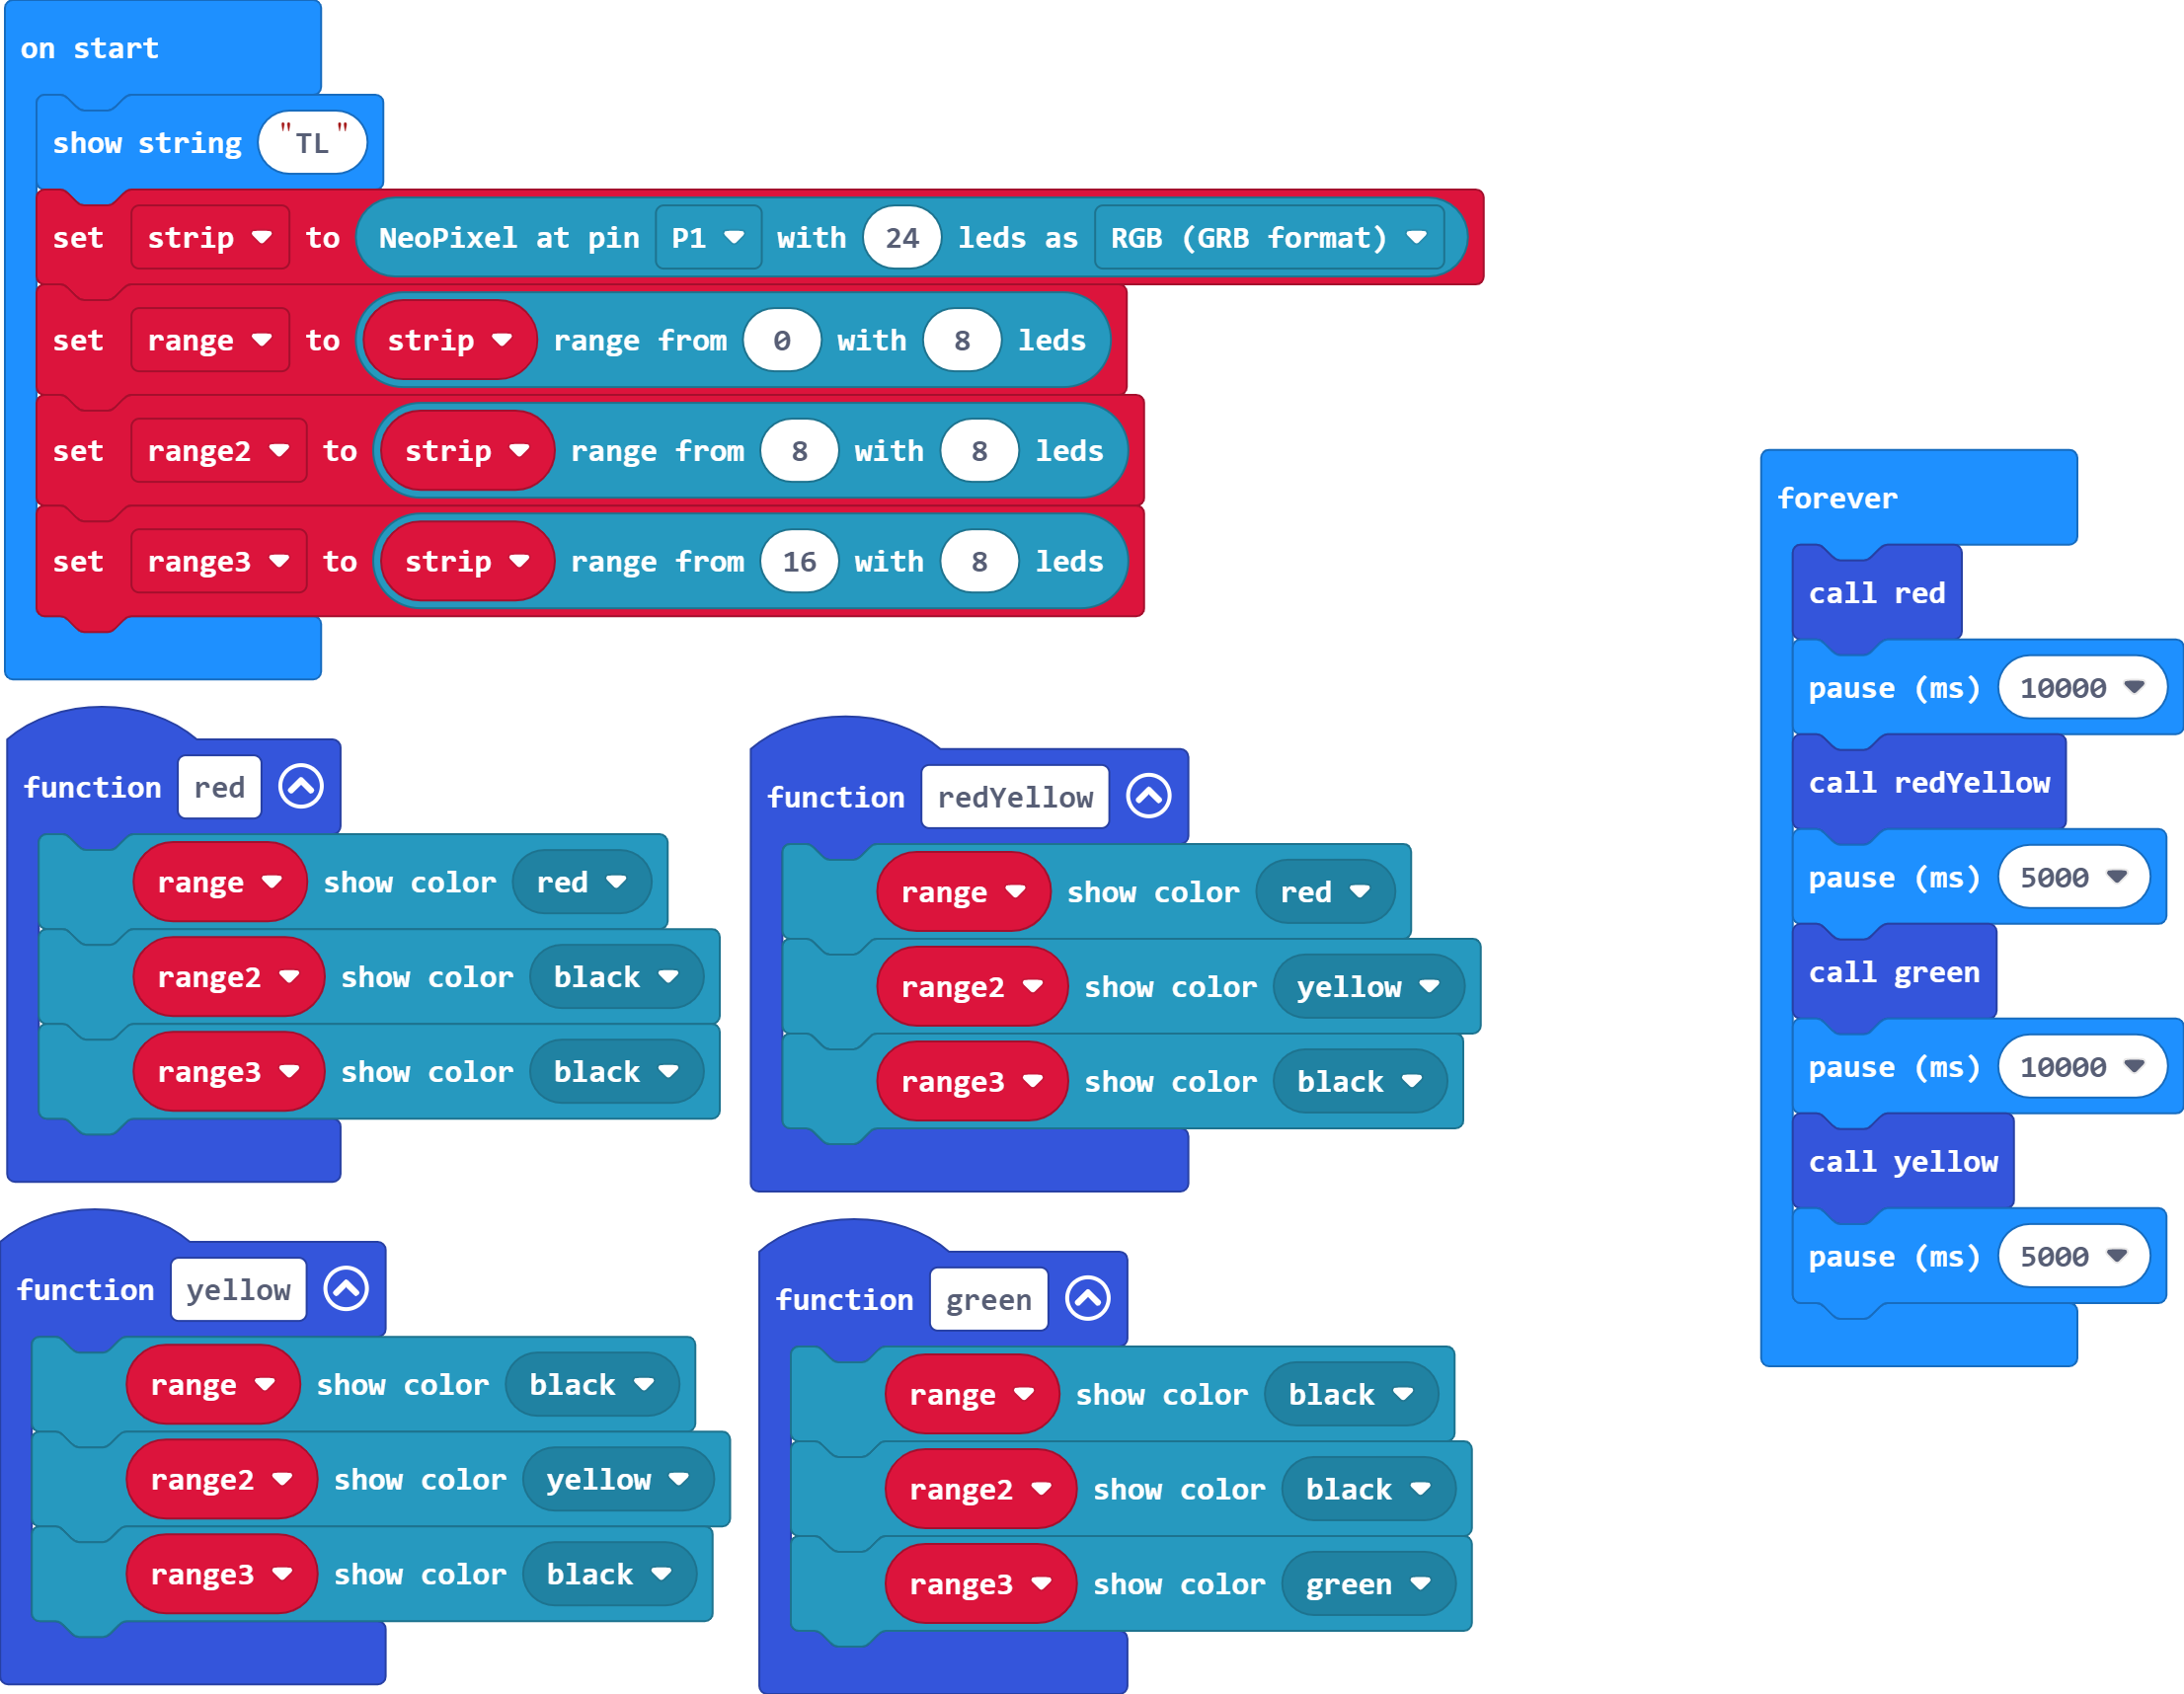
Move each light change into their own functions, remember to then call them in the forever loop.
Give each function a suitable name.
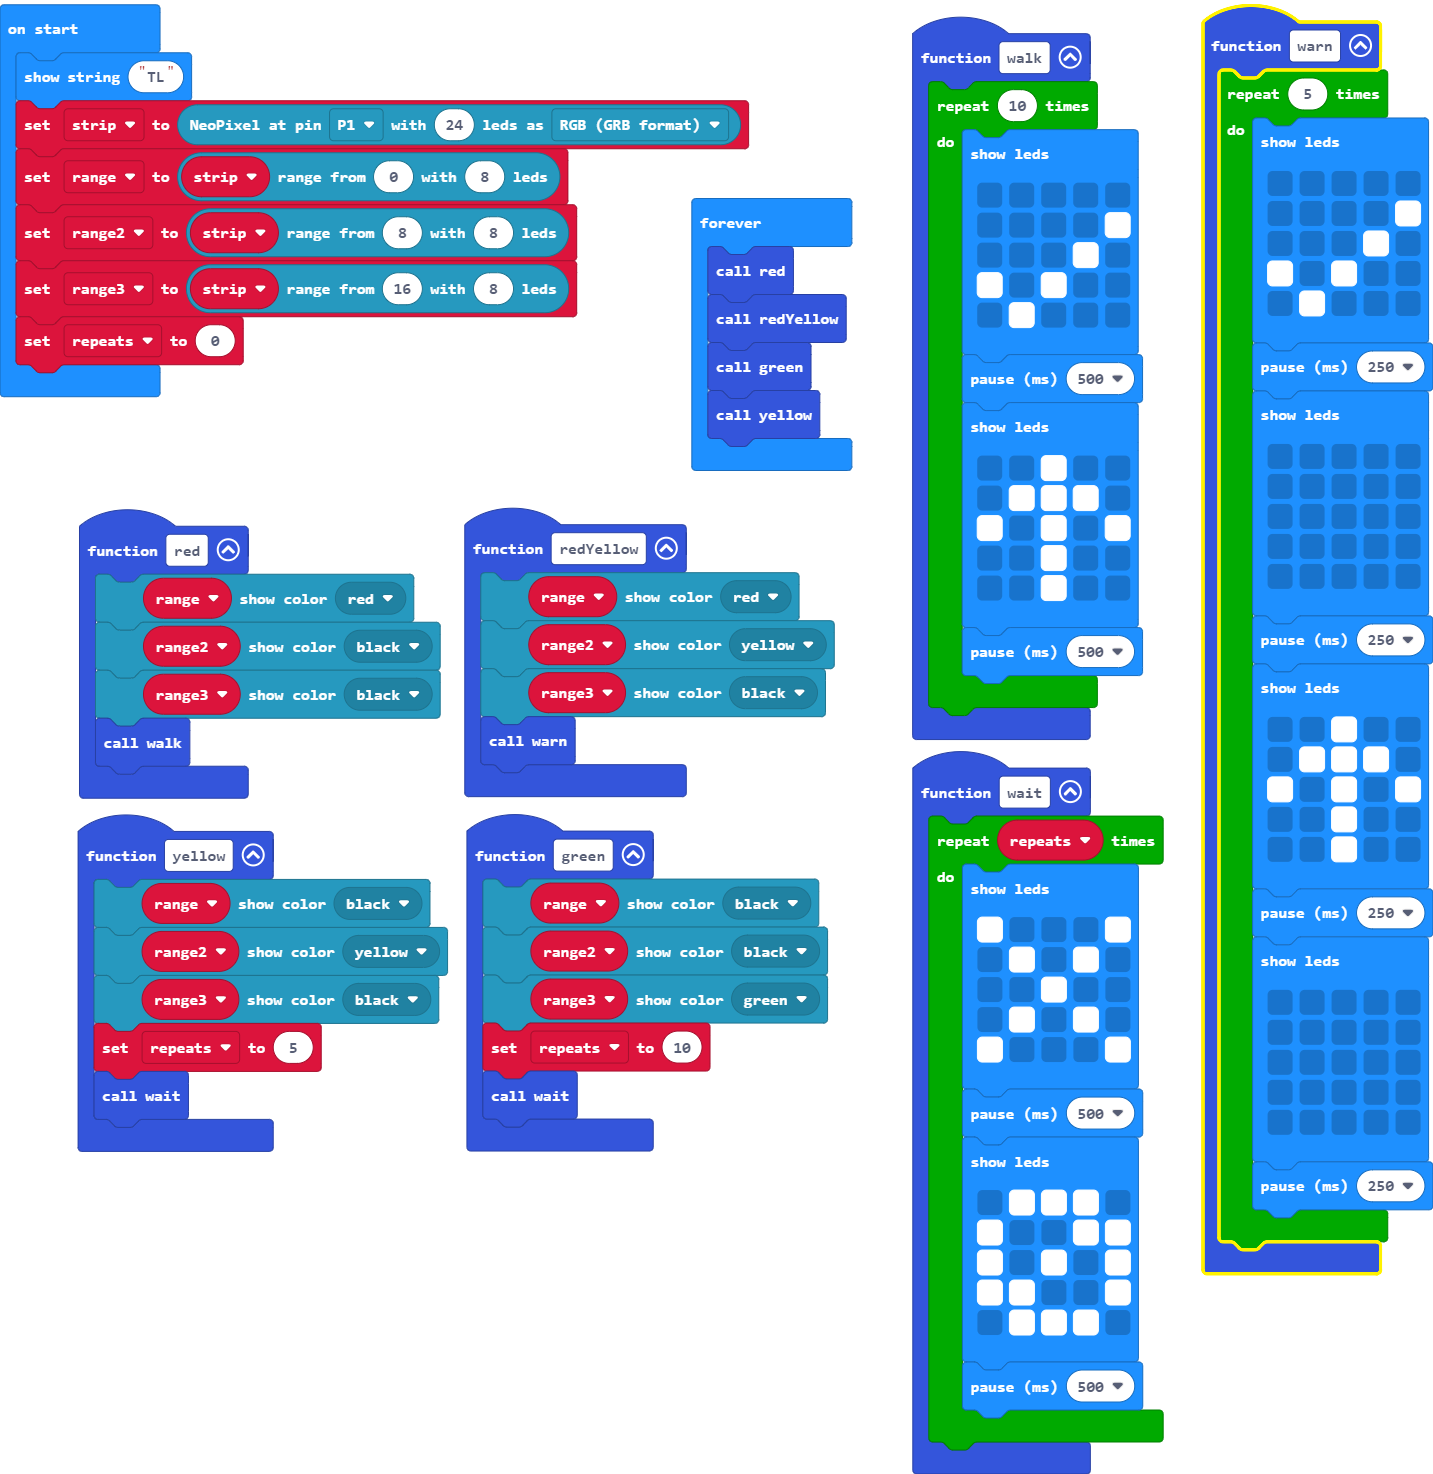
Add animations to the Micro:Bit to show when it is and isn't safe for pedestrians to cross the road. Do this using three new functions - one for walk, one for wait, and one for warning that the lights are changing to green for the traffic.
Tip: You will need to time your animation to replace the use of pause blocks currently for timing the lights.
Tip: A variable will mean you only need one function for wait that can be used for when the light is green and when it's yellow.
This is a good opportunity to practice working with the 'repeat' blocks inside the functions.
You can call a function from inside another function.
If using two images for your animations, you'll need to repeat them 10 times with half seconds pauses after each for the red and green. Only 5 repeats when the yellow light is active.
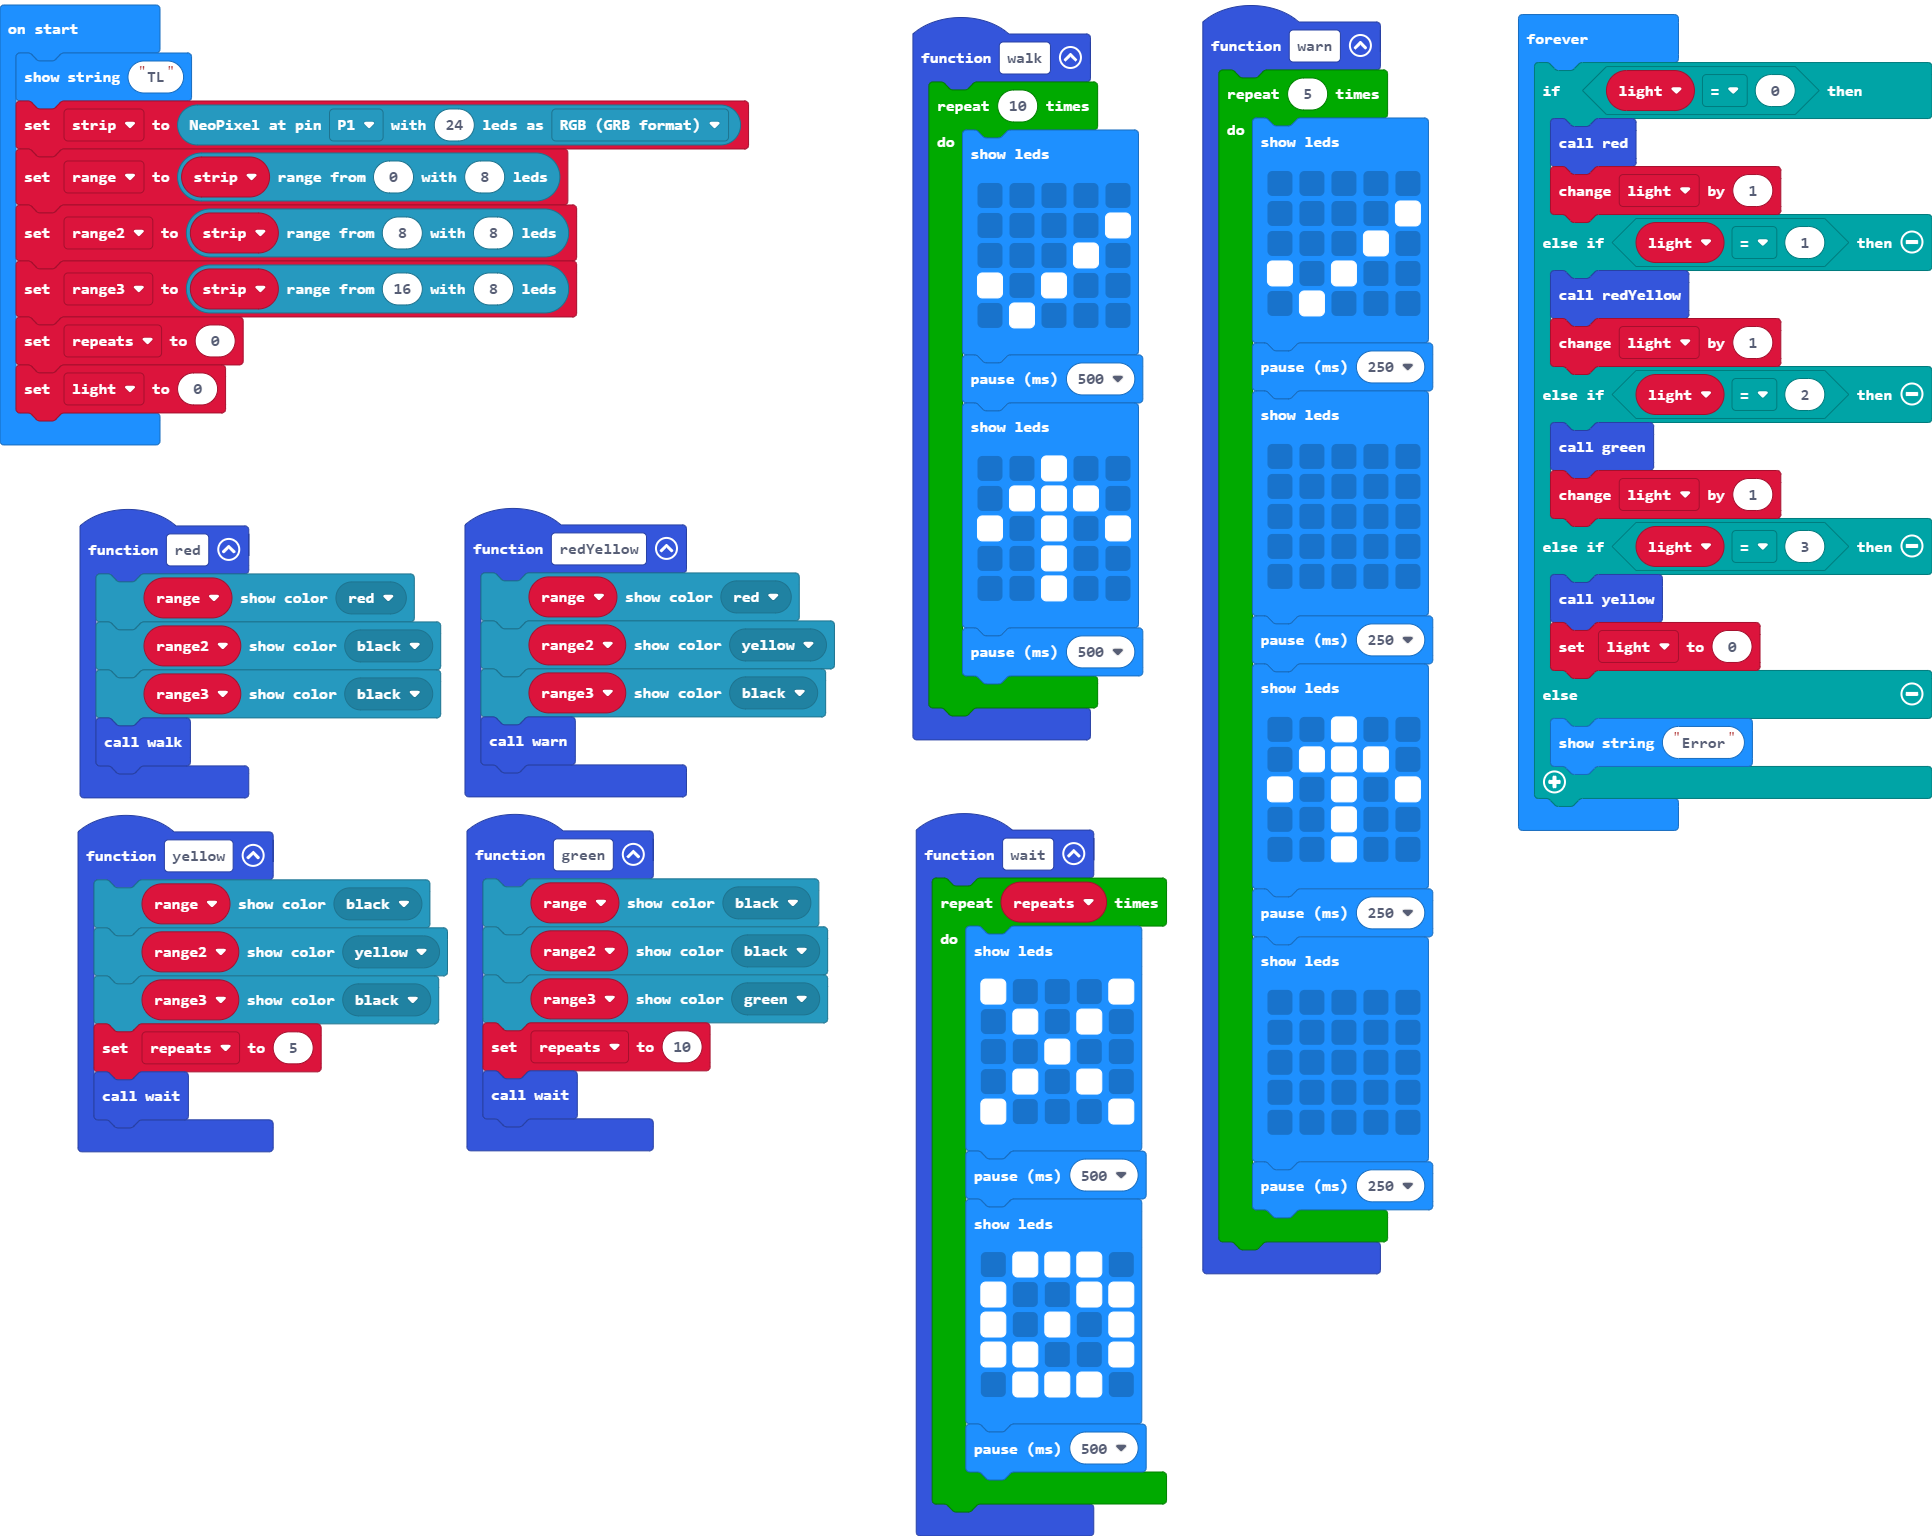
Create a traffic light colour variable for use to identify which light is currently active and use this in if/else if statements for setting the lights.
Tip: Remember to set the variable in the 'on start' block.
You will need to use numbers to represent the different light states.
Use an else statement to capture any errors regarding the variable value.
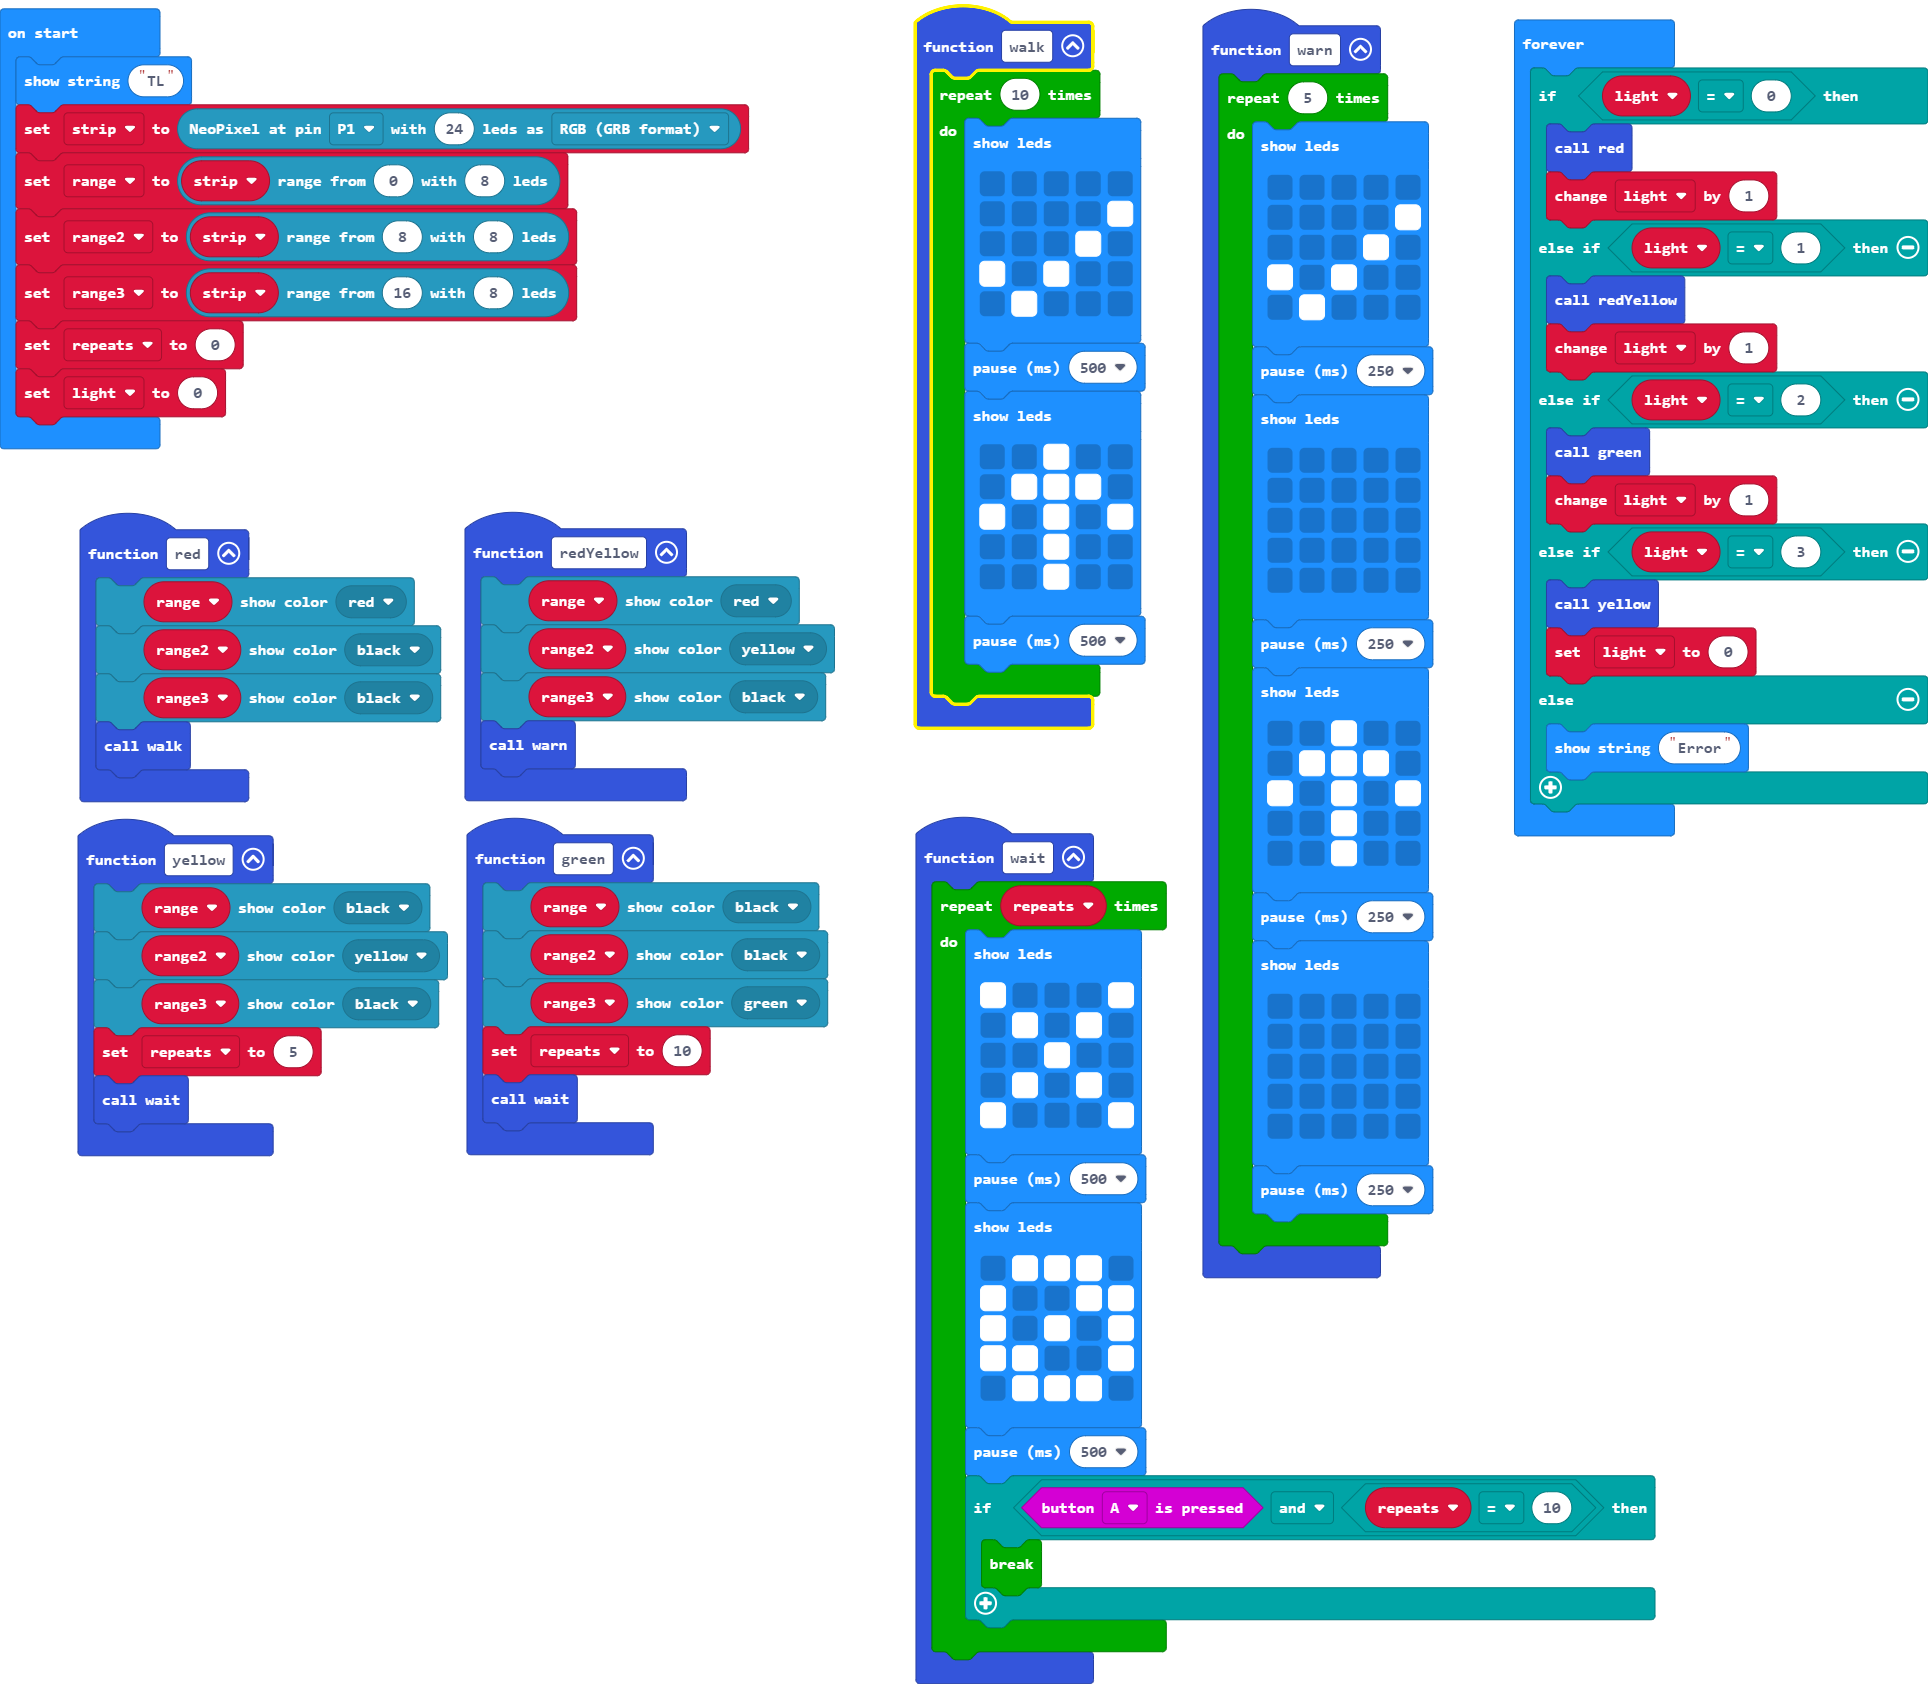
Have the A button on the Micro:Bit cause the traffic to come to a stop.
Tip: You only need this over-ride to work whilst the traffic lights are green.
Important: You can stop a loop early using the 'break' block found in the Loops menu.
You need to tell the program to change to yellow when button A is pressed.
To over-ride the program in this way, you will need to check if button A is pressed inside the relevant animation's repeat block.
You may also need to check against another variable, this can use a stacked if statement or an 'and' Boolean Operator.
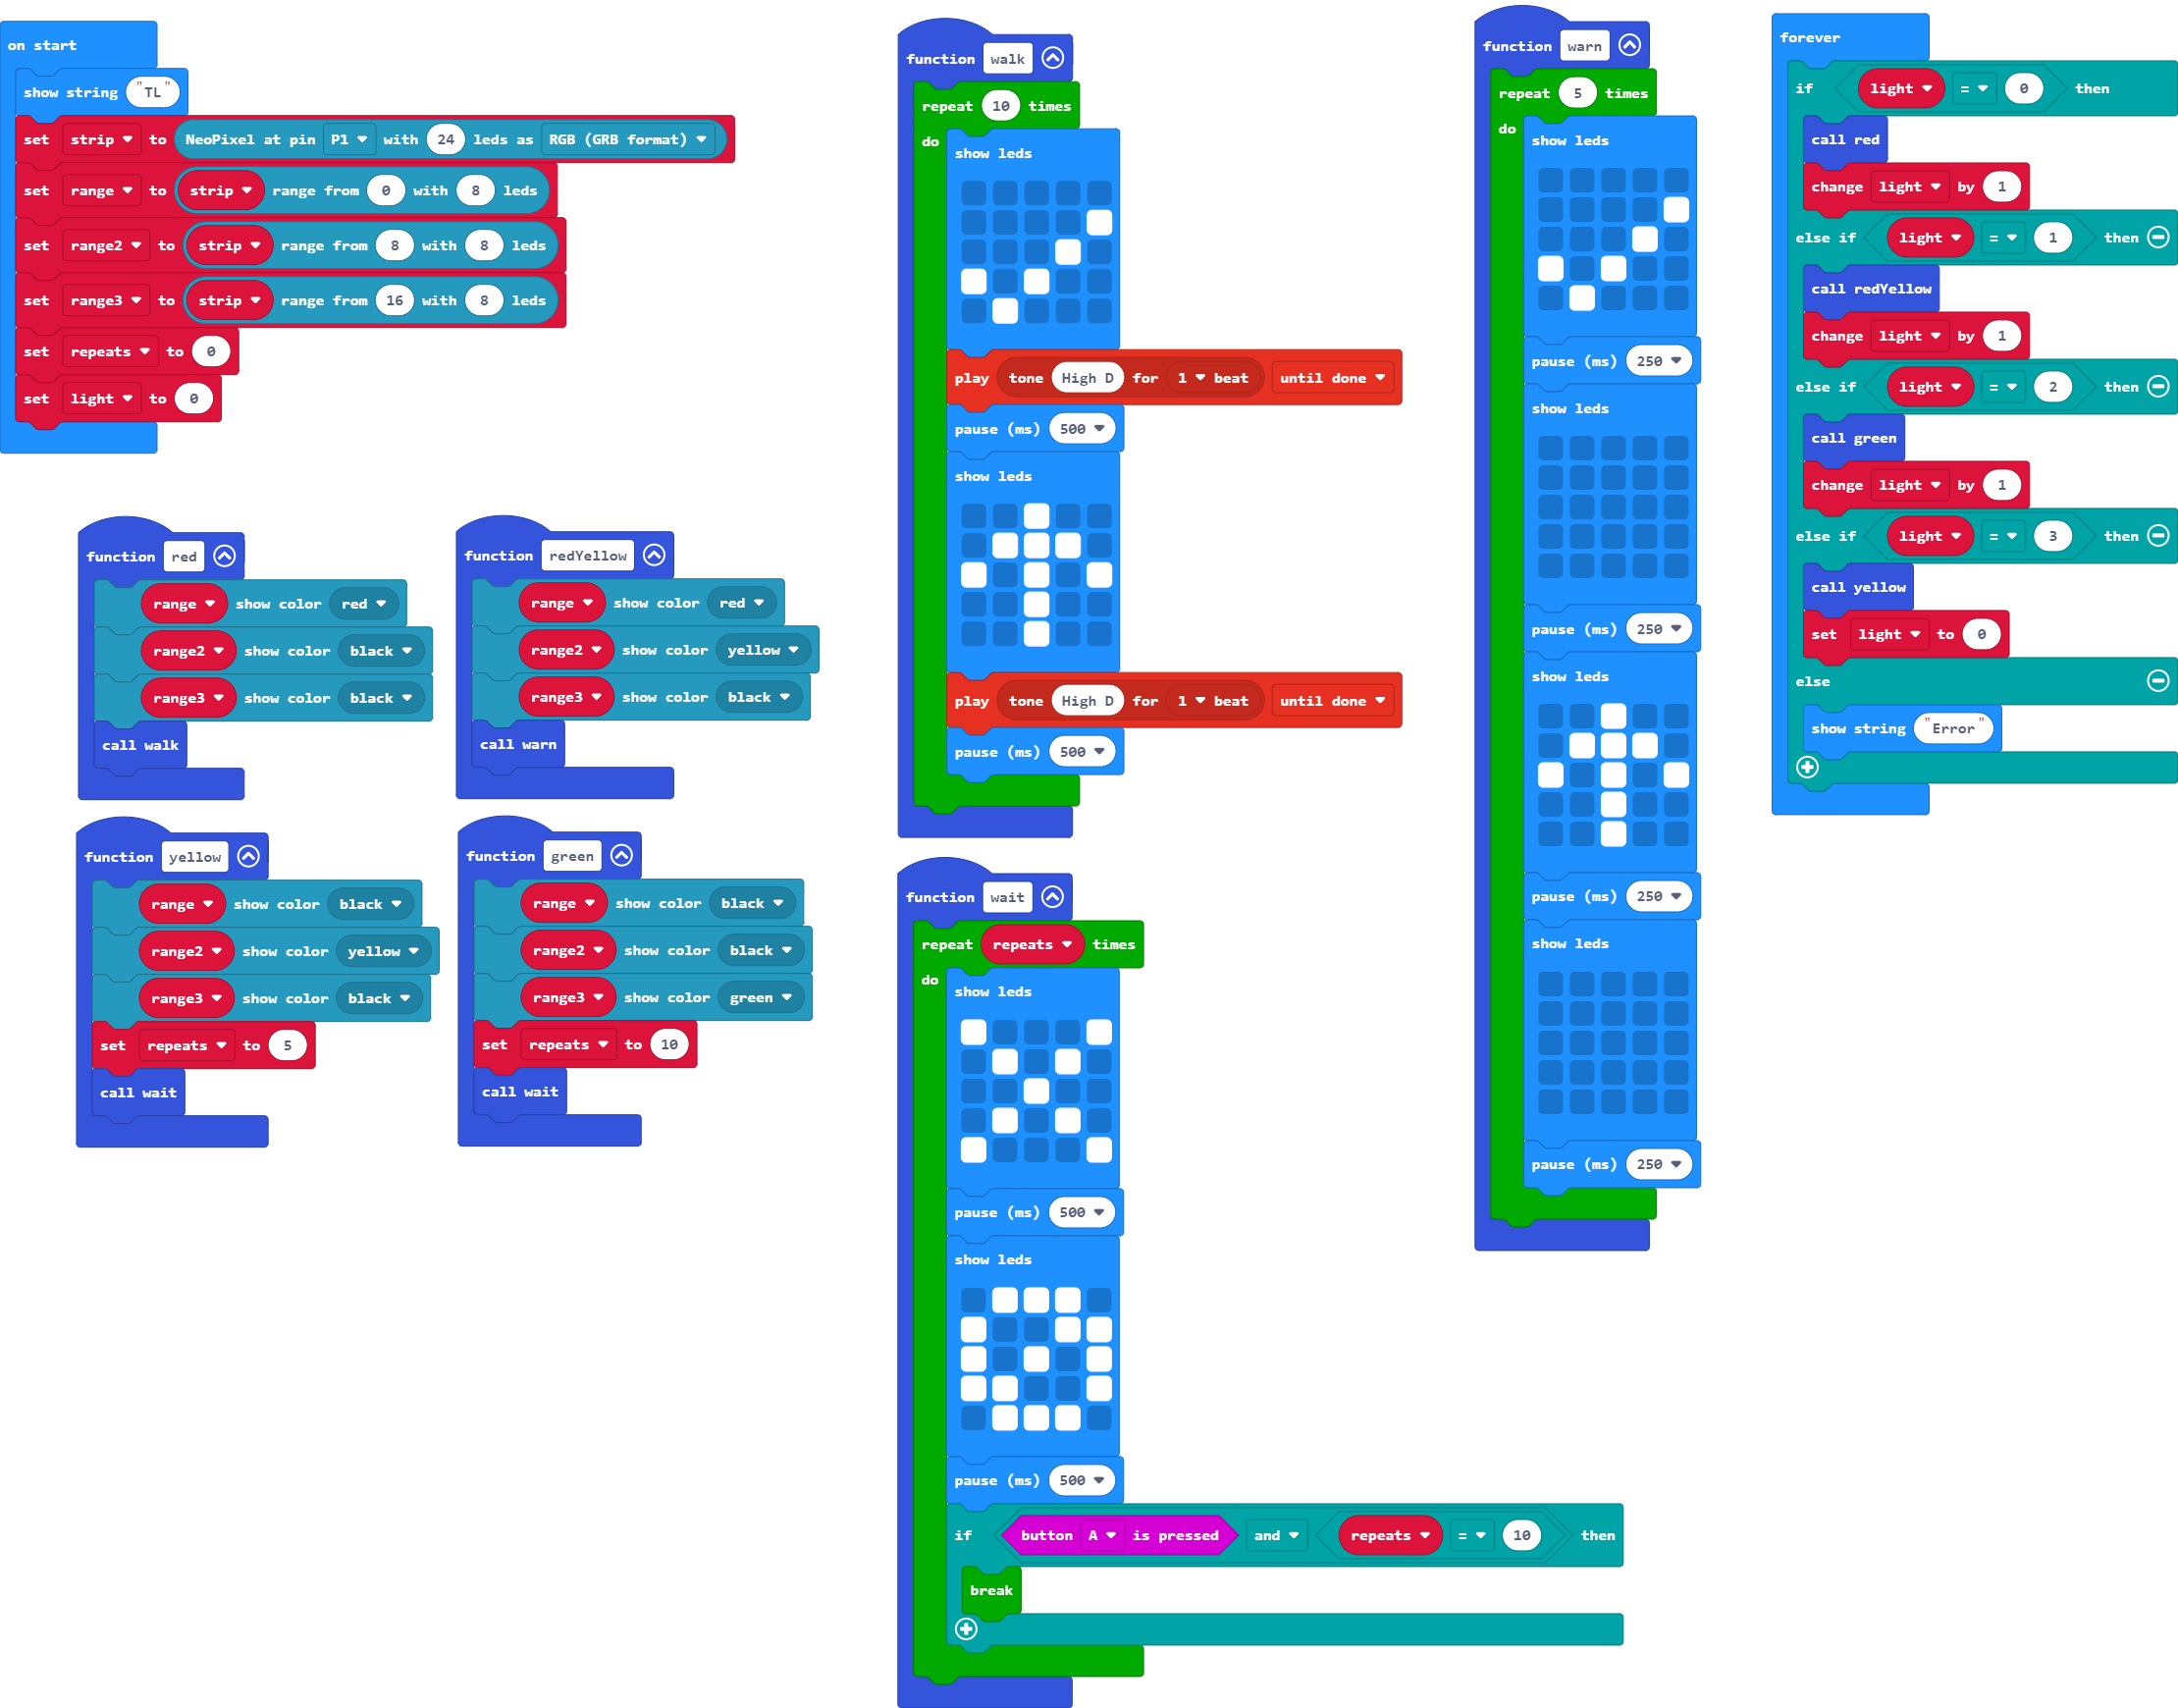
Add sound to indicate when it is safe to cross for those who cannot see the visual instructions.
This just requires a single note to be played on each image change in the animation for when it is safe to start crossing (when the traffic light is red).
The below exercise is to expand the program further. This is for you to investigate and explore - there are no answers provided.
Add a second Neopixel to pin 2 and have it act as the traffic light for traffic flowing in the other direction.
How much can you tidy up your code with functions, while loops, repeat blocks, and variables?
Video Lesson:
Exercises:
For this session we shall be creating a program to turn your BBC Micro:Bit into a sound meter using a servo.
As with all our exercises, they are designed for learners to complete a level before moving to the next. Otherwise you may miss information or skip a crucial step that stops your program from working.
Click on each challenge heading to expand.
Write a program that plays an alarm when the sound level is over 200.
Tip: Don't forget the start-up routine to identify the program.
This requires an if statement with a condition of sound level > 200.
There is a variable block for the sound level in the Input menu for the V2.
Add some pauses to reduce the rate of your chosen sound/note.
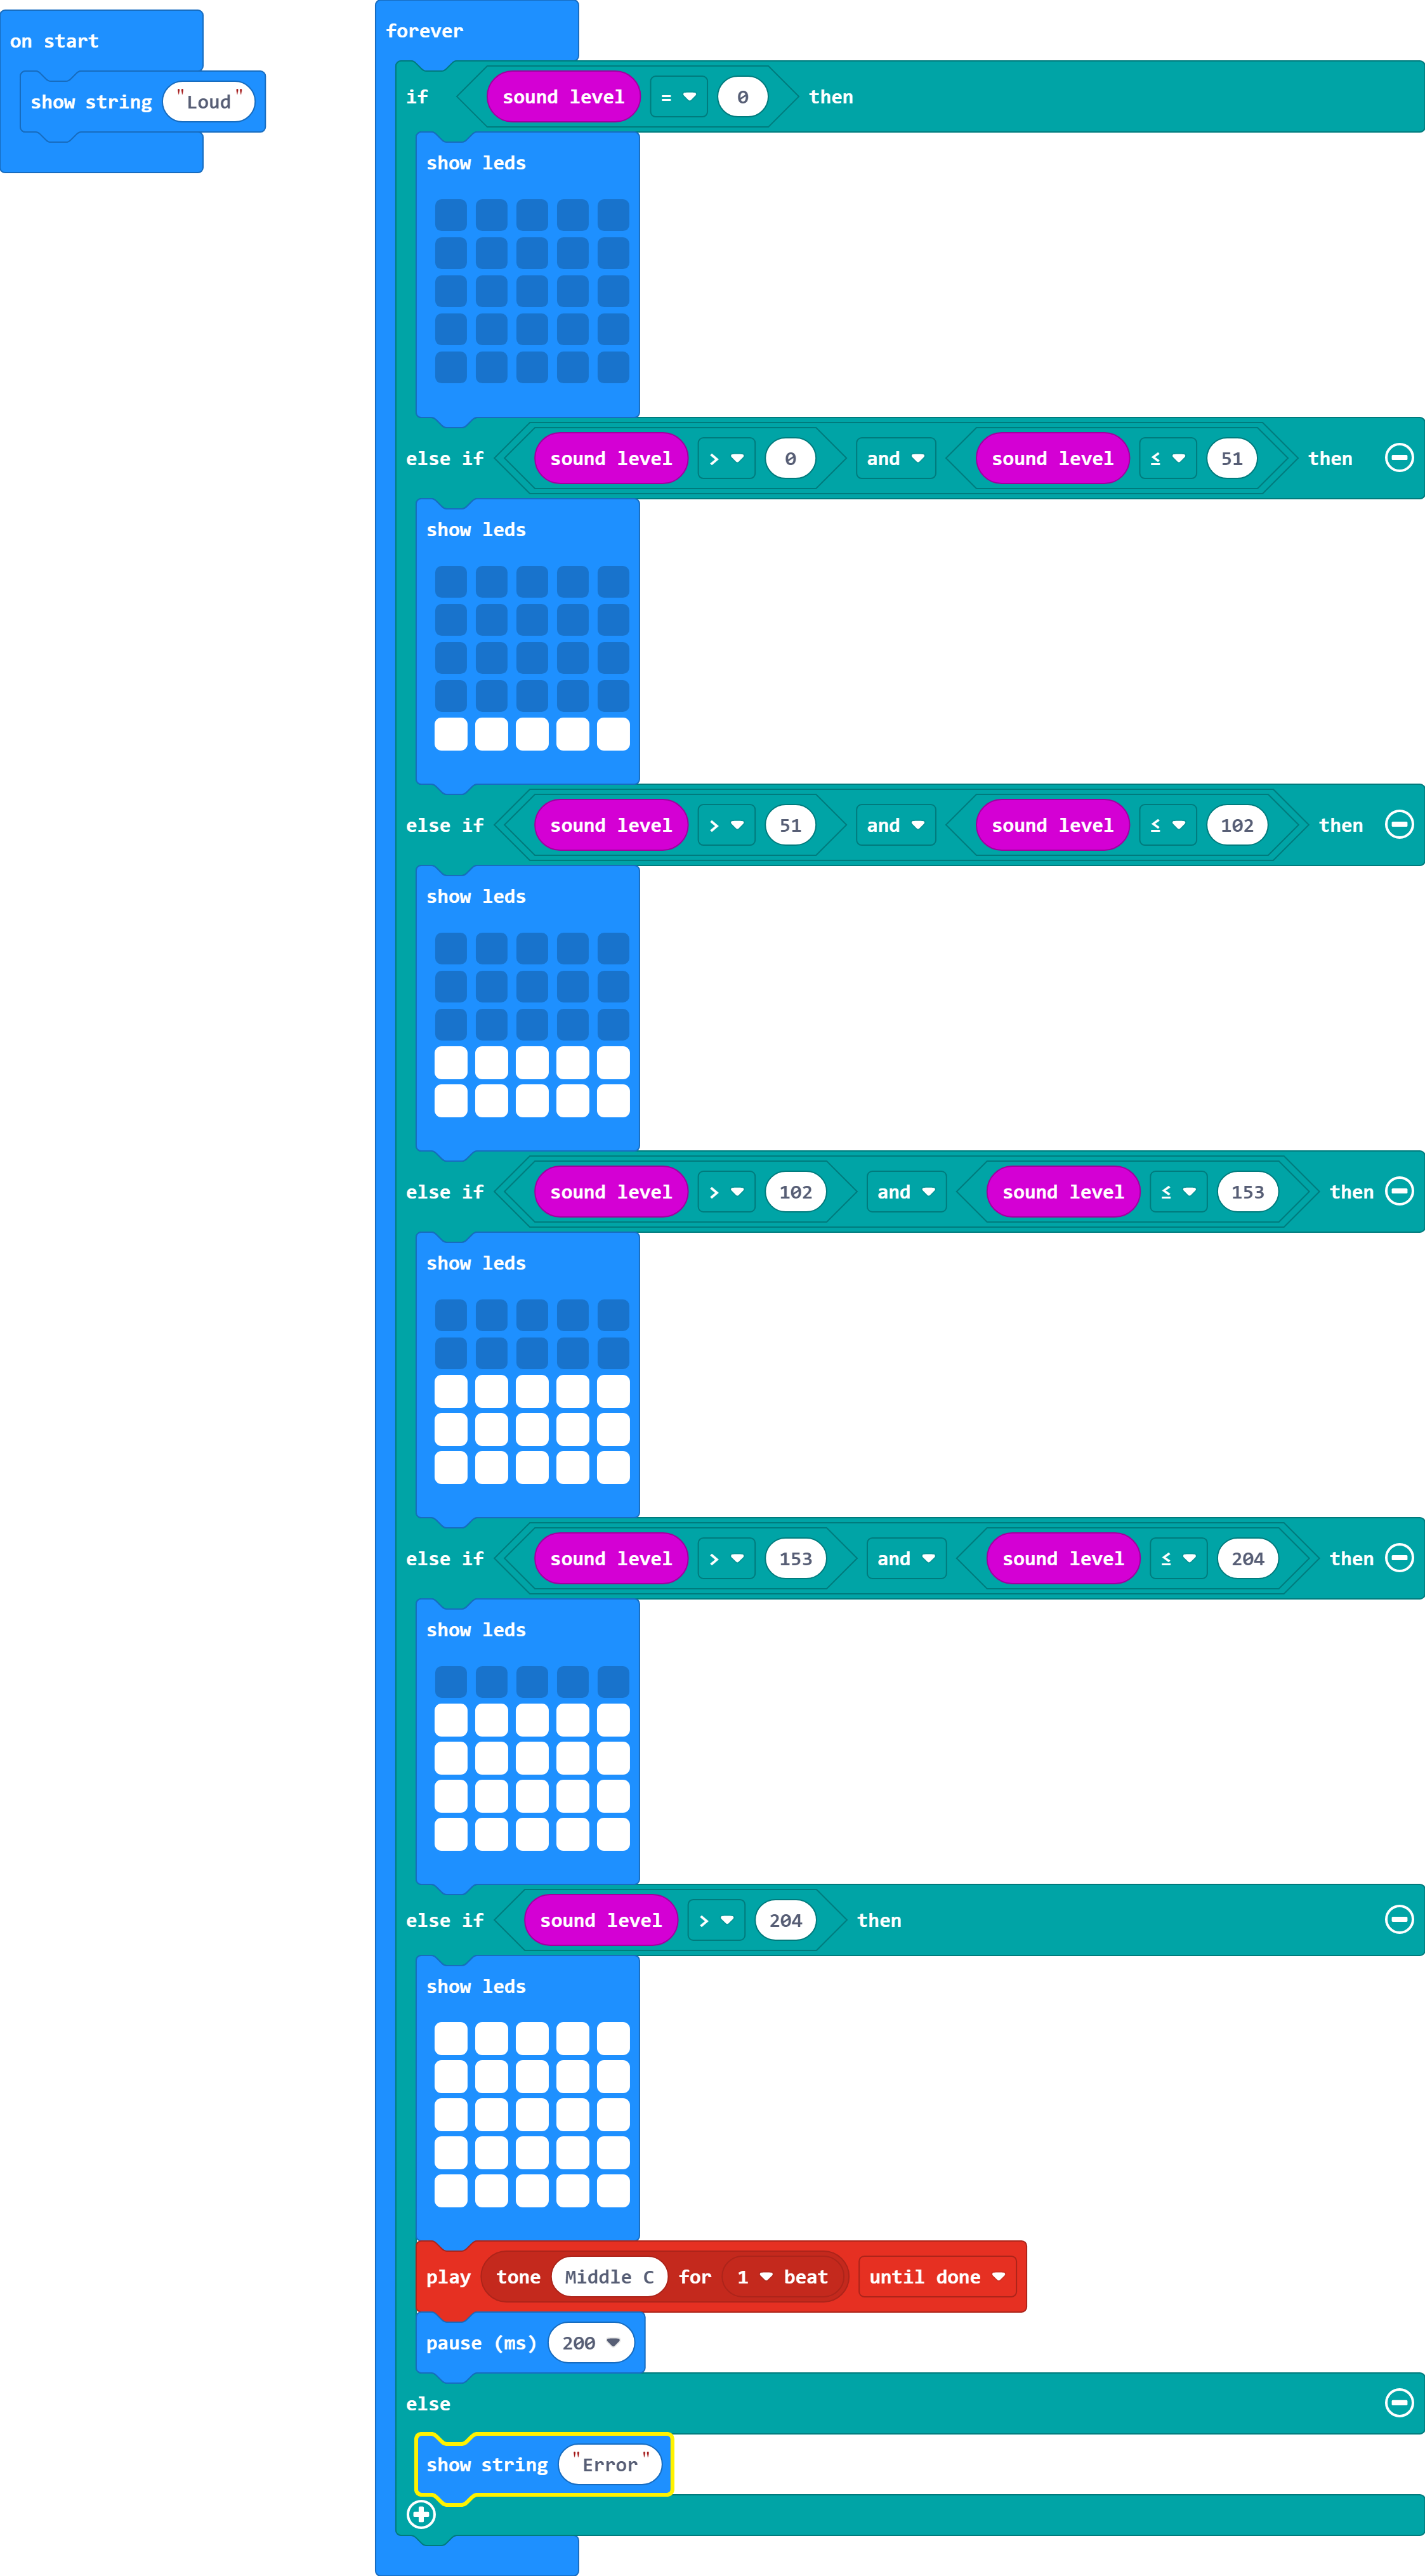
Have the Micro:Bit display the sound level on its screen.
Tip: This can be done using a 'show string' block.
This needs to be in the forever loop, outside of the current if statement.
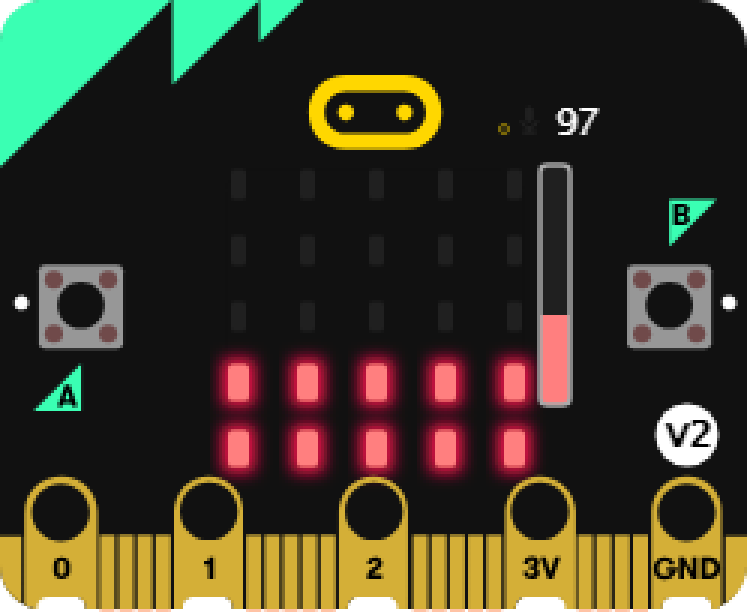
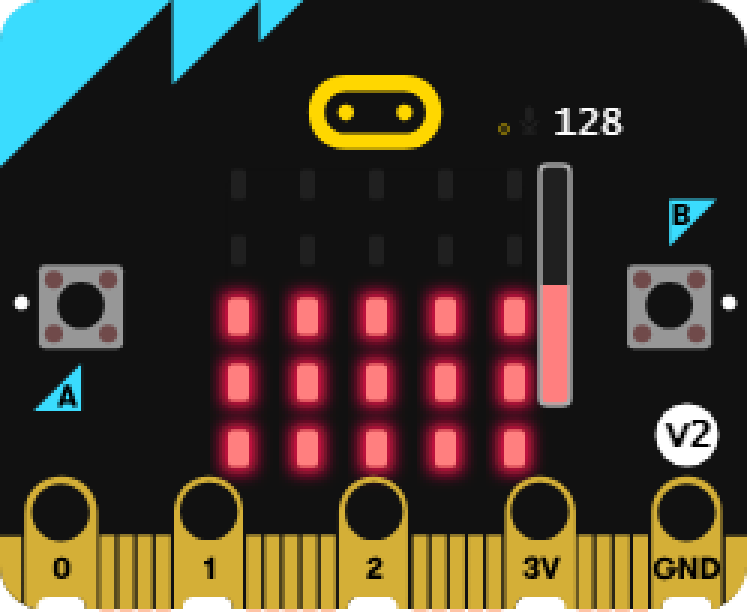
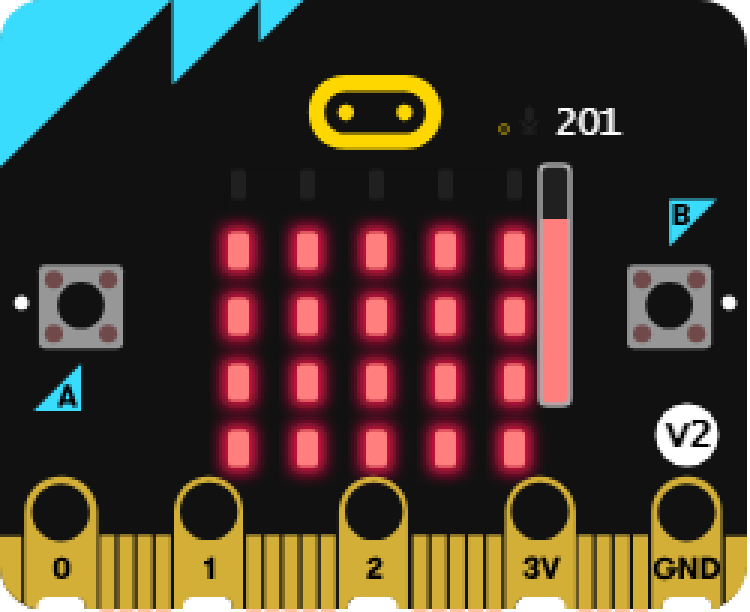
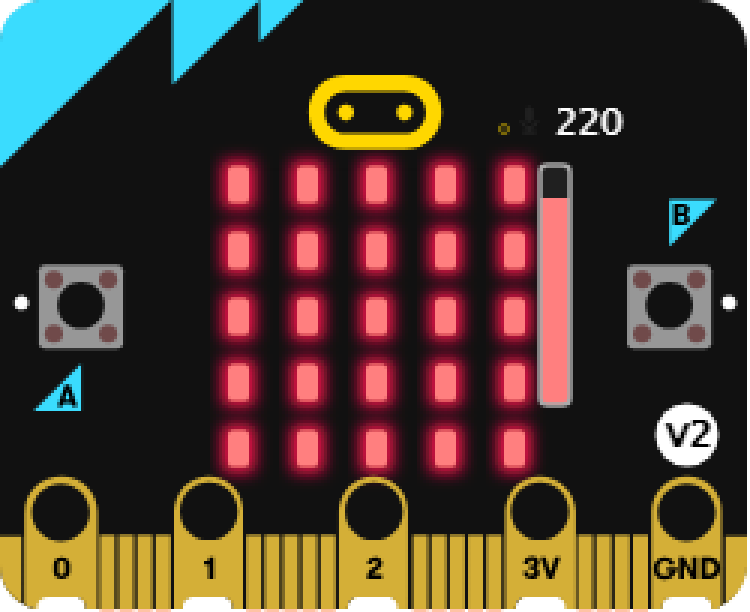
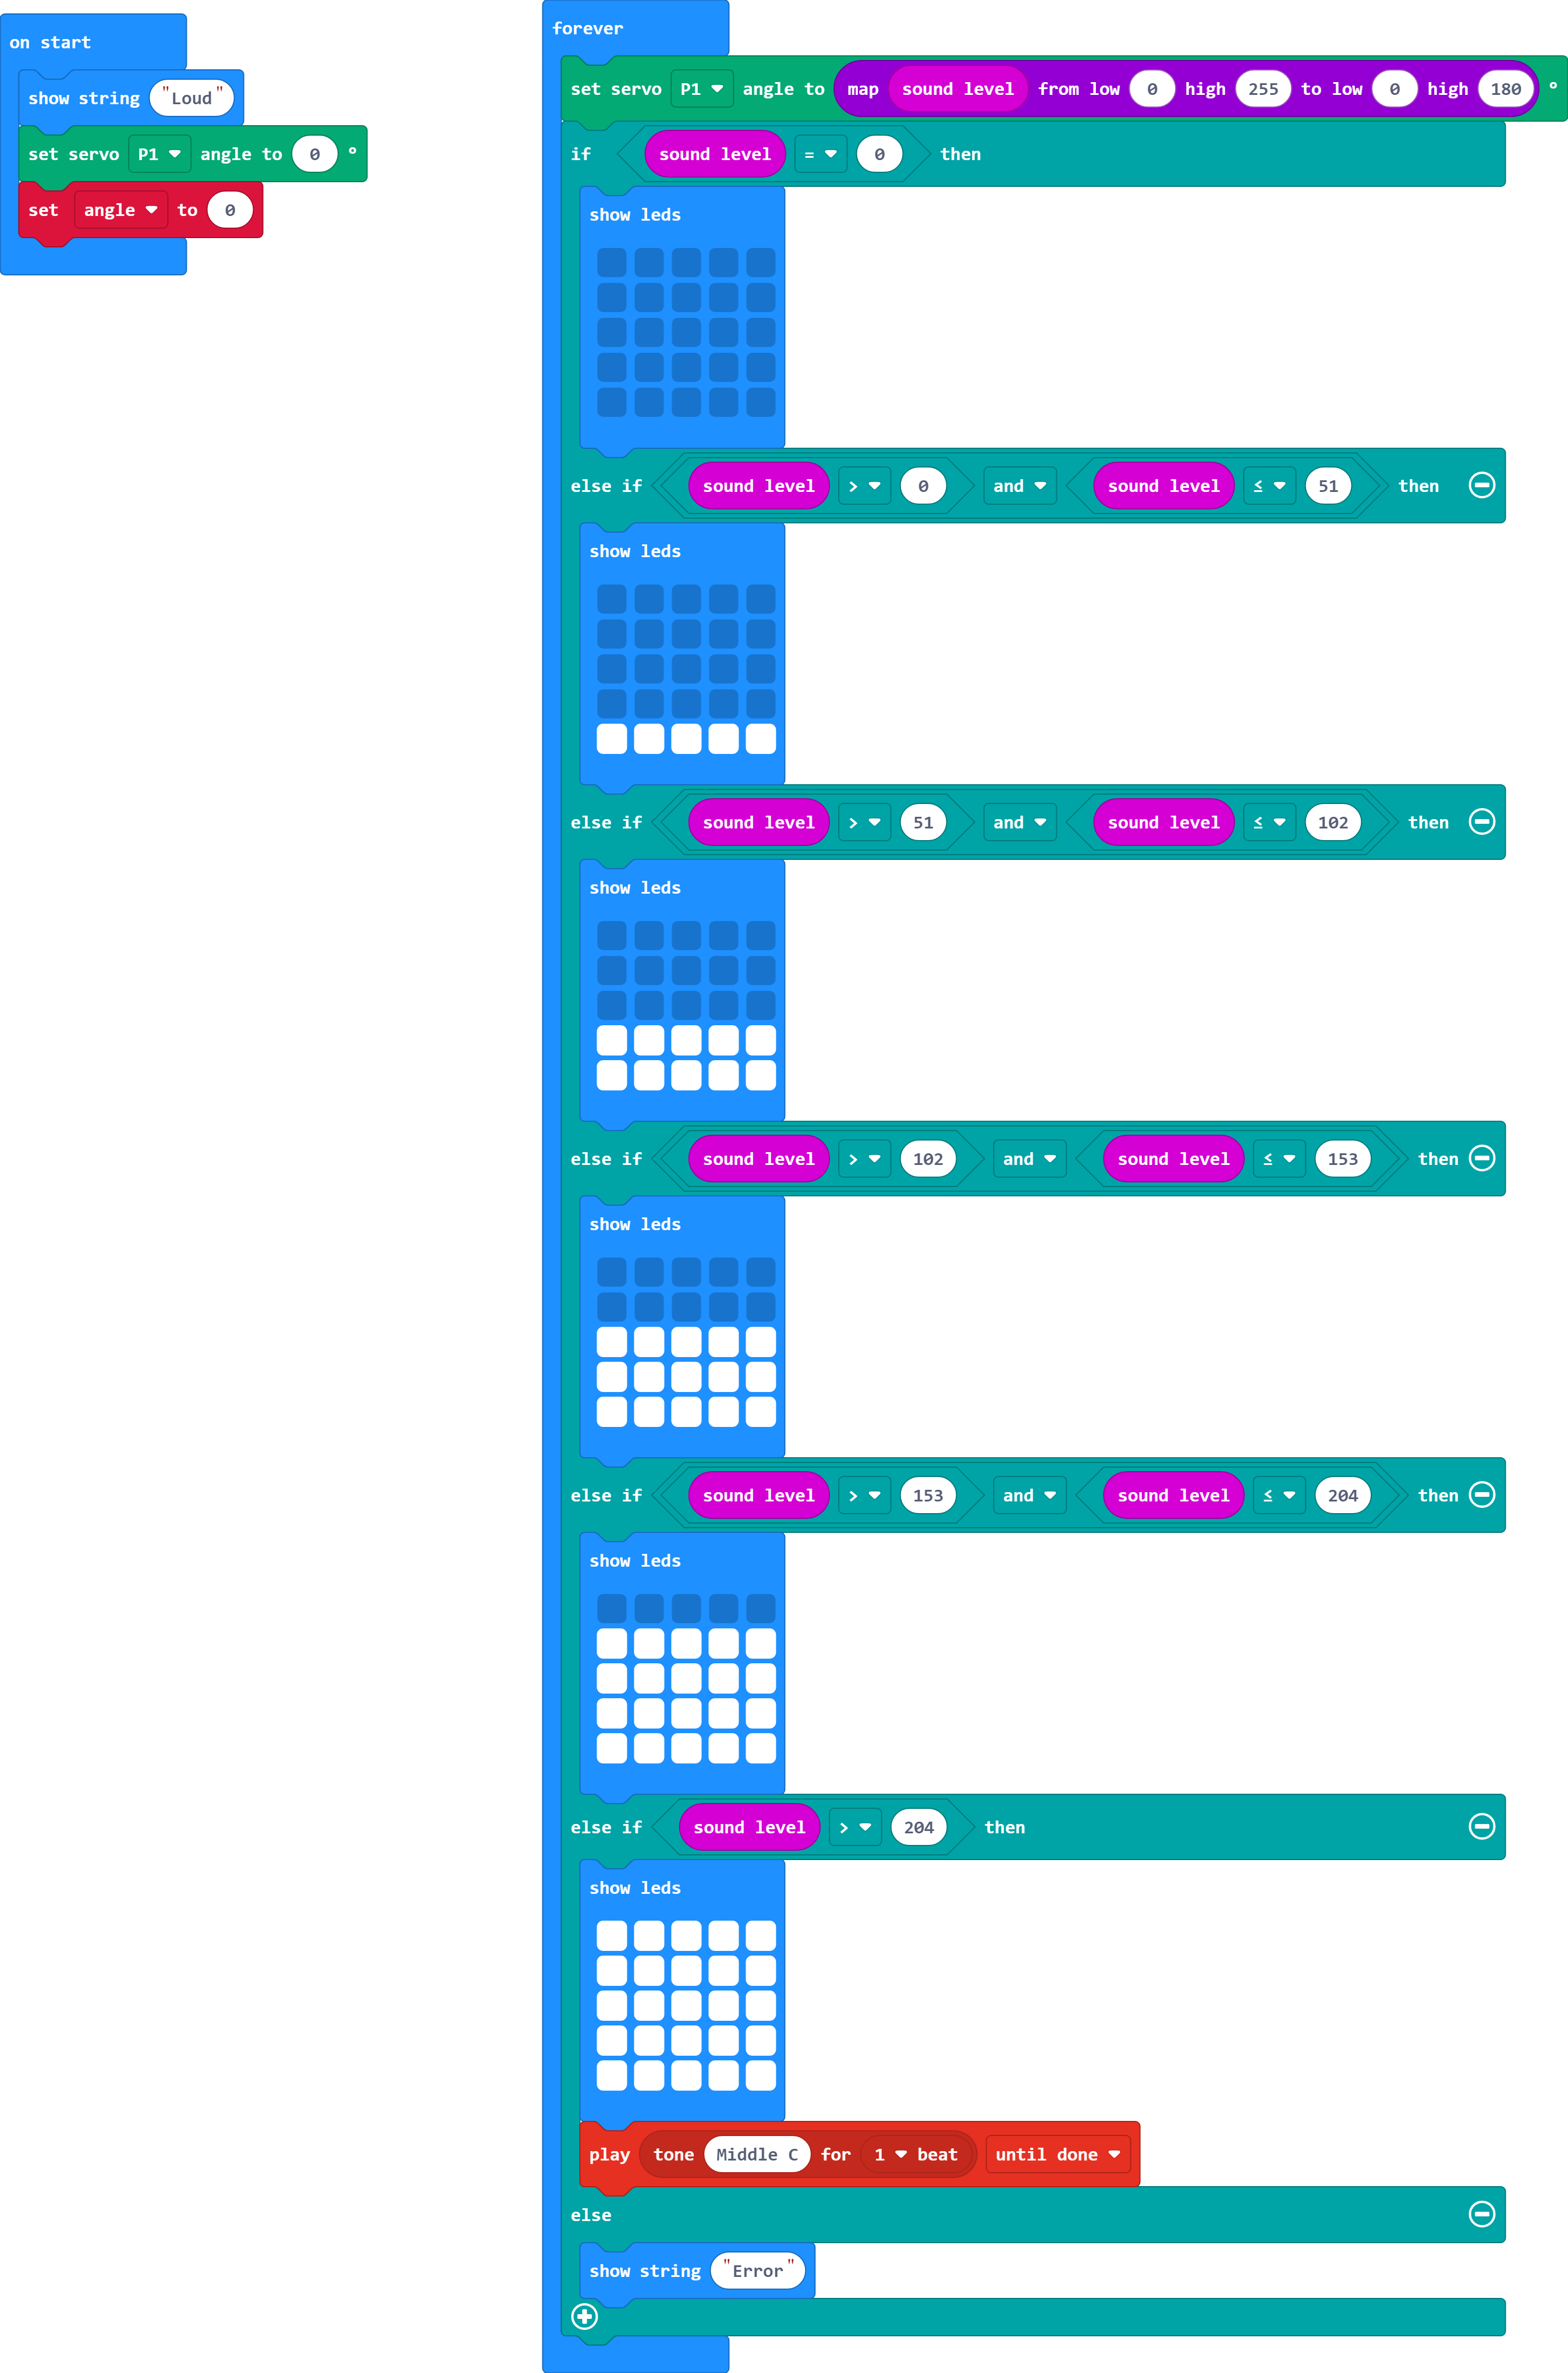
Notice how the show string block slows down our alarm sound. Let us resolve this by replacing the number with these images and conditions:
Sound level is 0.
Sound level is over 0 and less than or equal to 51.
Sound level is over 51 and less than or equal to 102.
Sound level is over 102 and less than or equal to 153.
Sound level is over 153 and less than or equal to 204.
Sound level is over 204.
The alarm should now only sound when the meter is full.
This will require a new series of if and else if statements.
Remember you can use the 'and' Boolean operator instead of stacking if statements.
Use the else statement at the end for any errors in the program.
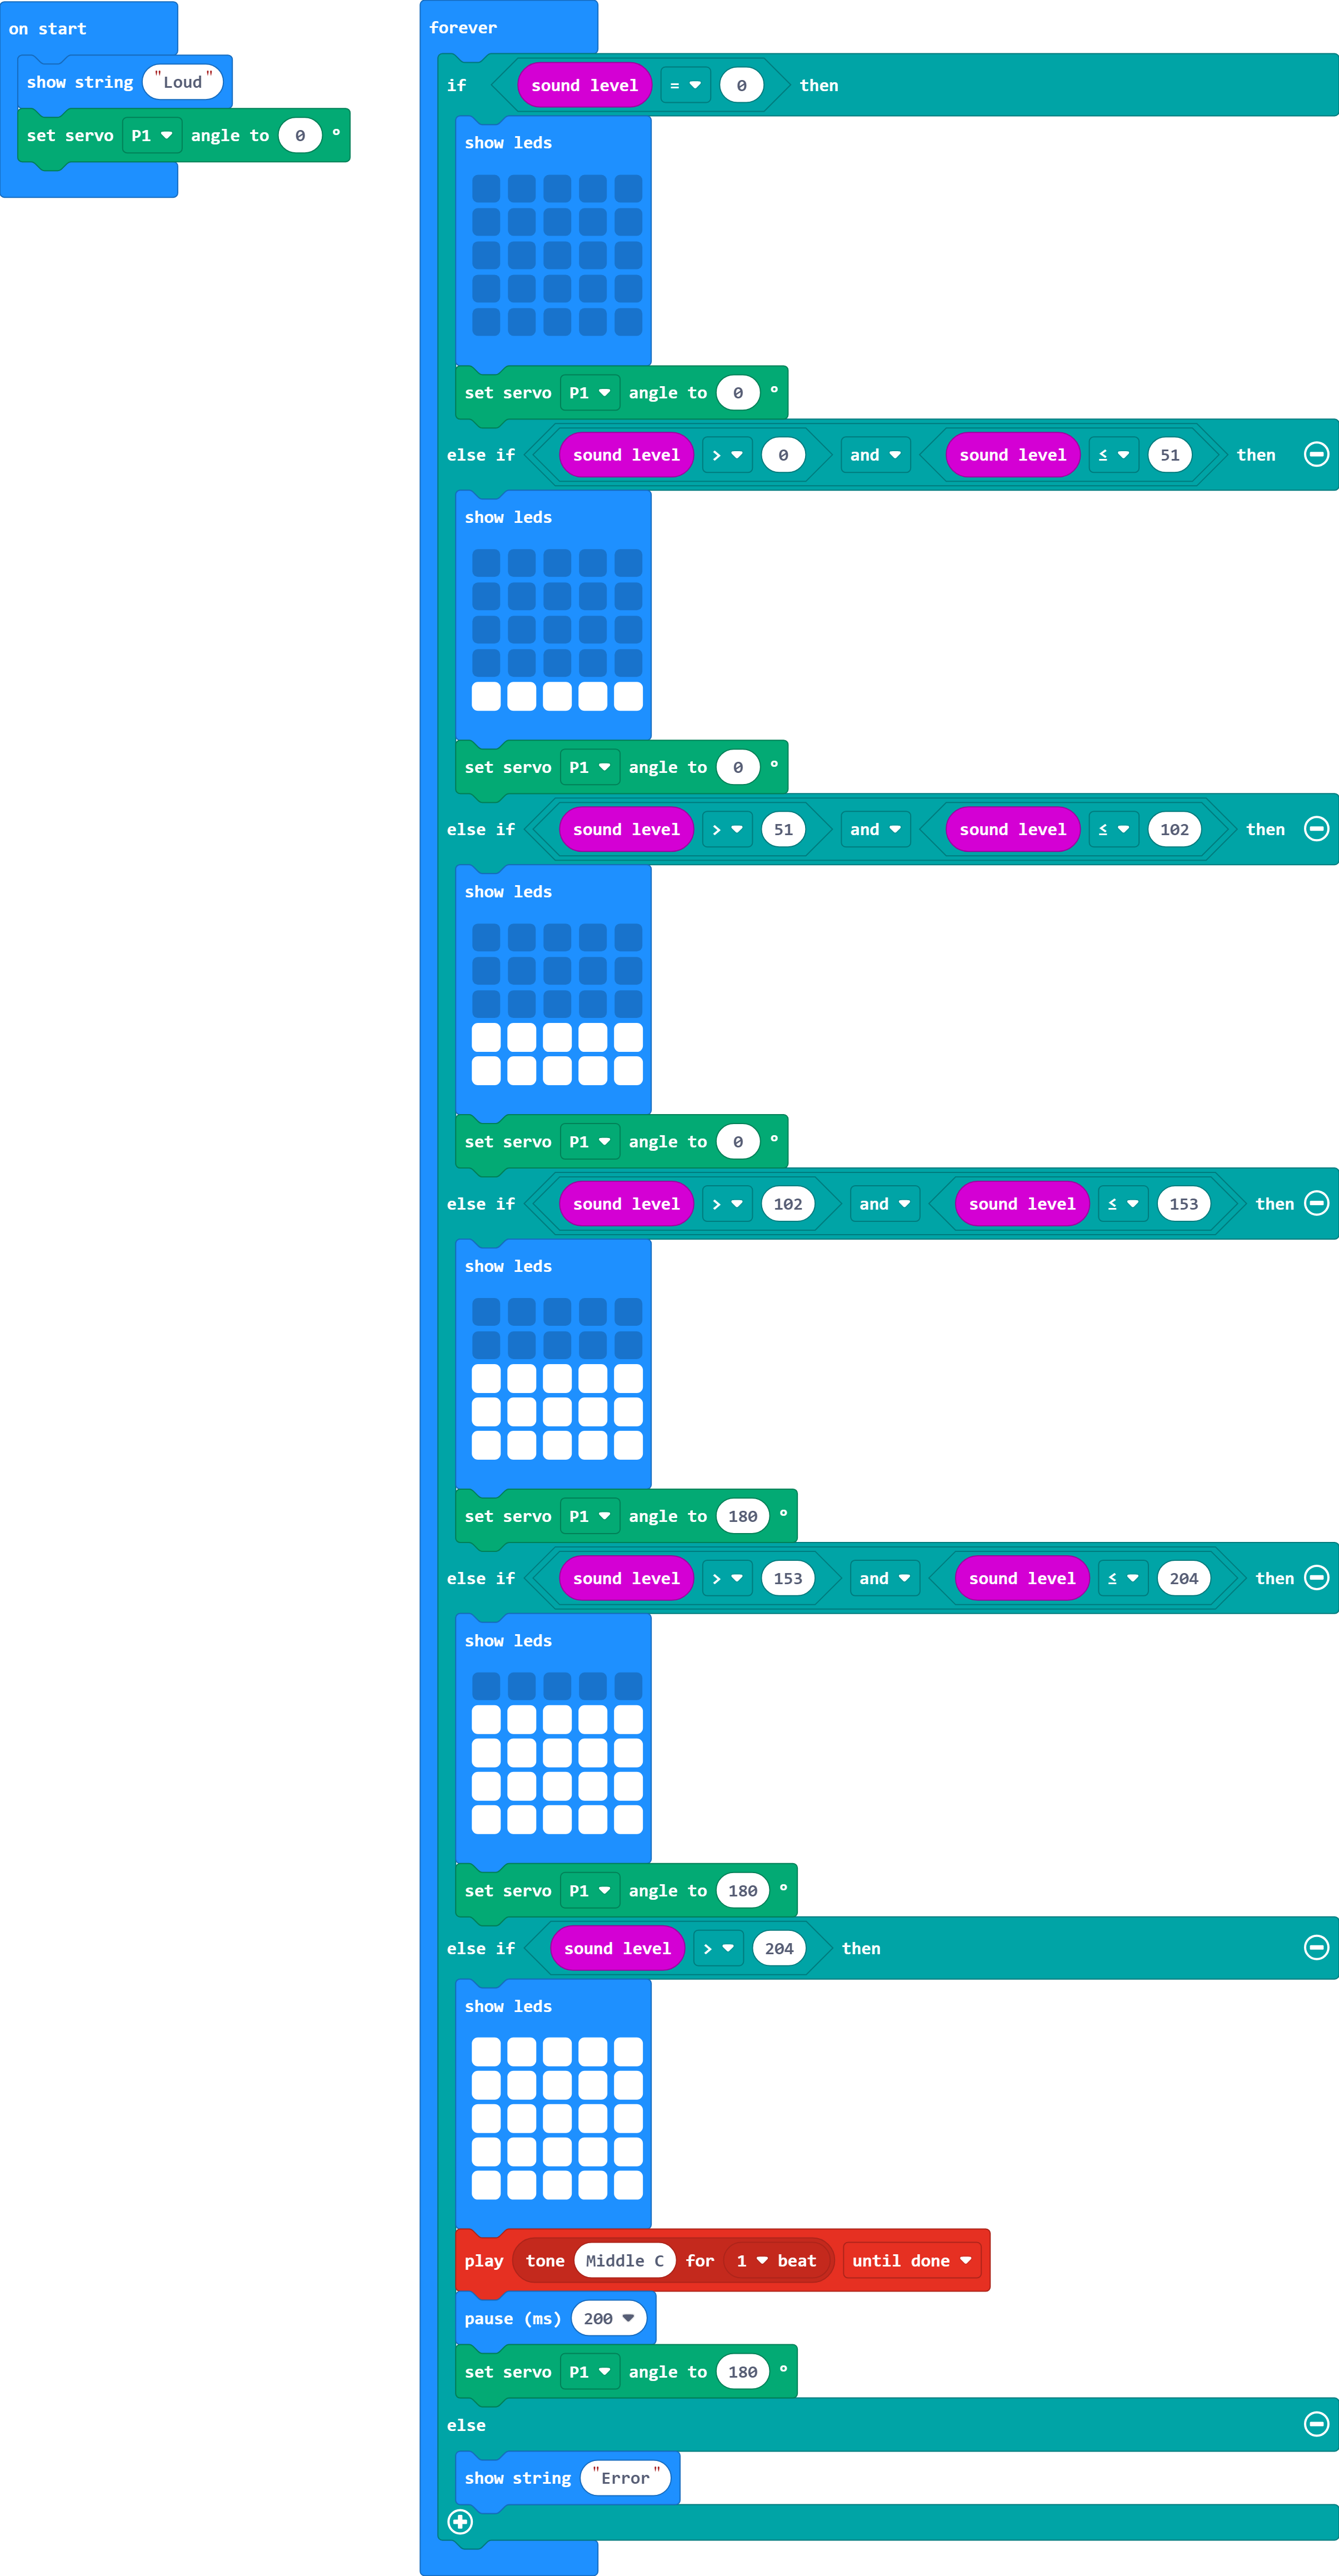
Add a 180° positional servo to pin 1. Program the servo to rest at 0° whilst the sound level is less than or equal to 102. Otherwise, it needs to move to 180°
Tip: You will need to use the servo extension.
We can use all the default settings for the positional servo for this. However, it is still good practice to set the servo to a start position (0° in this case) in the 'on start' block.
You will need to set the servo angle in each if/else if statement.
When testing, make sure you give the servo time to complete its rotation - if you switch the condition too quickly it will not behave the way we expect it to.
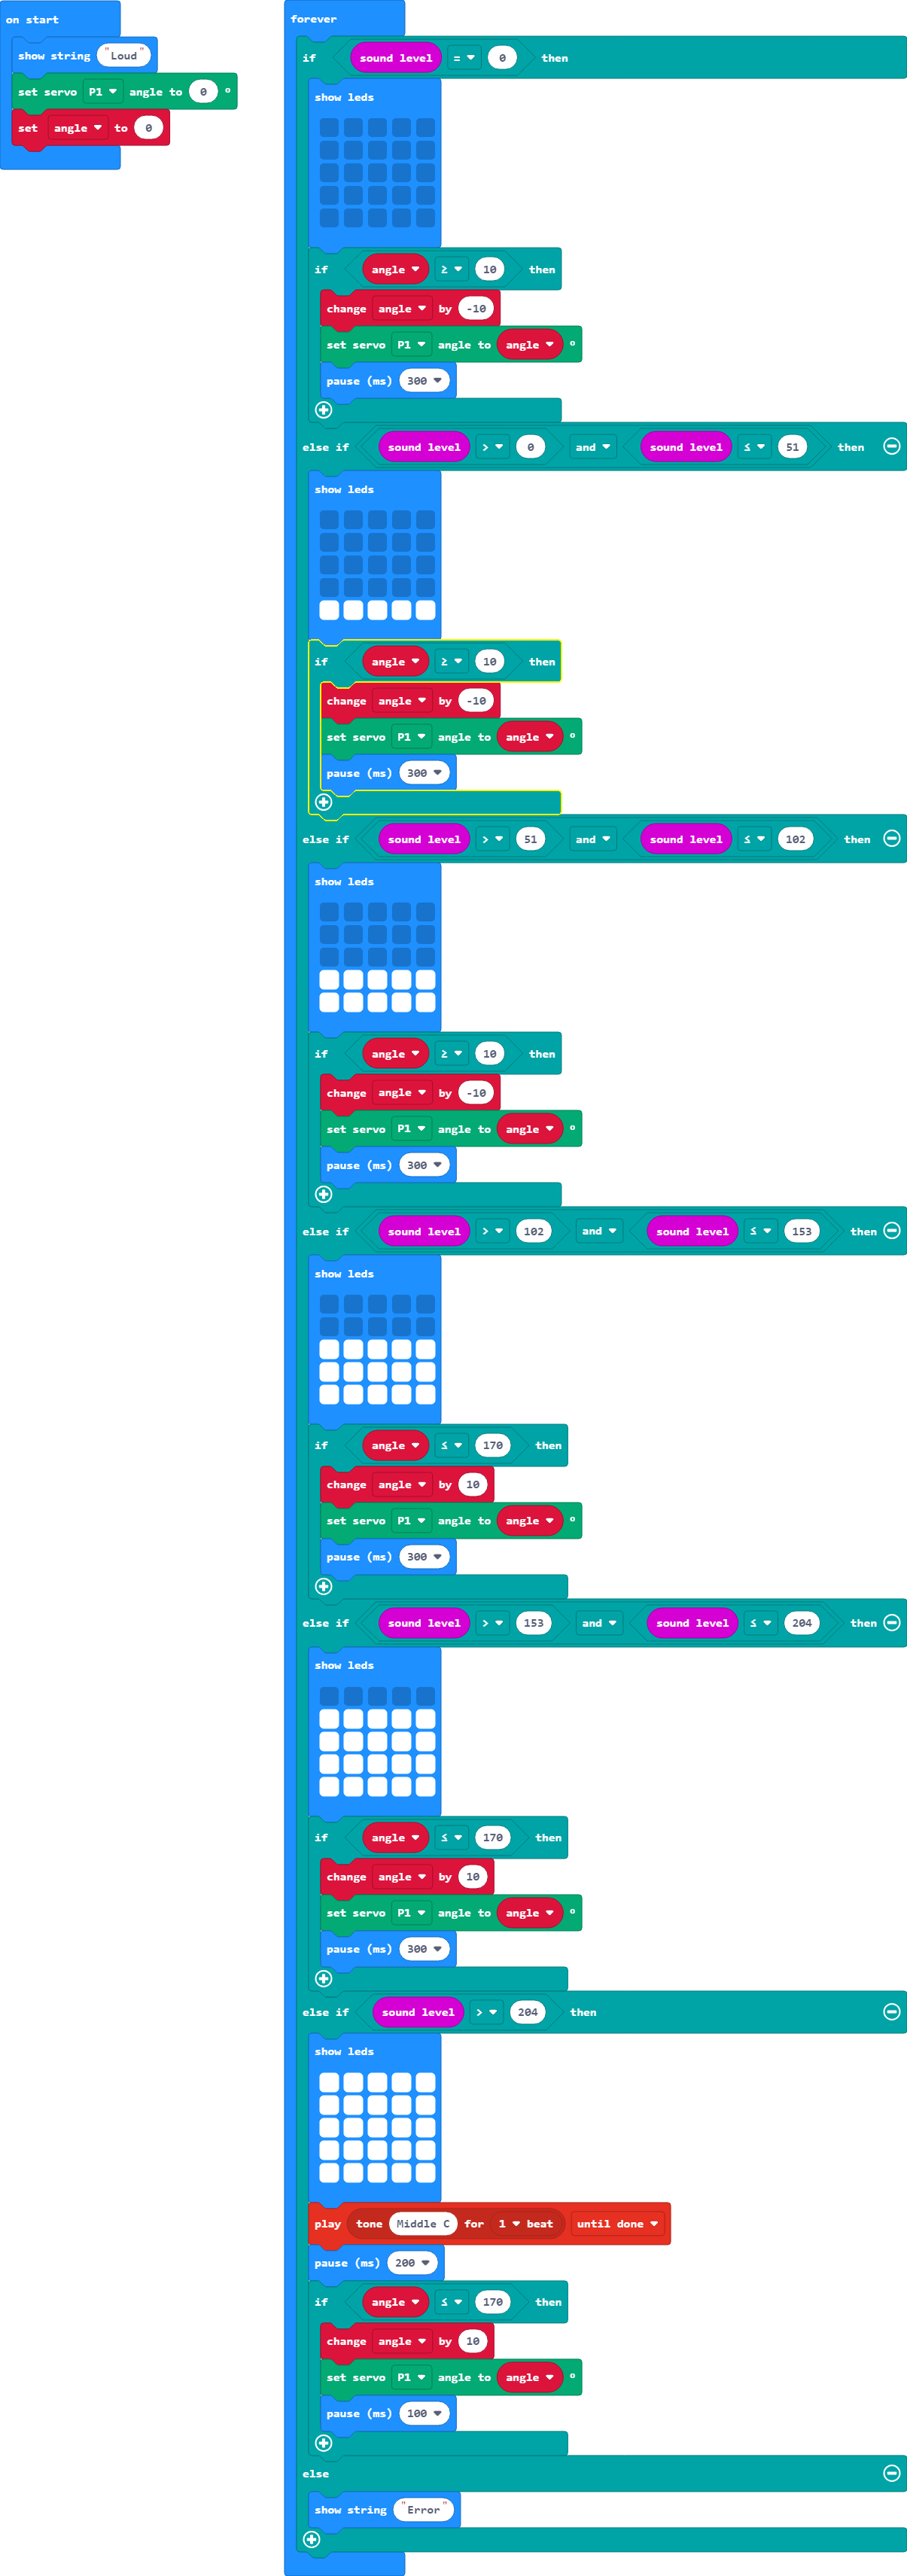
When the servo changes direction, can you have the servo move only 10° every 300 milliseconds? This reduces the stress on the servo, stopping it from breaking - something the simulator does not replicate.
Tip: You will need to make sure the servo does not attempt to turn below 0° or further than 180° - this could break your servo.
You will need to create a variable for the angle - remember to set this in the 'on start' block.
This new variable can be used to set the servo angle - changing it up or down by 10°.
When setting up your if statement conditions consider the values to use - as we're moving 10° at a time, consider using 10 and 170.
These new if statements will need to replace the set servo blocks in each if/else if statement.
As there is already a 200 millisecond pause in the > 204 statement, we need to adjust the movement to total 300.
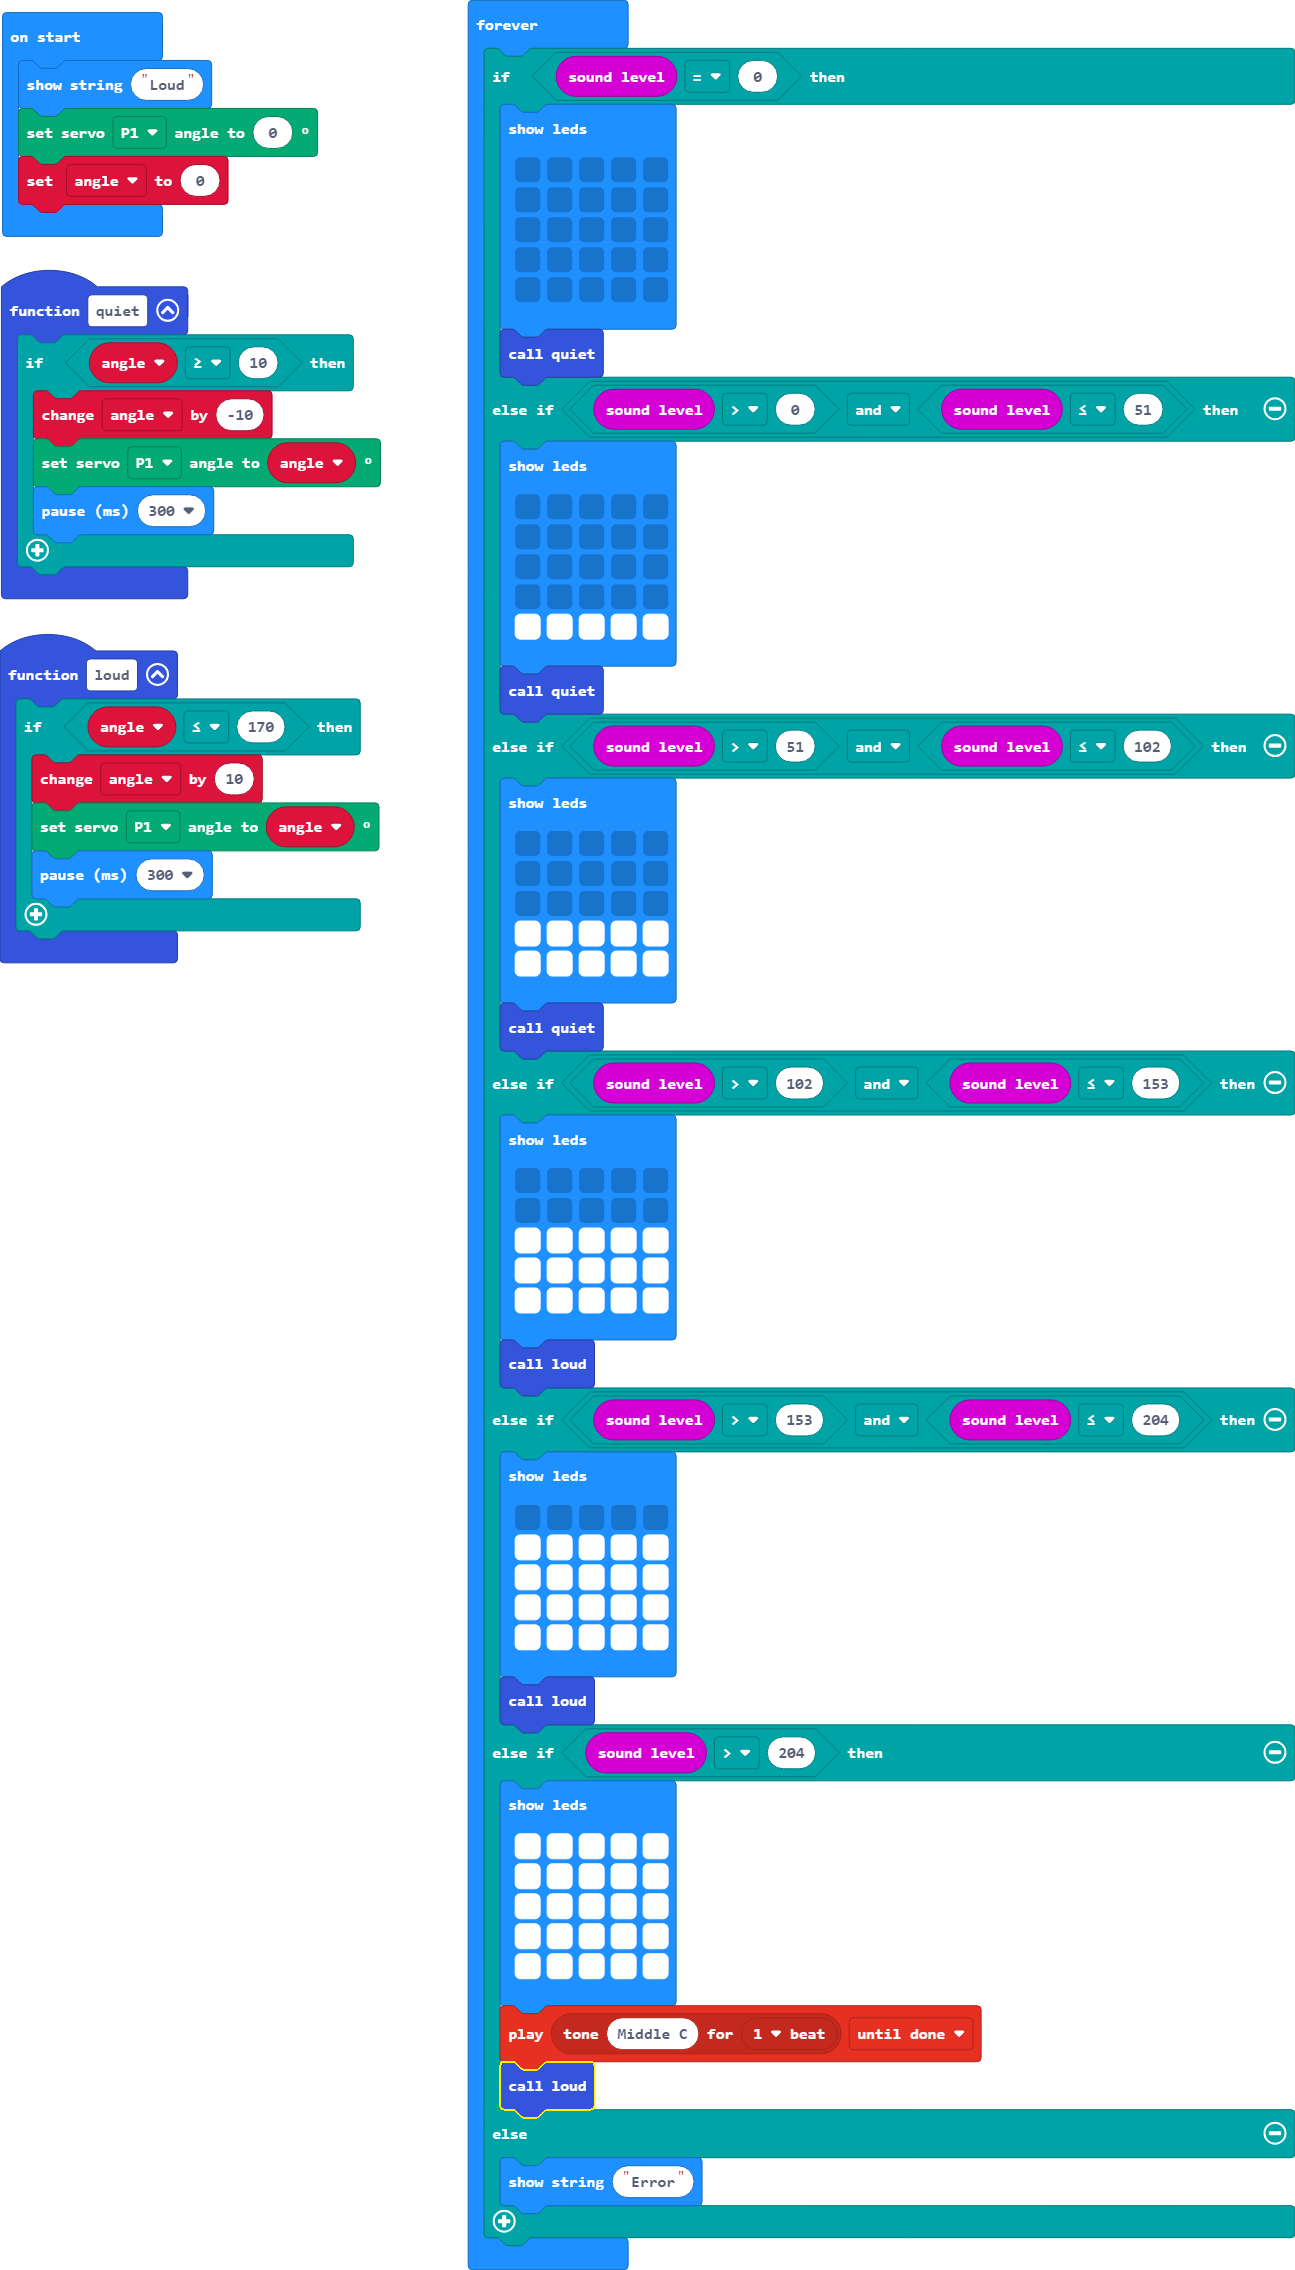
To tidy up our code, let's move the servo instructions into their own functions and call them when needed.
Tip: You'll need one for lowering and one for increasing the angle.
Remember the Functions menu is in the Advanced section.
To only have two functions - remove the 200 millisecond second pause from the alarm program so it too can use the 300 milliseconds pause in the servo function.
Before you start this exercise, we advise that you duplicate your program as we will be deleting a lot of the previous code.
Step 1. Close your program and return to makecode.microbit.org's homepage.
Step 2. Click on the view all option next to 'My Projects'.
Step 3. Select the file you want to duplicate (a green tick should appear on the file).
Step 4. Click on the duplicate option in the top right of the screen. This will allow you to then select a name for your new copy.
Step 5. Open your new copy and continue with the next challenge.
Instead of having a single value determining the movement of the servo, let us look at having the servo act like the arm on a sound meter (as shown below), traveling to the correct angle for the current sound level.
Important: We have a range of 0° to 180° on the servo but the sound level has a range of 0 to 255. There are two ways to approach this:
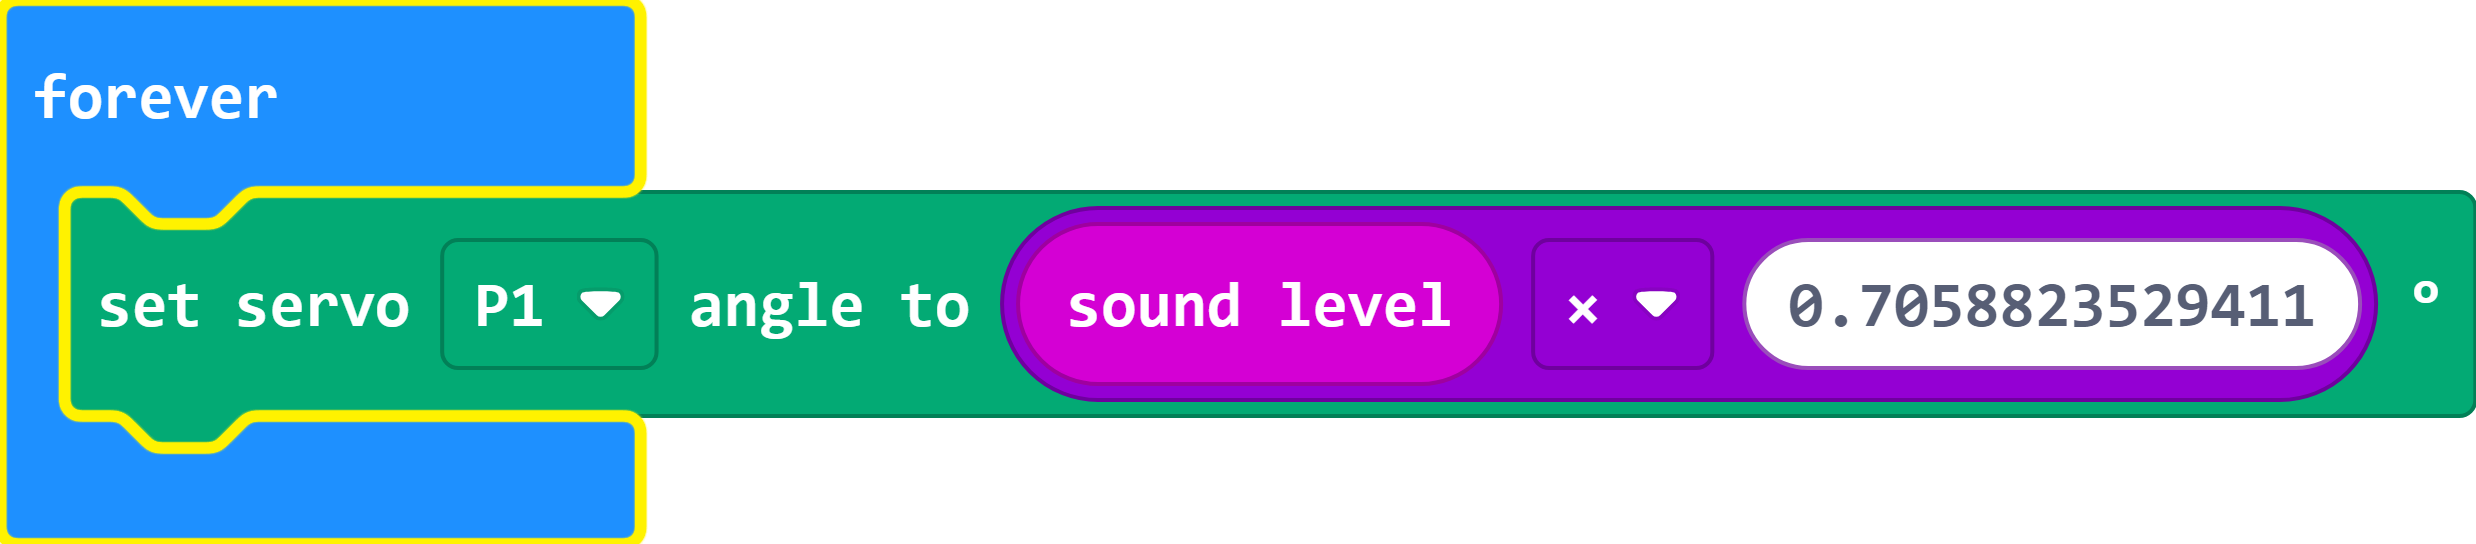
Do the maths ourselves
Work out how far the meter needs to move for one unit of sound:
(180 ÷ 255) = 0.7058823529411°
Use the above value with a Maths block inside a 'set servo' block.
Use the 'map' block
The map block allows us to enter the range we're measuring (sound level) which is 0 to 255 and convert it to the servo's range of 0 to 180. The block then does all the calculations for us.
We need to delete the functions we've created for the servo from our program. The 'call' blocks will automatically vanish when their function is removed.
Keep the screen meter animation in place.
A single 'set servo' block using the method chosen from above is all that's required for this.
The below exercises are designed to expand your understanding of servos. These are for you to investigate and explore - there are no answers provided.
Instead of using the meter to measure sound level, have it measure radio signal strength, with an alarm for if the signal gets too weak.
Tip: You will need to find the range of values for the radio signal strength.
Remember the traffic light program we created last session? Now you can add a rail crossing with a servo acting as the barrier arm.
Tip: You can only attach the servo to pins 0, 1 or 2. However, you can relocate the Neopixels to other pin numbers (up to 16).
Video Lesson:
Exercises:
For this session we shall be creating a program to control a railway crossing. This includes revision of radio communications, if-statements, variables, functions, Neopixels, and servos.
We recommend you attempt these challenges using the standard editor.
As with all our exercises, they are designed for learners to complete a level before moving to the next. Otherwise, you may miss information or skip a crucial step that stops your program from working.
Click on each challenge heading to expand.
For these exercises, imagine you have one Micro:Bit controlling the crossing whilst another is acting as a beacon on-board the train. The crossing will know a train is coming when the beacon's signal strength gets stronger.
Use an image, animation and/or text to create a start-up screen that identifies your program.
If only using an image, include a pause (500ms) so it remains on the screen long enough to see.
Try not to make the start-up take too long, otherwise this will get frustrating during testing as we progress.
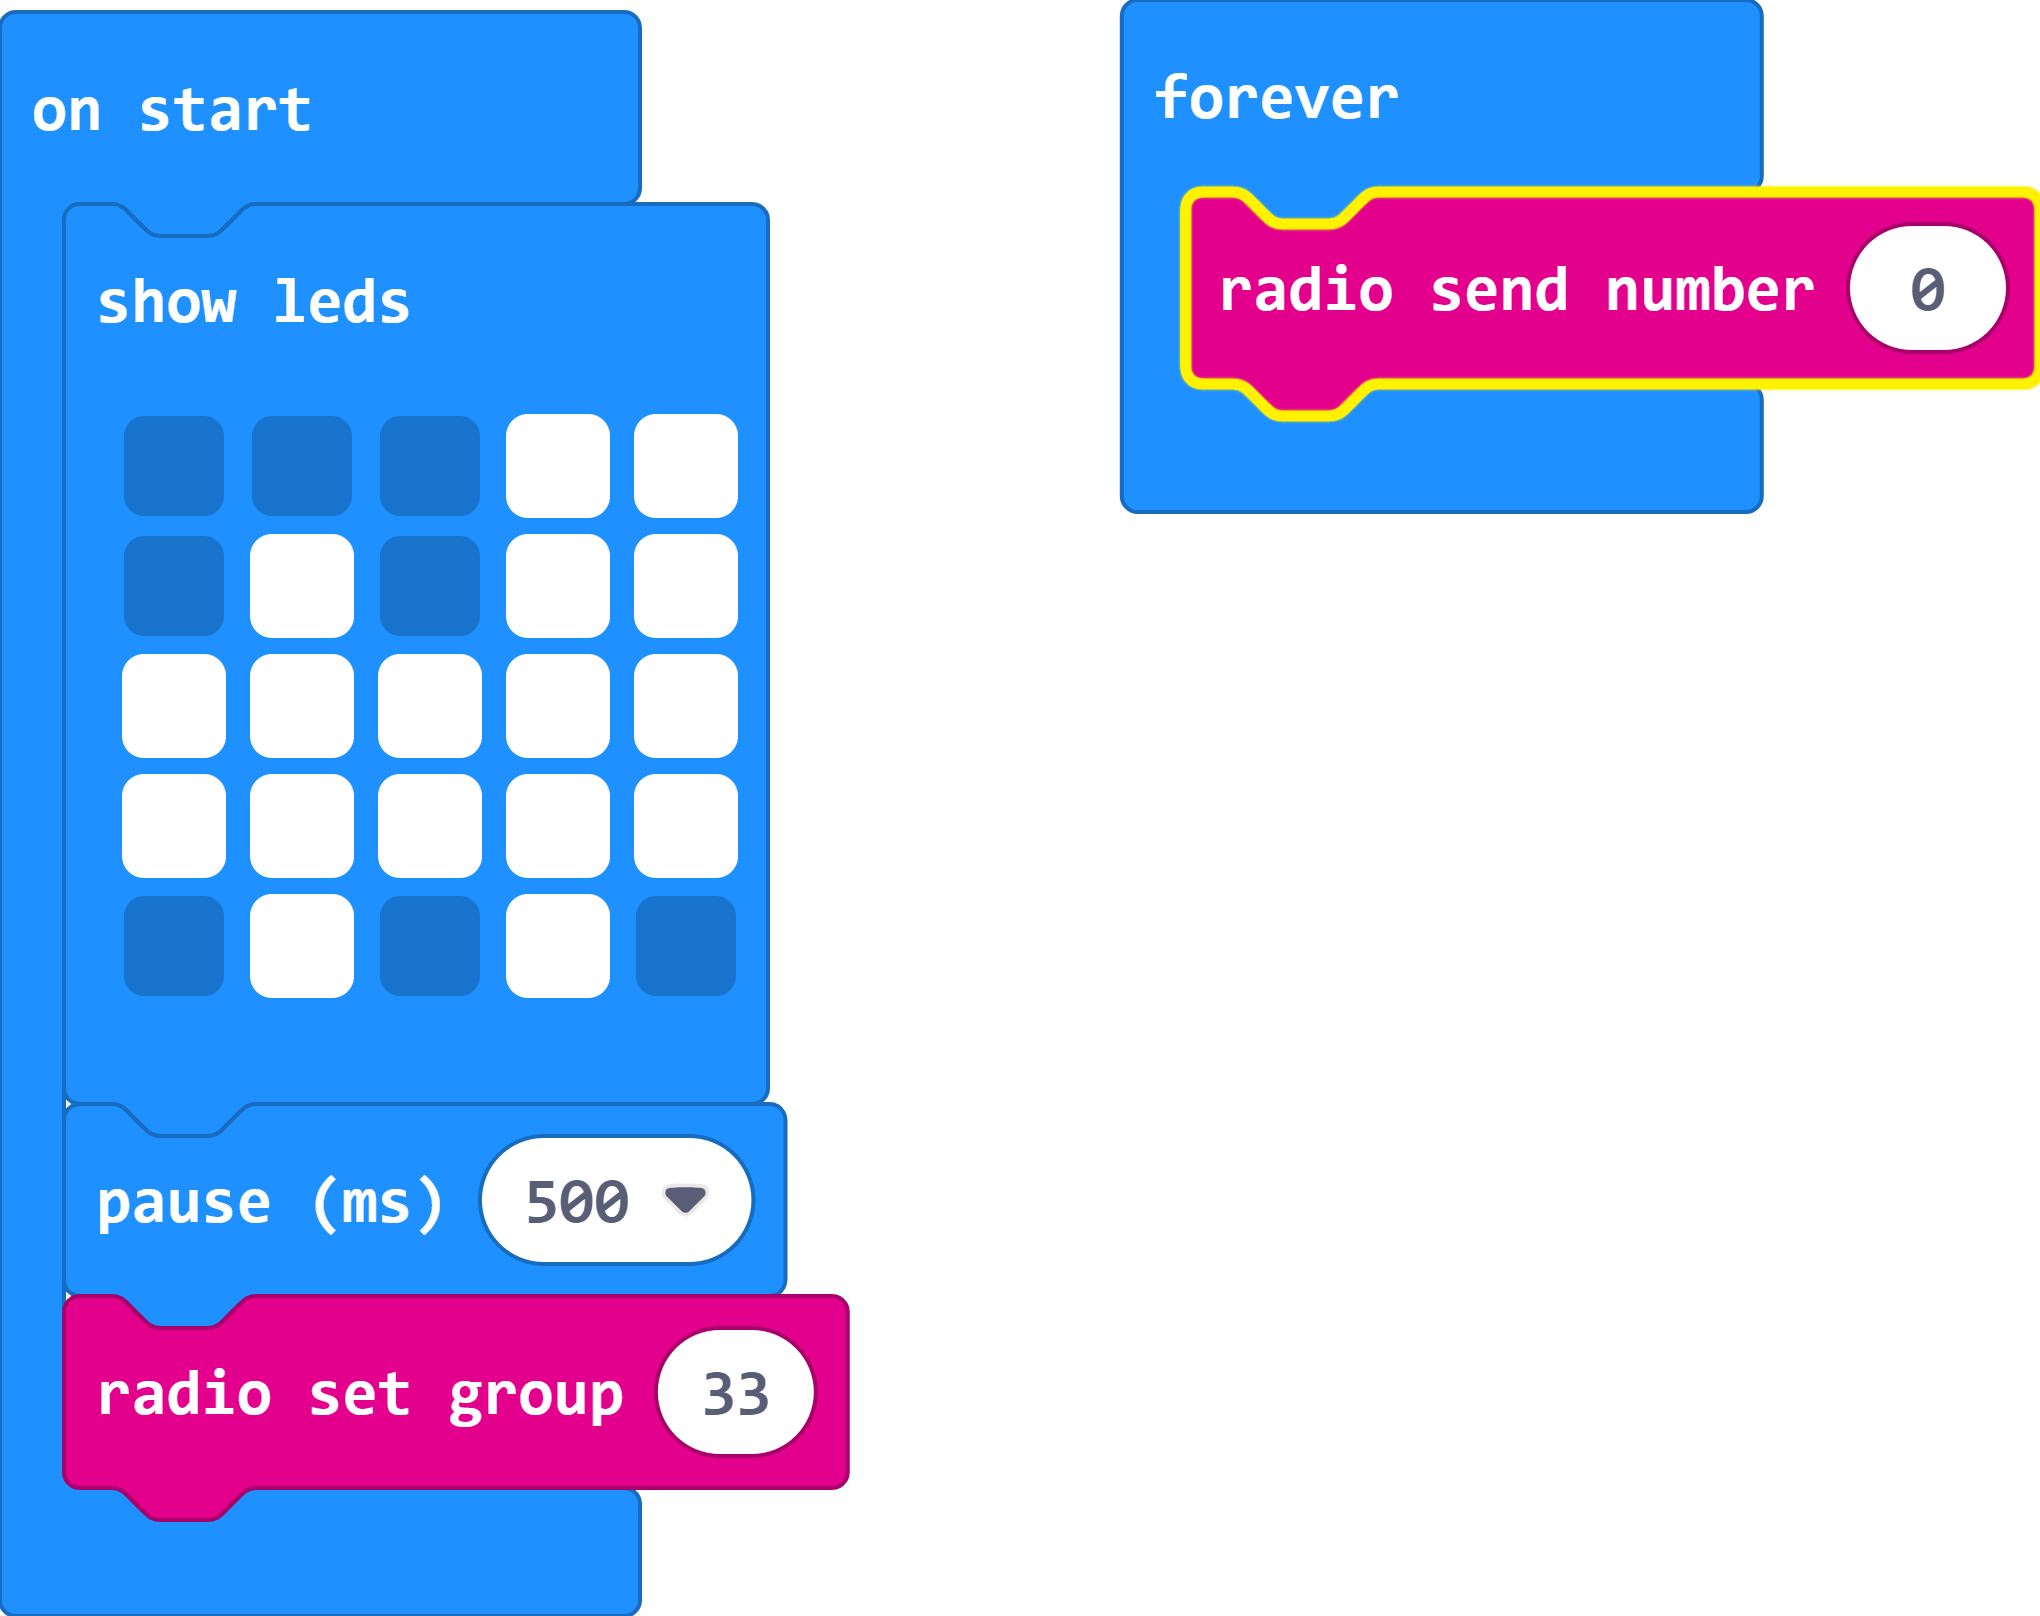
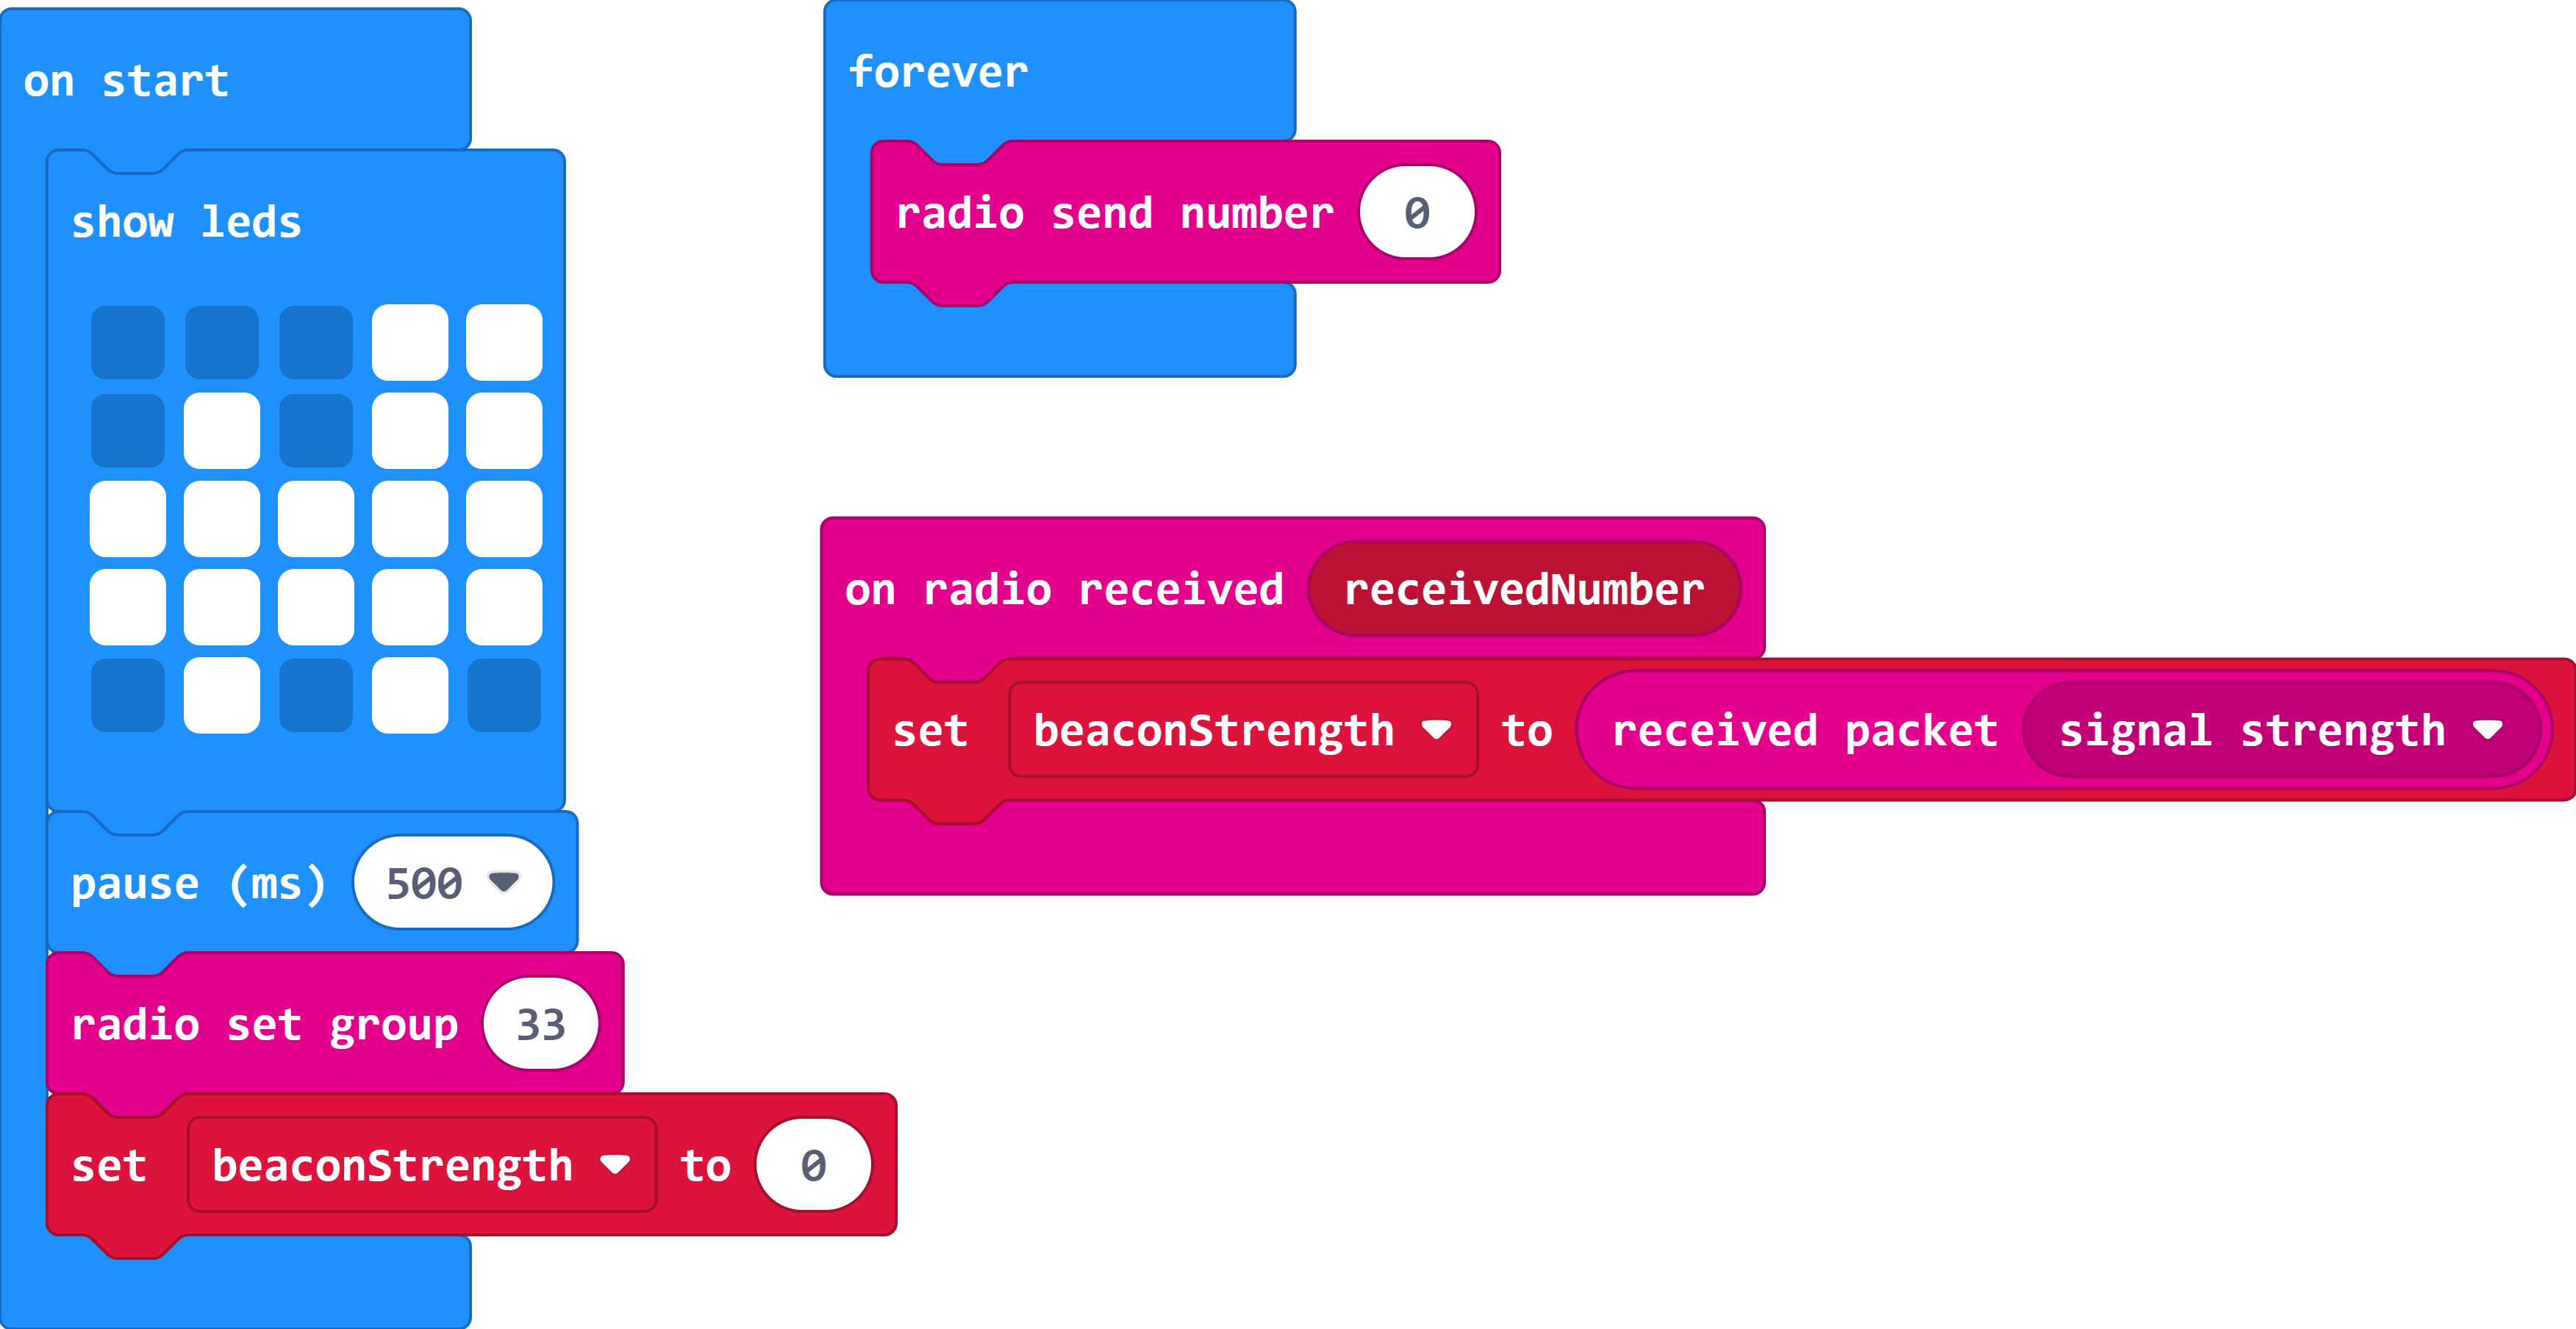
Have the Micro:Bit send the number zero via radio from inside the forever loop.
Tip: Don't forget to set a radio group for your Micro:Bit to use.
You can find the blocks you need in the Radio menu.
You need to set a radio group in the start-up sequence.
Create a beacon strength variable and have it set to the signal strength being received.
Tip: To measure the signal strength, the program needs to first receive the sent number.
Pick a suitable name for your new variable. Some programs use lots of variables, and it helps to be able to quickly identify what each one is for.
Remember to set your new variable to 0 when the program first starts - This is good practice for when you start learning text-based programming languages.
You will need to set your new variable to the received signal strength value inside an 'on radio received' block.
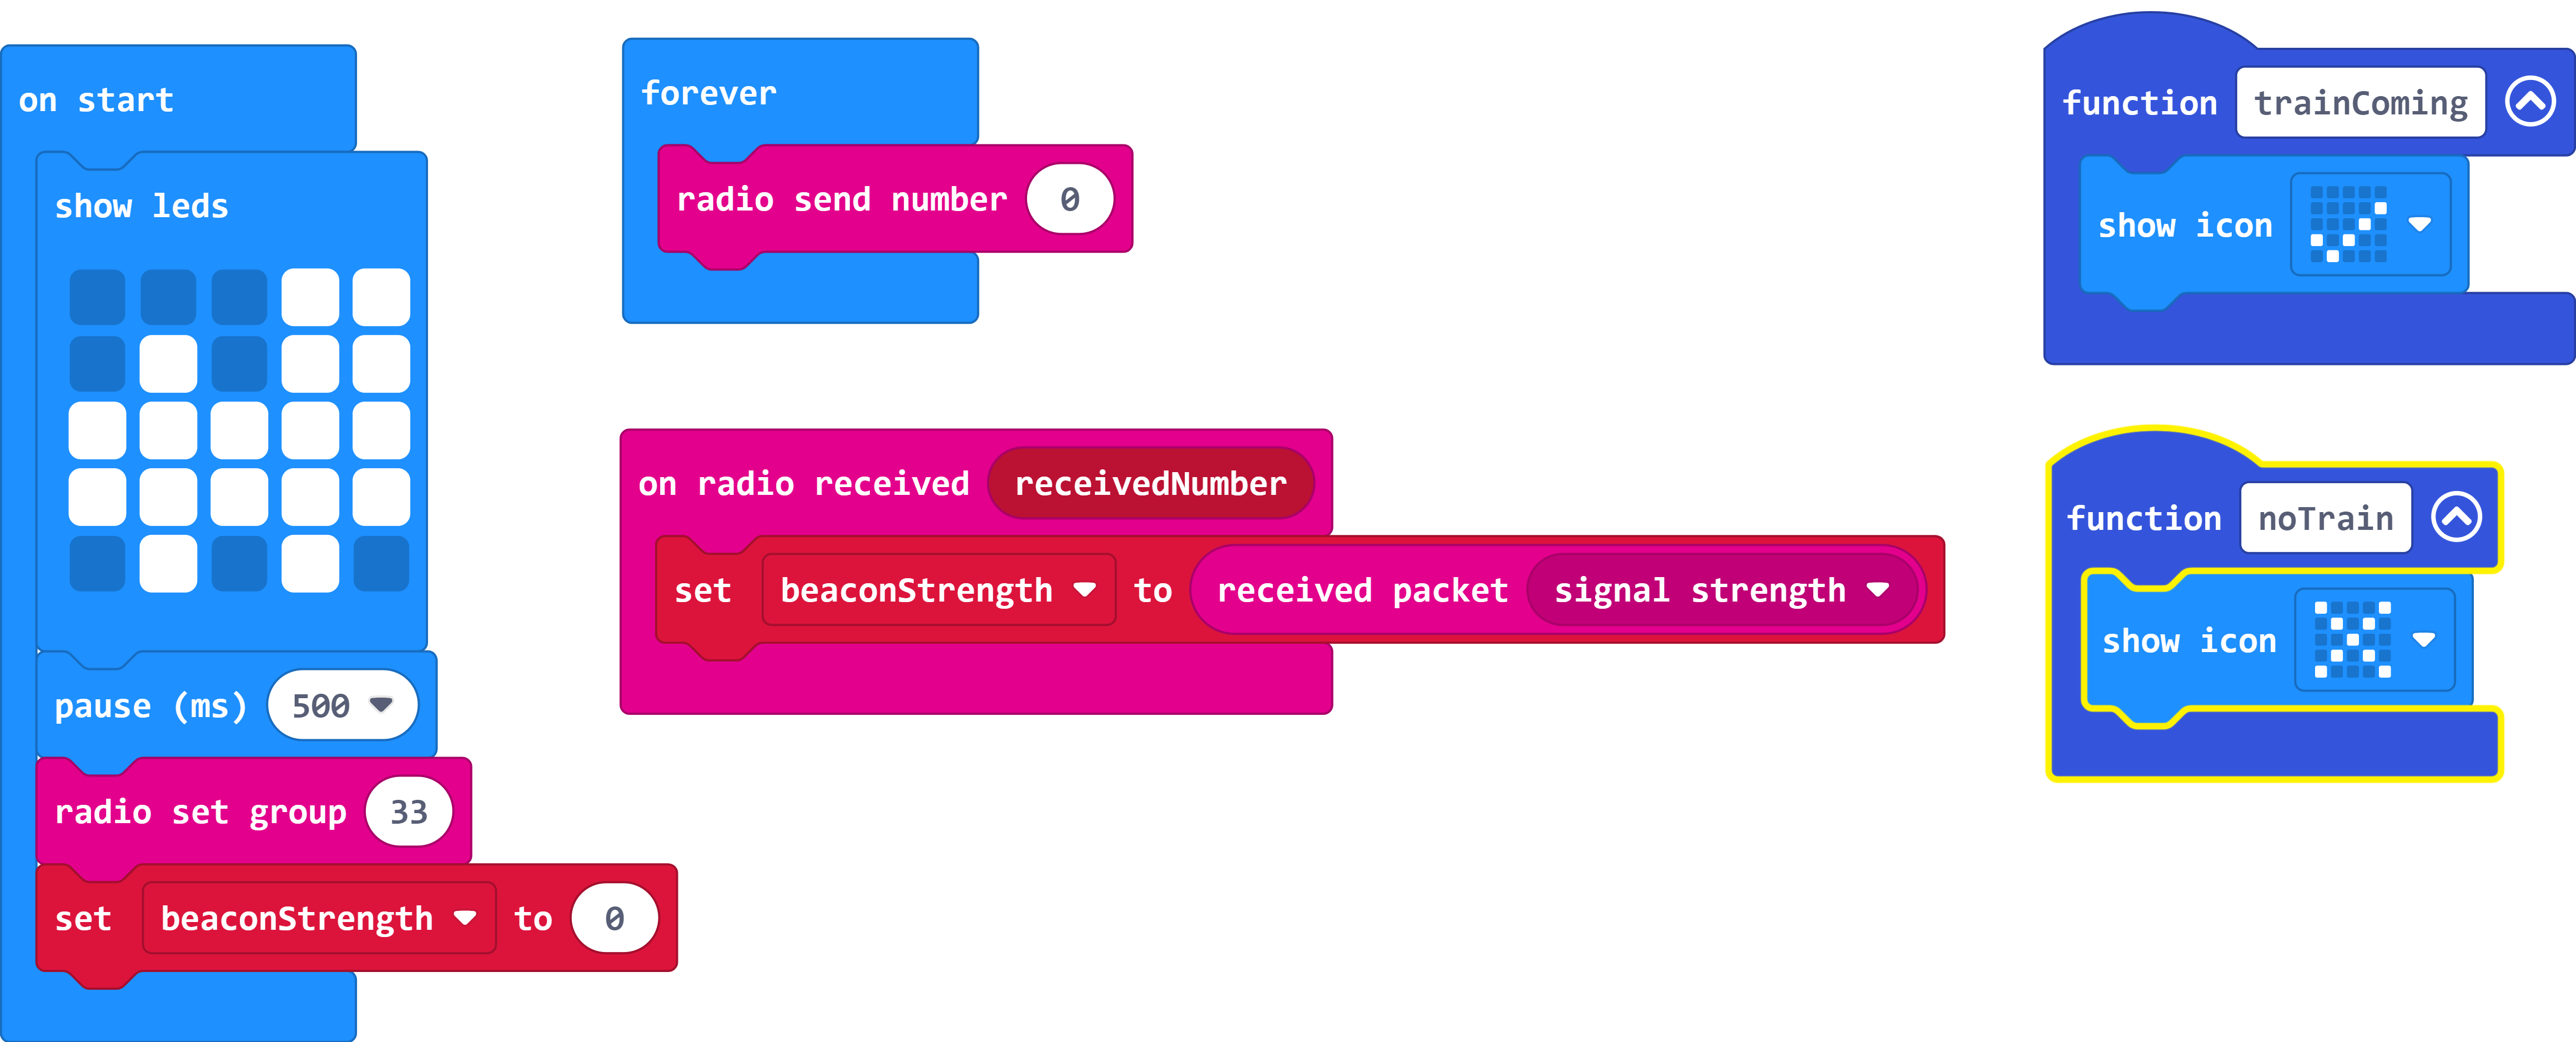
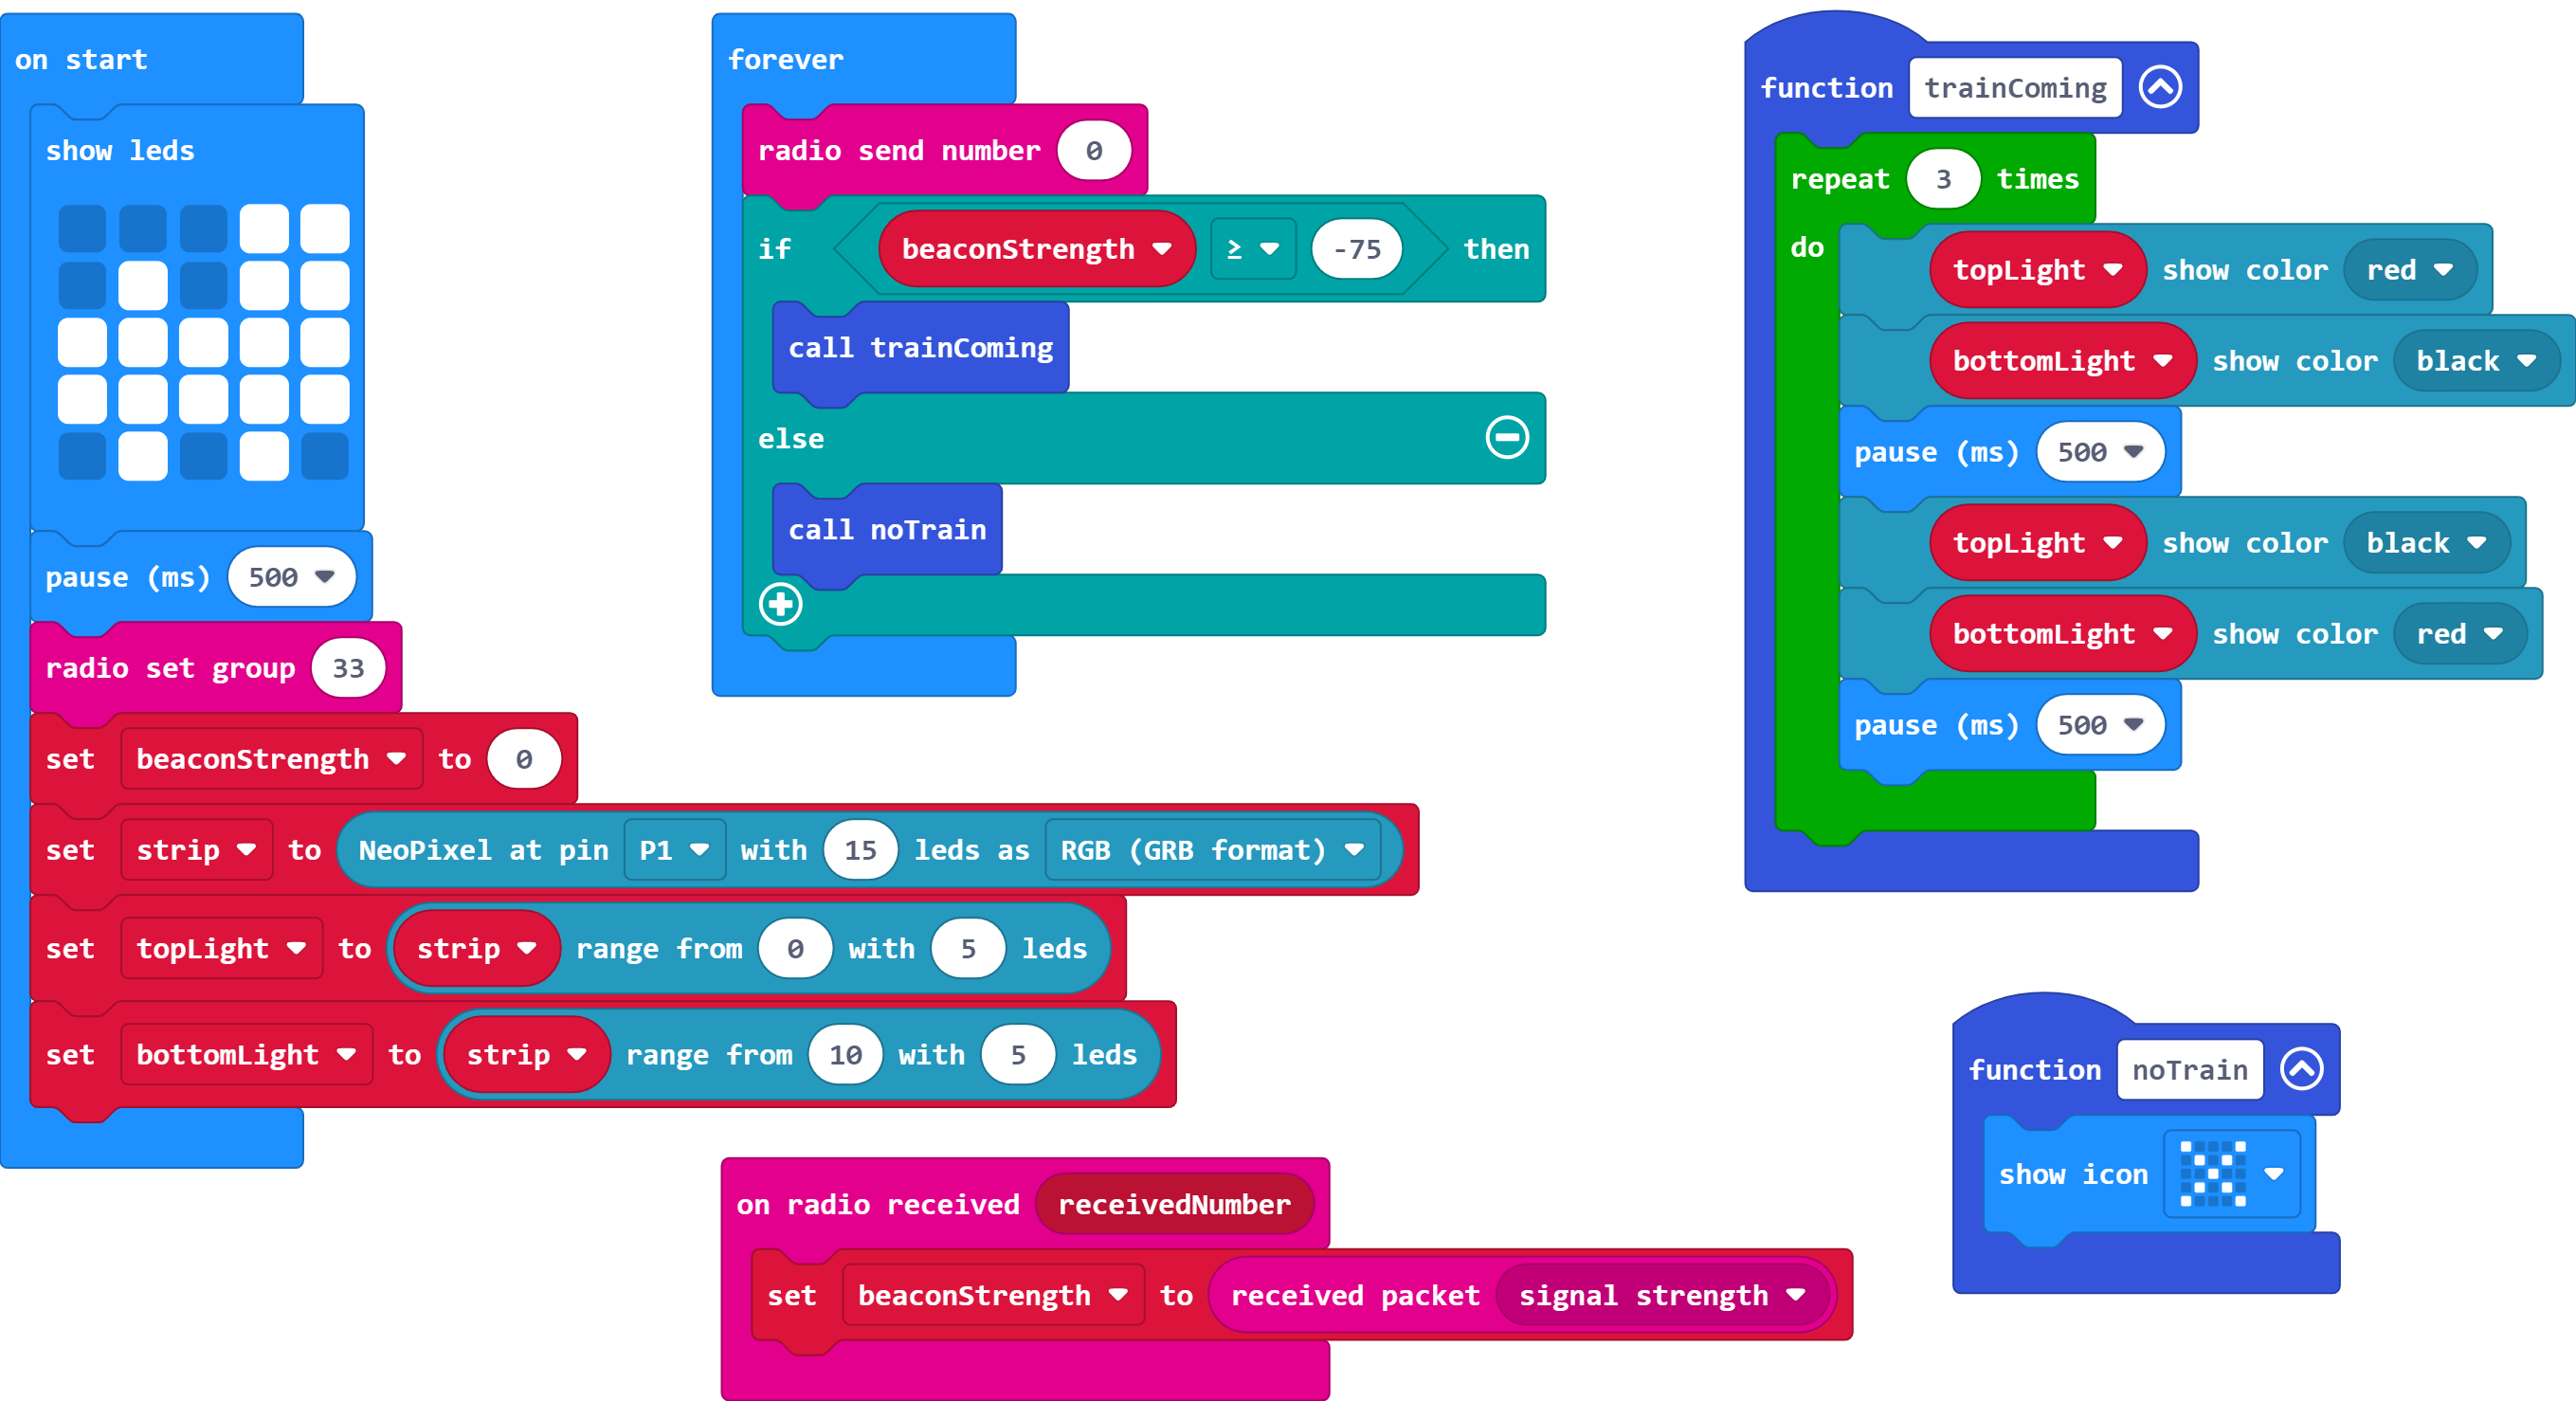
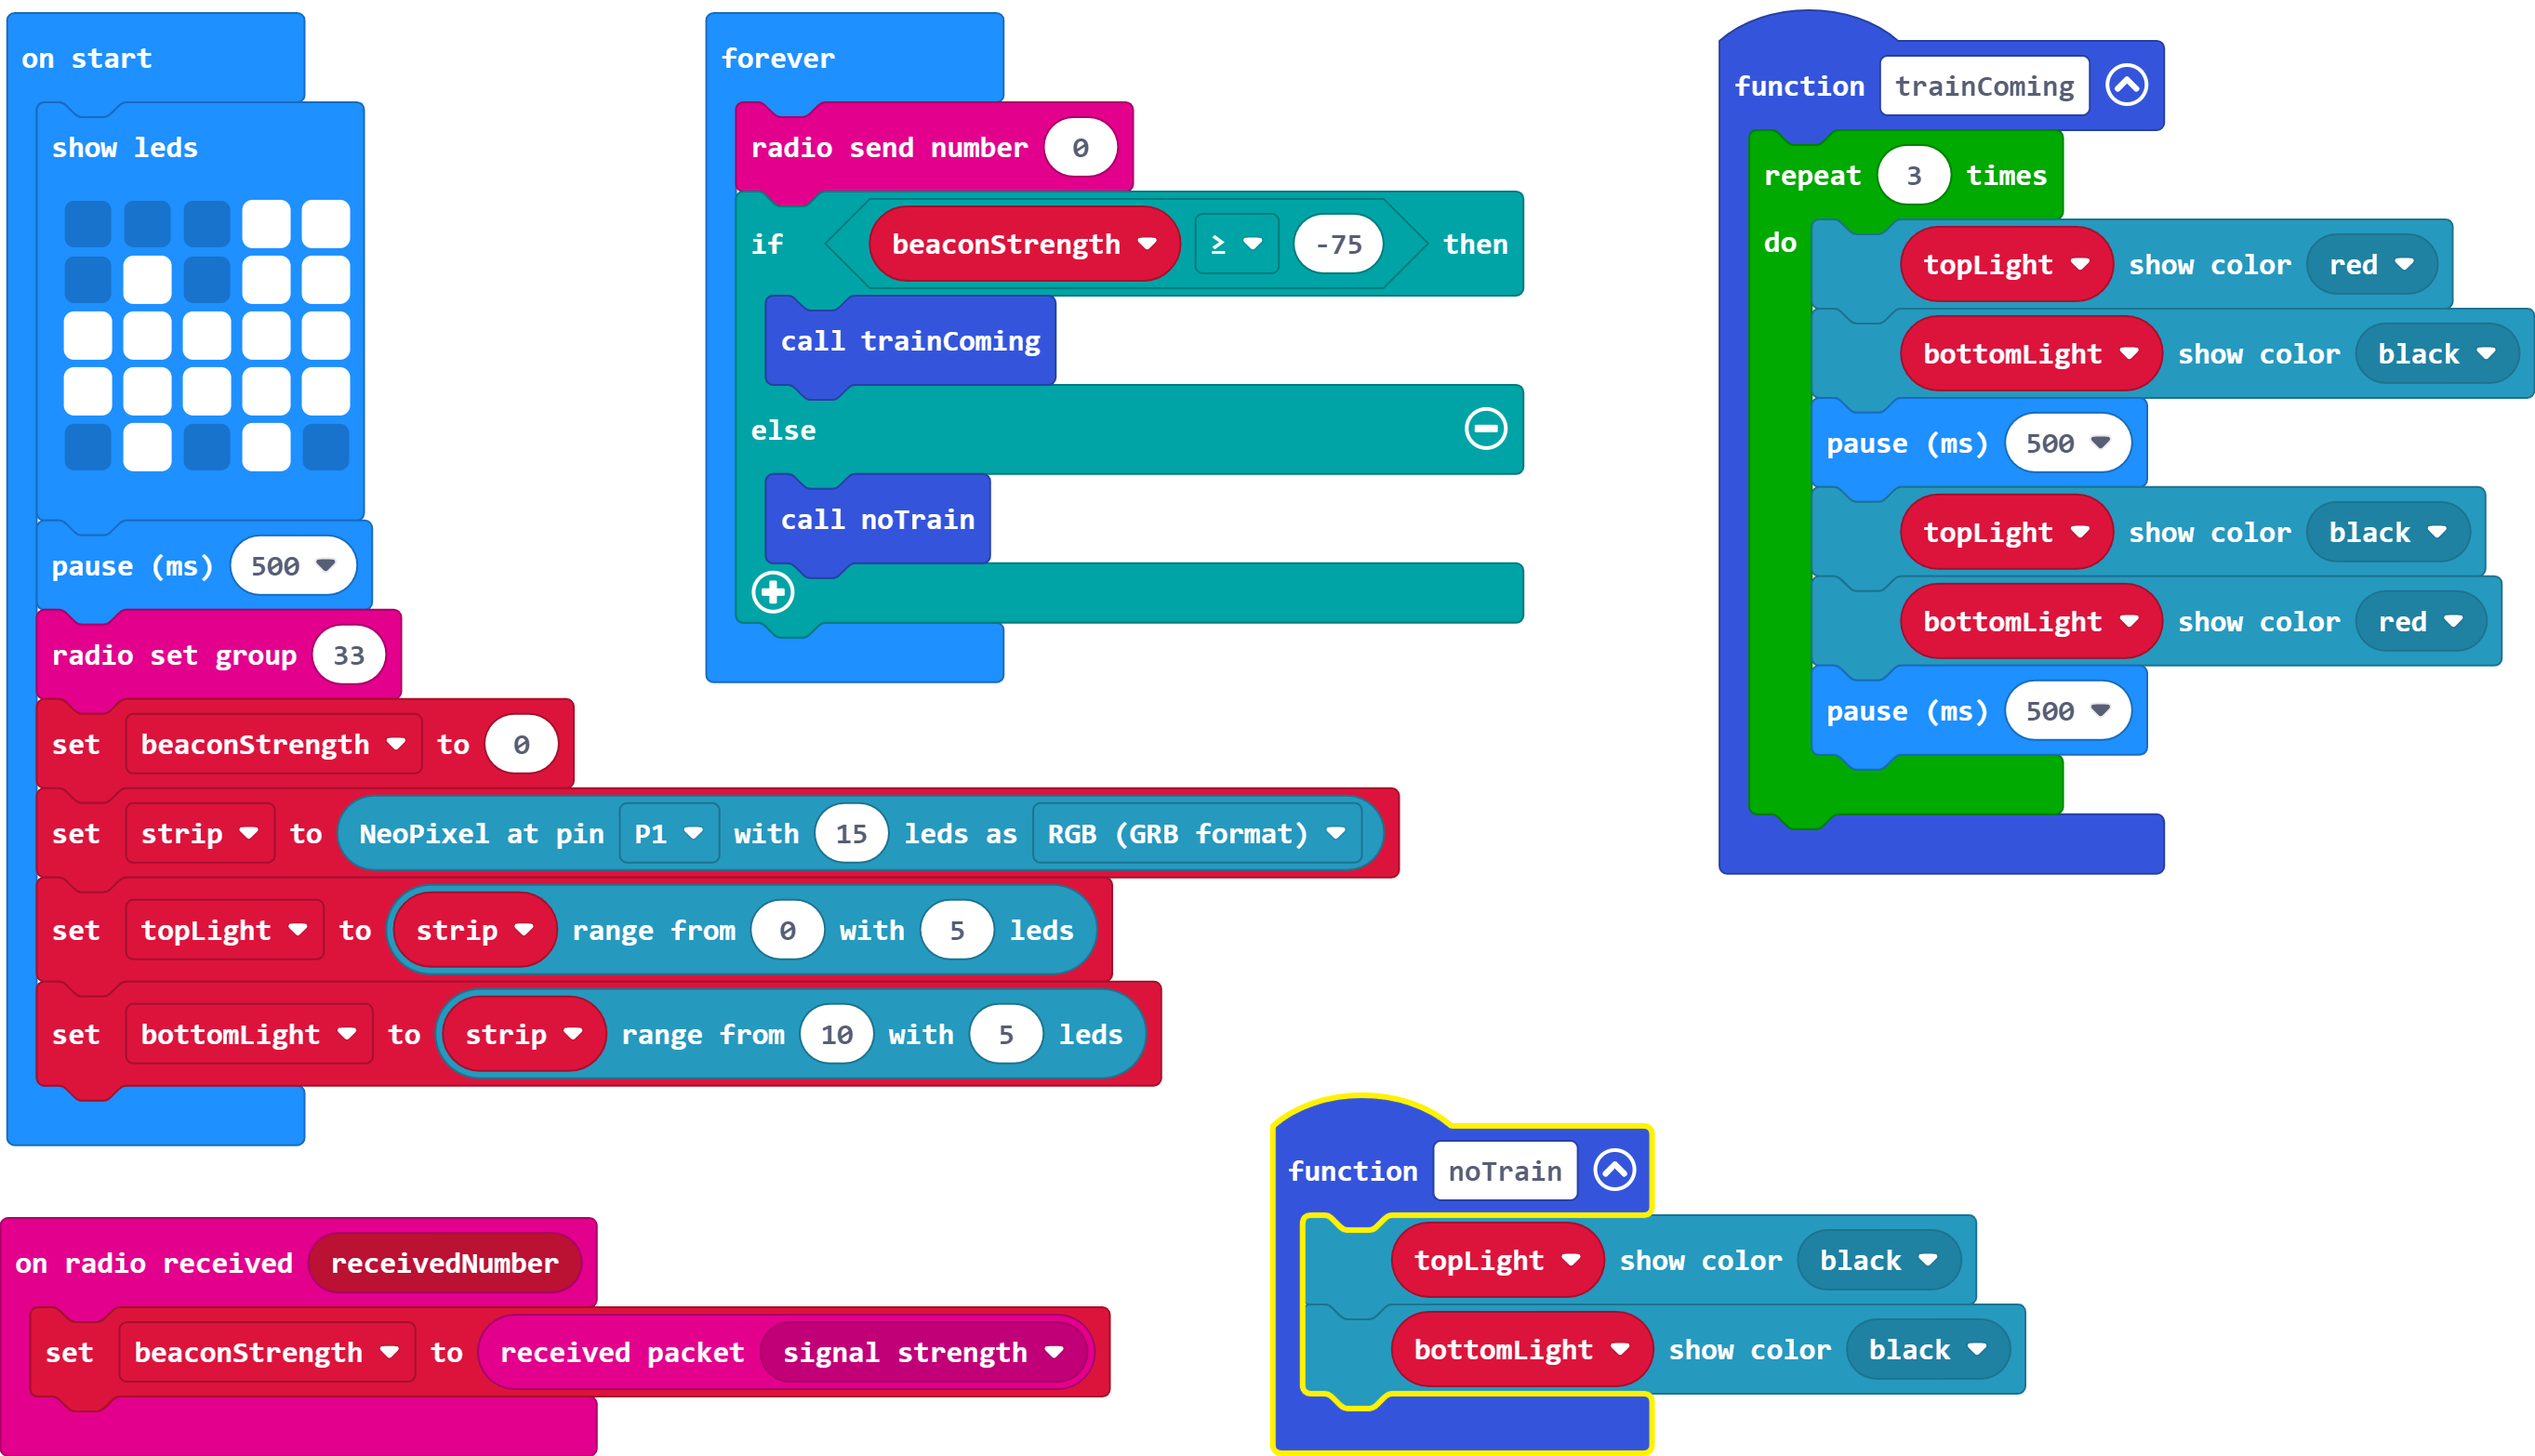
We now need two functions, one for the program for when a train is coming, the other for when there isn't. Give each function a suitable name and have a different image in each.
Tip: The images at this stage are for testing, so any will do.
The Functions menu can be found in the Advanced section.
These functions will not show in testing, as we have not called them in the program.
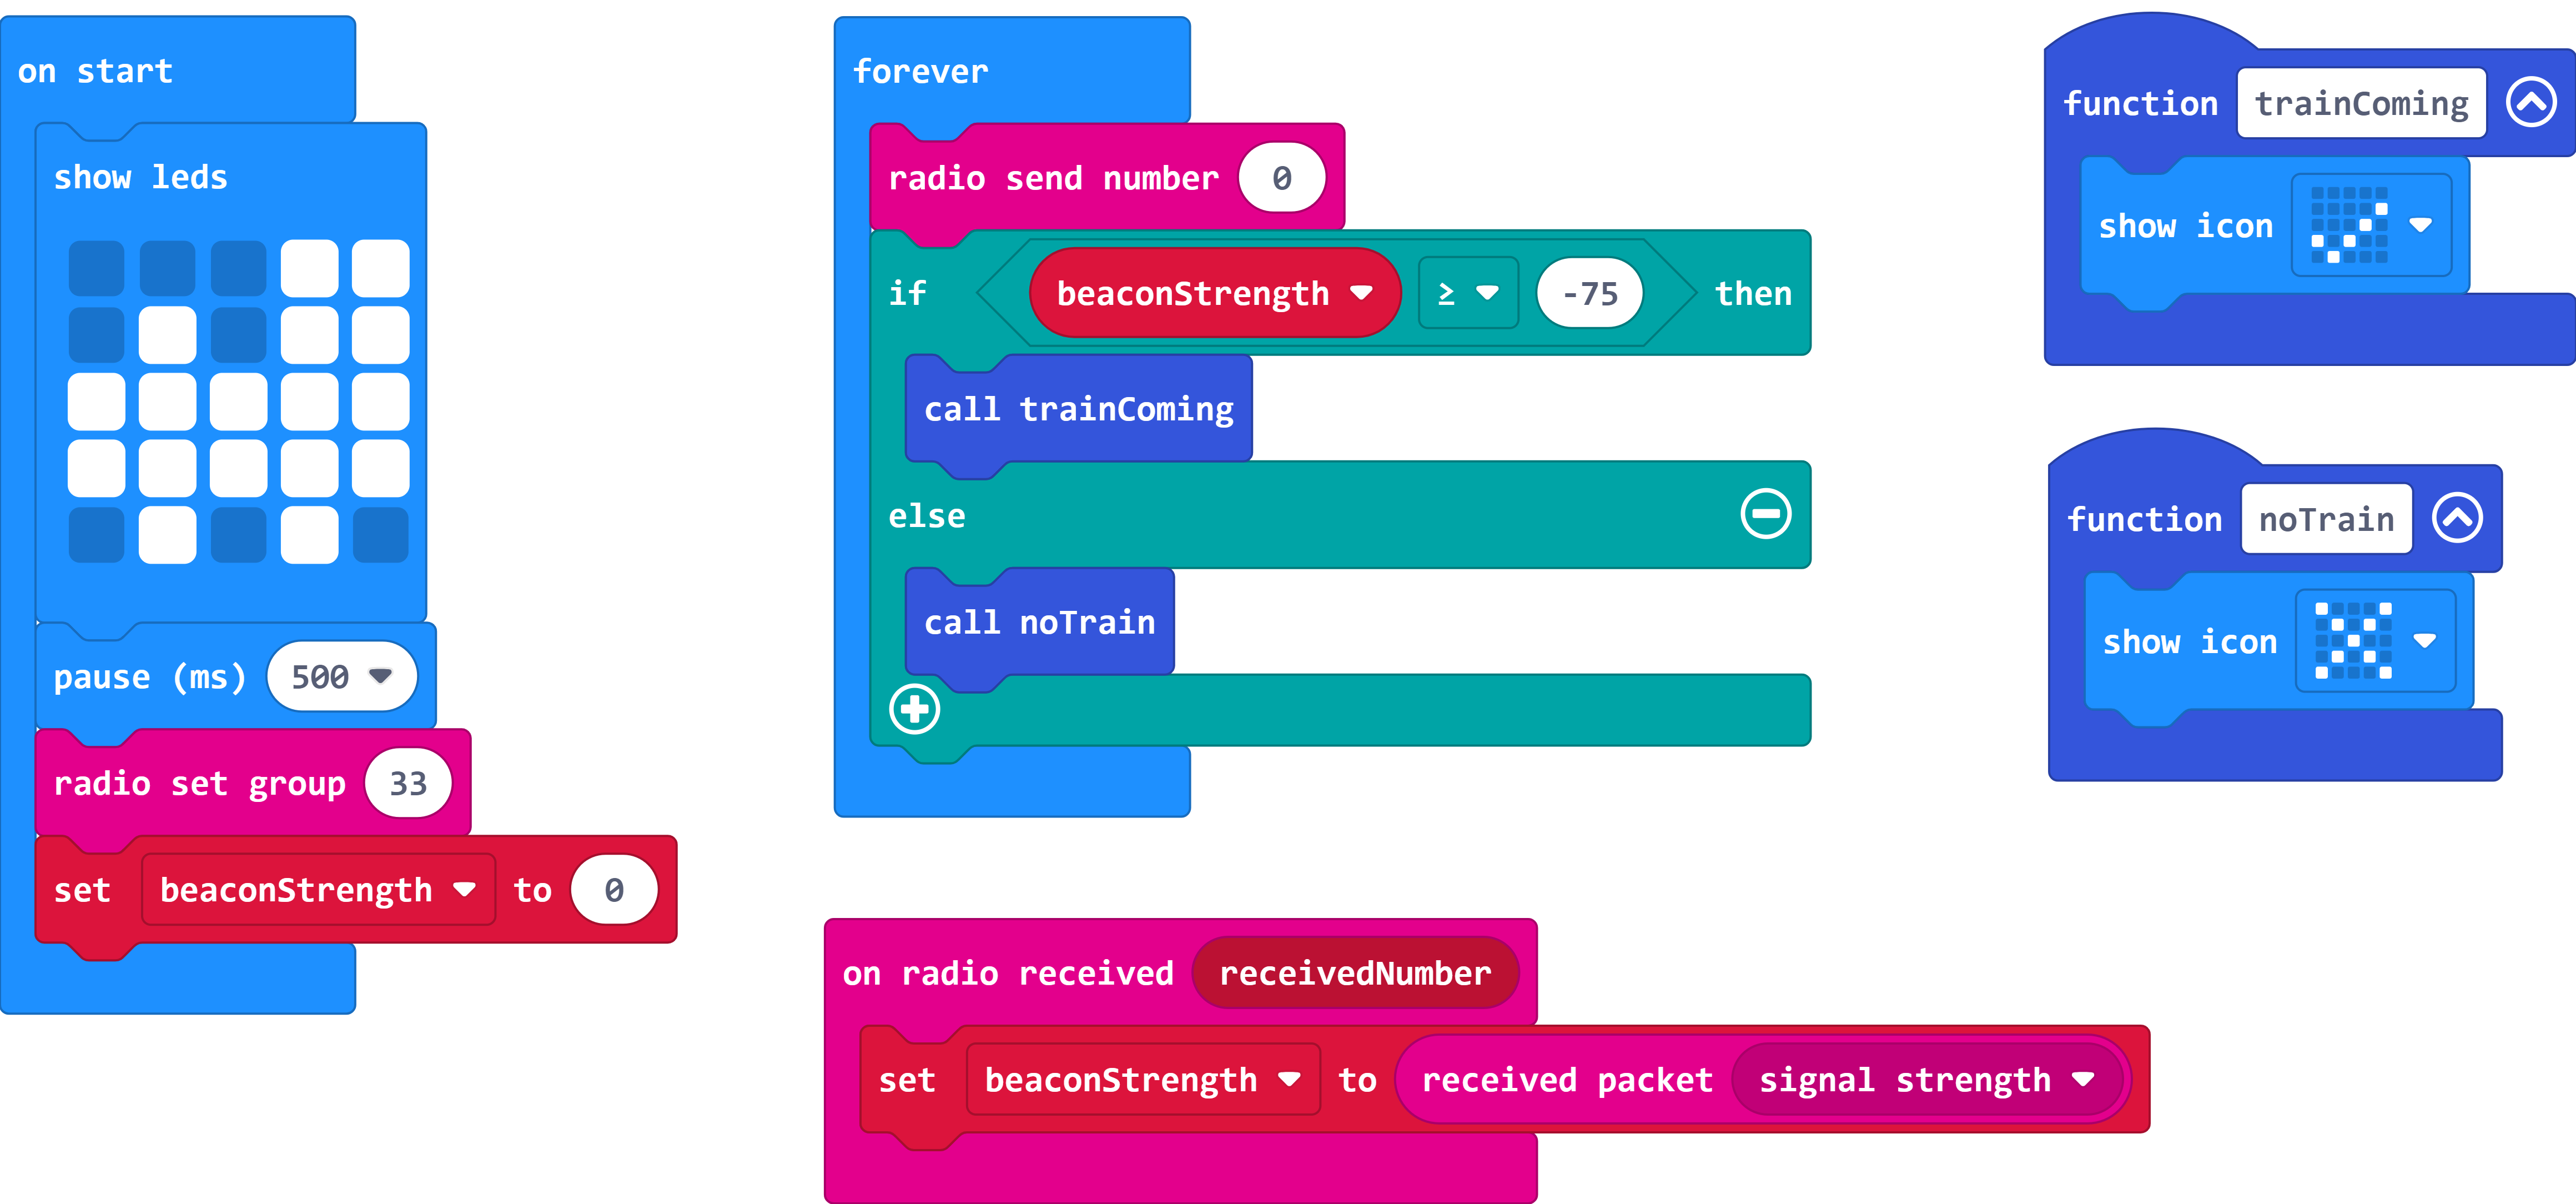
Call your function for when a train is coming when the signal strength is greater than or equal to -75. Otherwise, call the no train coming function.
Tip: While testing in the simulator, treat the top Micro:Bit as the crossing controller and the bottom Micro:Bit as the train beacon.
You will need to create an if statement for this which compares the beacon strength value to -75.
The radio signal strength for the Micro:Bit in the simulator has a range of -128 (weakest signal) to -42 (strongest signal).
Remember we have several maths symbols to choose from: = equals, < less than, > greater than, ≤ less than or equal to, and ≥ greater than or equal to.
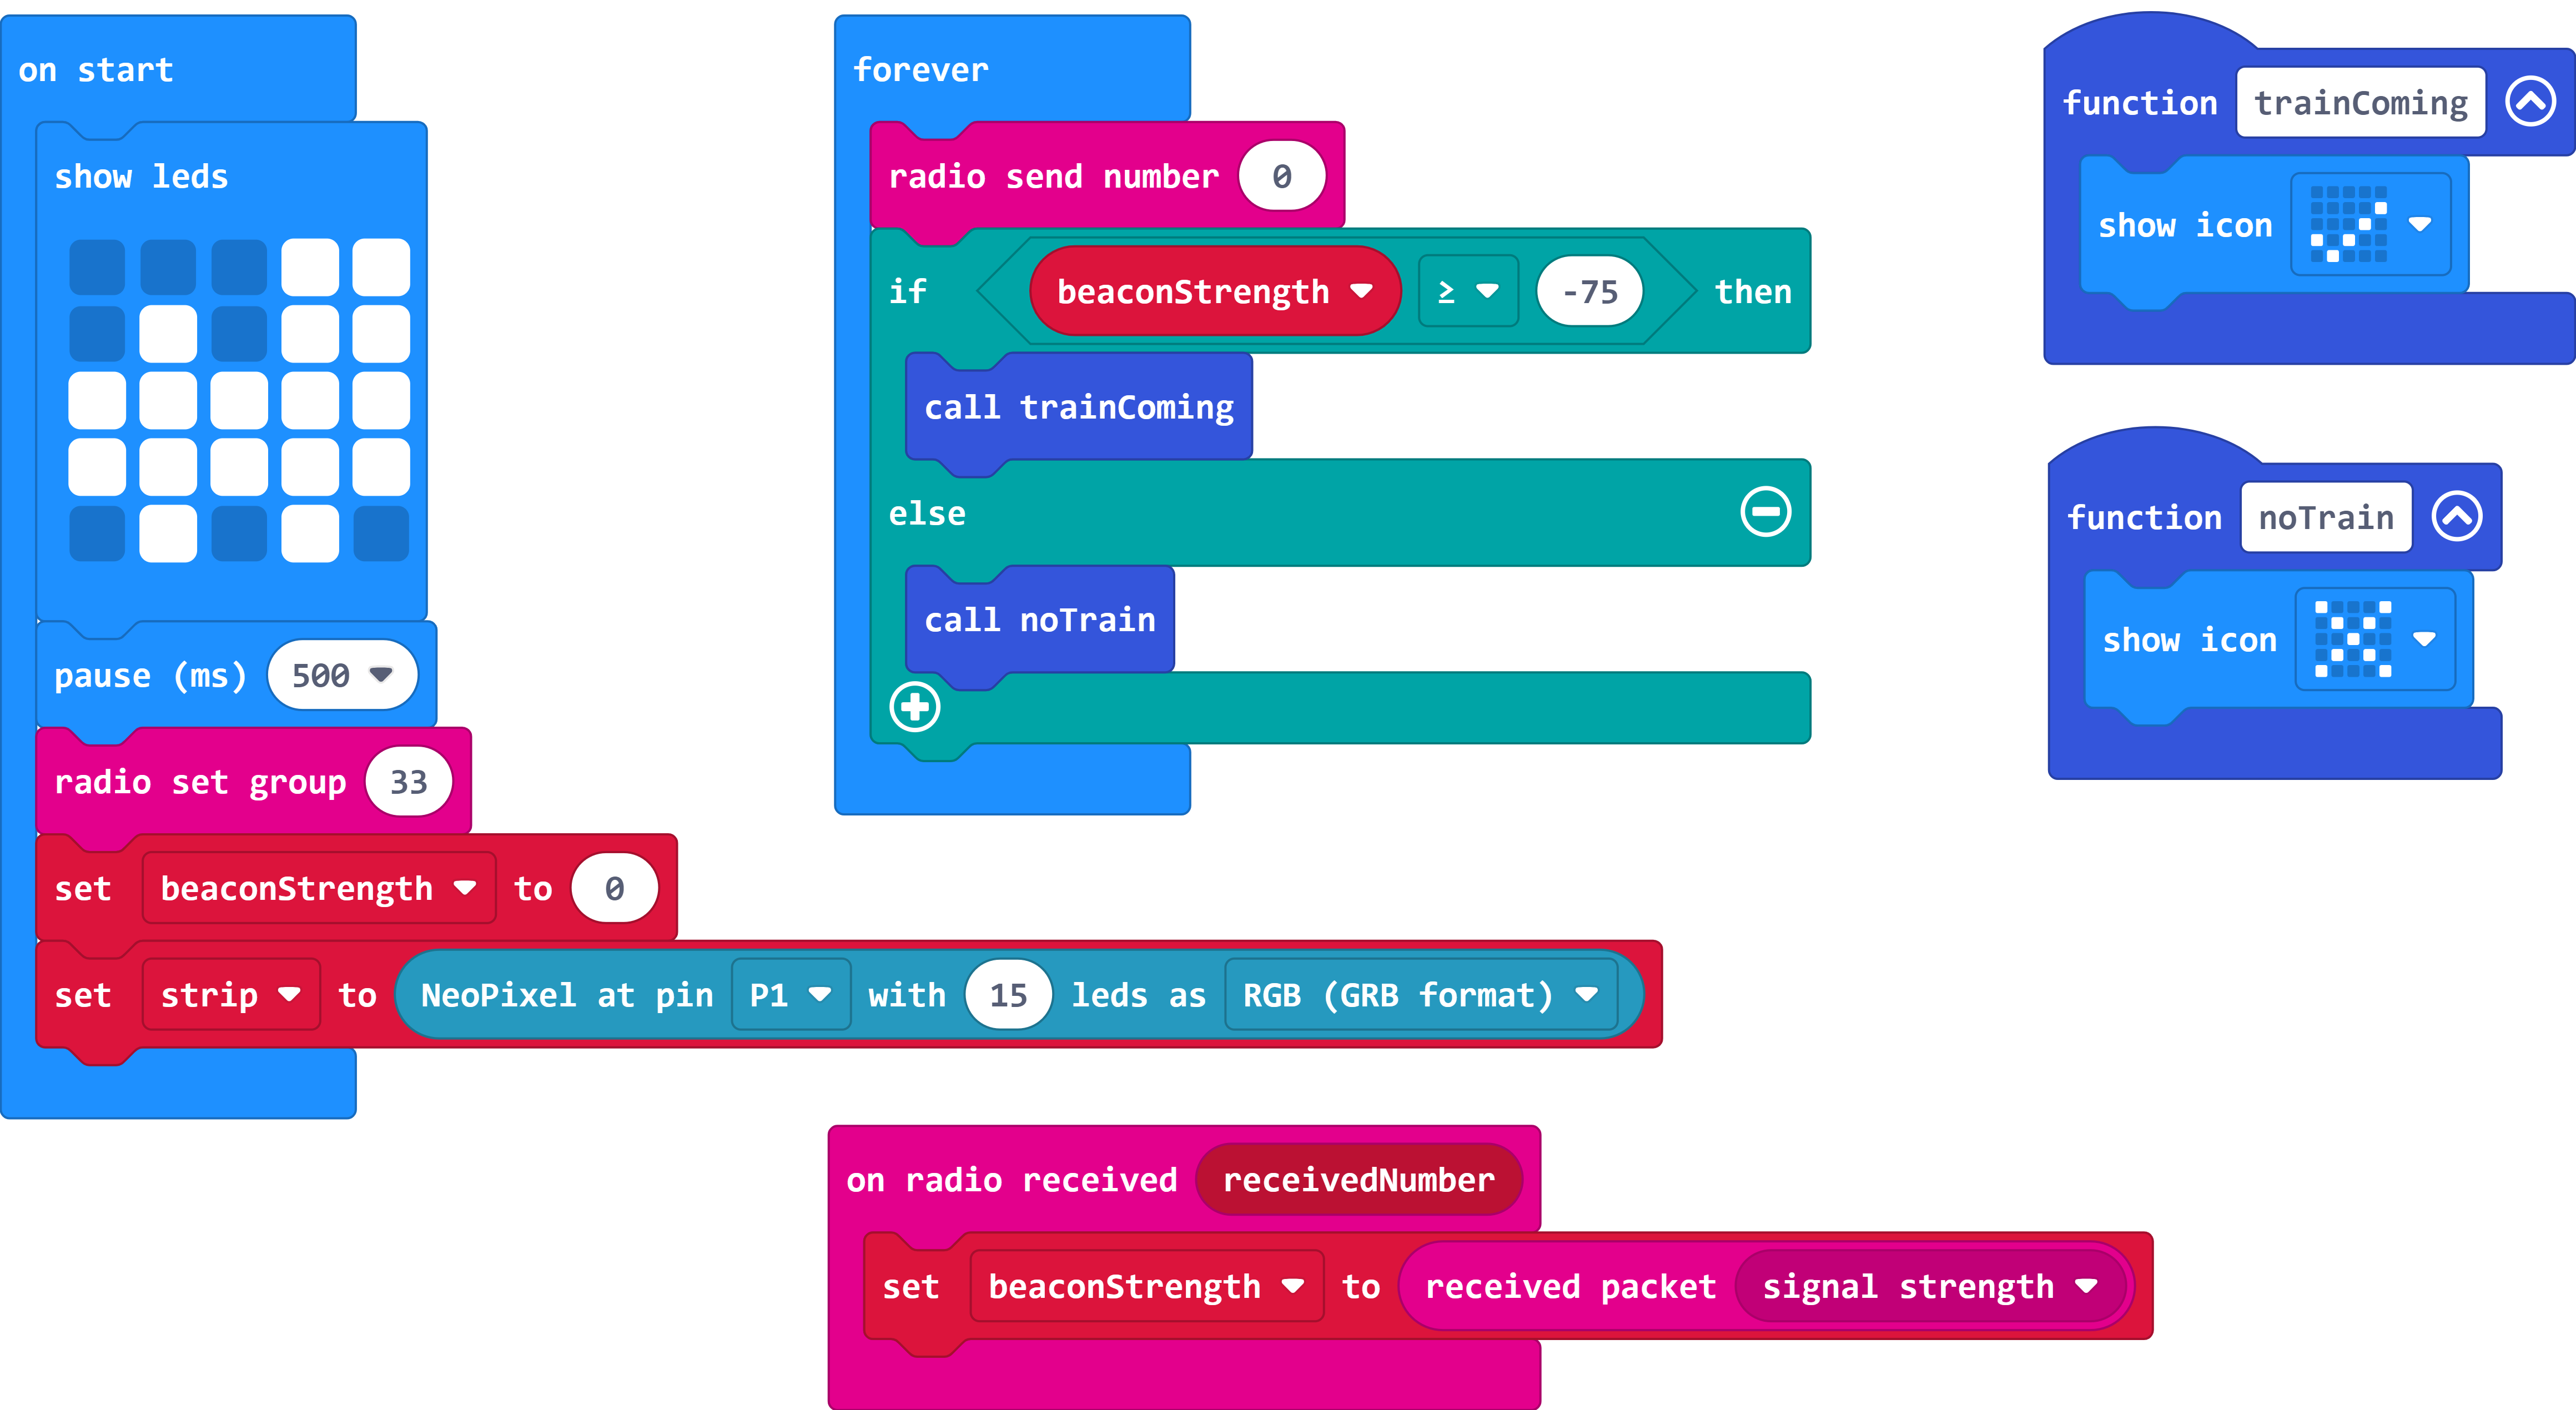
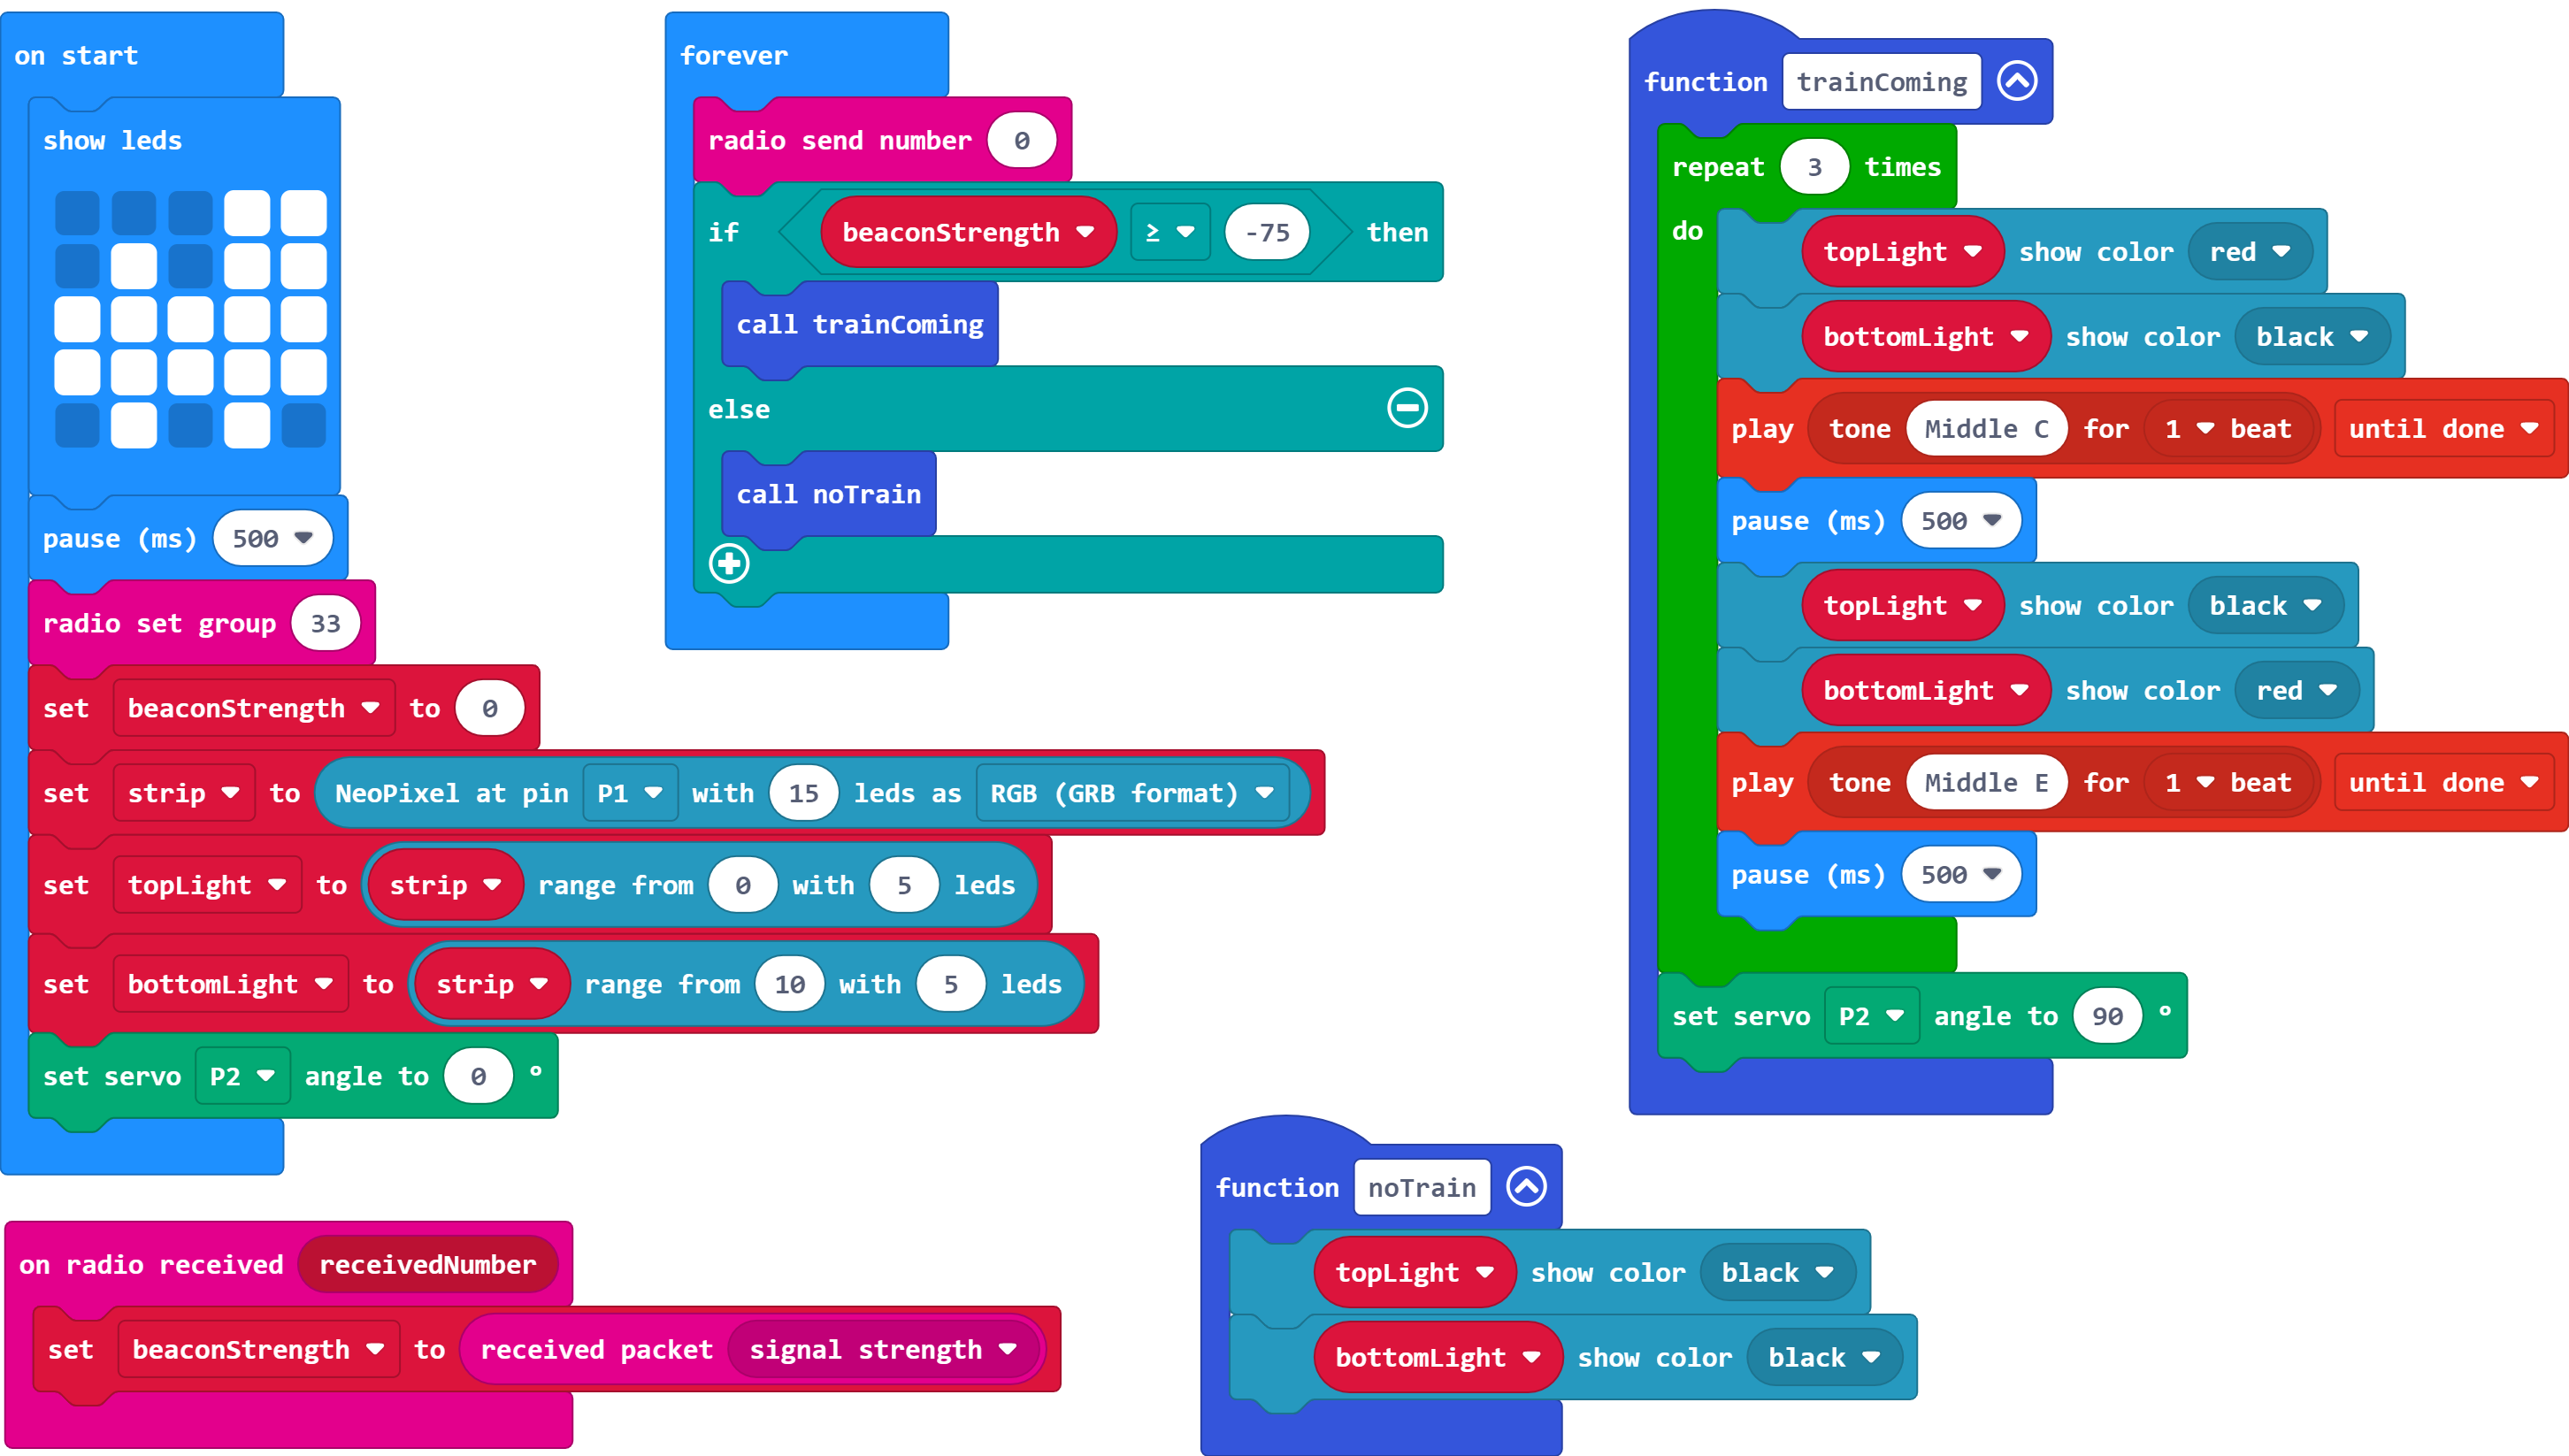
We now need to create our crossing lights. For this we need a Neopixel connected to pin 1 which is made up of 15 LEDs.
Tip: You'll need to add the Neopixel extension to your blocks menu.
Re-visit Session Four if you need a reminder of how to get and use the Neopixel extension blocks.
You will need to change the default length from 24 to 15 LEDs.
Set up two ranges, with suitable names - one for the top 5 LEDs and another for the bottom 5 LEDs.
Tip: Remember that counting in computing starts at zero.
The first range will start at 0, whilst the bottom range will start at 10.
Remove the image in your function for when a train is coming and replace it with a program that will turn the lights on and off (alternating between the top and the bottom) three times. Include a pause of 500ms after each light turns on.
Tip: Remember that setting a light to black turns it off.
Each time a light turns on, the other needs to turn off.
You can use a 'repeat 3 times' block to shorten the program.
Replace the image in you function for when a train is not approaching with a program to make sure the lights are all turned off.
You will need to set both of our light ranges to black in the function for when there is no train coming.
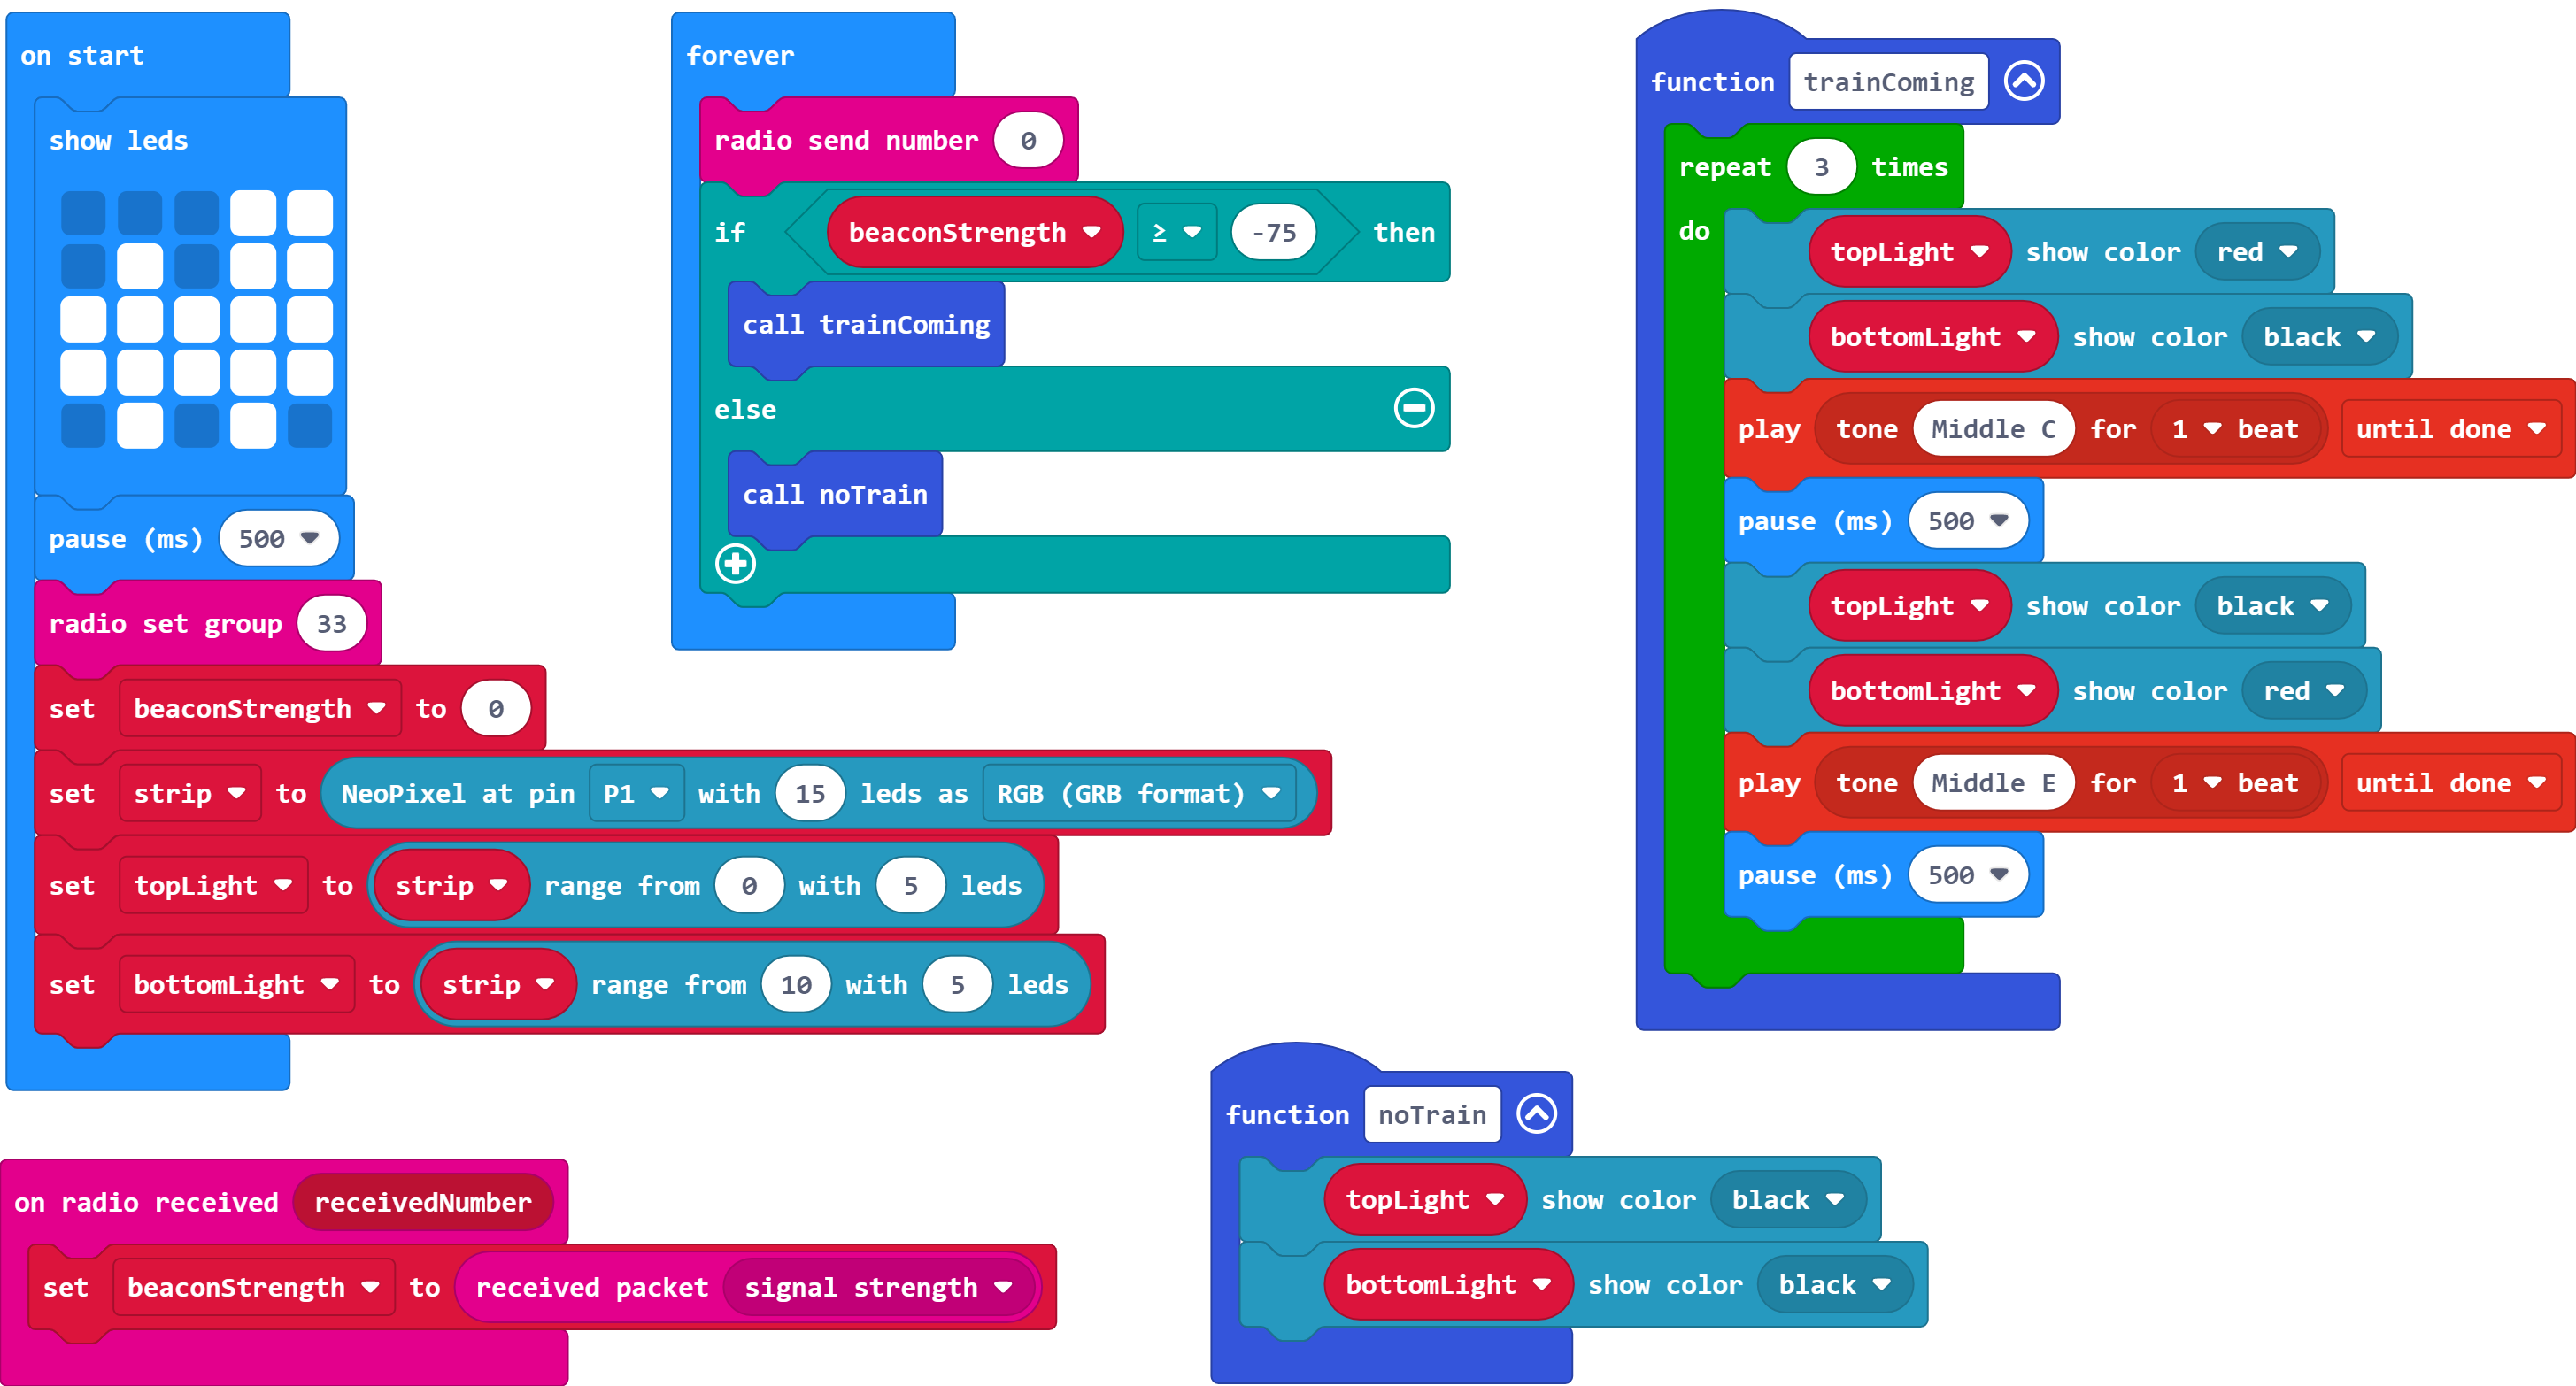
Have your program play a middle C note when the top light is on and a middle E note when the bottom light is on. This is our alarm to warn drivers and pedestrians a train is coming.
Tip: When testing, make sure the top Micro:Bit (our 'crossing') has a very low signal strength or the alarms on both Micro:Bits may merge and/or be out of sync.
You only want the notes to be 1 beat long.
You can change the note inside the 'play tone' block.
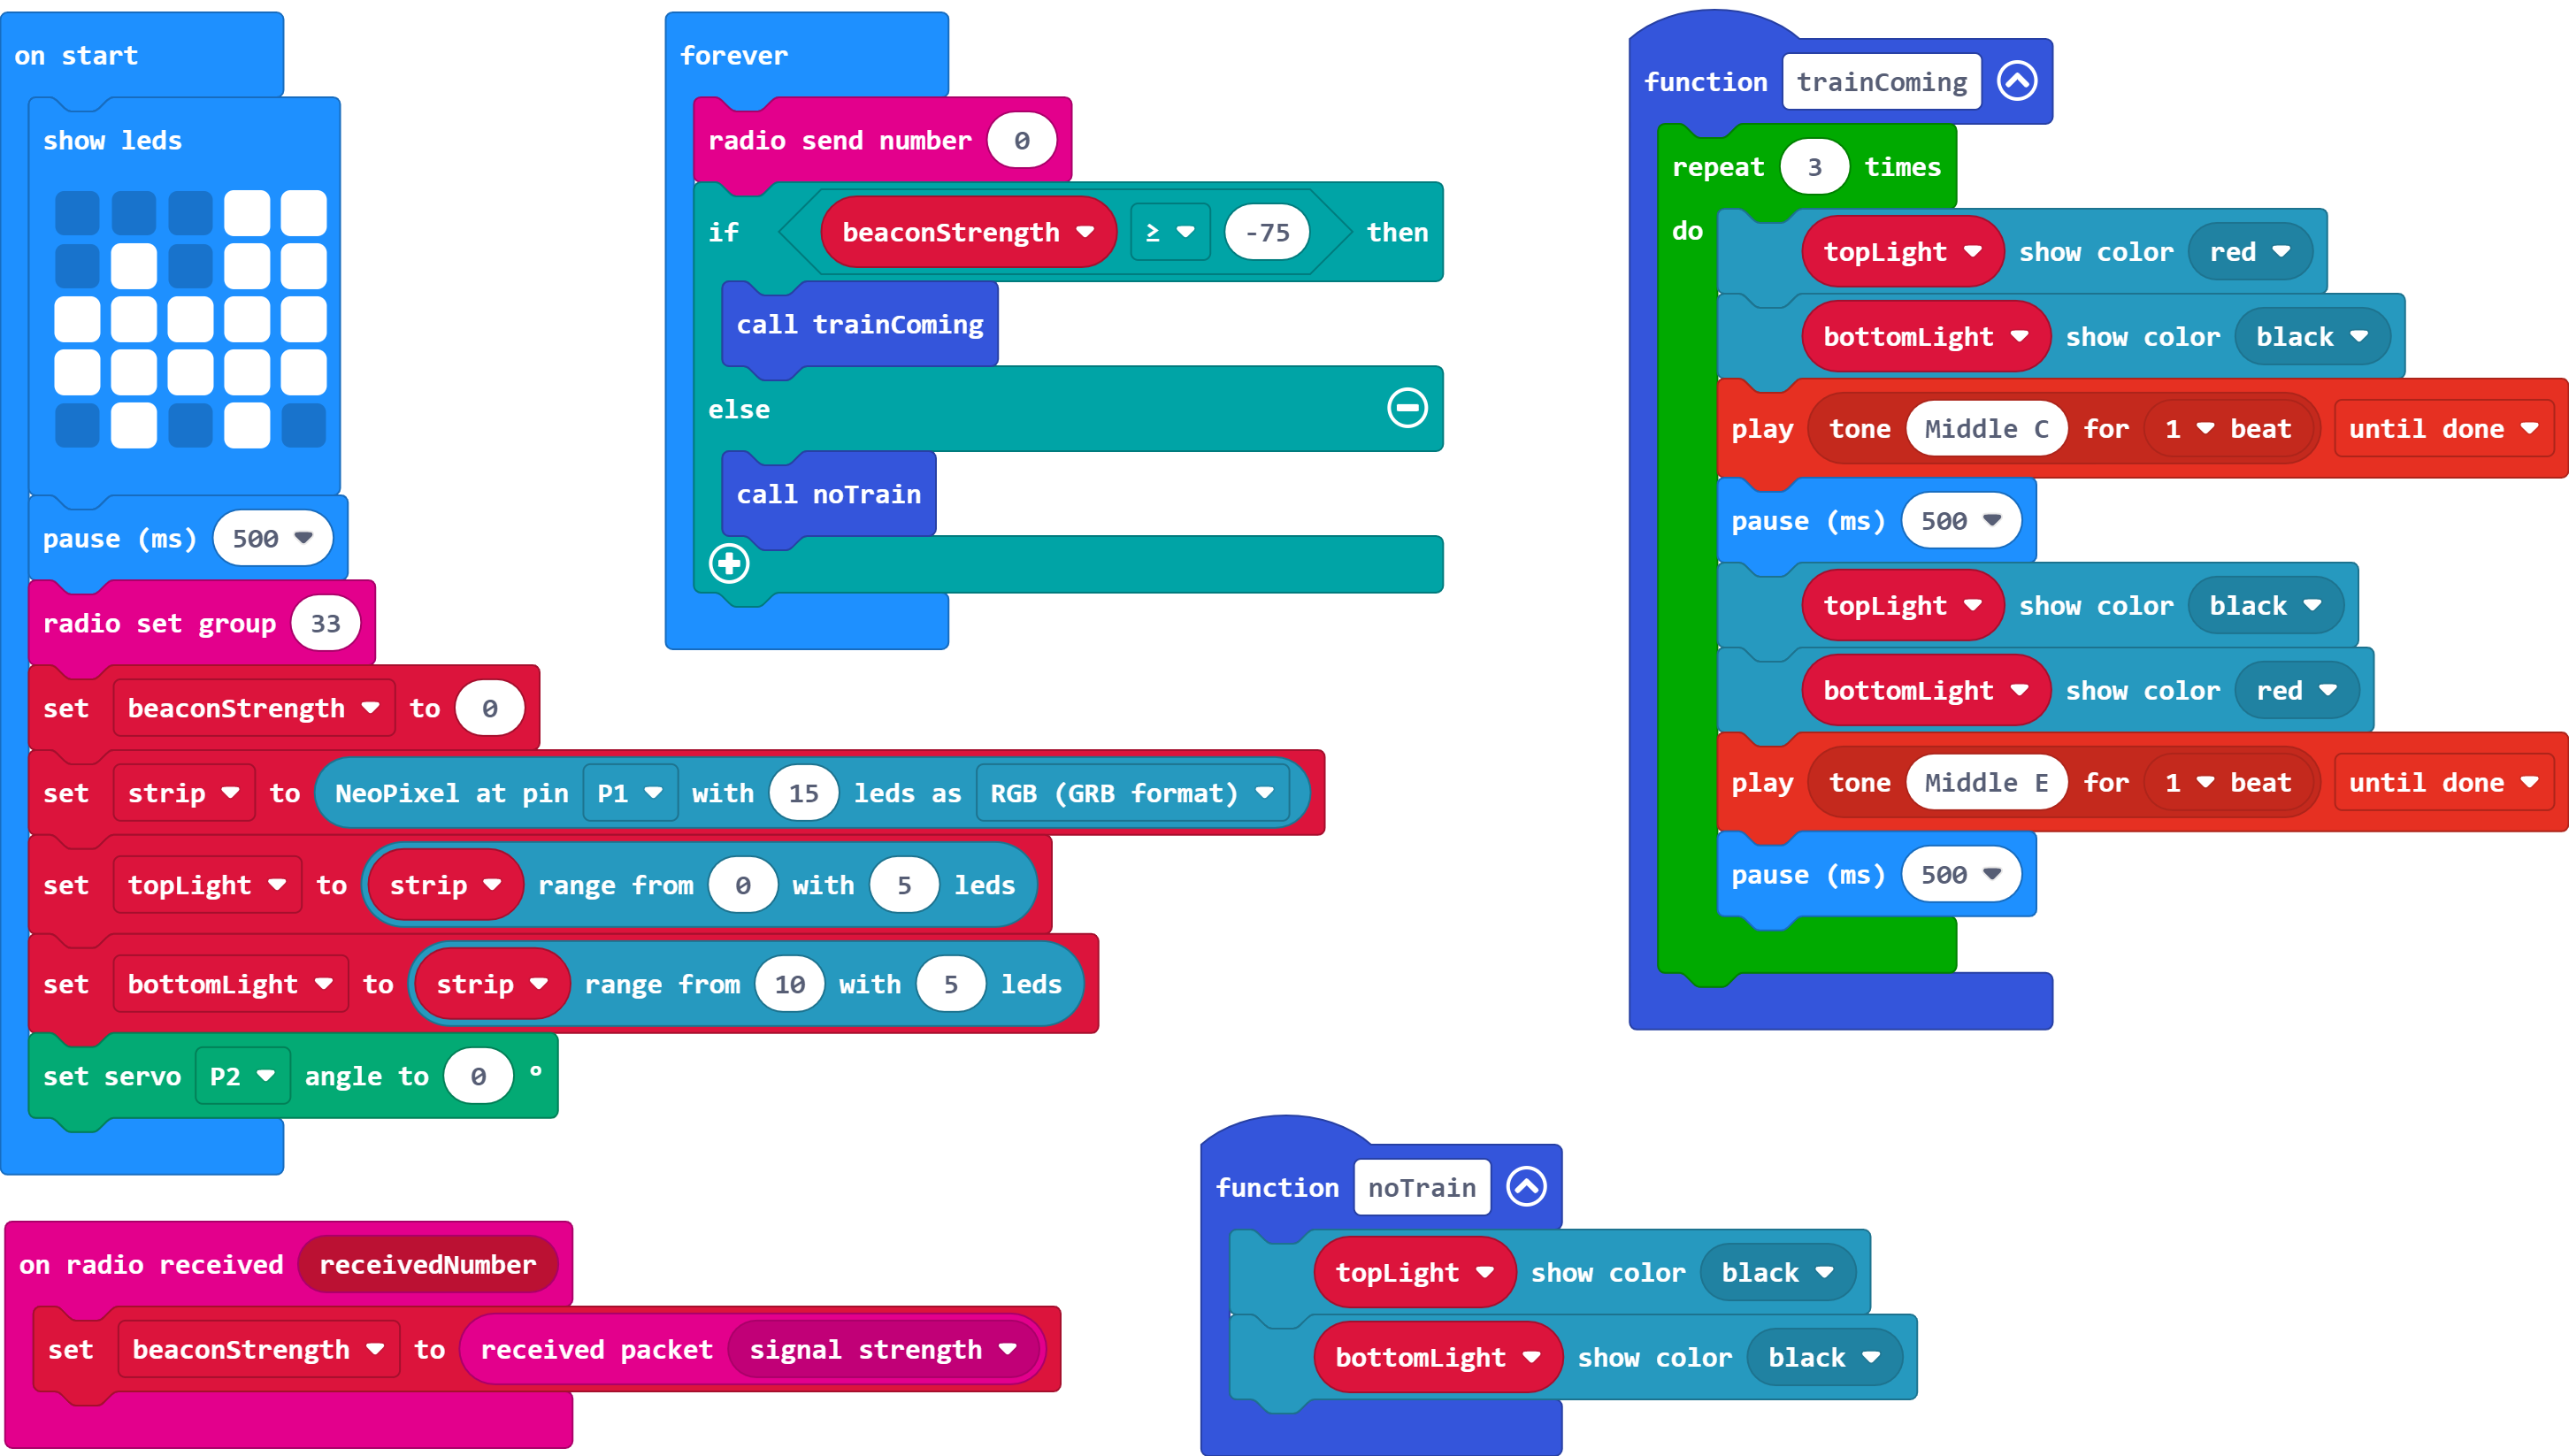
For our railway crossing barrier we shall use a servo to control its movement. This needs to be connected to pin 2 and be in the open position (0°) at the start of the program.
Tip: This will require the Servos extension.
If stuck, please look back at Session Five.
When a train is approaching, we want the lights and alarm to sound three times and then for the barrier to close (move to 90°).
Be careful not to place this new instruction inside the repeat loop.
Remember that the servo is on pin 2.
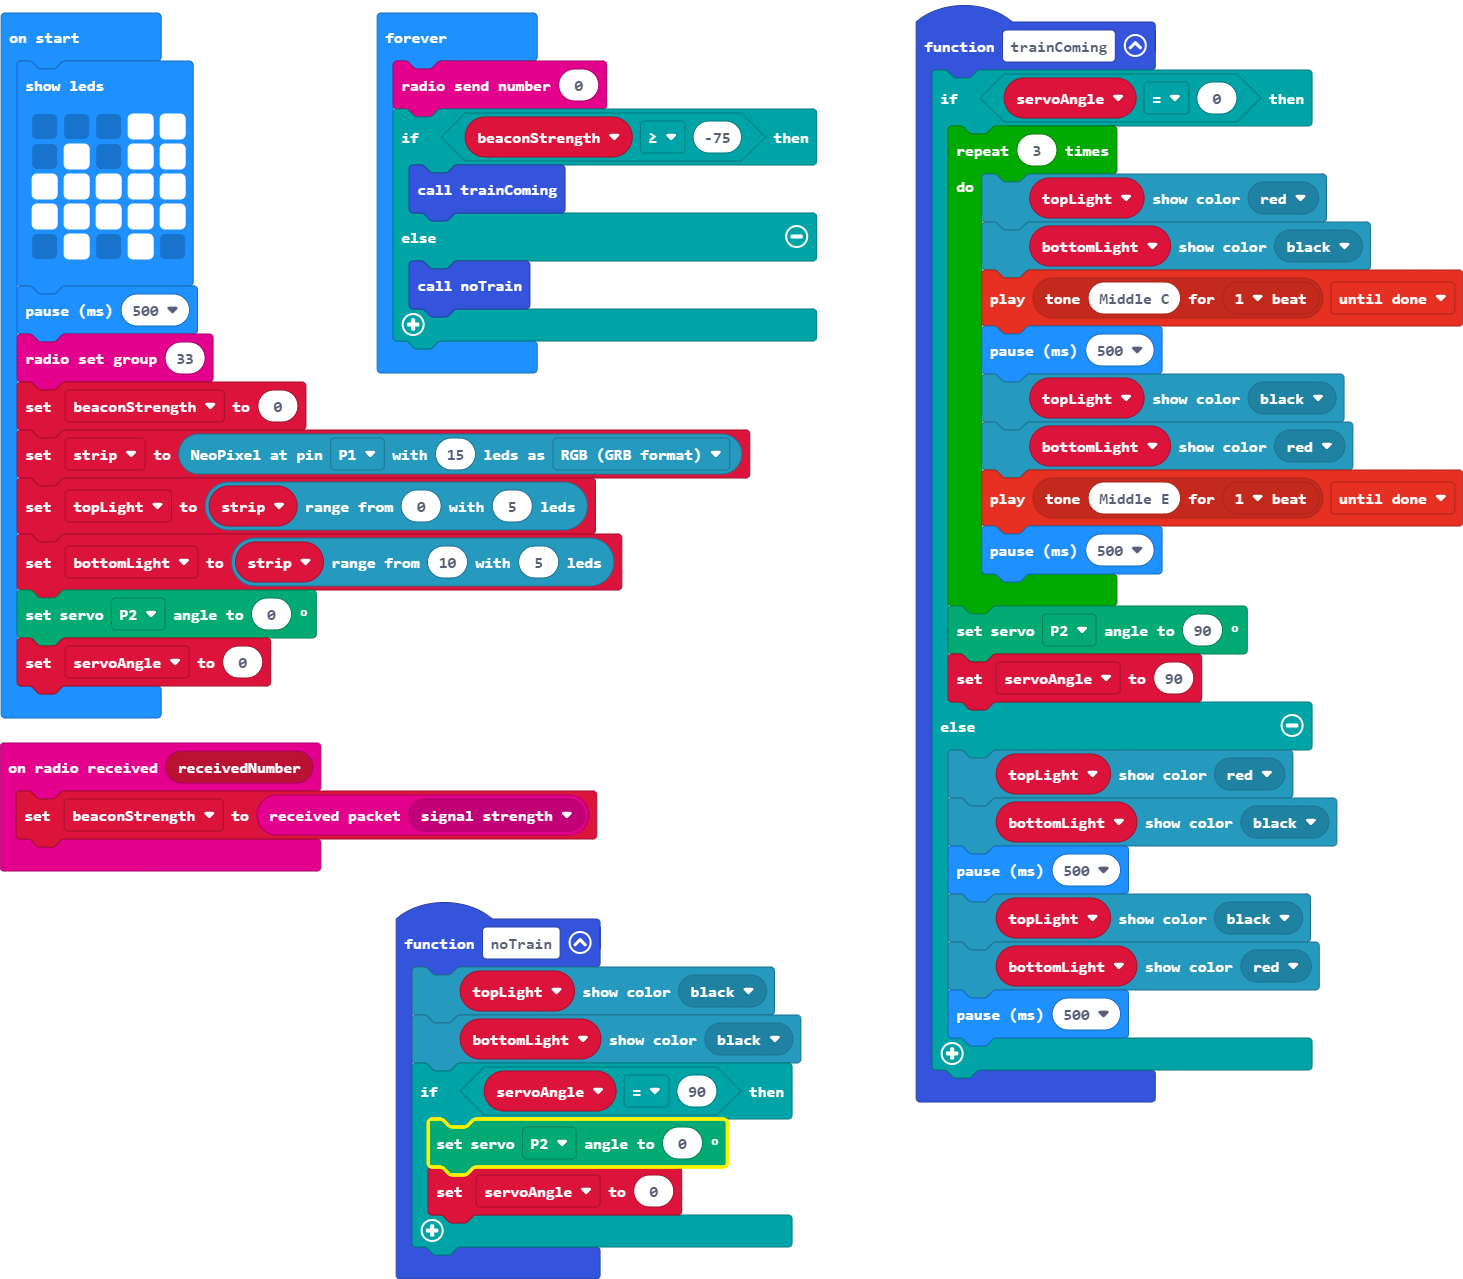
Once the barrier is closed, we need the alarm to stop while the lights continue to flash.
Tip: You will need a way to check the angle of the servo.
You will need a servo angle variable.
This new variable will need to be updated each time the barrier opens or closes.
Move the program with the lights and alarm into an if statement for when the barrier is open.
For when the barrier is closed, have the lights continue to flash. As long as the barrier is down, this will keep repeating, so you don't need to use a repeat block here.
Once the train has passed and the beacon signal fades to less than 75 again, we want the barrier to open (retuning to 0°).
Tip: Remember to also reset your new angle variable at the same time.
You can use the angle variable to tell if the gate needs opening. This is the opposite to the check we've already done to see if it needs closing.
Don't forget that our servo is attached to pin 2.
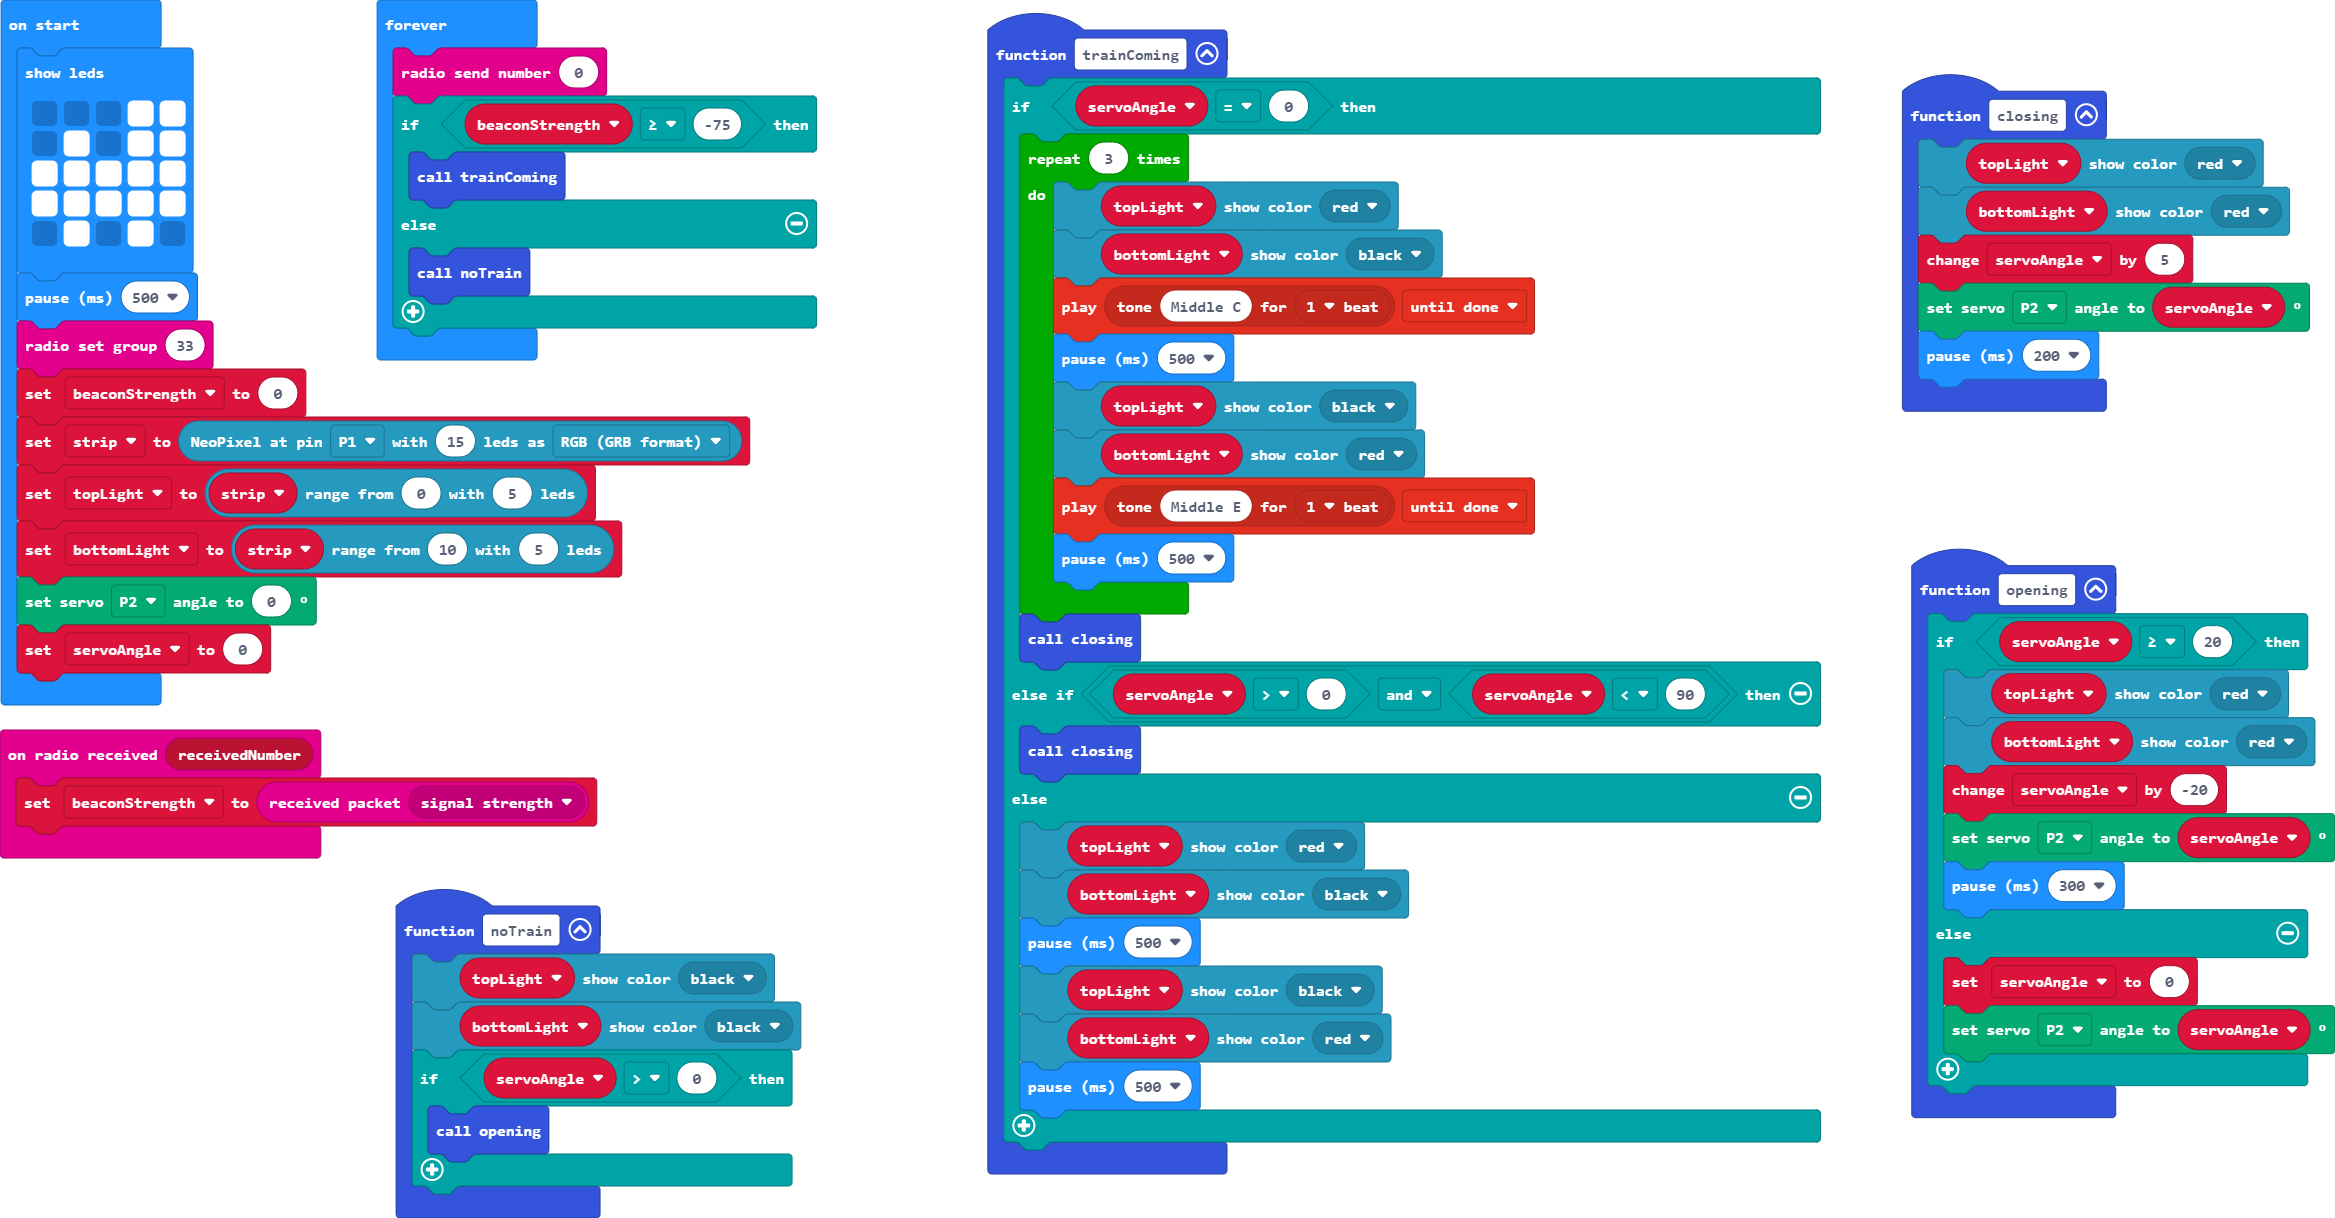
At the moment, the servo is moving too fast. This could cause injury to a pedestrian or damage a passing vehicle. So we need the barrier to lower 5° every 200ms. When it is opening, it is safer to go faster - in this case 20° every 300ms.
Tip: Turn both the red lights on fully during these movements as the flashing will stop during these movements.
Our function for when our train is coming will need an else if statement for when the barrier is only partially closed.
You will need to use the angle variable in the maths conditions.
Remember you can also use the 'and' Boolean block demonstrated previously if you want to check against two values.
Perhaps create new functions for the opening and closing movements. Yes, you can call a function inside another function.
When opening the barrier be aware that 90 cannot be divided by 20. Think about how you will make sure the barrier opens fully without going too far and breaking the servo.
This section is an additional activity for you to try out - this will provide an opportunity for revision whilst introducing some new blocks and terms.
As with all our exercises, it is best to work through this is order.
Select a heading to expand.
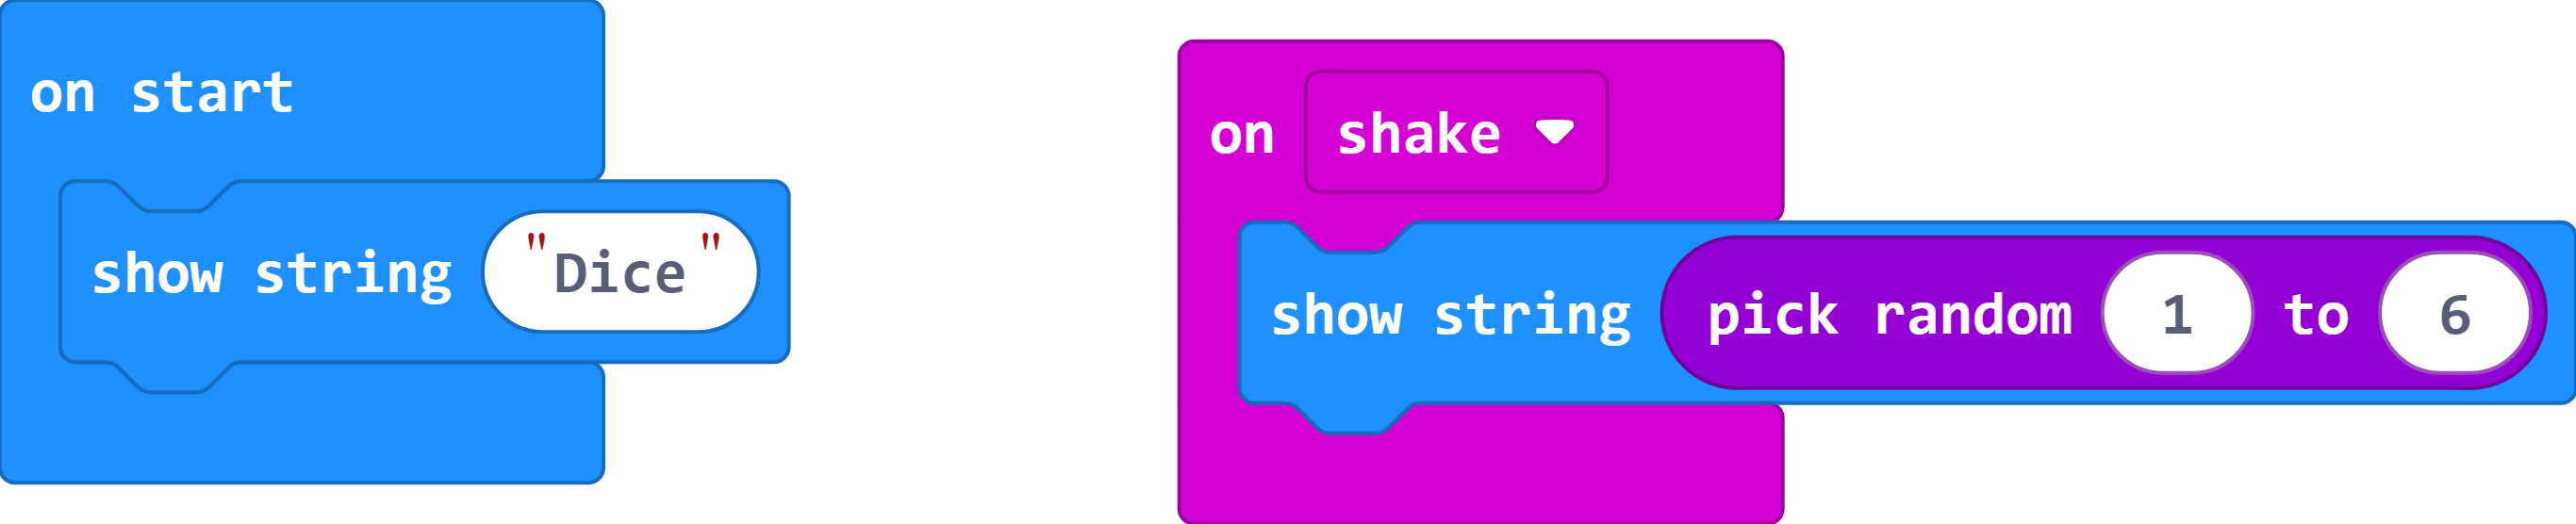
Create a basic dice rolling program on your Micro:Bit. This should show a random number between 1 and 6 on the screen when shaken.
Tip: Don't forget your start up screen.
If stuck, revisit sessions two and three.
This does not require a forever loop.
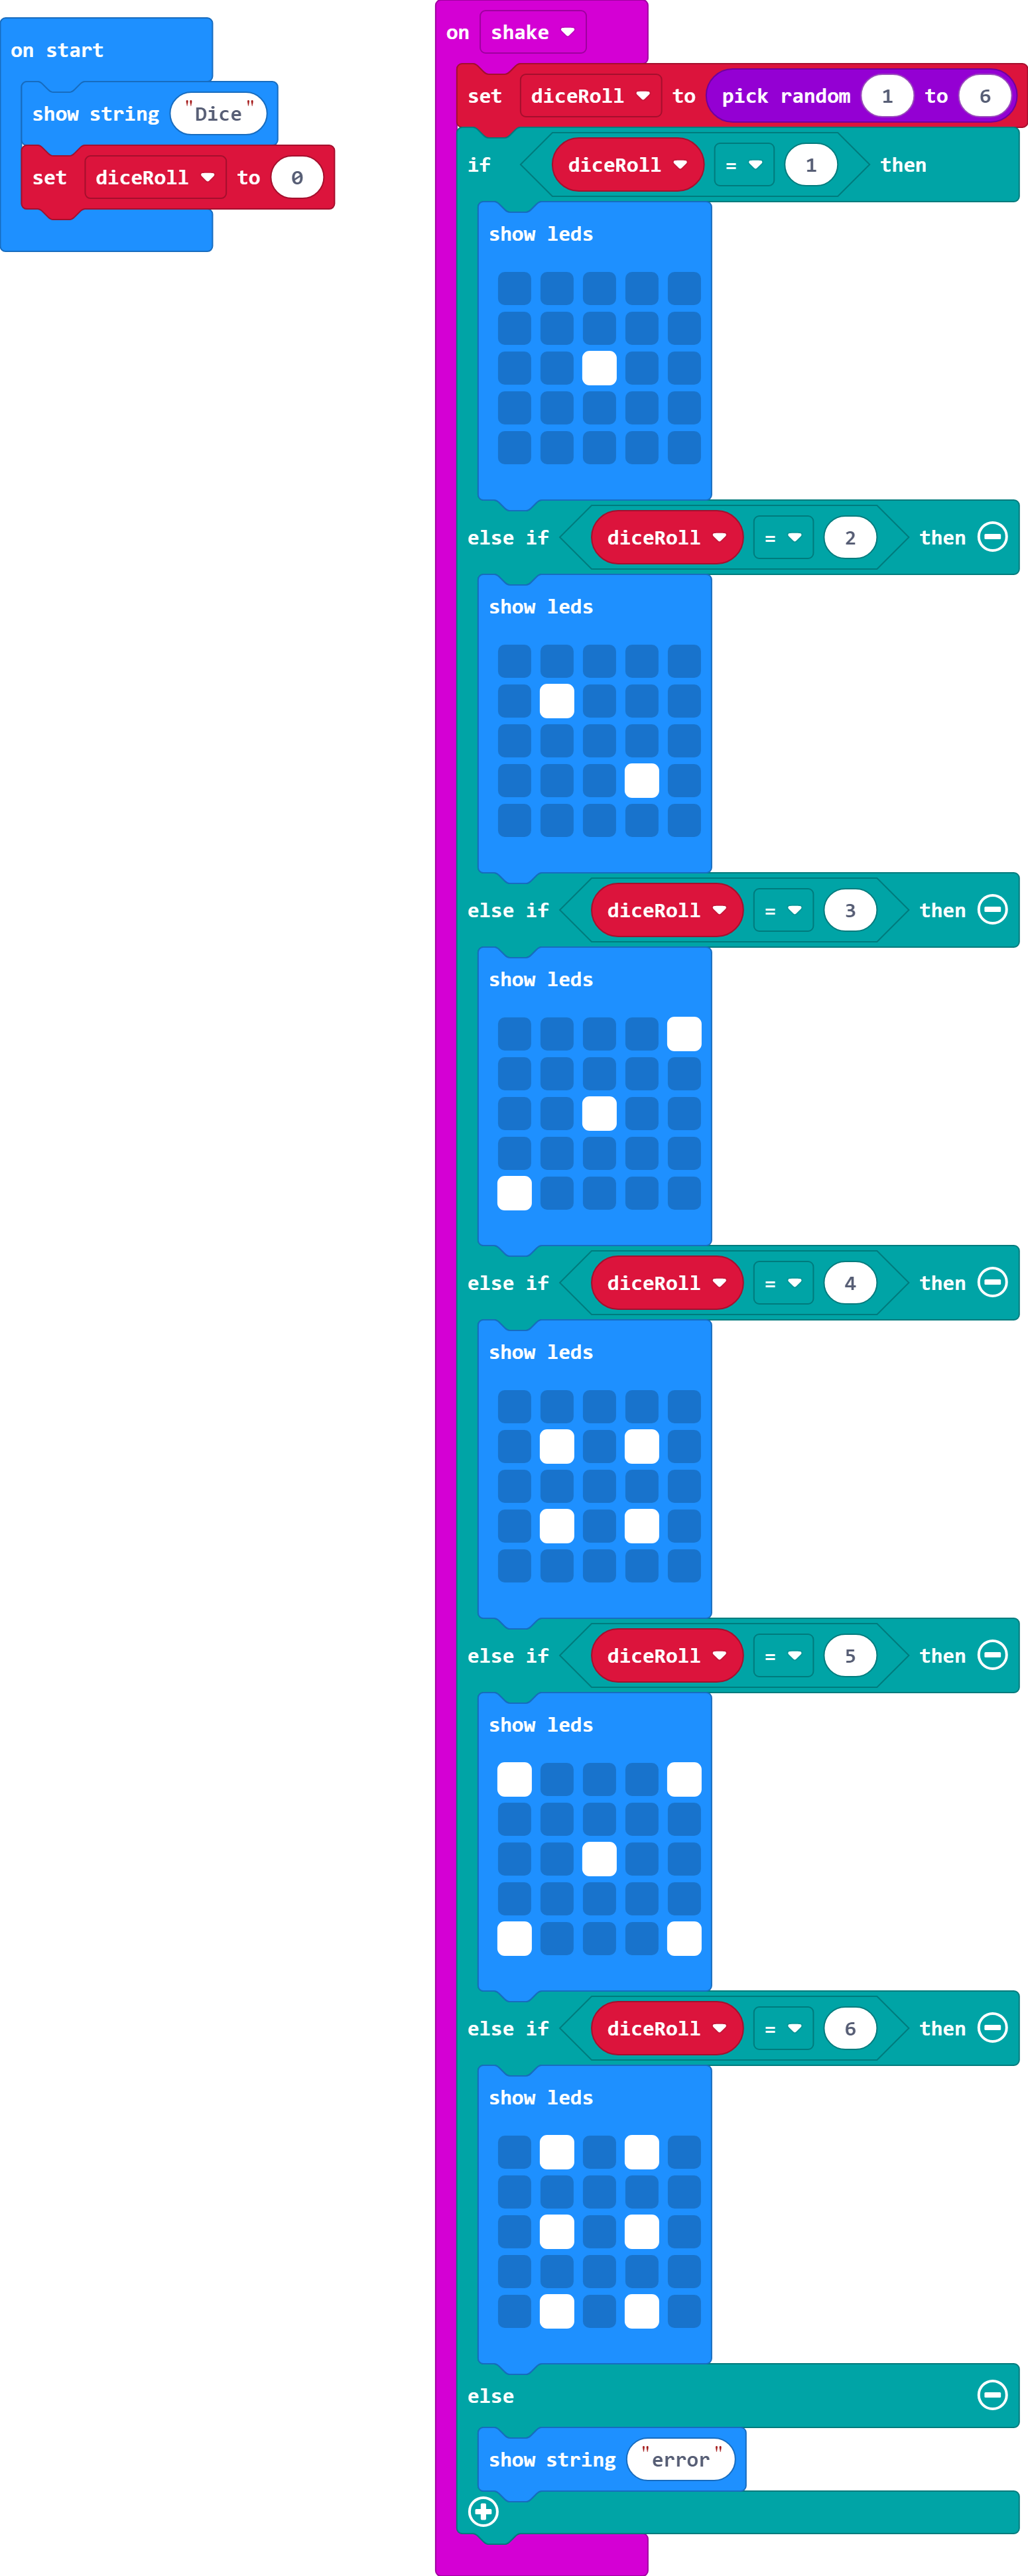
Instead of showing a number, have the screen show the following images depending on the value rolled.
One
Two
Three
Four
Five
Six
Tip: You will need to create a variable to hold the dice roll value.
You will need a different if/else if statement for each possible value. You can then use the else statement to catch any errors.
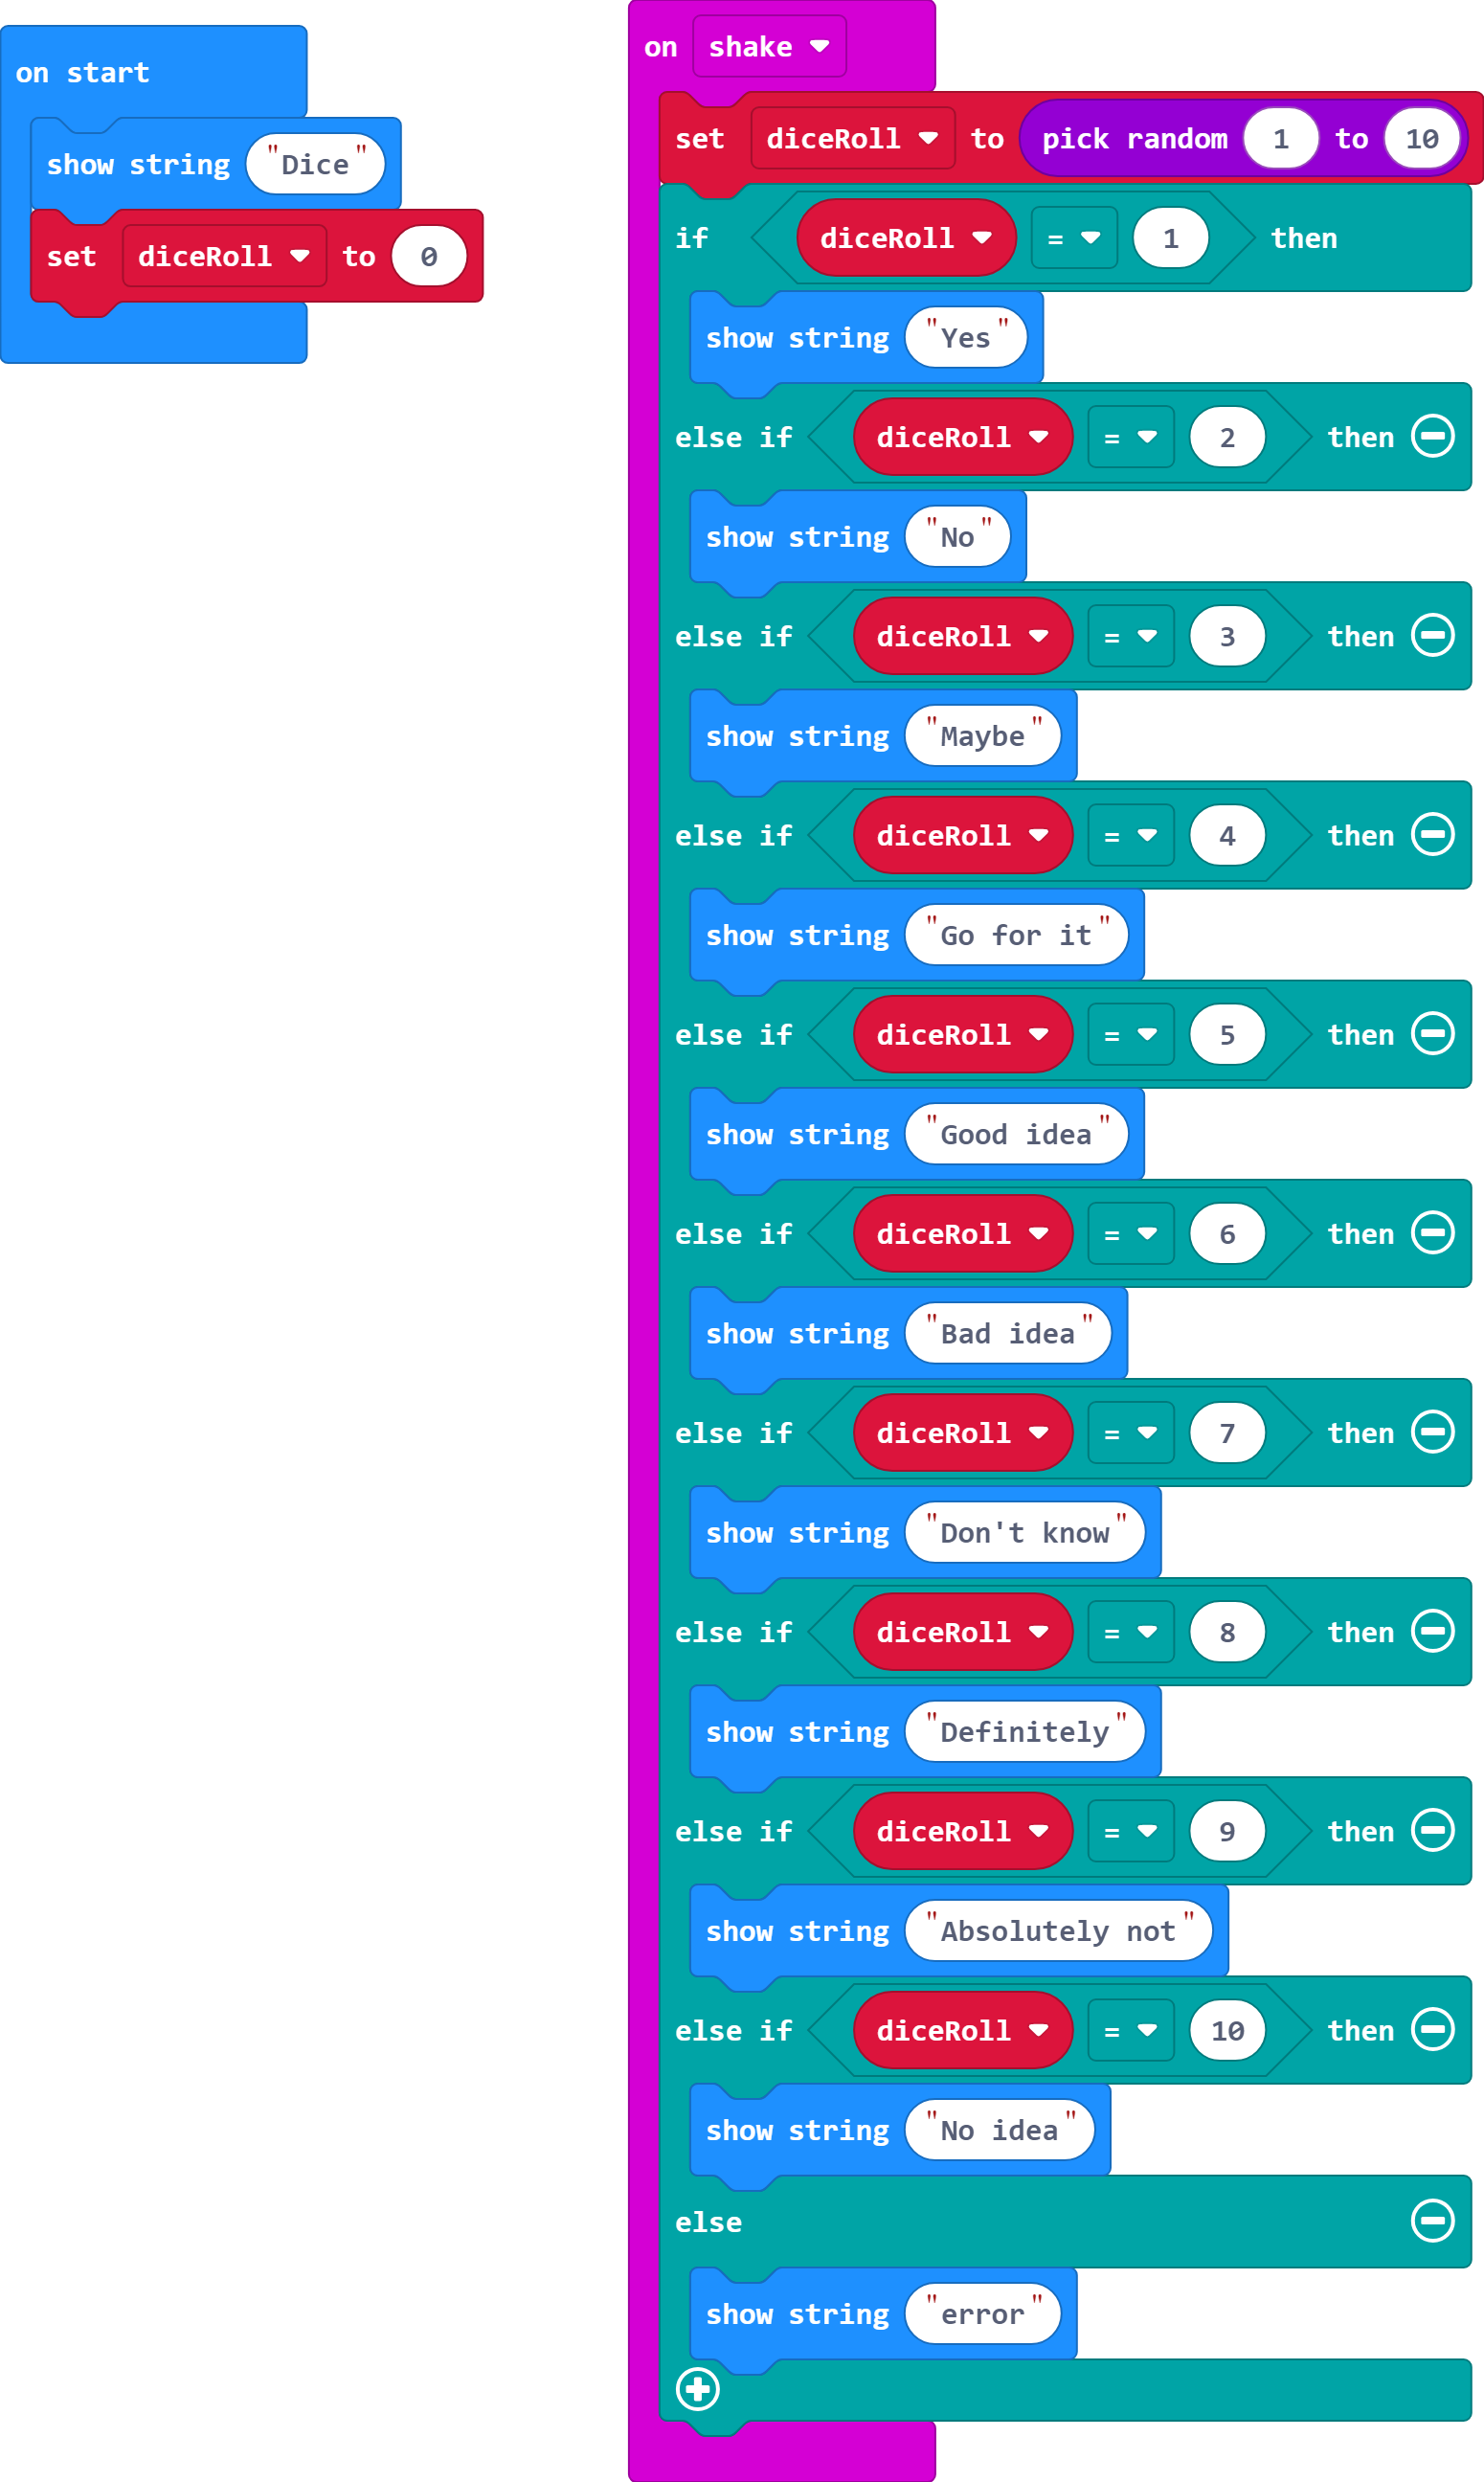
A Magic-8 Ball is like a dice, put instead of numbers it produces answers when shaken.
Instead of showing numbers in your program, have the Micro:Bit display the answers yes, no, maybe, go for it, good idea, bad idea, don't know, definitely, absolutely not, and no idea.
Tip: There are now 10 options.
For the first six options you can simply replace the current images.
You will then need to add four more else if statements.
Don't forget to change the random number generator to have 10 options instead of 6.
There is a different way we could have approached this program. We could have used something called an array. Array blocks can be found in the Advanced menu.
An array is a special kind of variable. Instead of holding only a single piece of information like the variables we've used, it can hold a list of values/strings.
You can then call a value from the array by its location in the list. As with most coding, the numbering of list items starts at zero.
Example:
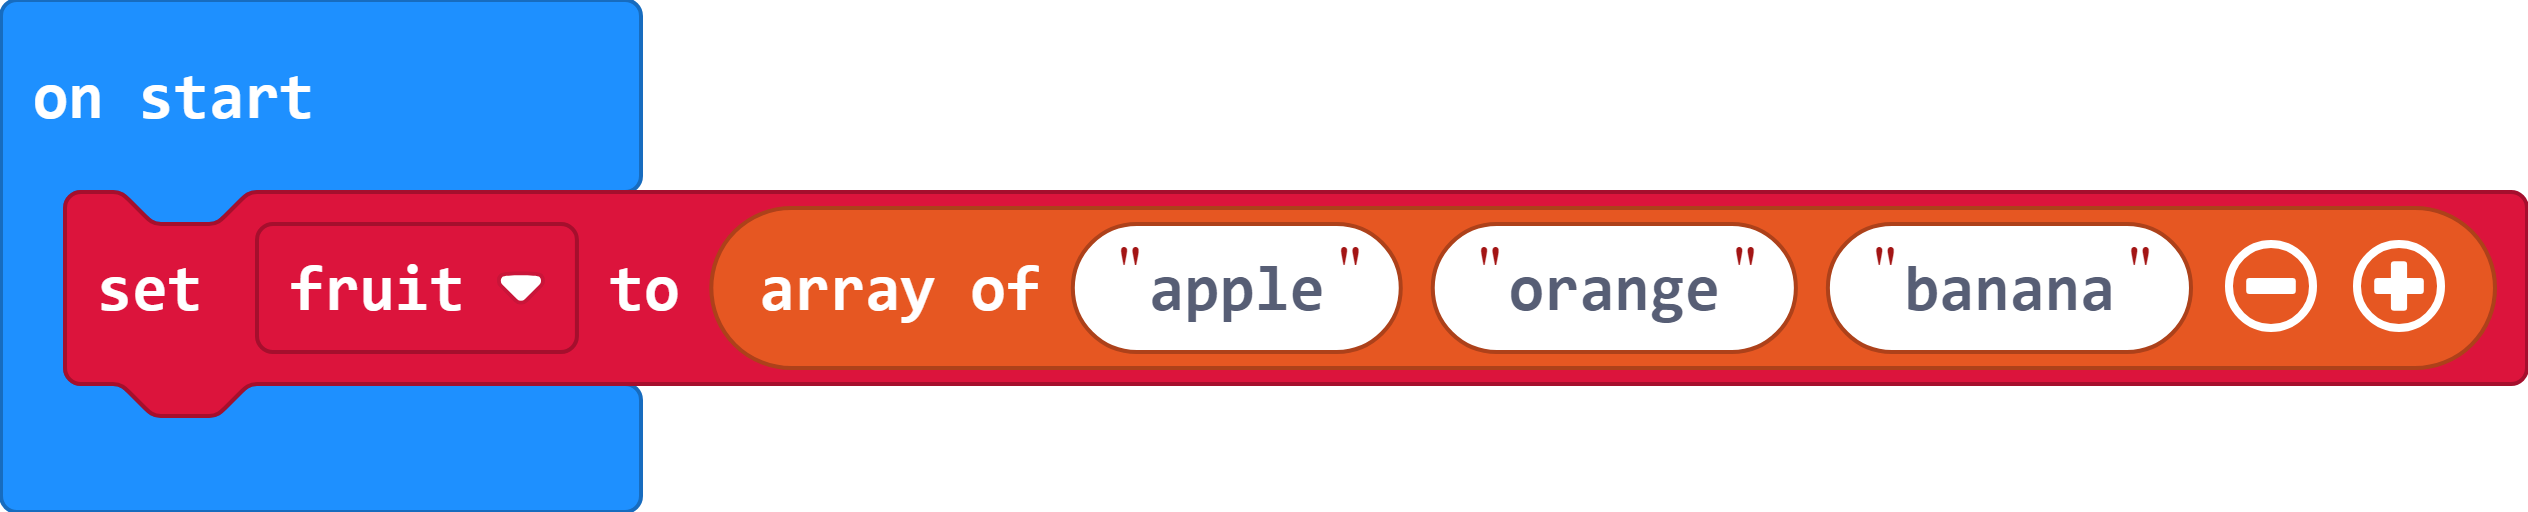
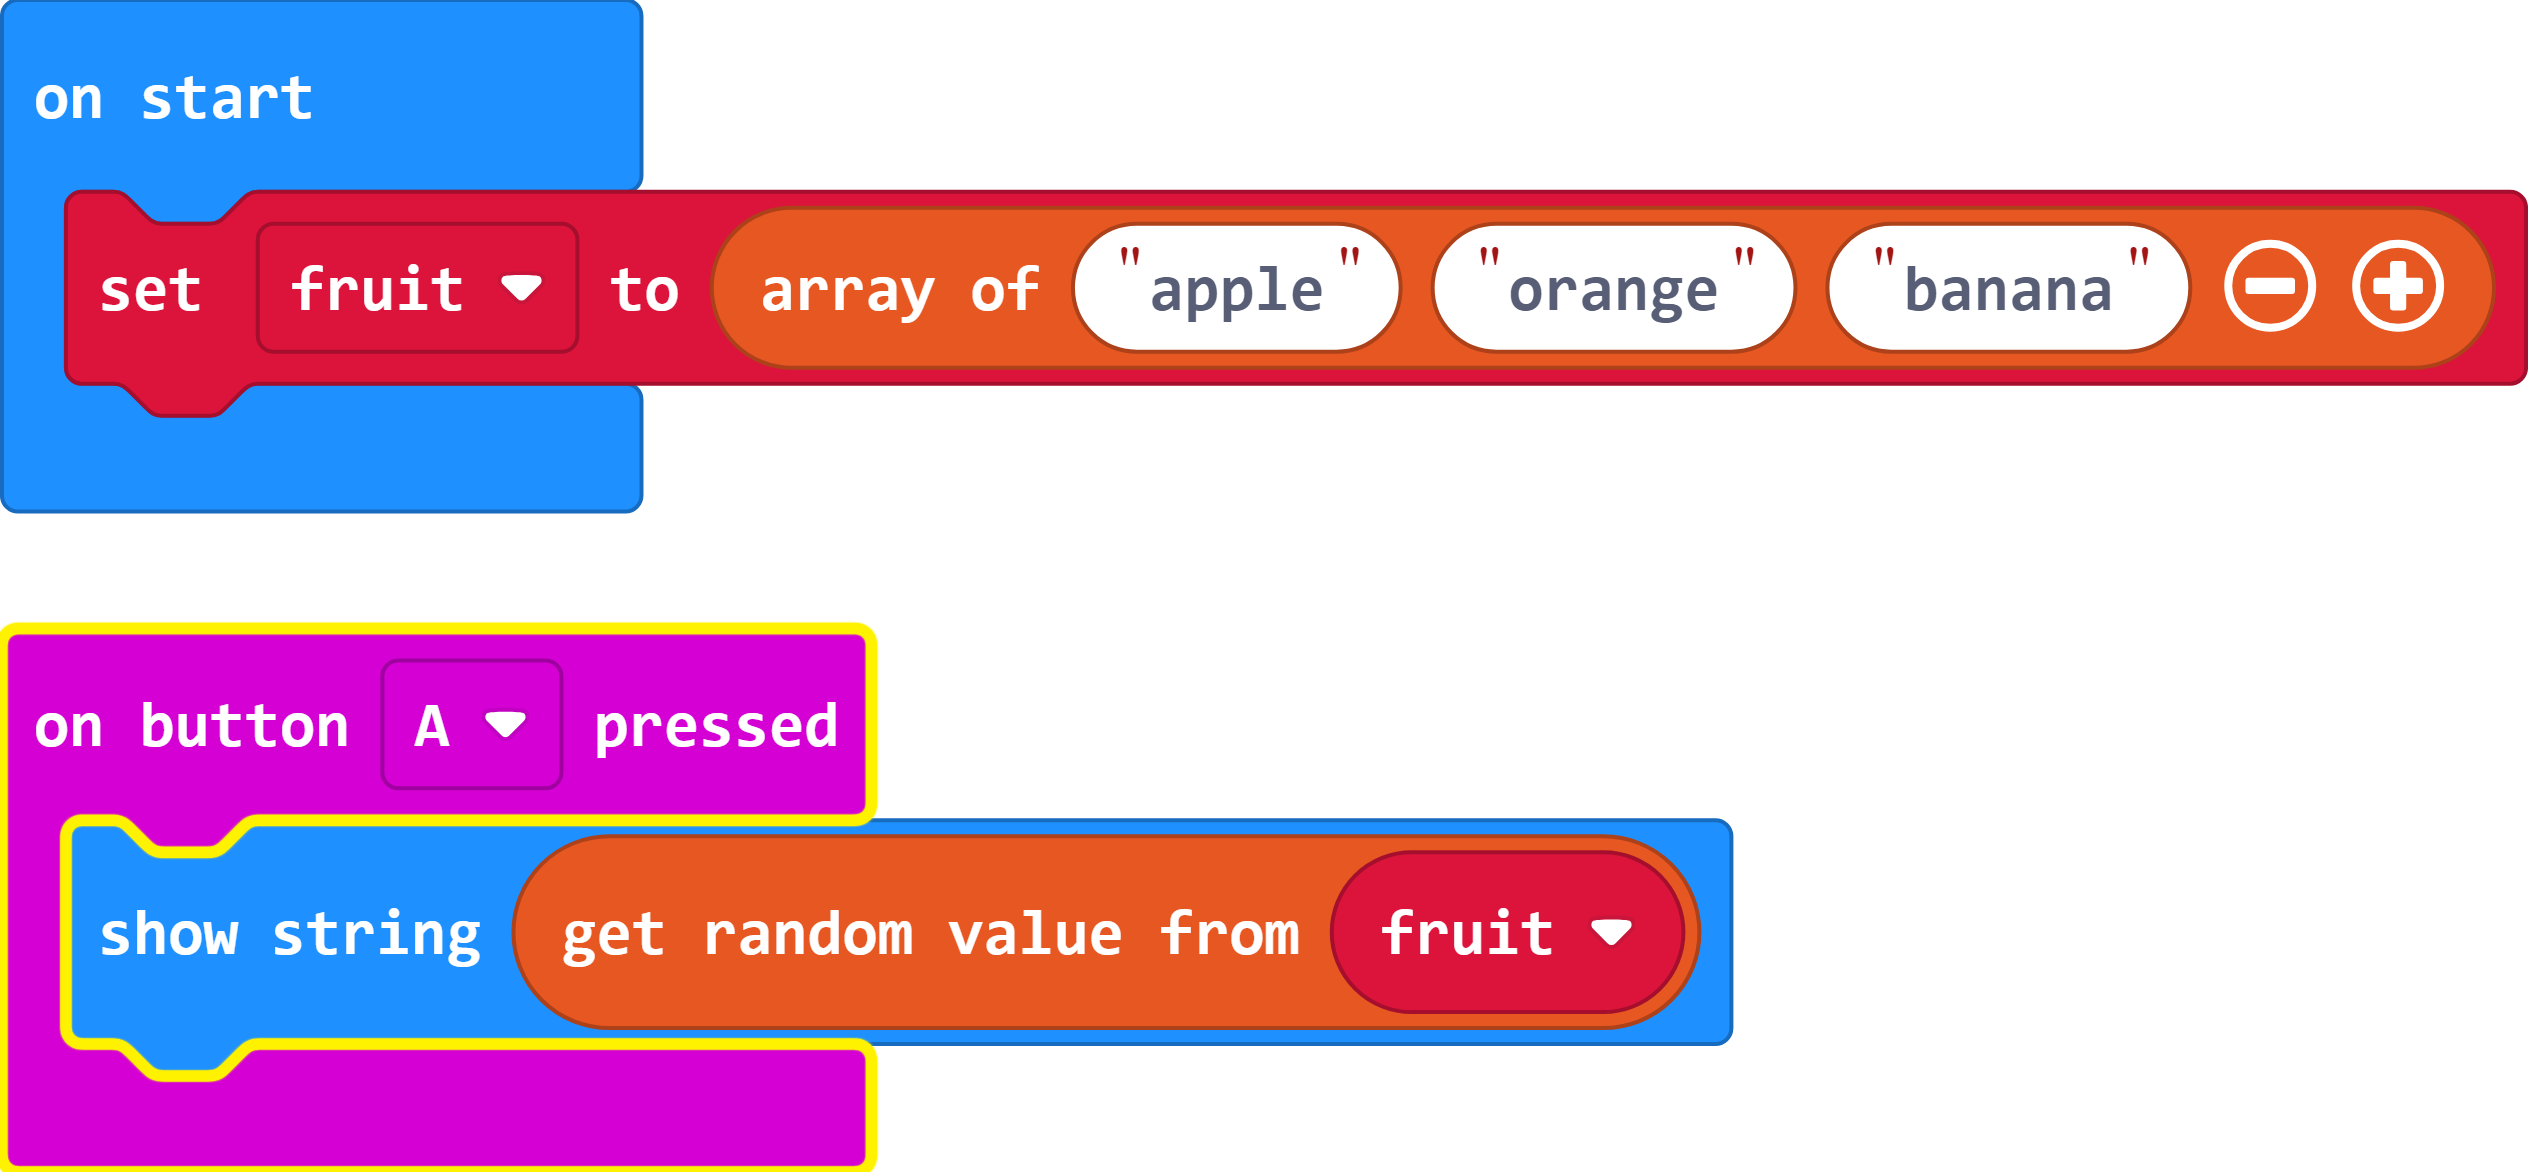
Let's say we wanted to write a program that randomly selected a string from a list of apple, orange, and banana when we press button A.
As with any variable, we need to set the array in the 'on start' section:
We can add or take away items to the array using the plus and minus buttons on the block.
To have the screen show a random item from the array we can use the 'show string' combined with a 'get random value from' array block.
We now have a complete program that randomly selects an item from the list and displays it on the screen when we press button A.
As the Magic-8 Ball program has a single variable which has a list of different strings (the answers) we could use an array and have the program randomly select from a list instead of using such a large if/else if/else statement.
Important: Arrays cannot be used to replace all if and else if statements. With Makecode, they can only be used for lists of strings or numbers. For example, you could not use this for the dice program with different images for each value.
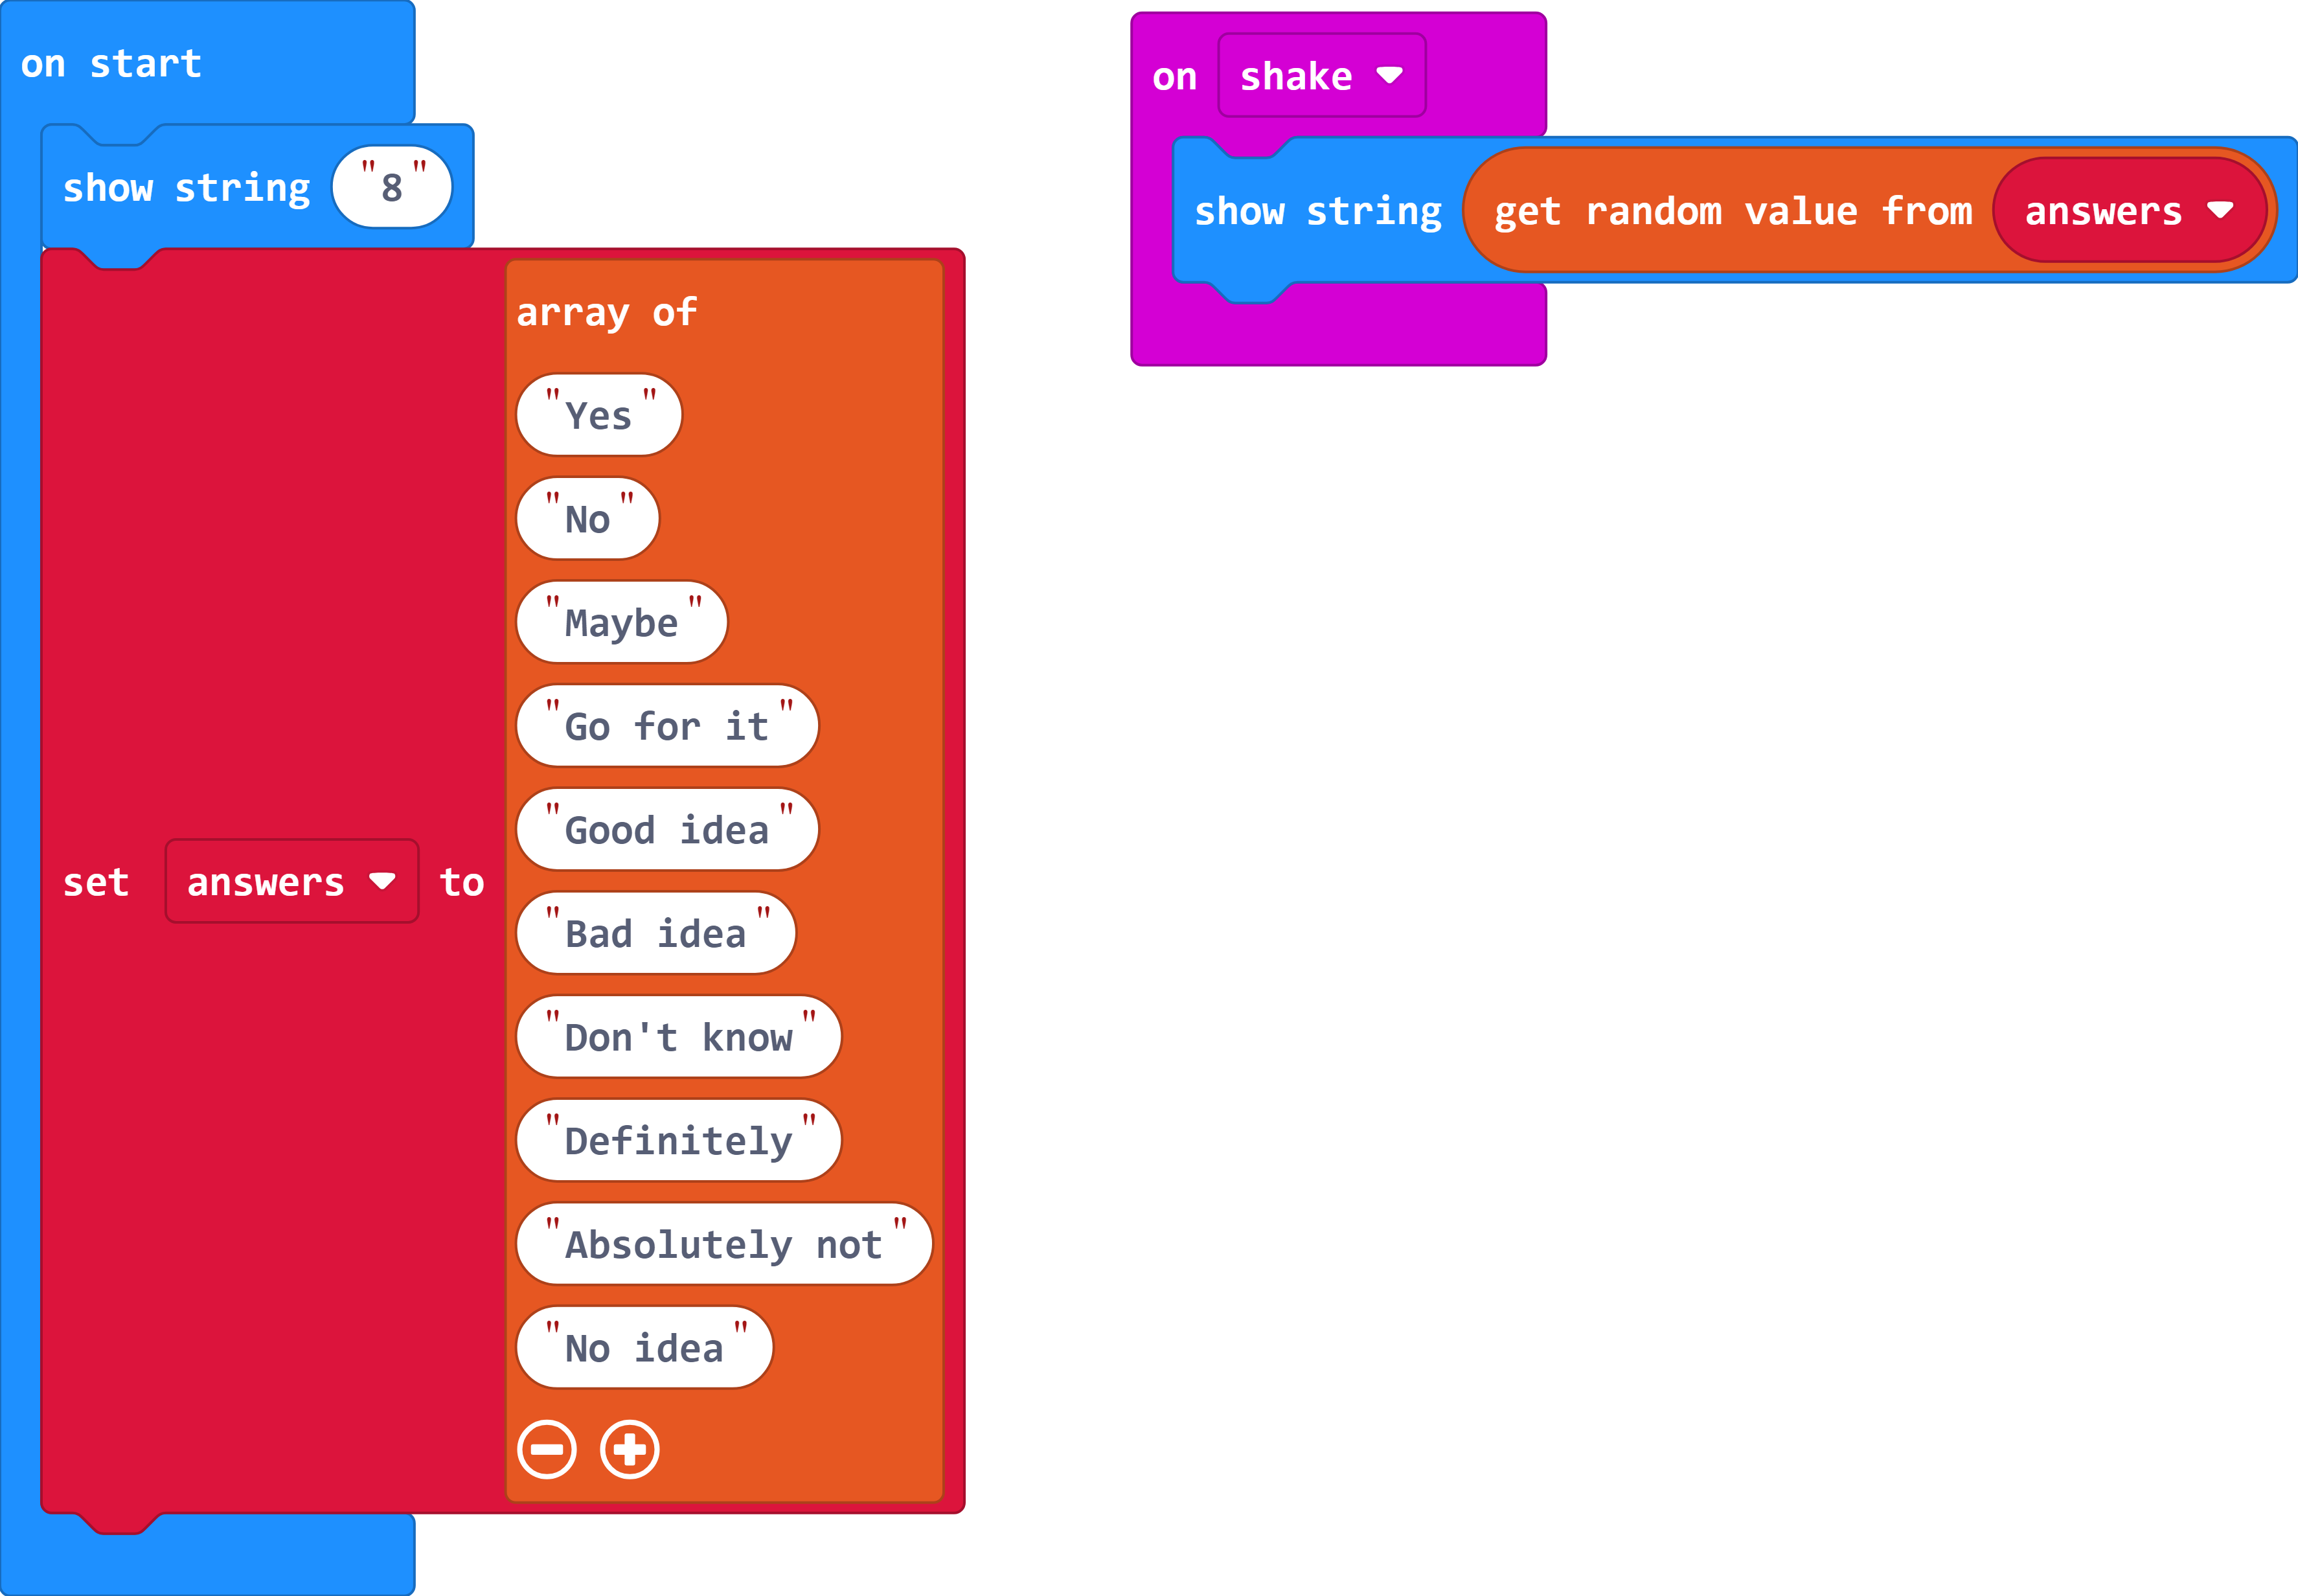
Change your Magic-8 Ball program to use an array for all possible answers and randomly select from it when shaken.
Tip: You may want to duplicate your file first so you can compare them later.
Use the fruit list program in the example and replace the fruit with the Magic-8 Ball answers provided in the silver exercise.
Make sure you are using the text list block, the number version will error if you add words.
Remember, you can add more items to the array using the plus symbol on the set-up block.
Rename the list to something more suitable than fruit.
If you haven't already, re-design the start sequence for the Magic-8 Ball instead of the dice.
Now that you've discovered random generators using arrays, there are number of different fun things you can create. Here are some ideas.
A volunteer selector - you can create an array containing all the names of people in your class and next time no one volunteers, you can use it to select someone randomly.
Creative writing program - have a series of arrays to help put together a storyline idea. For example, you could have random location/genre/character/sidekick generators.
Shopping mayhem app - put your shopping list into an array and then use the random generator to decide what order to shop in.
Tip: You may want to do some research on how to remove items from an array after they've come up.