Rydym wedi addasu'r deunydd a gafodd ei greu ar gyfer ein Clwb Roboteg fel bod pawb yn gallu ei ddefnyddio gartref neu yn yr ysgol.
Mae pob un o'r sesiynau isod yn cynnwys gwers fideo gan aelod o'n staff a set o ymarferion i asesu eich dealltwriaeth. Gan fod y dudalen hon ar gyfer dysgwyr annibynnol, mae'r atebion wedi'u cynnwys.
Dewiswch bennawd sesiwn i gychwyn.
Gwers Fideo (yn Saesneg):
Ymarferion:
Rydym wedi creu her ar dair lefel (efydd, arian ac aur) er mwyn i ddysgwyr ddechrau ymchwilio a chreu rhaglenni yn Microsoft Makecode.
Dylai pob dysgwr ymgymryd â'r her efydd i gychwyn cyn rhoi cynnig ar yr heriau uwch.
Cliciwch ar bennawd pob her i gael y manylion.
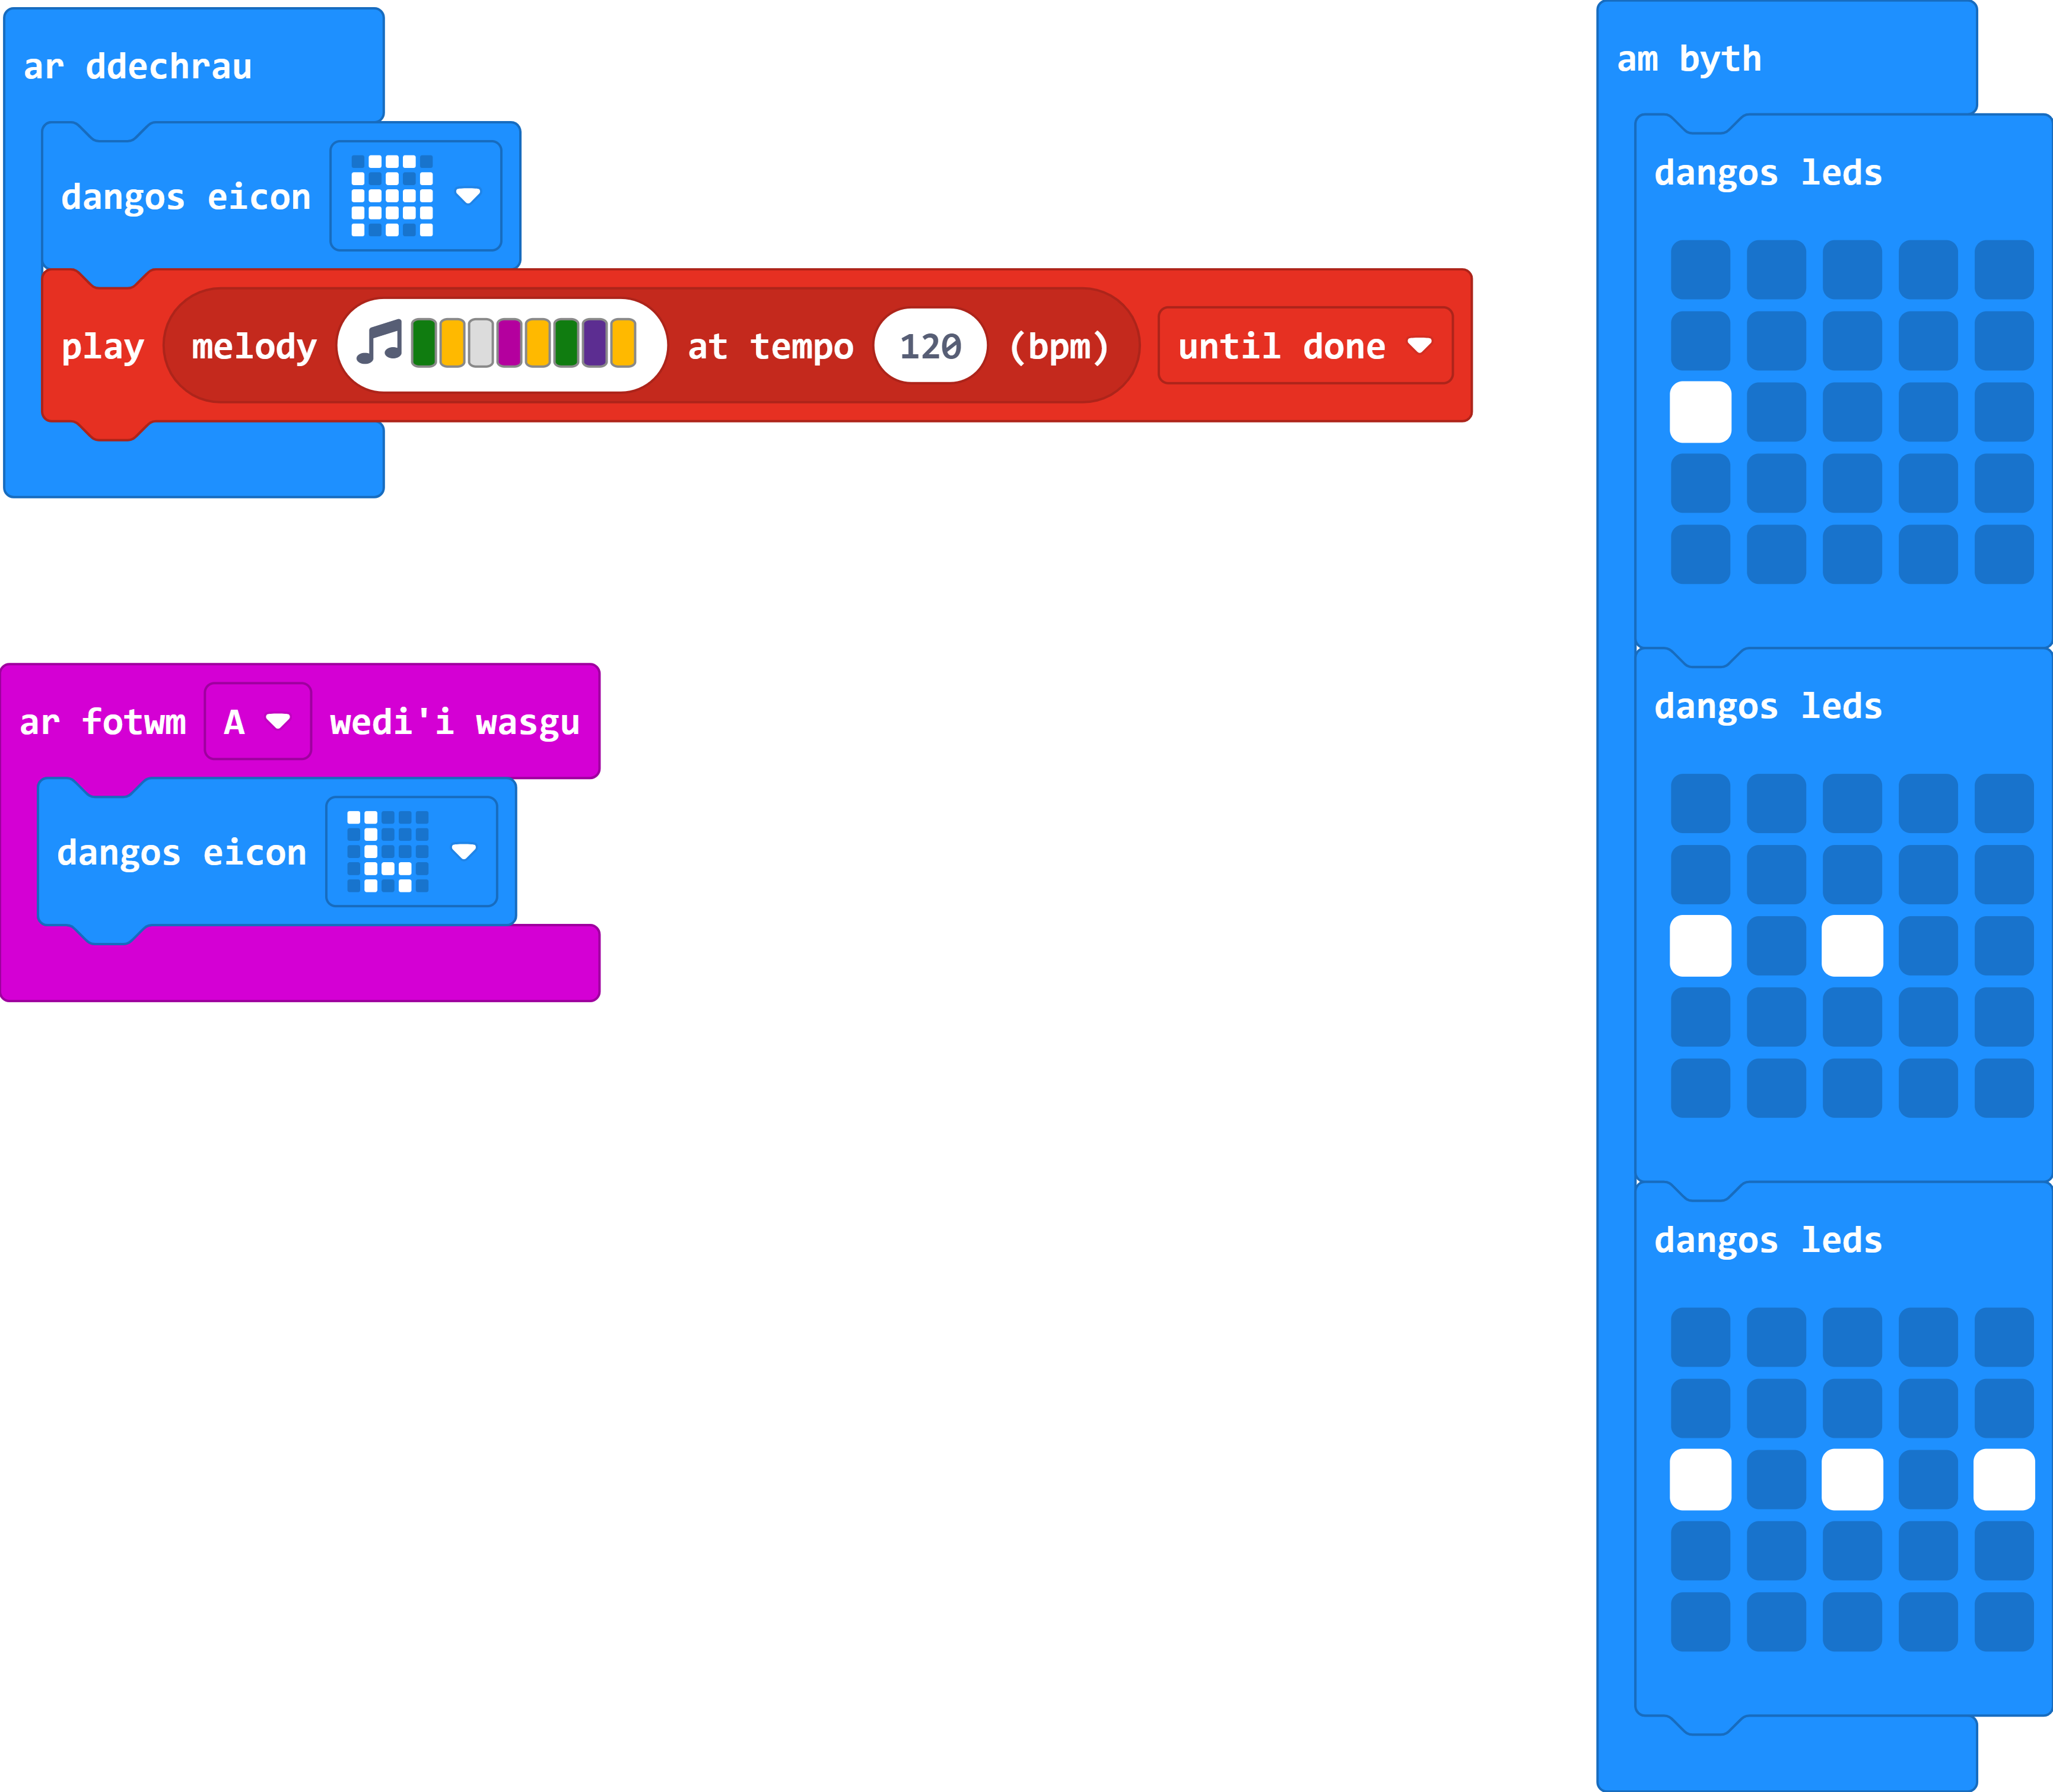
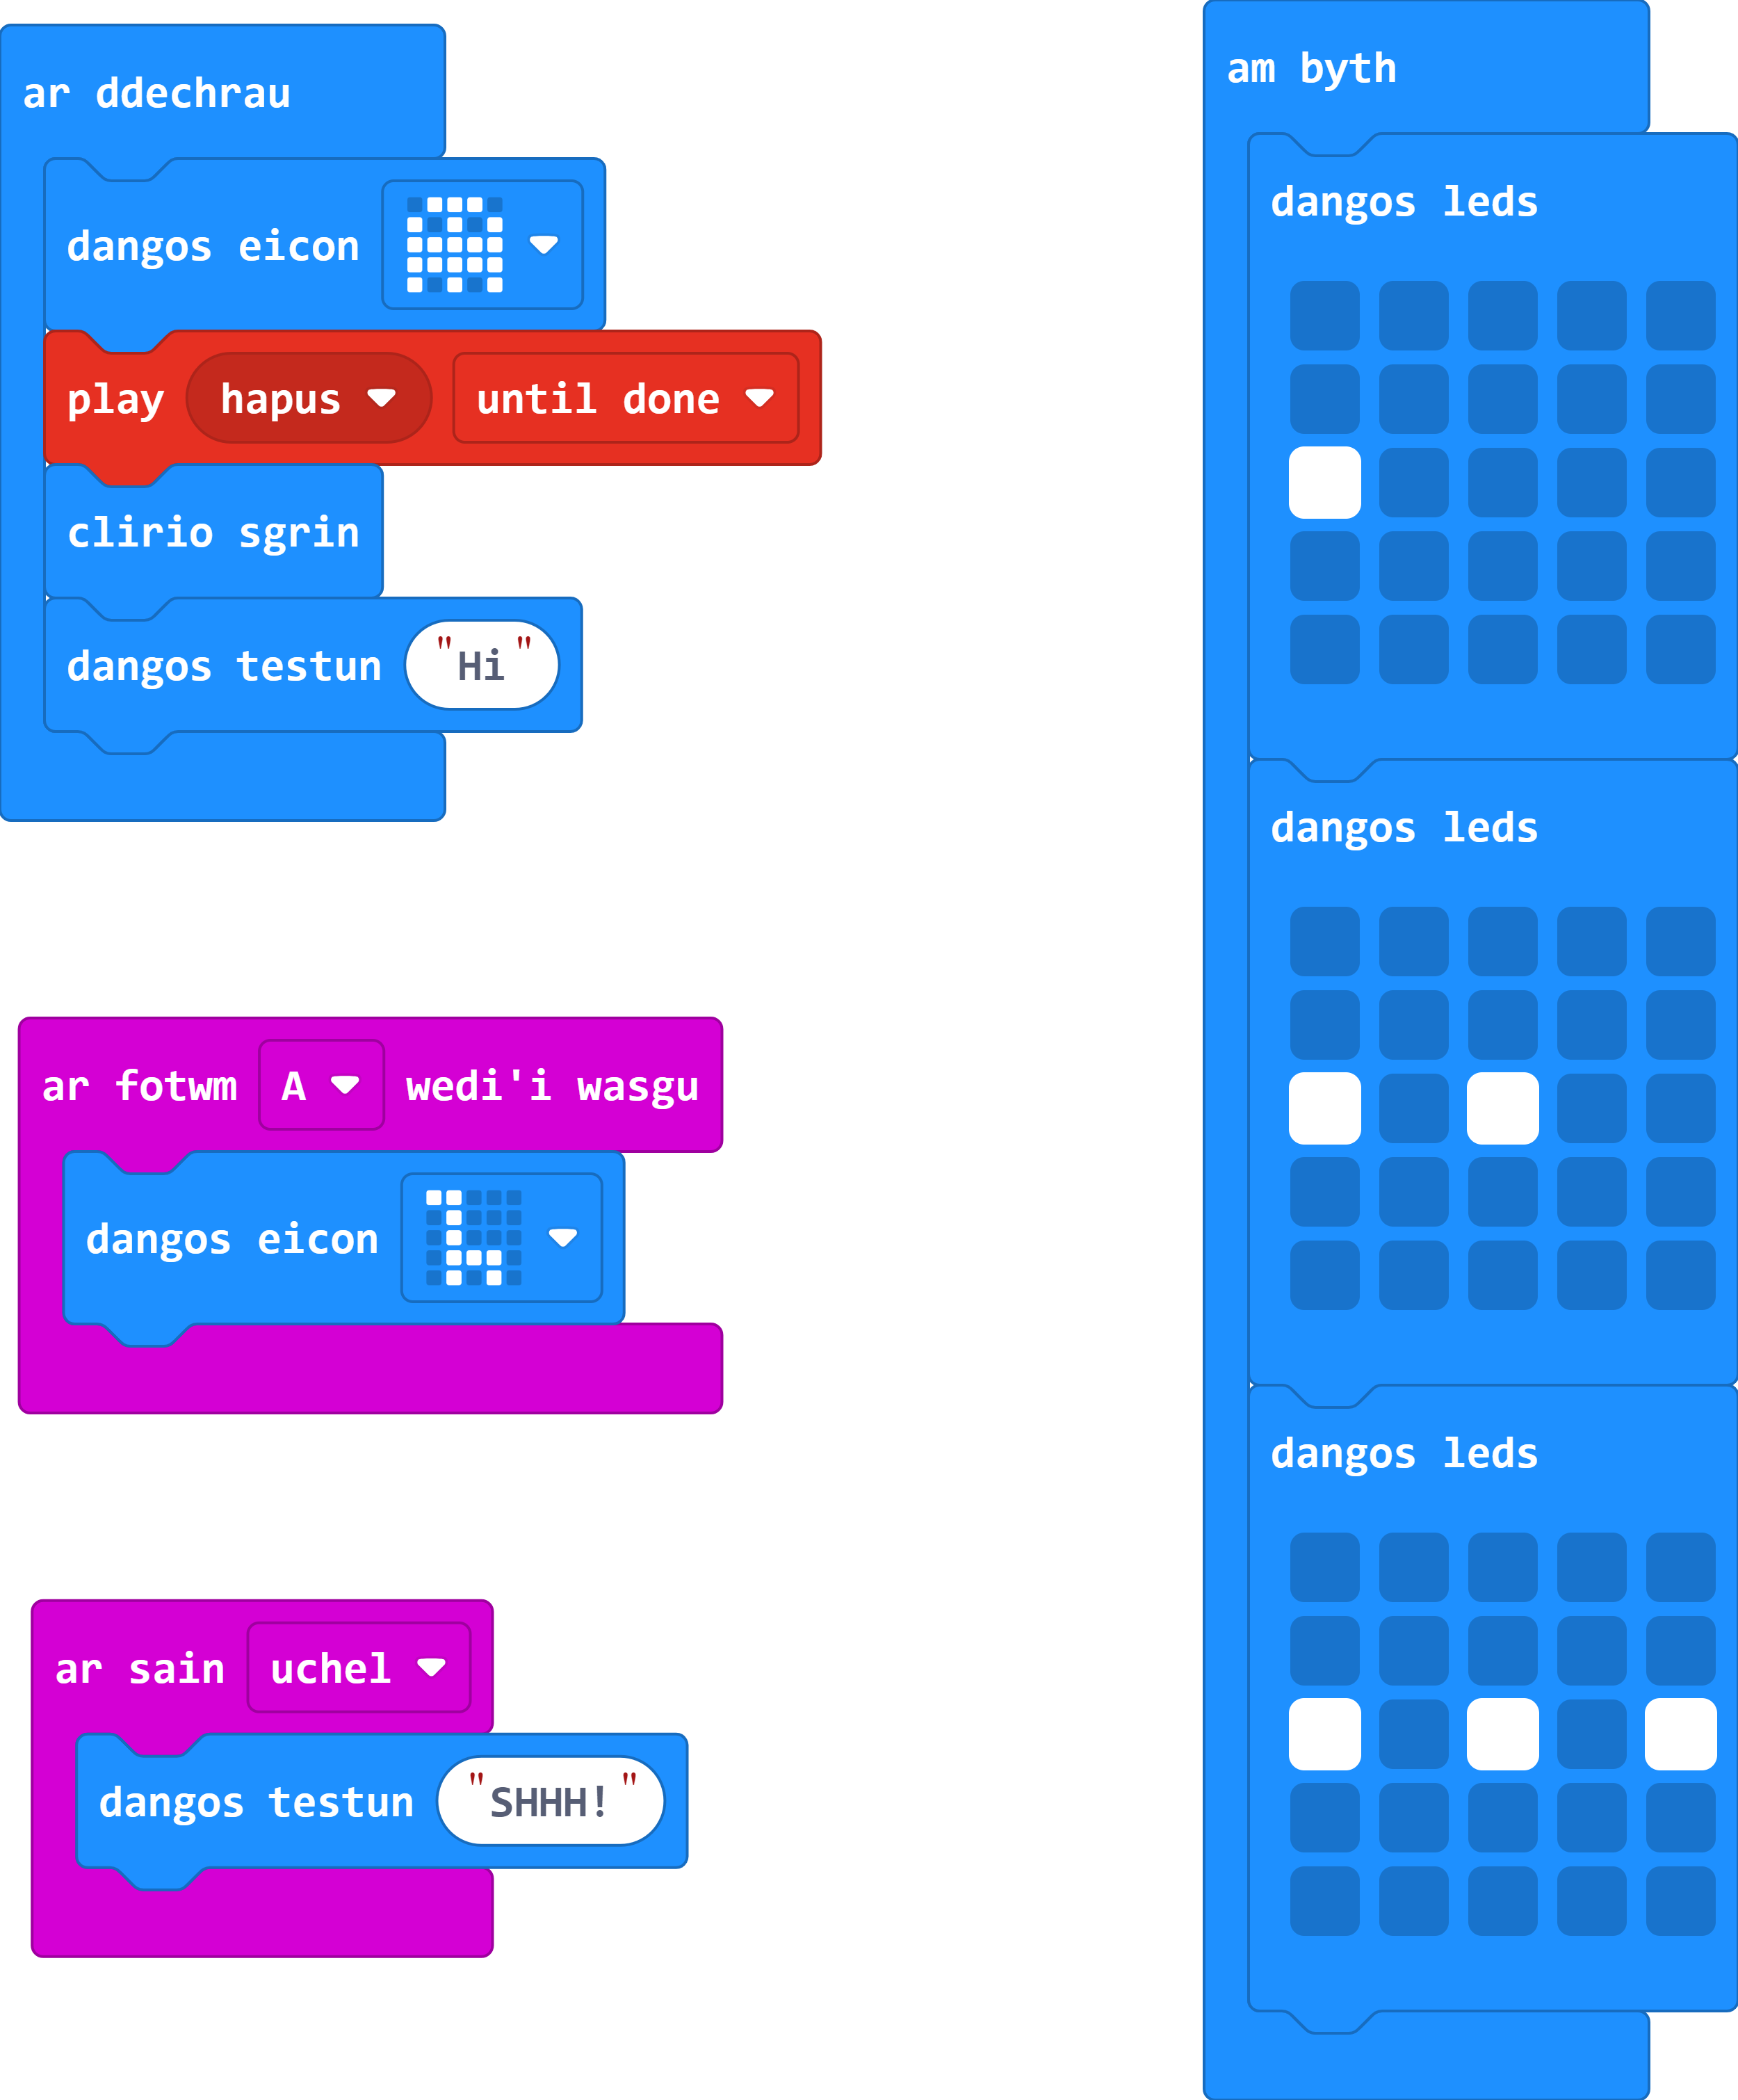
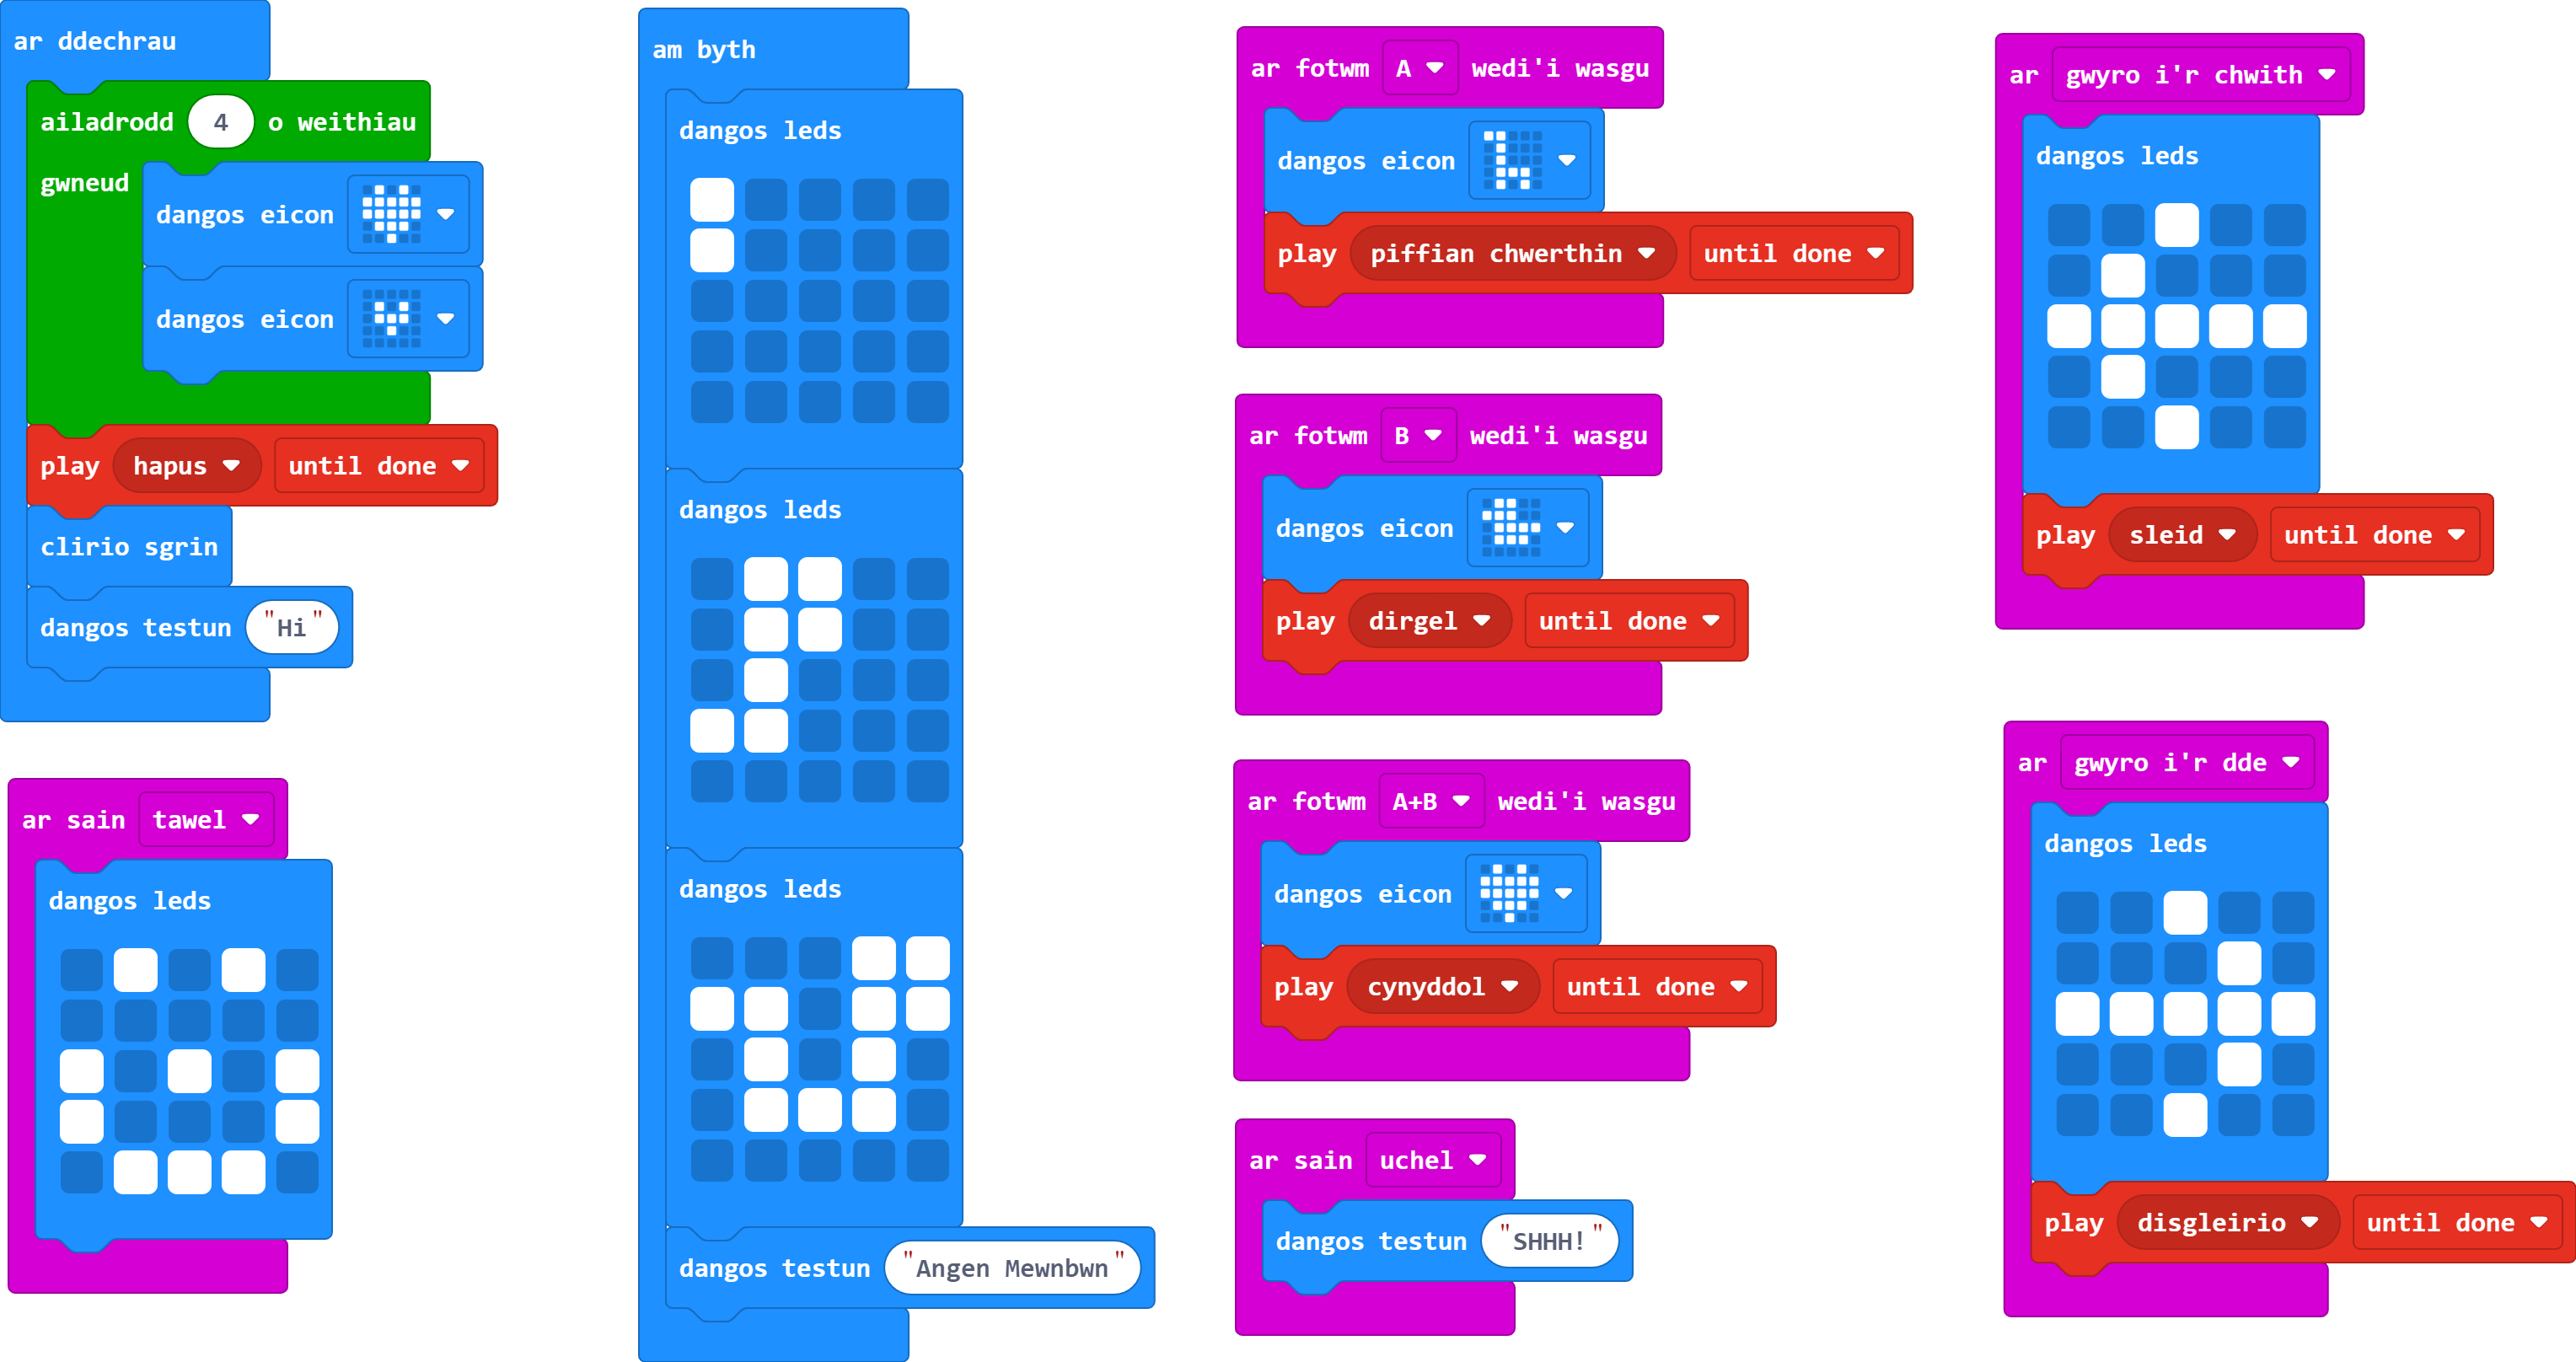
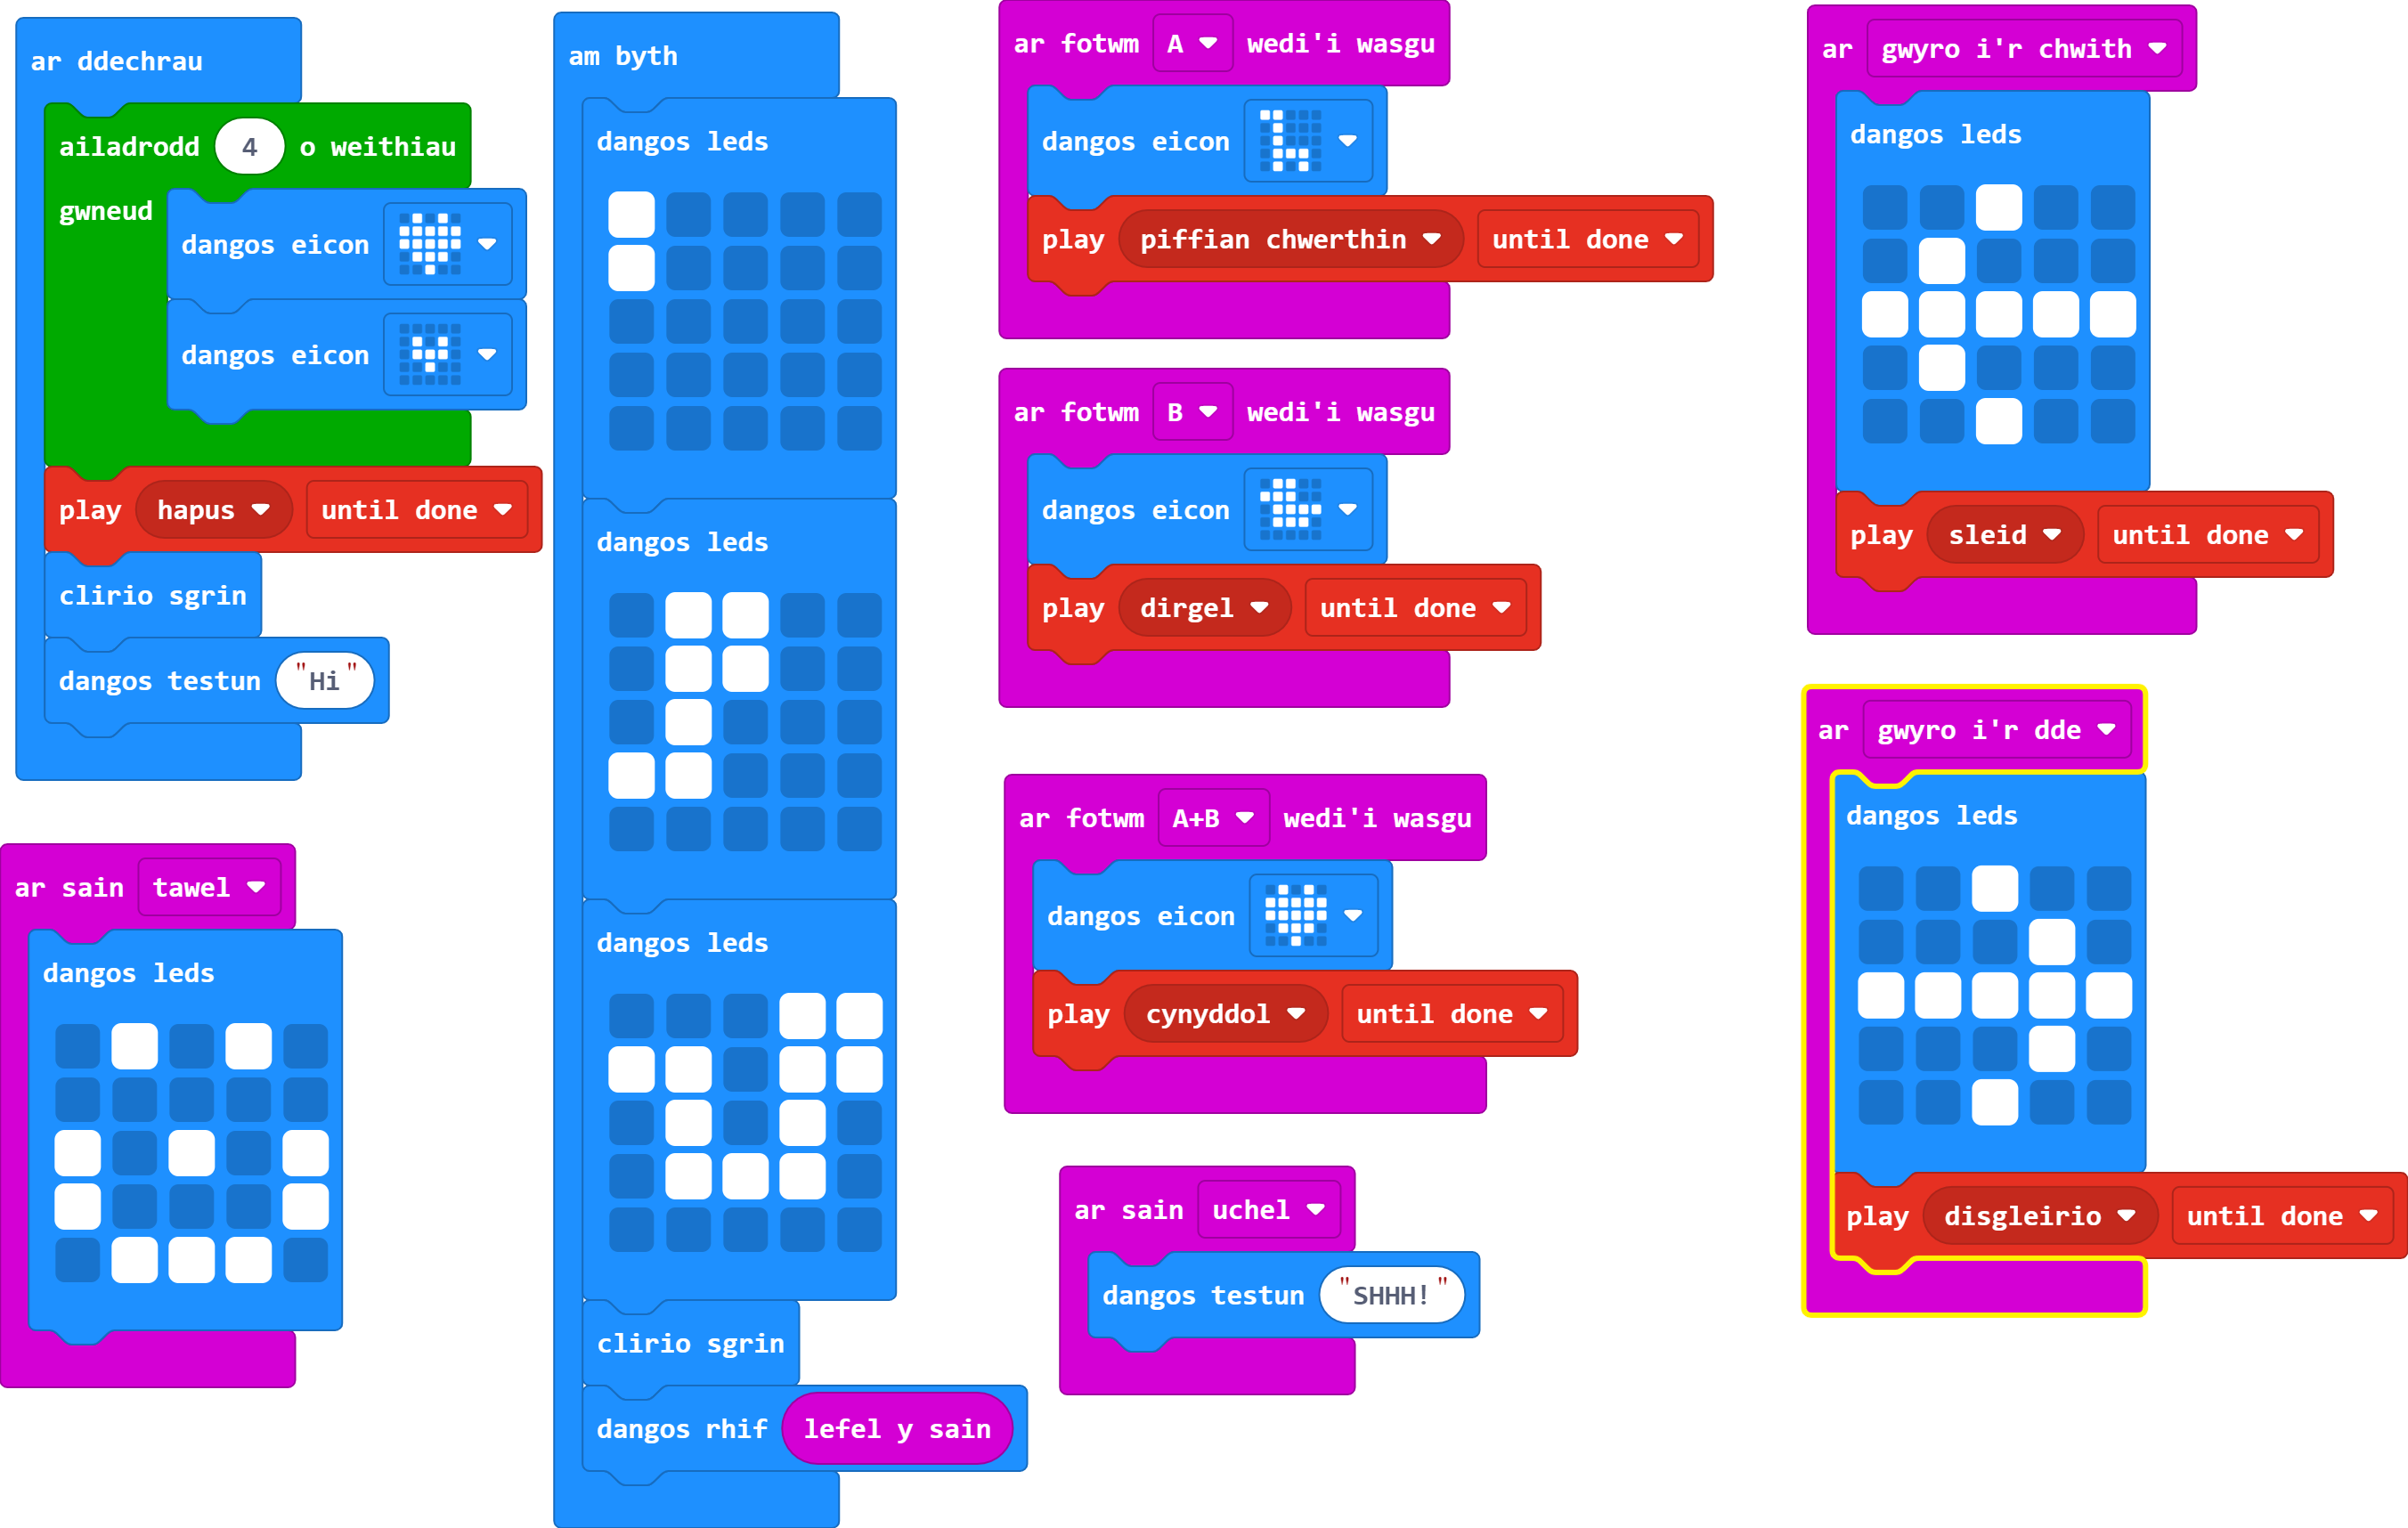
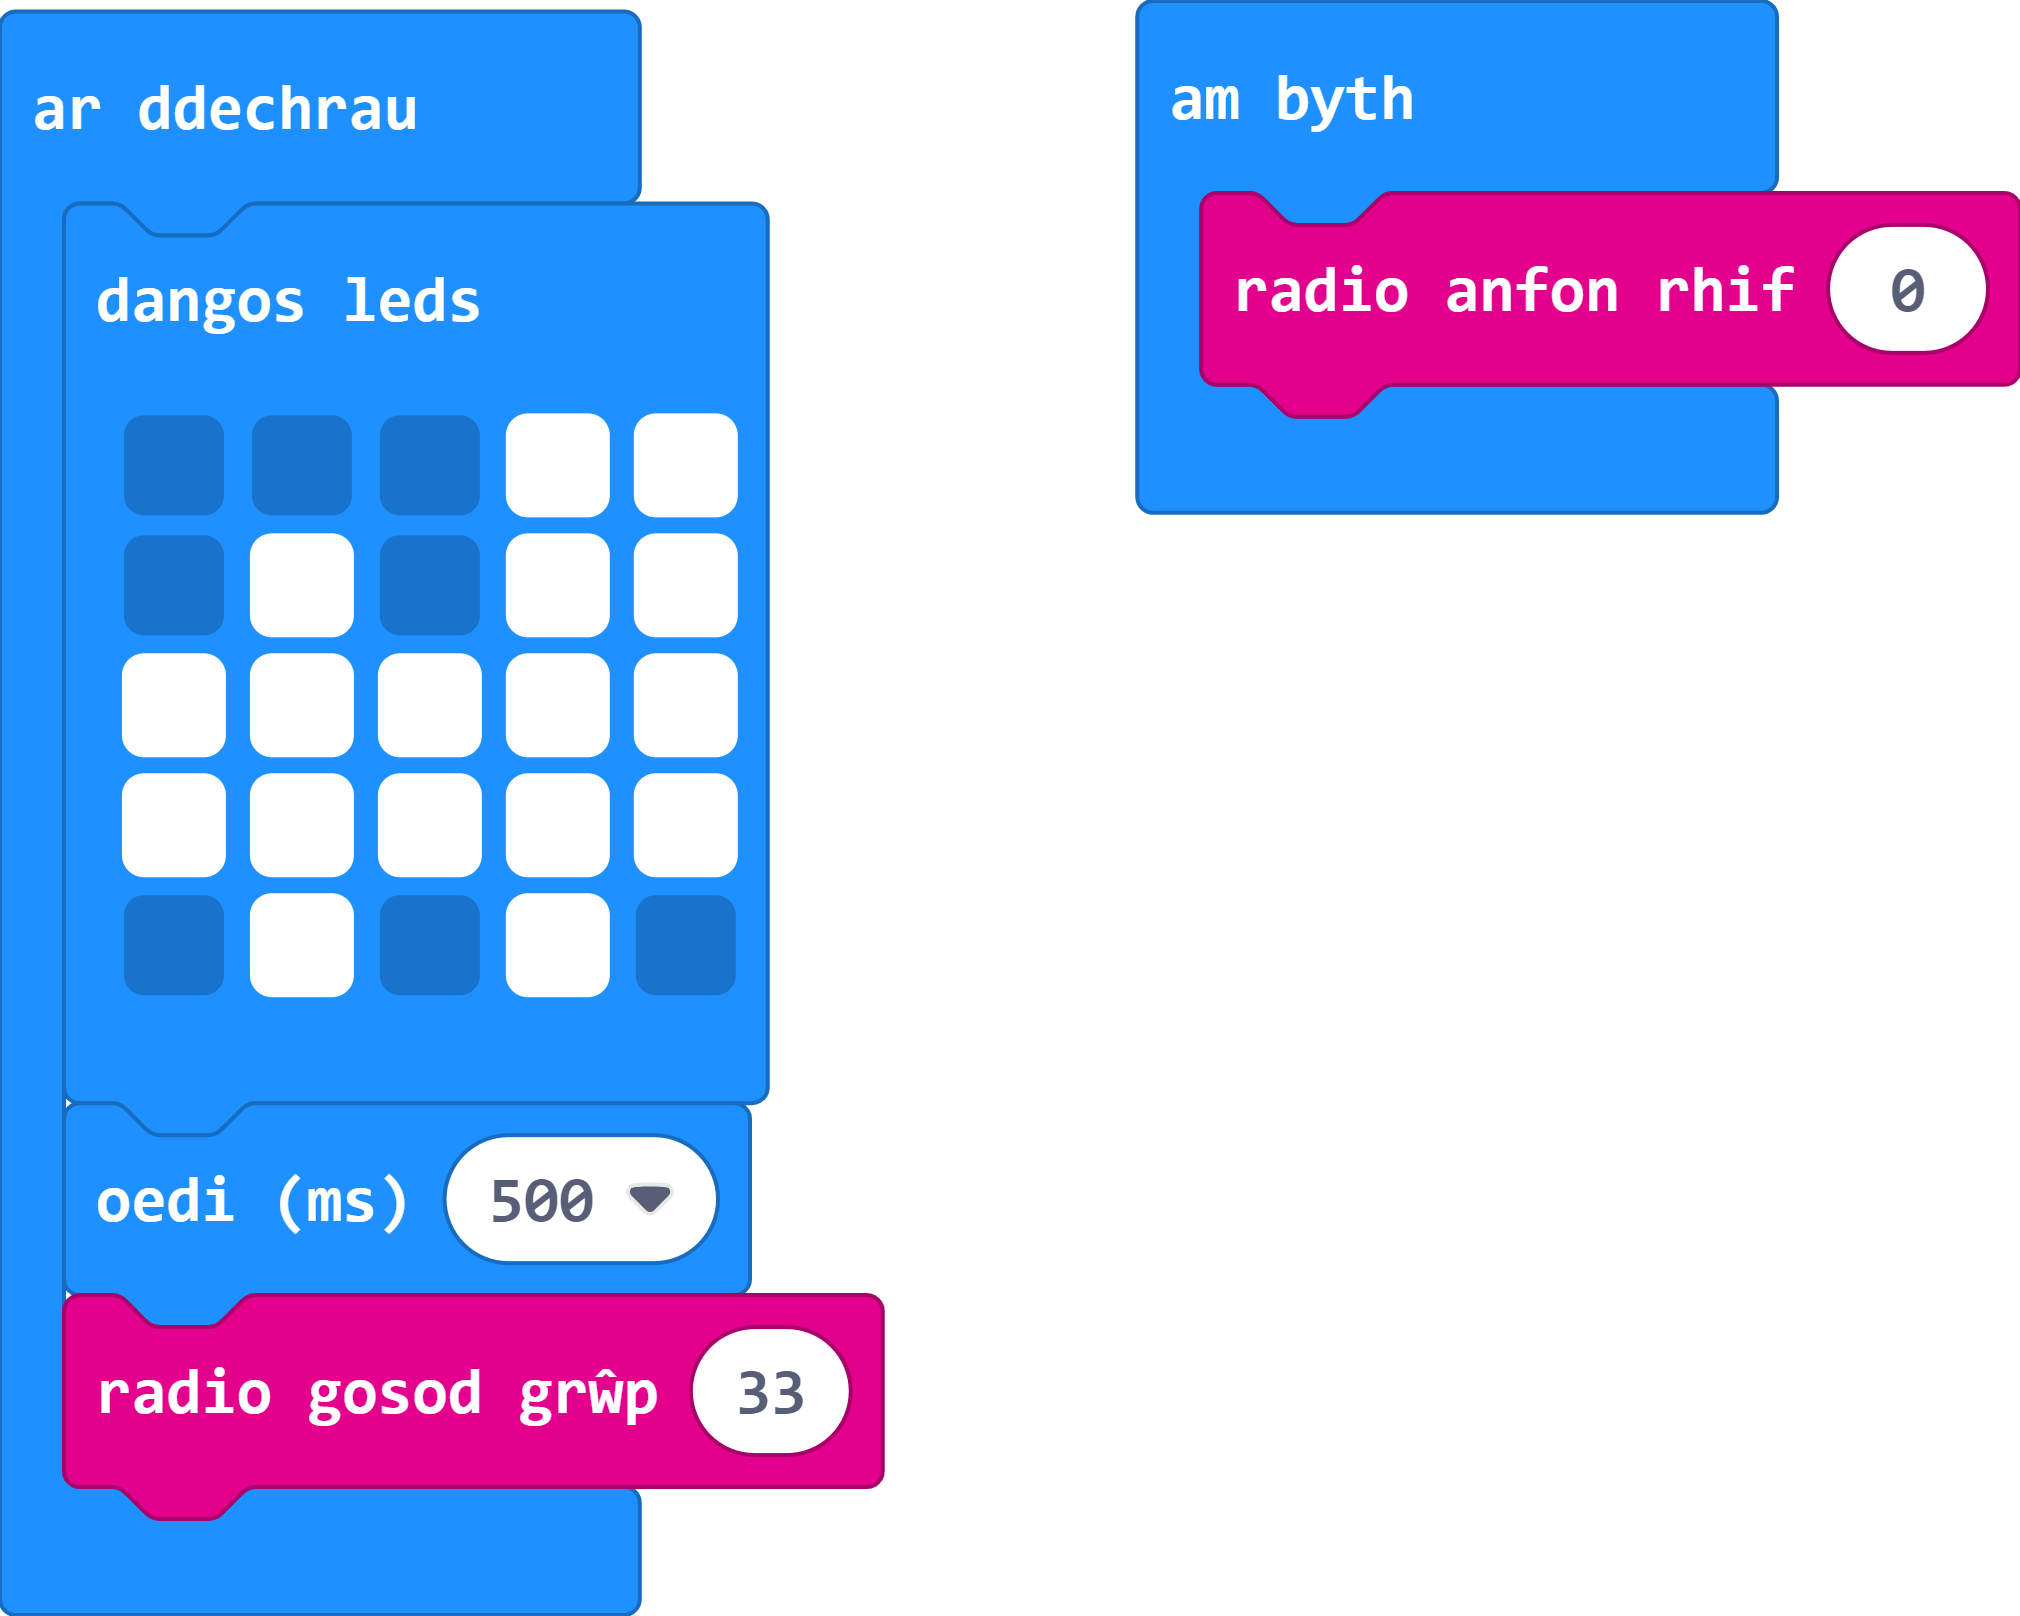
Creu rhaglen (yn Makecode) sy'n gwneud y canlynol:
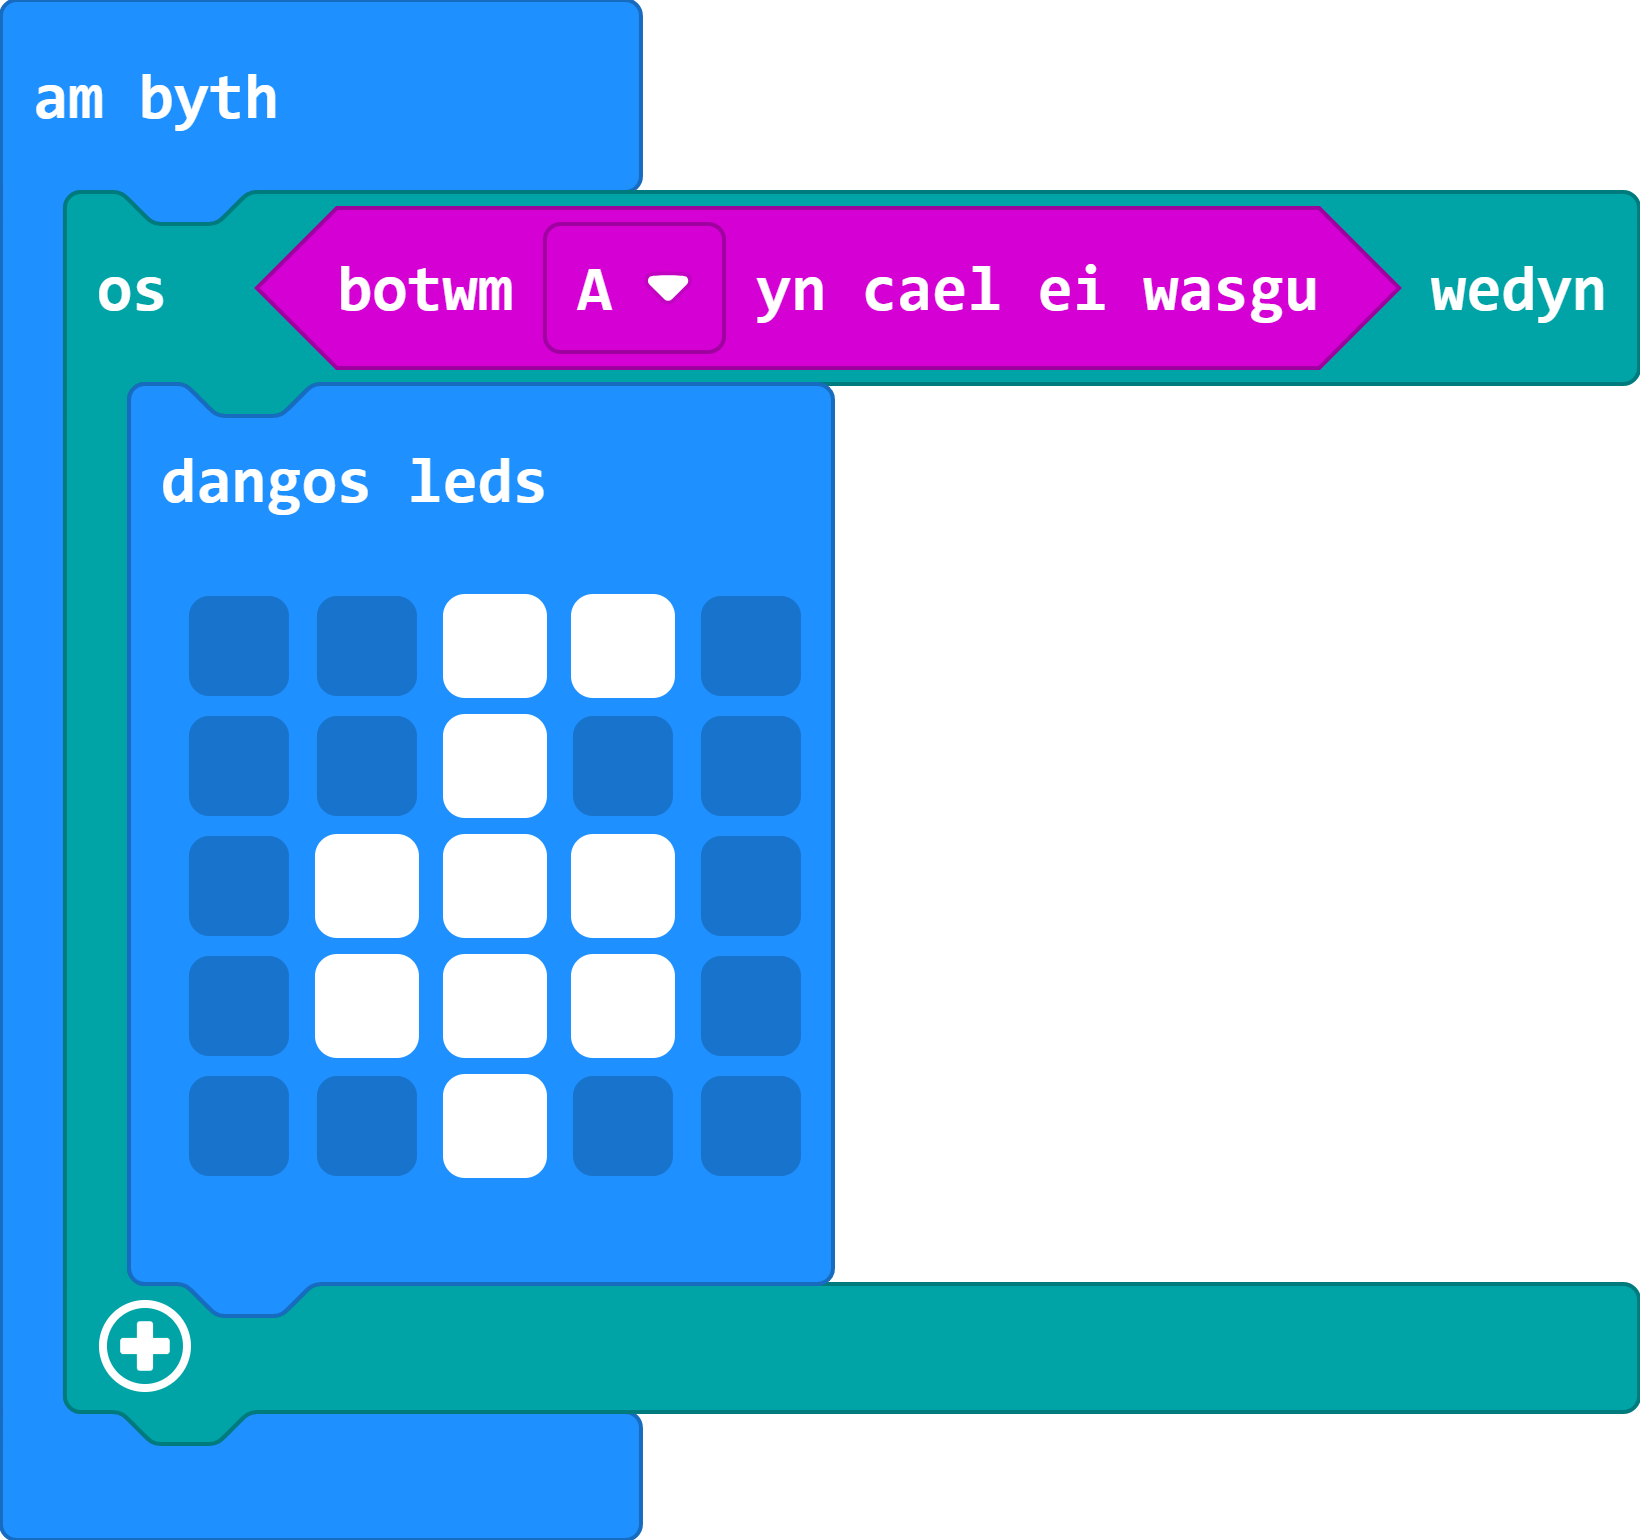
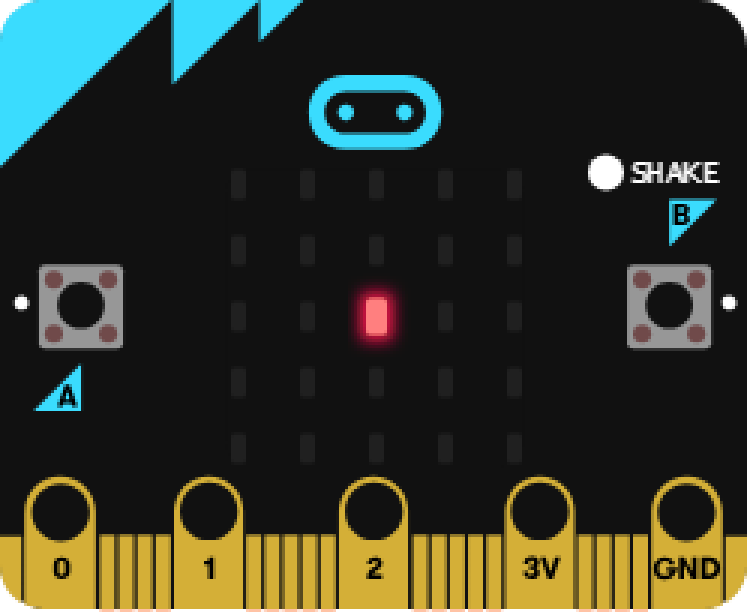
Pan fydd y rhaglen yn dechrau, rhaid sicrhau bod y LEDs yn dangos delwedd o'ch dewis.
Gair o gyngor: I ddileu blociau, pwyswch y botwm dileu ar eich bysellfwrdd neu llusgwch y blociau yn ôl i'r ddewislen.
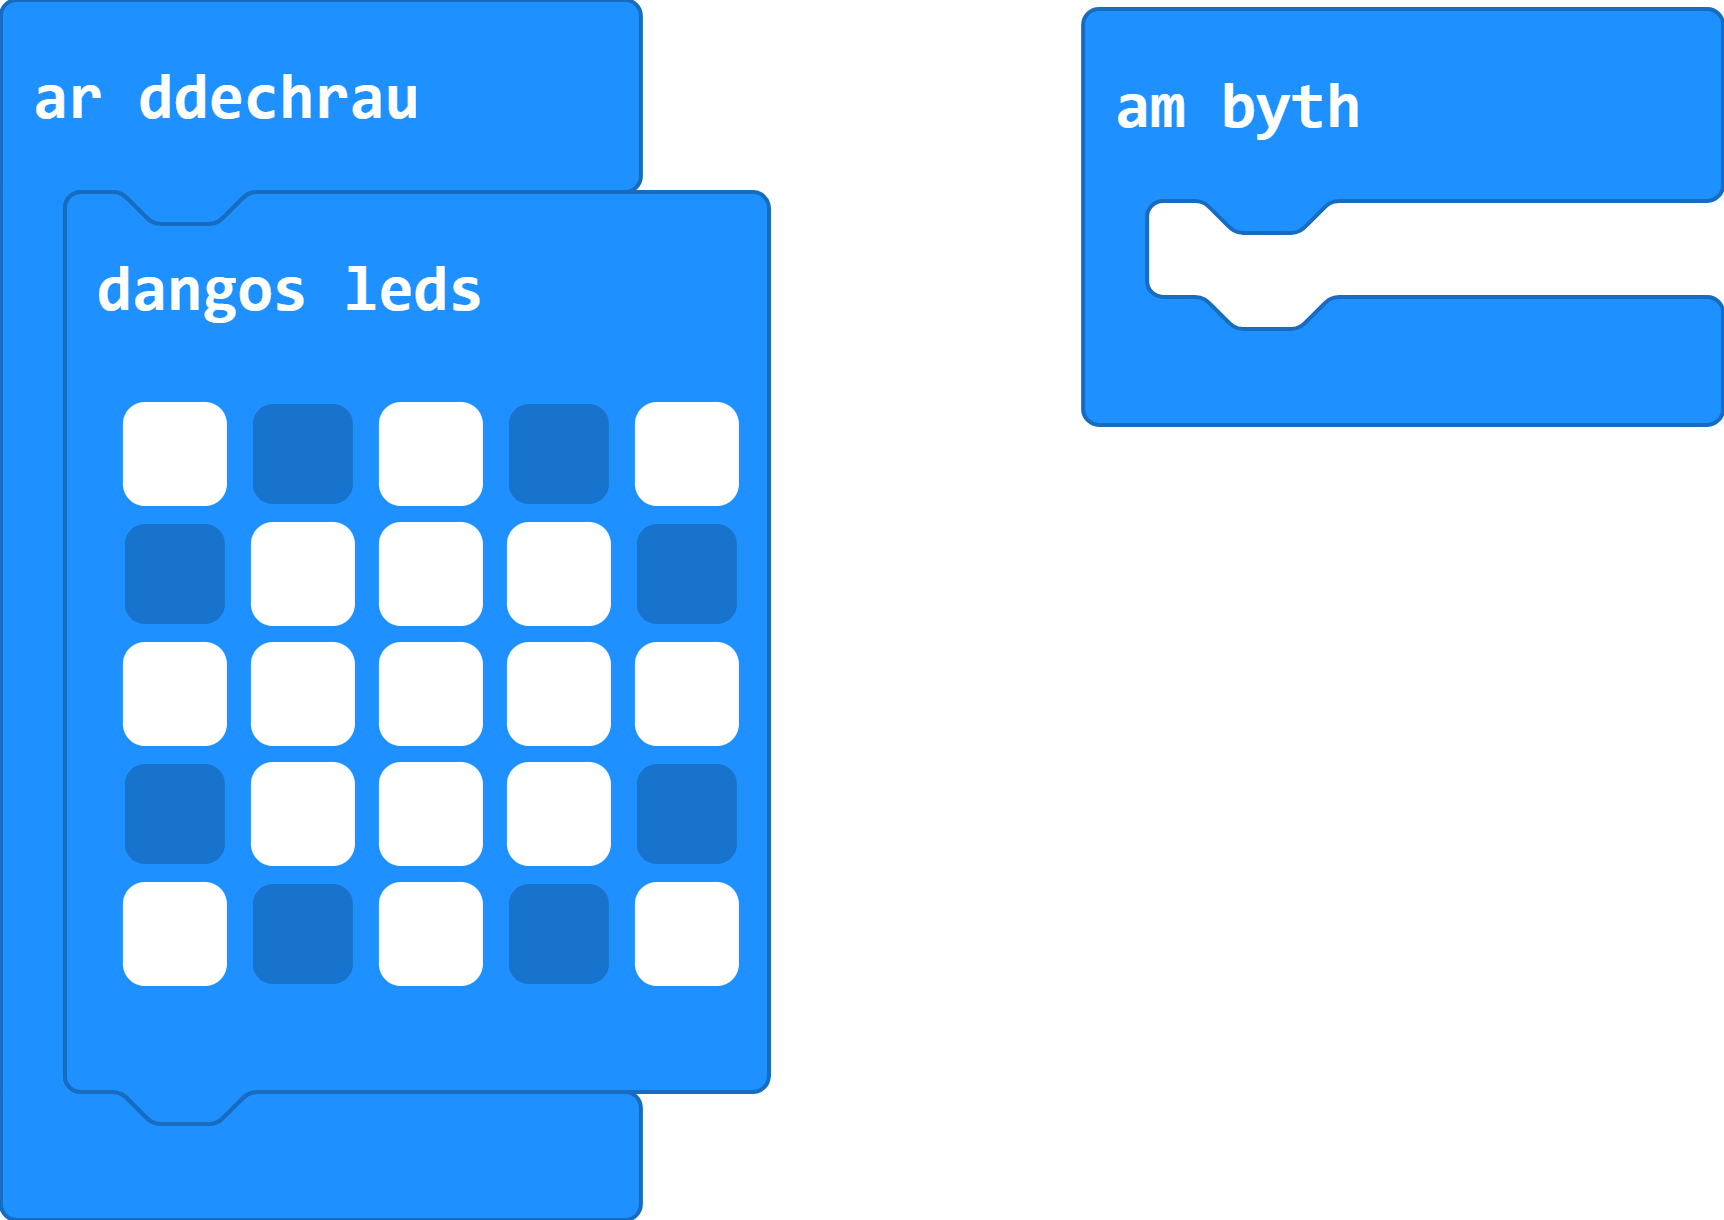
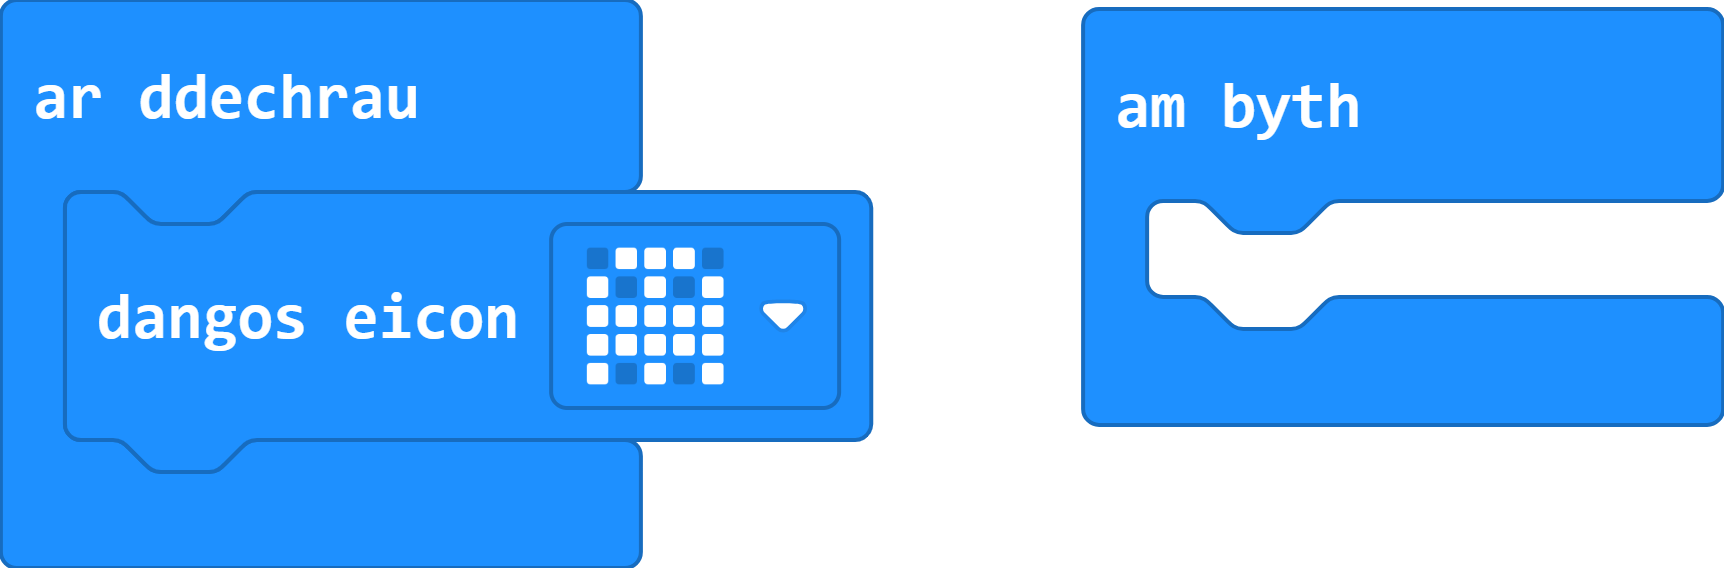
Gallwch ddefnyddio delwedd sy'n bodoli eisoes gyda'r bloc 'dangos eicon' neu greu eich delwedd eich hun gan ddefnyddio'r bloc 'dangos leds'.
Os ydych chi'n defnyddio'r bloc 'dangos leds', gallwch glicio ar y sgwariau i ddewis a ydyn nhw'n cael eu goleuo ai peidio.
Byddwch ond eisiau gweld y nodwedd hon pan fydd y rhaglen yn dechrau, felly dylech ei rhoi yn y bloc 'ar ddechrau'.
Os ydych chi'n dal i gael trafferth, defnyddiwch y botwm ateb isod.
Defnyddiwch y bloc 'dangos leds':
Defnyddiwch y bloc 'dangos eicon':
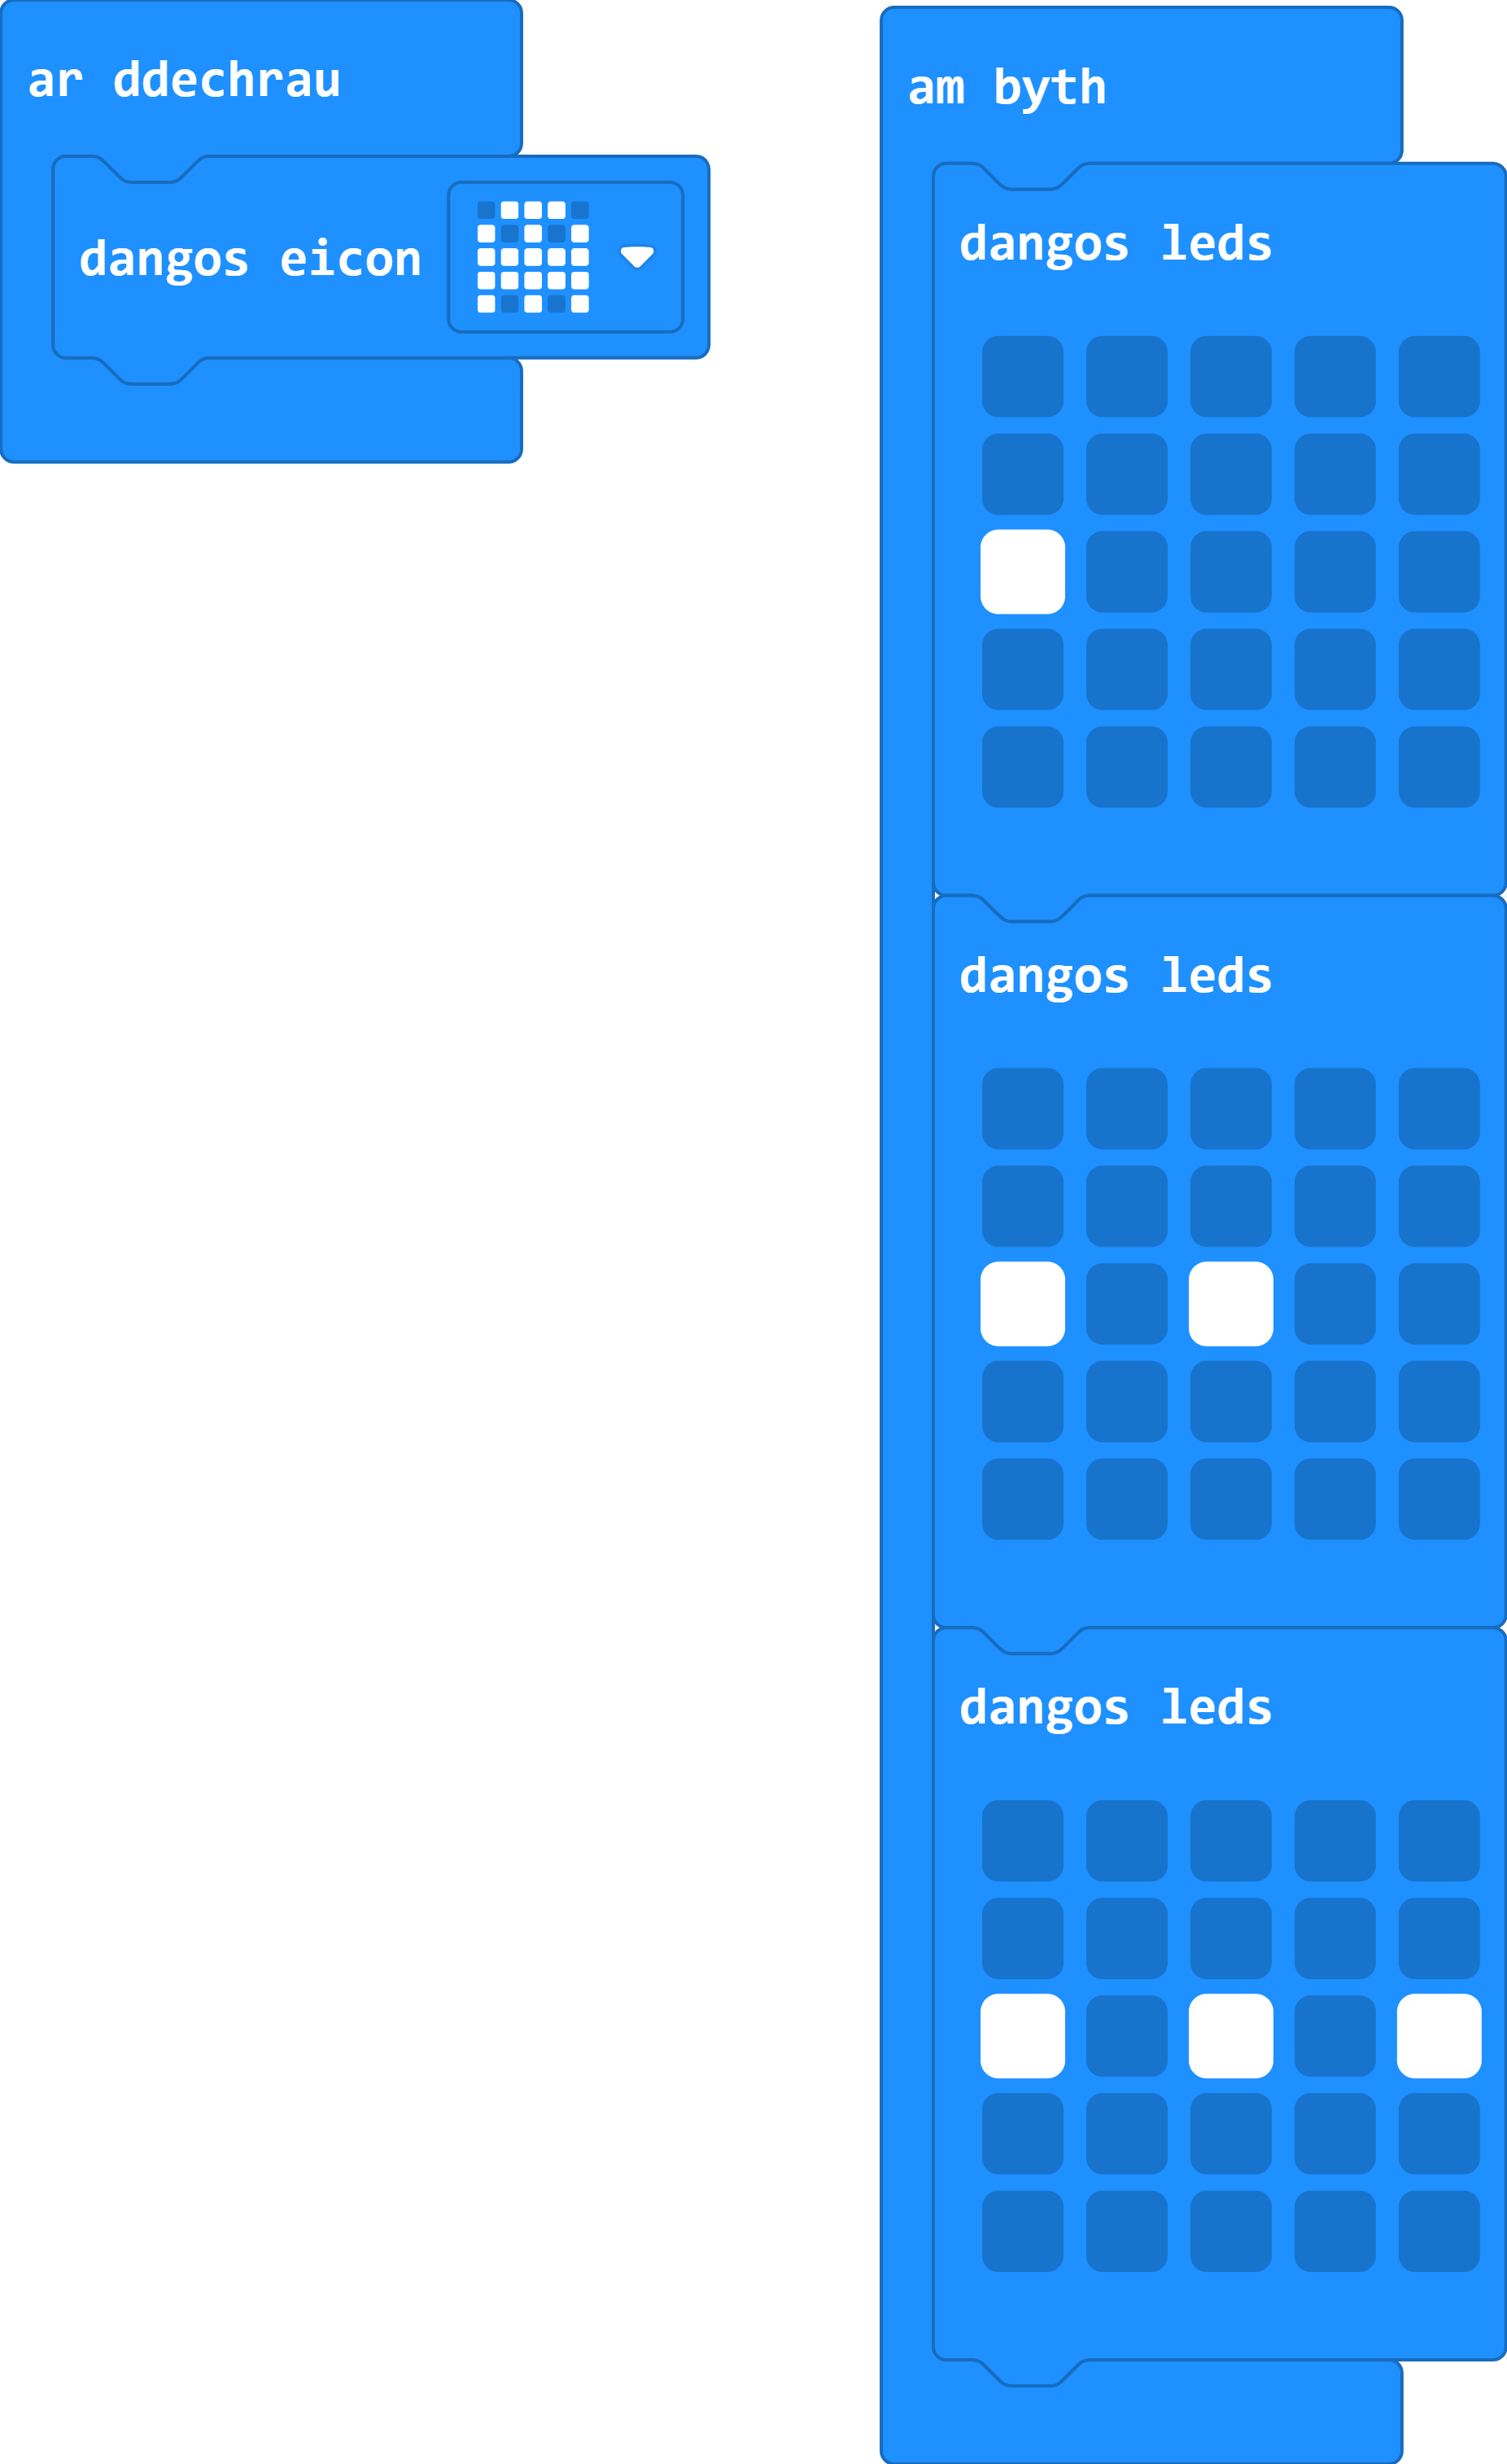
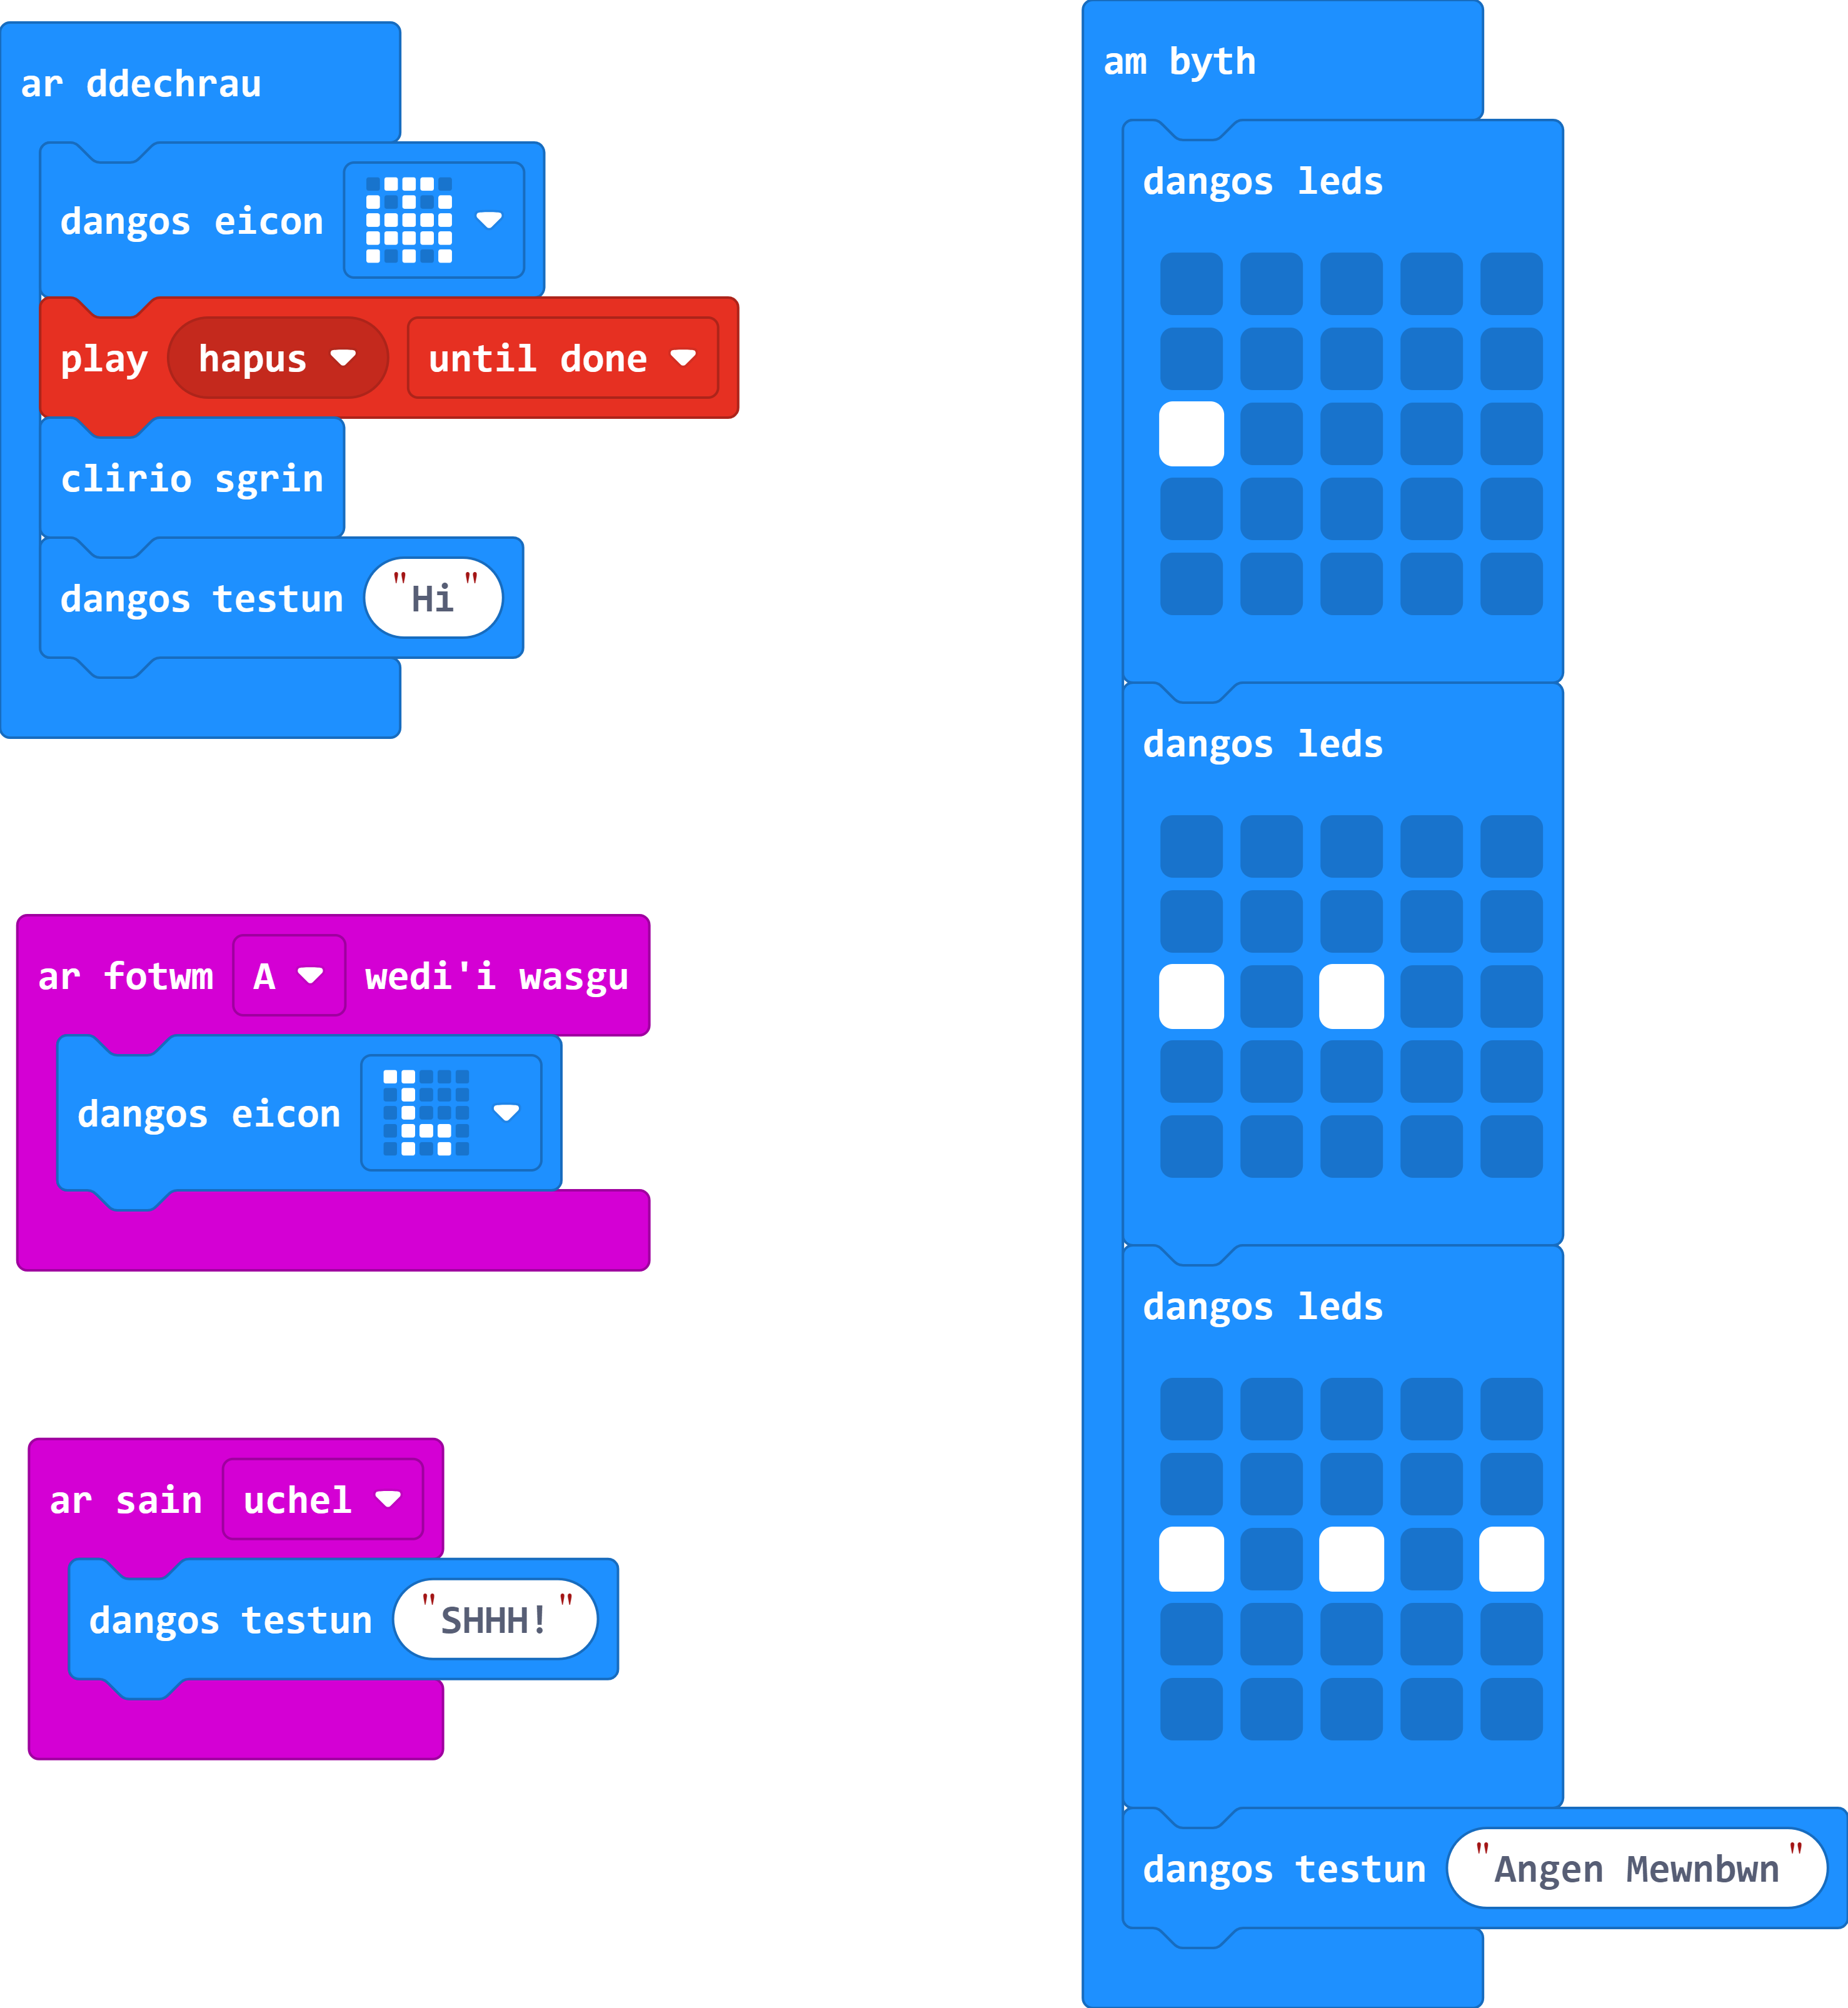
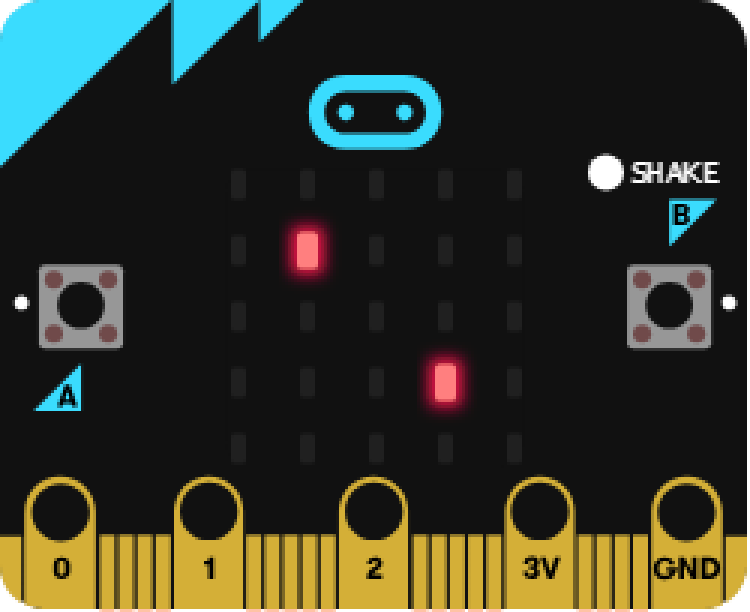
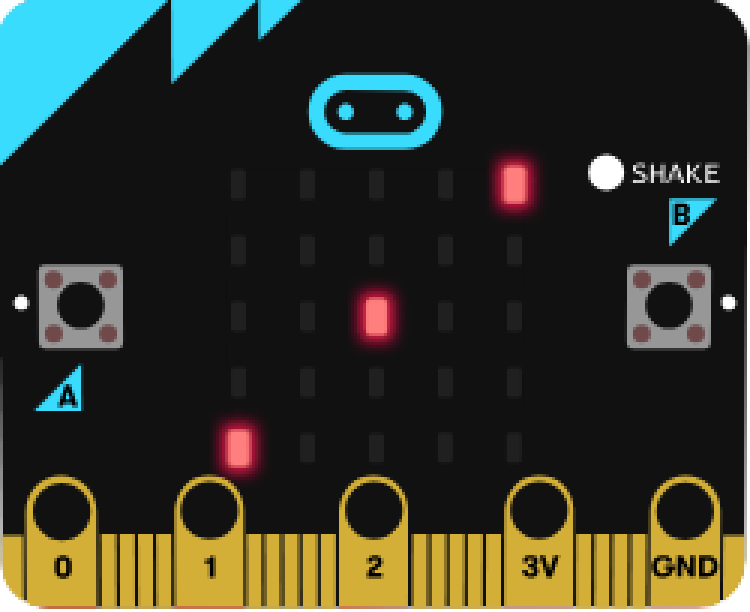
Ar ôl cwblhau'r cam cychwyn, dylech ddefnyddio'ch rhaglen i chwarae animeiddiad drosodd a throsodd nes eich bod yn stopio'r rhaglen.
Gair o gyngor: Cyfres o ddelweddau yw animeiddiad sy'n gwneud i wrthrych edrych fel petai'n symud.
Bydd angen i chi ddefnyddio'r bloc 'am byth' i wneud hyn.
Gellid defnyddio dwy ddelwedd yn unig i greu animeiddiad syml.
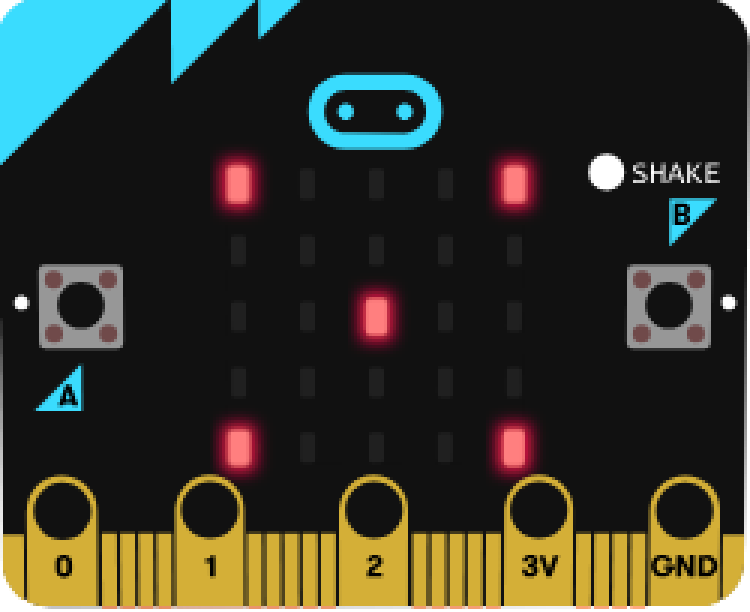
Er enghraifft, gallwch ddefnyddio'r bloc 'dangos eicon' ar gyfer y galon fawr ac yna'r galon fach. Bydd hyn yn creu animeiddiad sy'n edrych fel calon yn curo.
Does dim angen saib ar gyfer cyfres o ddelweddau sy'n gwneud animeiddiad oni bai eich bod am arafu'r lluniau.
Gallwch ddefnyddio 'dangos leds', 'dangos eicon', neu gyfuniad o'r ddau.
Os ydych chi'n dal i gael trafferth, defnyddiwch y botwm ateb isod.
Mae hyn yn dangos nad oes angen i chi ddefnyddio llawer o LEDs i greu animeiddiad.
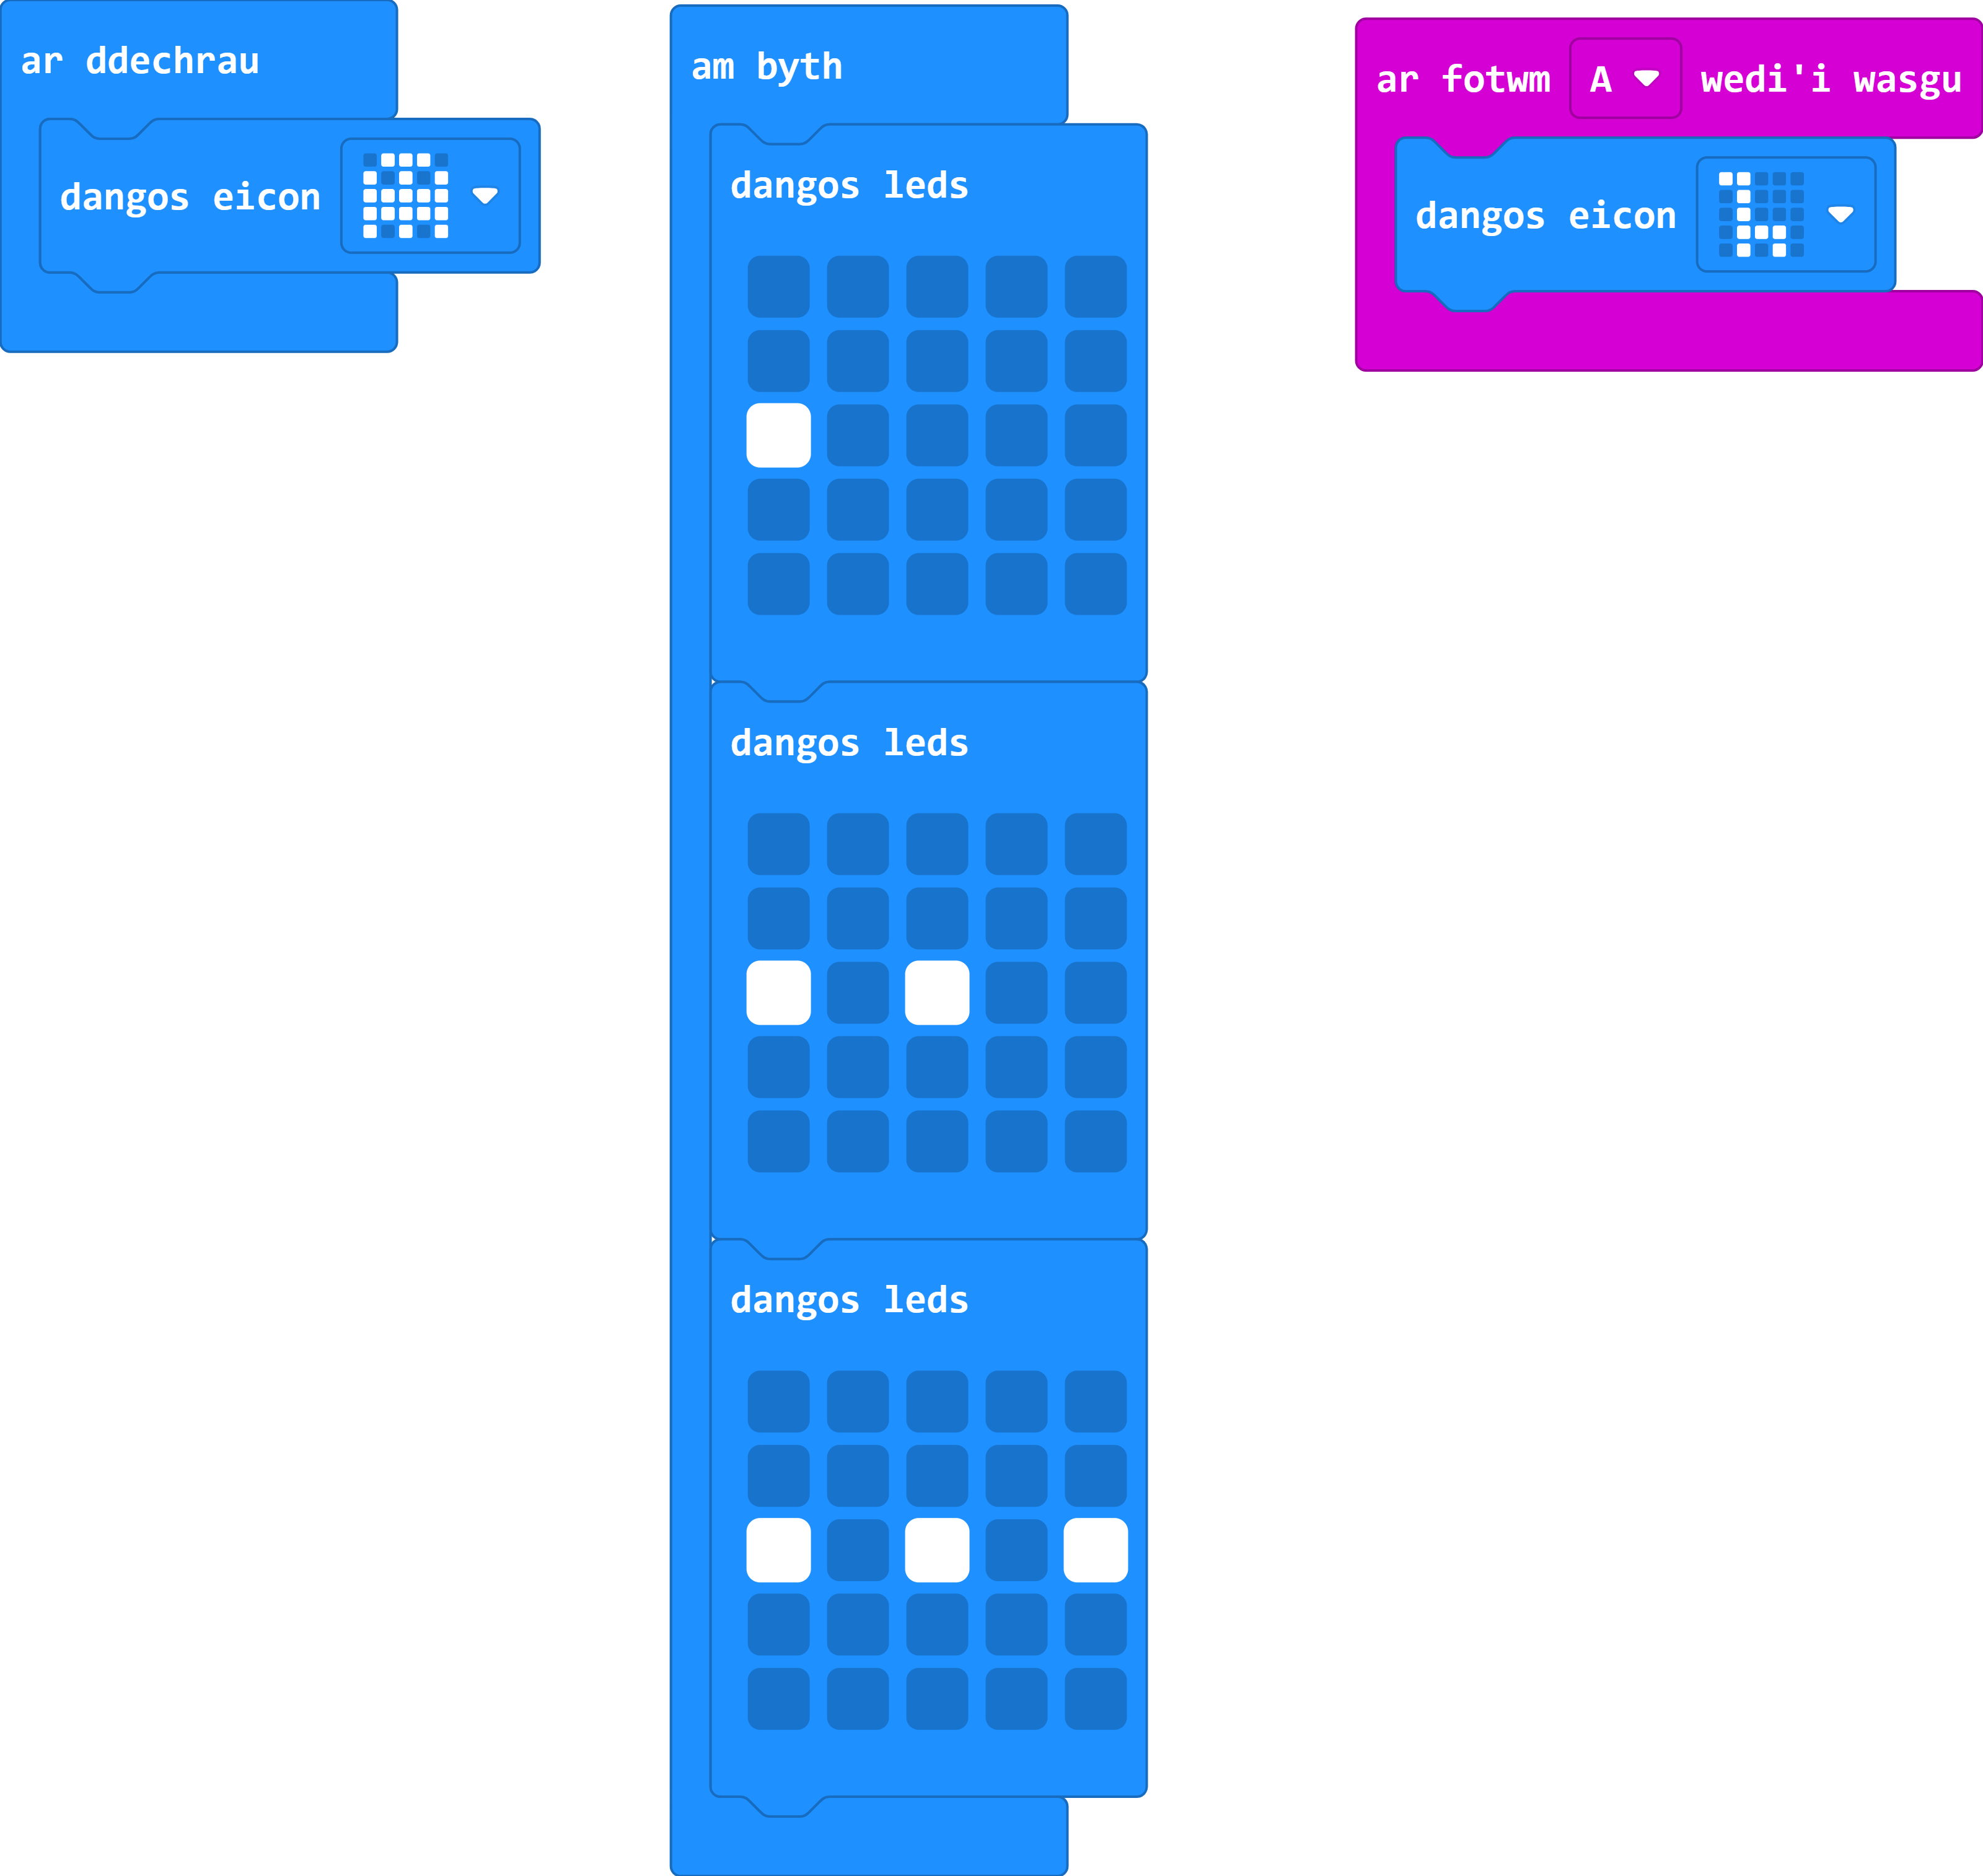
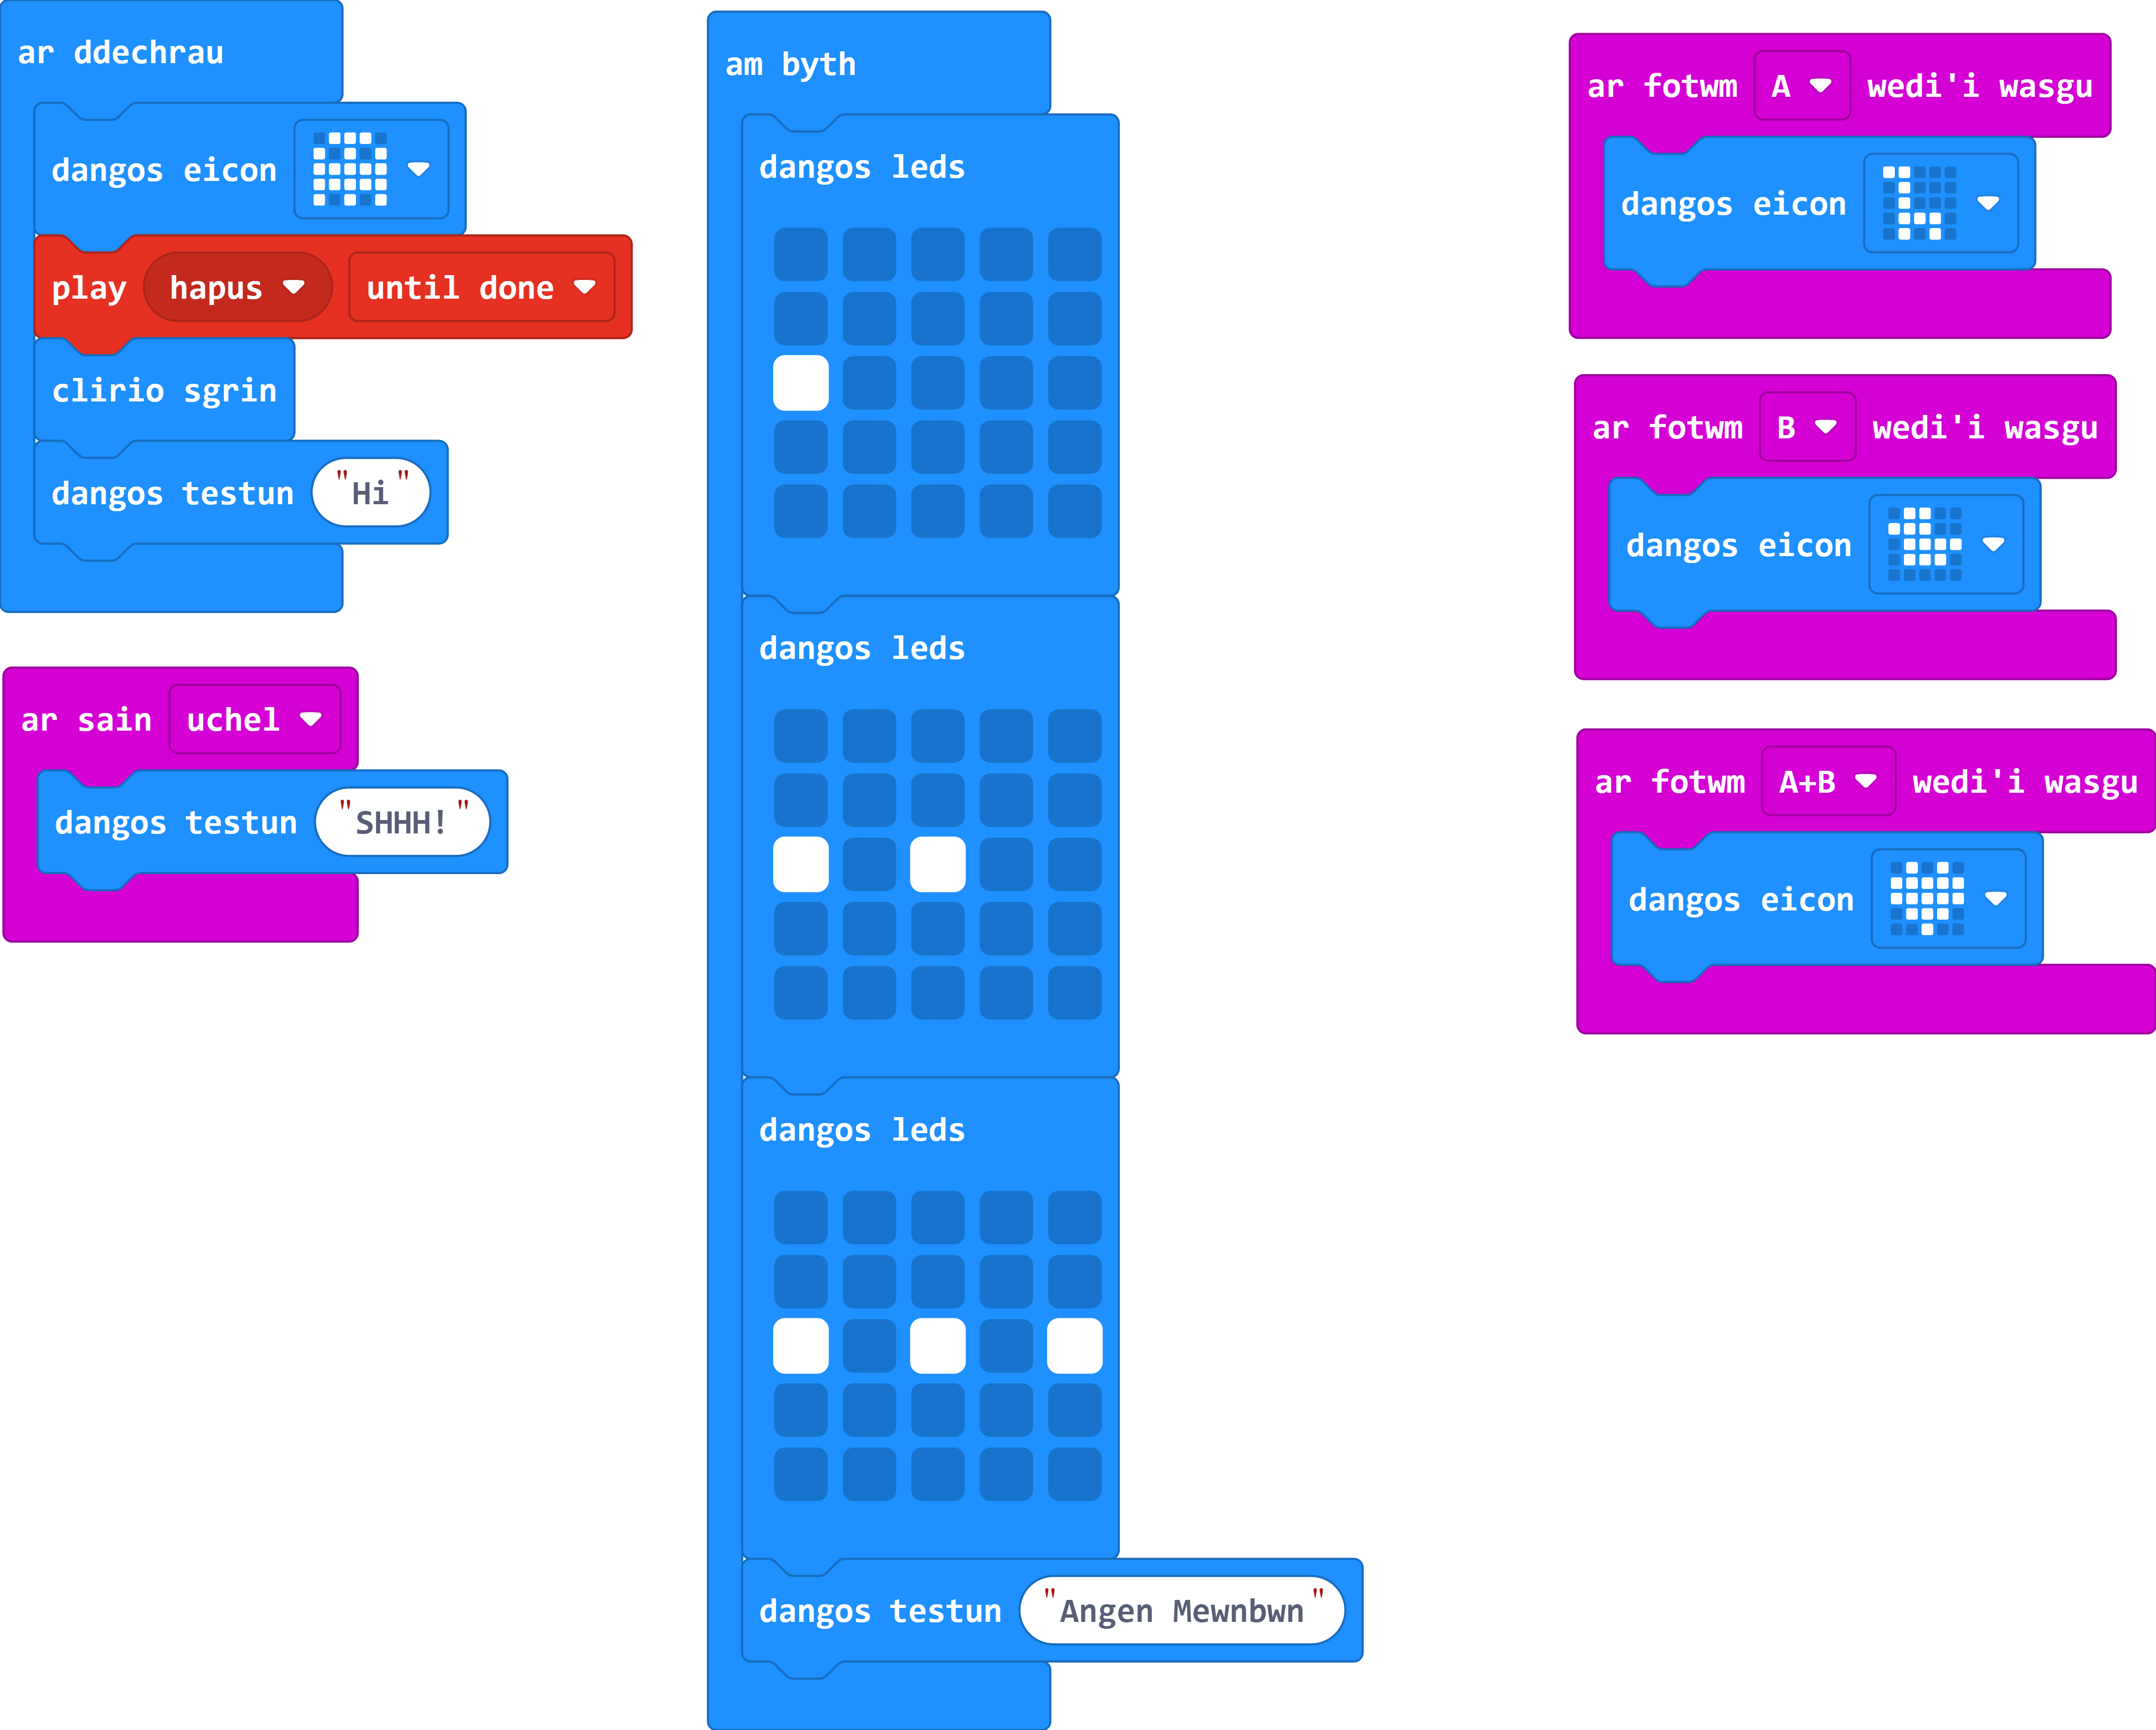
Gofalwch fod delwedd wahanol yn ymddangos ar eich Micro:Bit wrth bwyso botwm A.
Gair o gyngor: Mae botwm A yn fewnbwn, felly chwiliwch am y ddewislen sydd â'r bloc sydd ei angen arnoch.
Gair o gyngor: I brofi'r rhaglen, dydy'r botwm A ddim yn cyfateb i'r botwm A ar eich bysellfwrdd. Mae'n cyfeirio at y botwm A ar Micro:Bit y tu mewn i'r efelychydd, a gallwch glicio arno gyda'ch llygoden.
Mae'r bloc y bydd ei angen arnoch ar gael yn y ddewislen bloc Mewnbwn.
Dydy'r bloc hwn ddim yn mynd y tu mewn i'r blociau 'ar ddechrau' neu 'am byth'. Yn hytrach, mae'n dechrau adran newydd o flociau cod.
Os ydych chi'n dal i gael trafferth, defnyddiwch y botwm ateb isod.
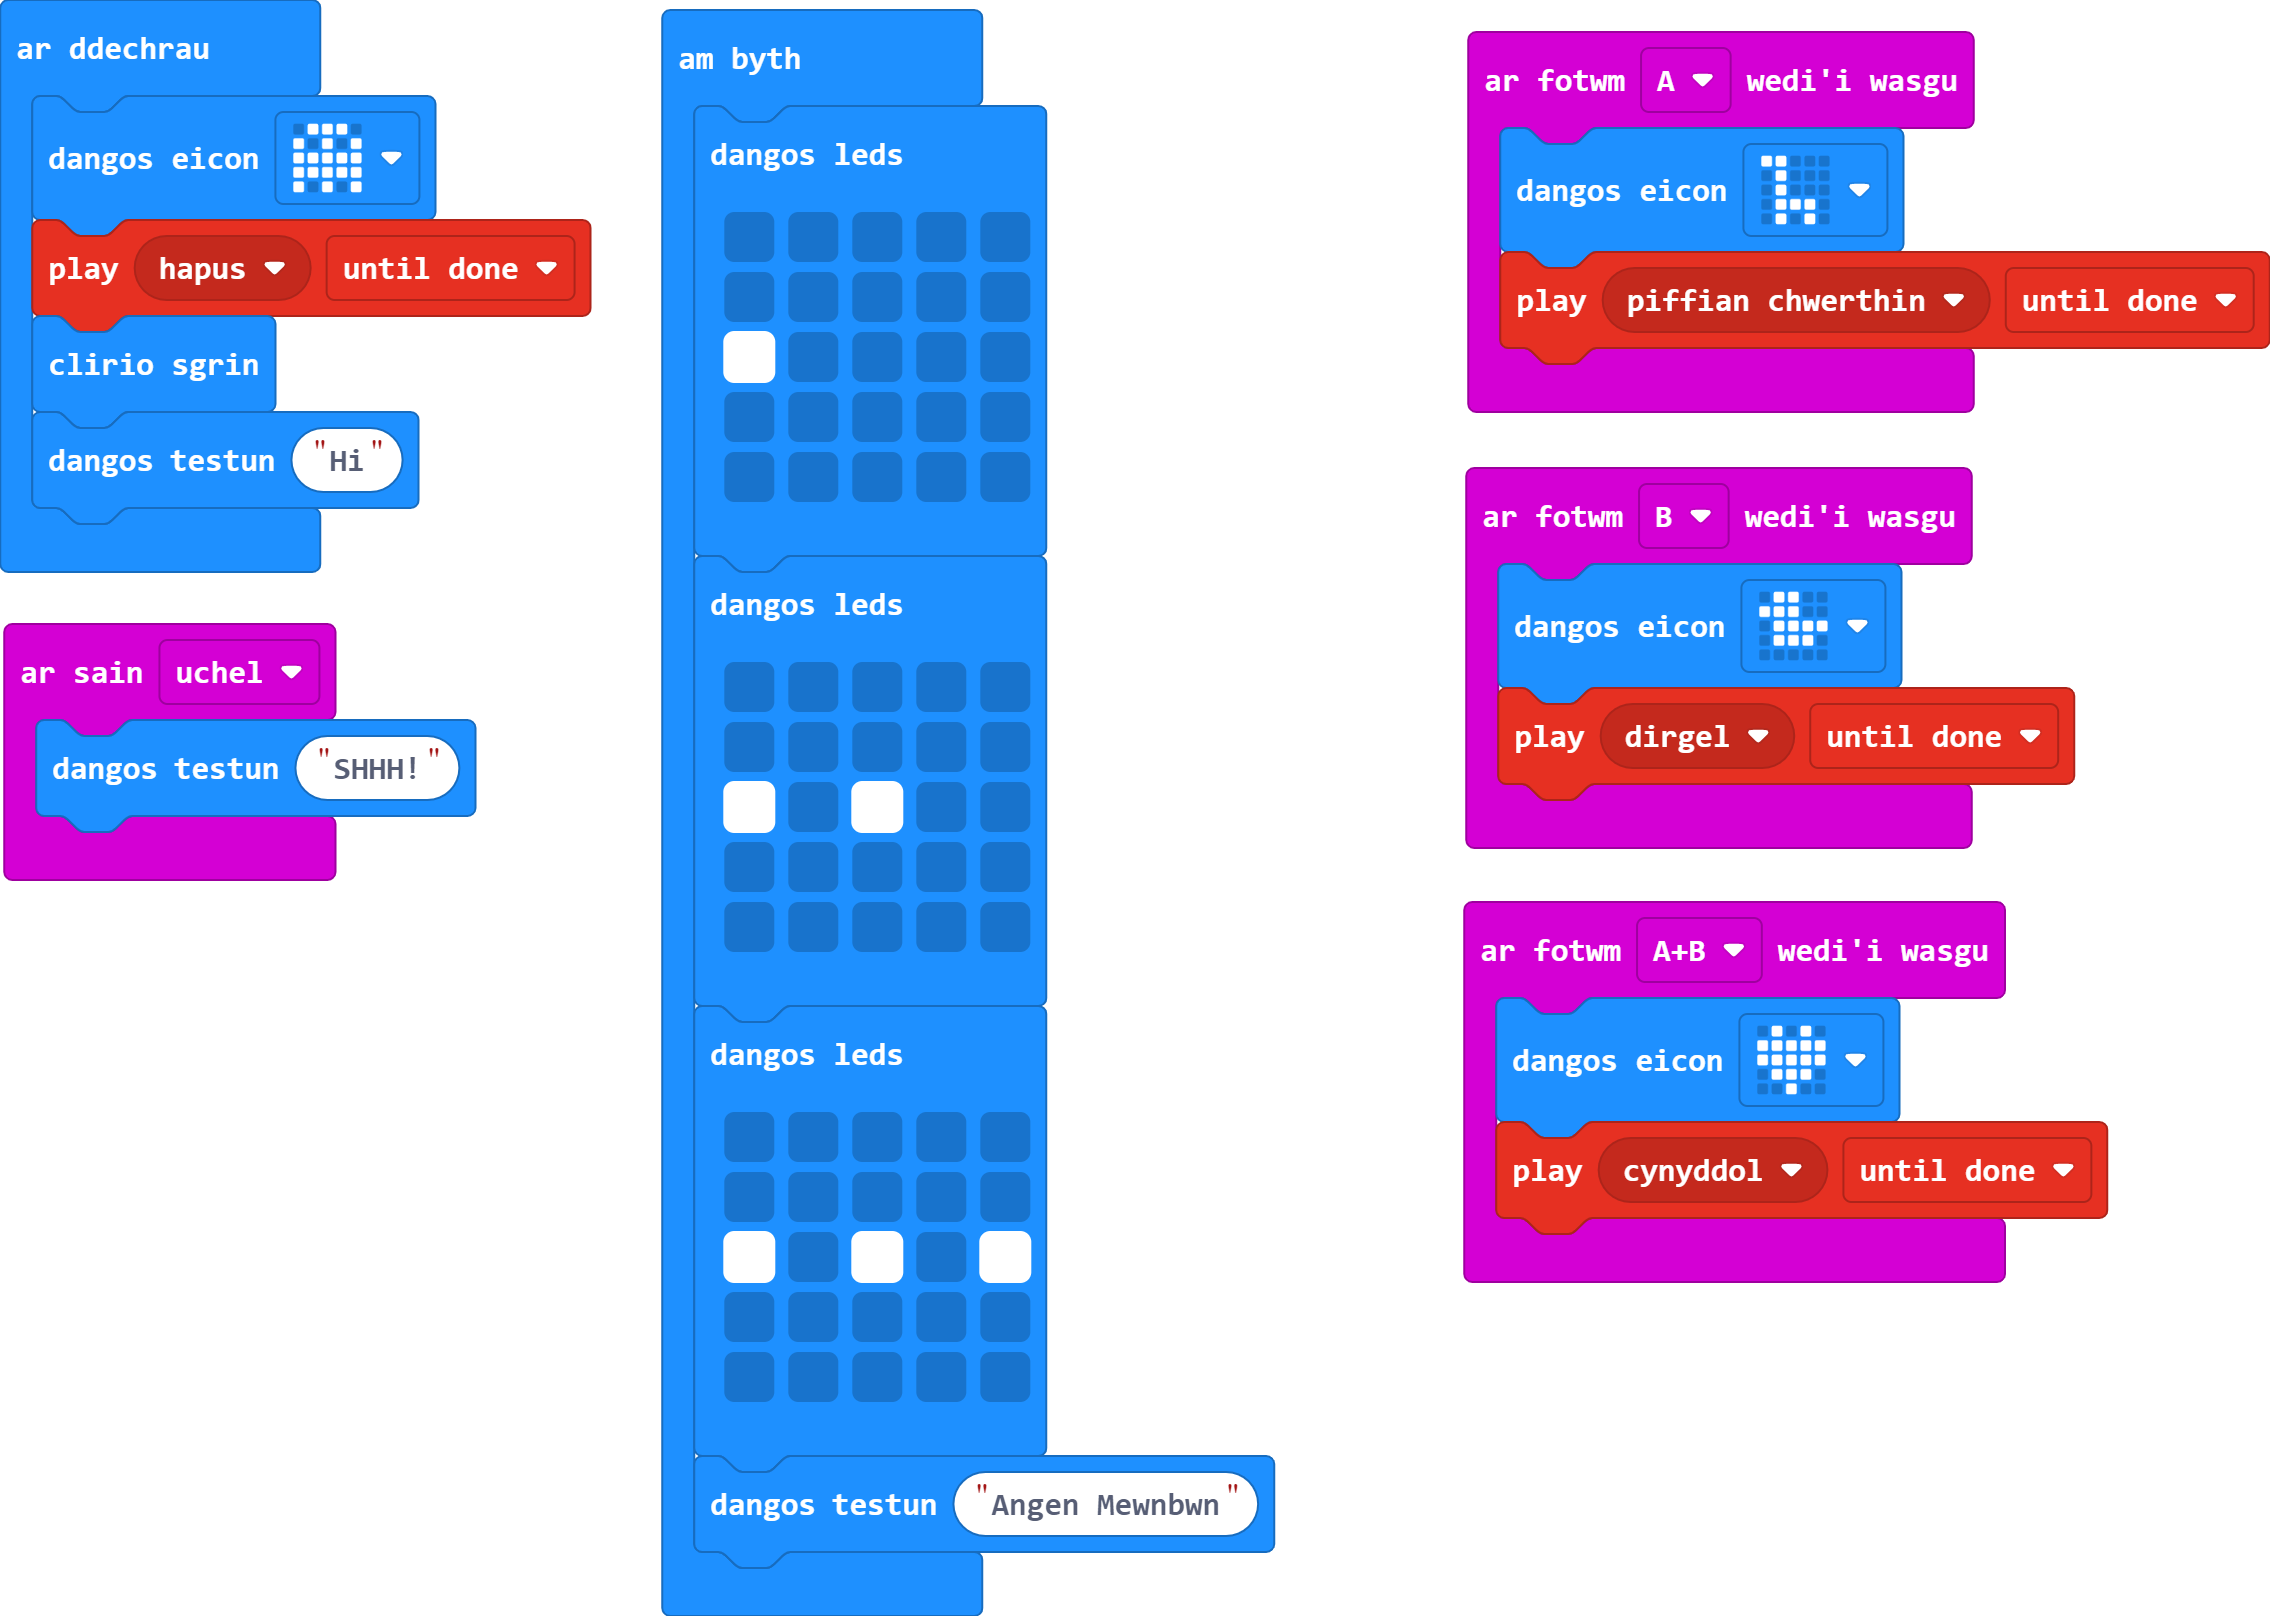
Ychwanegwch sain neu gerddoriaeth at eich dilyniant cychwyn.
Gair o gyngor: Dylech sicrhau bod lefel sŵn eich cyfrifiadur yn isel cyn ychwanegu sain. Gallwch addasu'r sŵn yn ystod y prawf i lefel o'ch dewis.
Gair o gyngor: Os ydych chi'n defnyddio cerddoriaeth, dylech gadw'r alaw yn fyr a'i chwarae unwaith yn unig, neu bydd rhaid i chi aros am amser hir nes bod yr alaw wedi gorffen yn ystod pob prawf.
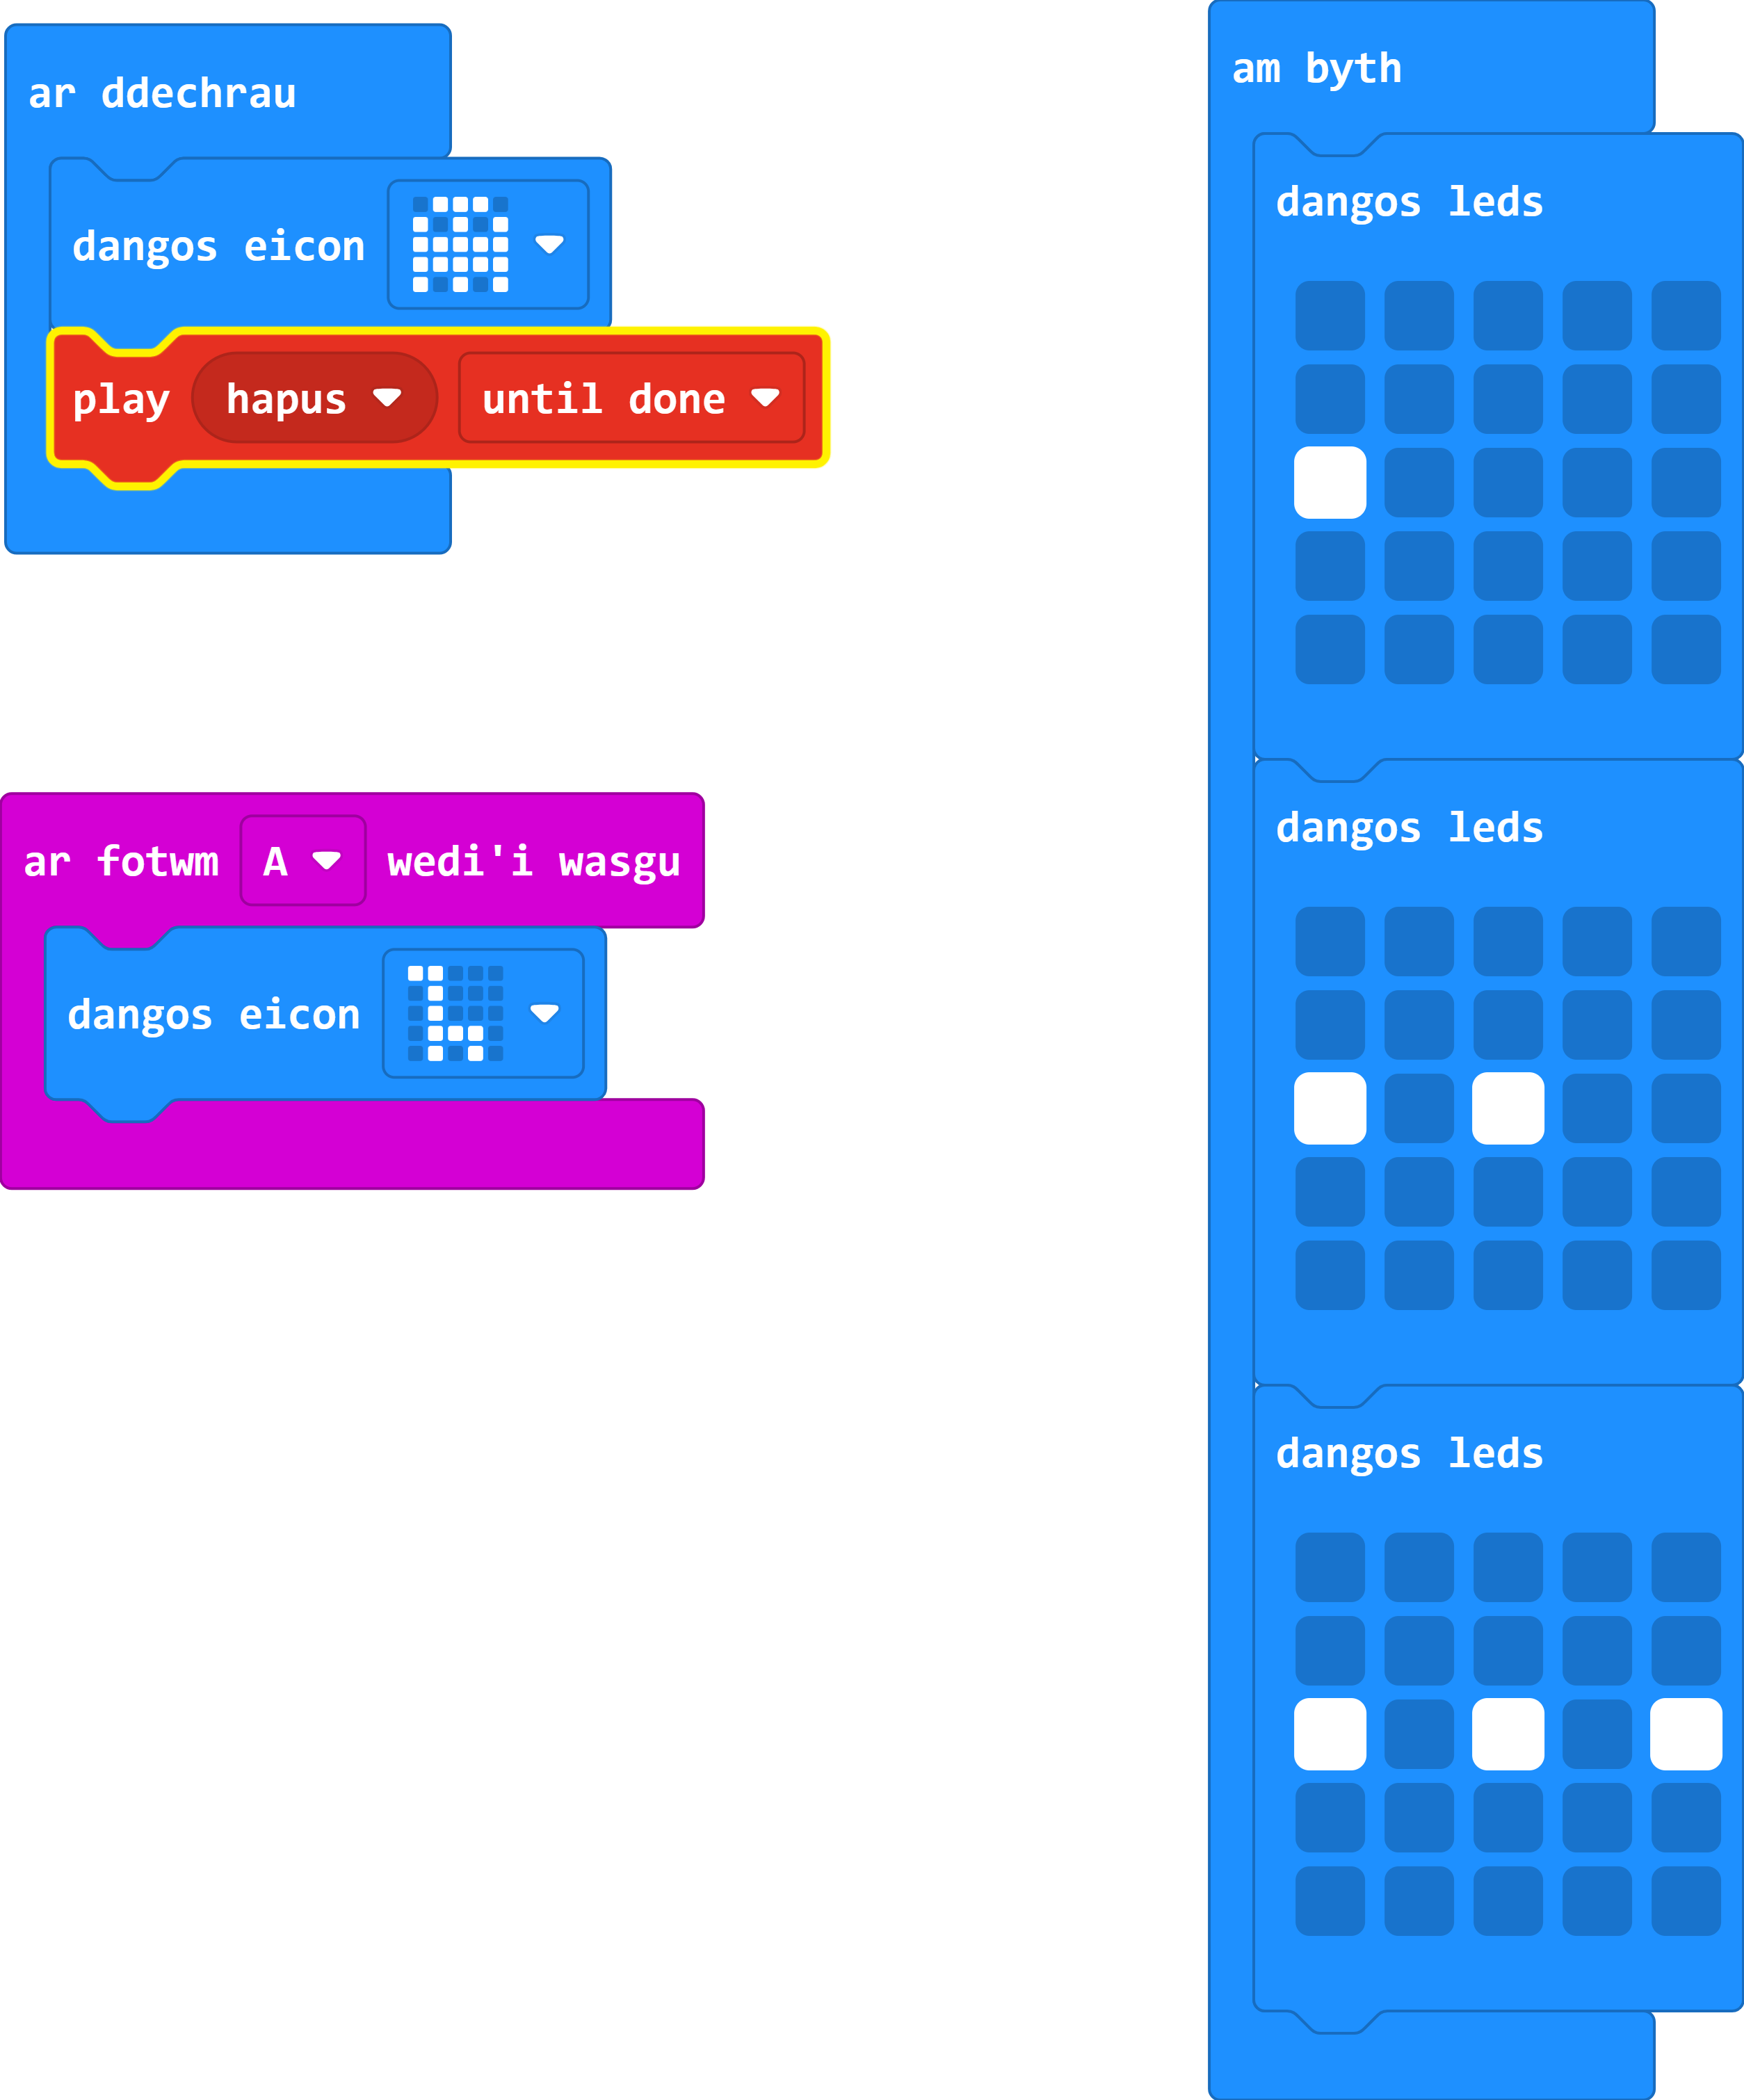
Gair o gyngor: Os nad ydych am greu eich alaw eich hun, sgroliwch i lawr y ddewislen Cerddoriaeth i ddod o hyd i alawon a synau parod.
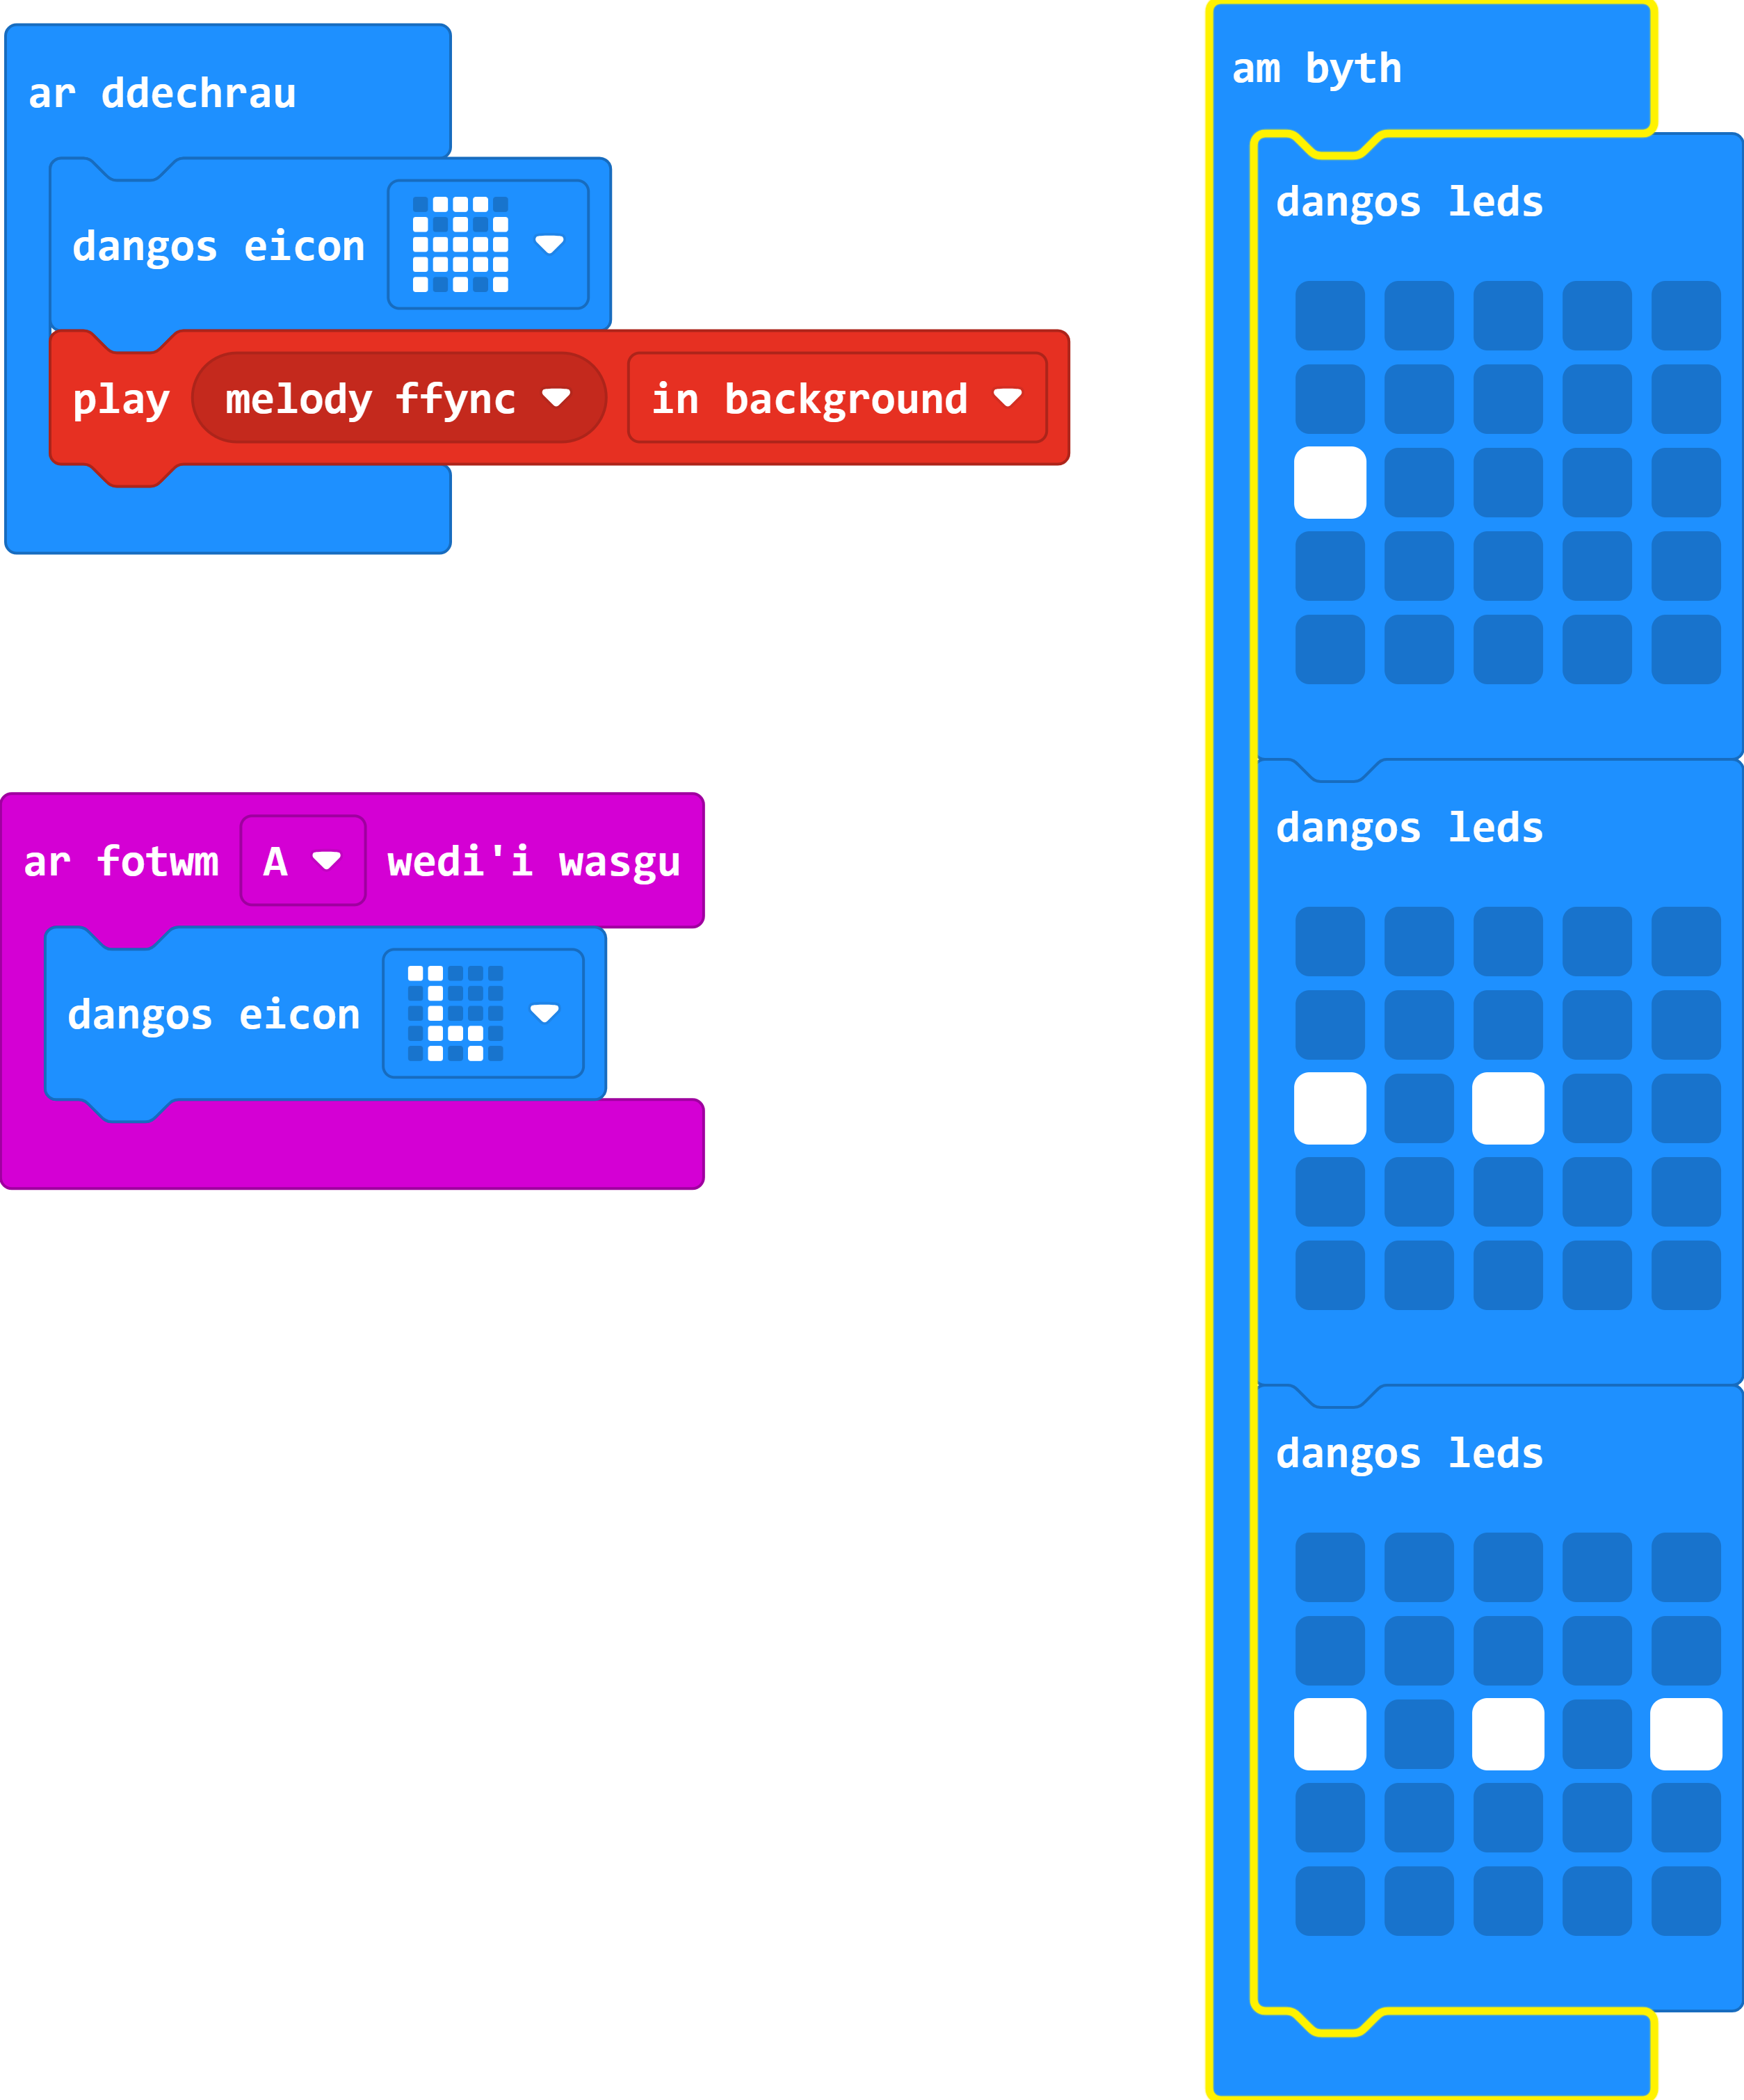
Os ydych chi'n defnyddio'r bloc 'play melody' ar frig y ddewislen Cerddoriaeth, gallwch greu eich alaw eich hun trwy glicio ar y symbol nodyn cerddorol yn y bloc, yna uwcholeuo'r bocsys i greu nodau gwahanol.
Os ydych chi'n defnyddio'r bloc 'play melody' gydag alawon sydd wedi'u rhagosod, dylech newid yr opsiwn 'in background' i 'until done' gan ddefnyddio'r saeth i lawr.
Os ydych yn dal i gael trafferth, defnyddiwch y botwm ateb isod.
Defnyddio eich alaw eich hun:
Defnyddio alaw sydd wedi'i rhagosod:
Defnyddio effaith sain:
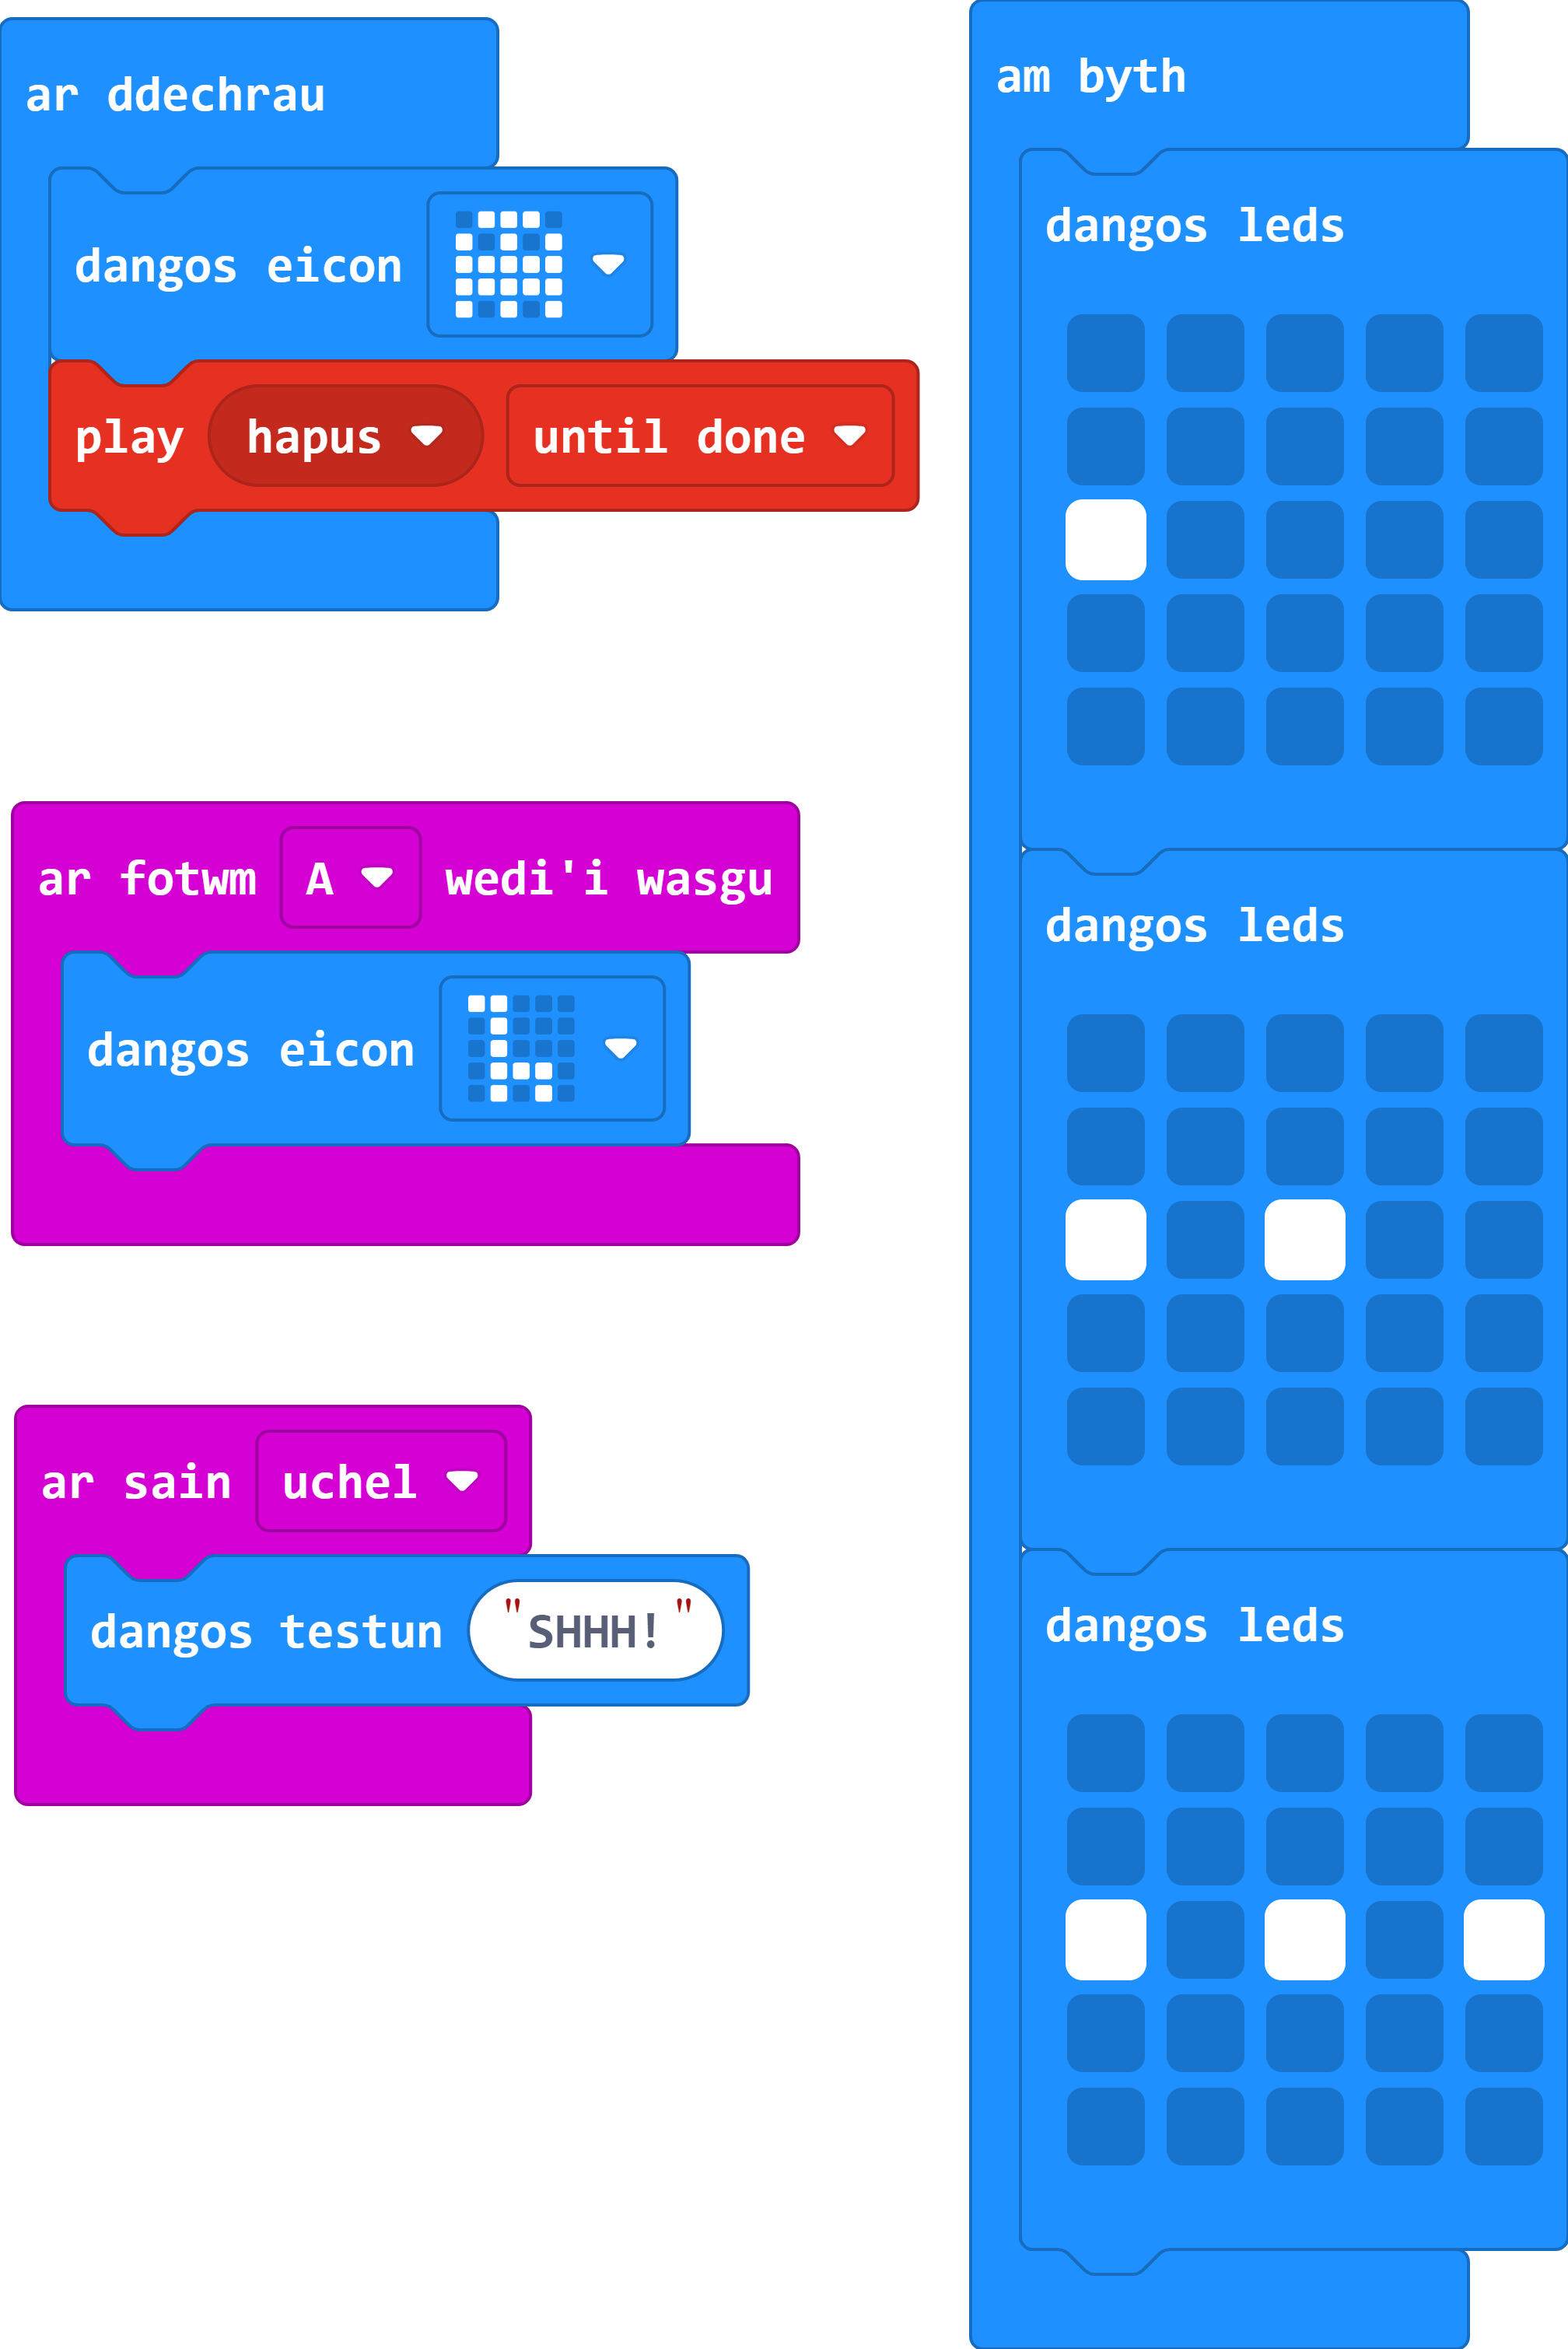
Gofalwch fod y Micro:Bit yn ymateb pan fydd yn clywed sain uchel.
Gair o gyngor: Dangosodd y fideo fod y meicroffon yn gweithredu fel synhwyrydd sain a'i fod yn ddyfais fewnbynnu.
Gair o gyngor: Gallech ddefnyddio delwedd, testun, cerddoriaeth neu sain fel ymateb.
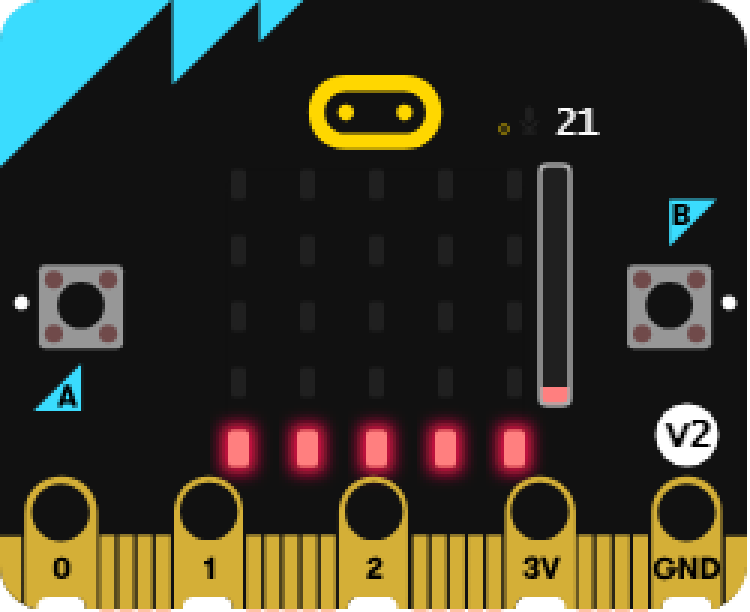
Gair o gyngor: Sain uchel yn y rhaglen hon yw unrhyw beth dros 170.
Mae'r bloc sydd ei angen arnoch ar gael yn y ddewislen blociau Mewnbwn.
Edrychwch o dan micro:bit (V2). Mae'r bloc yn yr adran hon oherwydd bod dau fersiwn o BBC Micro:Bit ar gael erbyn hyn a dim ond fersiwn 2 sydd â meicroffon.
Bydd angen i chi wylio'r fideo eto os ydych chi'n ansicr sut i greu sain uchel yn yr efelychydd.
Os ydych chi'n dal i gael trafferth, defnyddiwch y botwm ateb isod.
Mae'r datrysiad hwn yn sicrhau bod y Micro:Bit yn dangos neges pan fydd yn clywed sain uchel.
Defnyddiwch yr un rhaglen i greu'r canlynol:
Ar ddiwedd eich dilyniant cychwyn, cliriwch y sgrin ac ychwanegwch neges groeso.
Gair o gyngor: Defnyddiwch neges fer oherwydd bydd angen i chi aros iddi gwblhau bob tro y byddwch yn profi'ch rhaglen.
Gair o gyngor: Mae'r ddau floc sydd eu hangen i wneud hyn ar gael yn y ddewislen Sylfaenol.
Ym maes rhaglennu, rydym yn defnyddio'r gair testun i ddisgrifio unrhyw gyfres o symbolau.
Bydd angen i chi ddod o hyd i'r bloc 'dangos testun' cyn gallu newid y gair "helo" i air/neges o'ch dewis.
Os ydych chi'n dal i gael trafferth, defnyddiwch y botwm ateb isod.
Ychwanegwch neges i'ch dolen 'am byth' sy'n dweud 'Angen Mewnbwn'.
Gair o gyngor: Dylech drin y sgrin hon fel sgrin aros.
Byddwch yn defnyddio'r un bloc ag a ddefnyddiwyd gennym ar gyfer y neges groeso uchod.
Os ydych chi'n dal i gael trafferth, defnyddiwch y botwm ateb isod.
Sicrhewch fod y Micro:Bit yn arddangos delweddau gwahanol pan fydd y botwm B yn cael ei bwyso a phan fydd y ddau fotwm yn cael eu pwyso.
Gair o gyngor: Mae gan y bloc 'ar fotwm A wedi'i wasgu' saeth i lawr sy'n eich galluogi i newid yr A i B neu A+B.
Cofiwch fod modd dod o hyd i'r blociau botwm yn y ddewislen Mewnbwn.
Bydd angen tri o'r blociau hyn arnoch yn eich rhaglen, un ar gyfer pob cyfuniad o fotymau.
I brofi hyn, dylai'r efelychydd fod â botwm newydd sydd wedi'i labelu A+B, sy'n gadael i chi ddynwared effaith pwyso'r ddau fotwm gan ddefnyddio'r llygoden.
Os ydych chi'n dal i gael trafferth, defnyddiwch y botwm ateb isod.
Ychwanegwch effeithiau sain gwahanol gan ddibynnu ar ba fotwm sy'n cael ei bwyso.
Gair o gyngor: Mae'n bosibl y byddwch yn dechrau gweld rhai mathau o ymddygiad digroeso yn eich profion wrth i ni ychwanegu mwy o flociau at y rhaglenni botwm. Byddwn yn rhoi sylw i pam mae hyn yn digwydd a sut i osgoi hyn yn nes ymlaen yn y gyfres.
Os nad ydych chi'n ansicr, gweler cam 4 yn yr her efydd.
Os ydych chi'n dal i gael trafferth, defnyddiwch y botwm ateb isod.
Ychwanegwch adwaith ar gyfer pan fydd y Micro:Bit yn canfod ei bod yn dawel.
Gair o gyngor: Mae llawer o flociau yn cynnwys cwymplenni sy'n eich galluogi i newid geiriau allweddol.
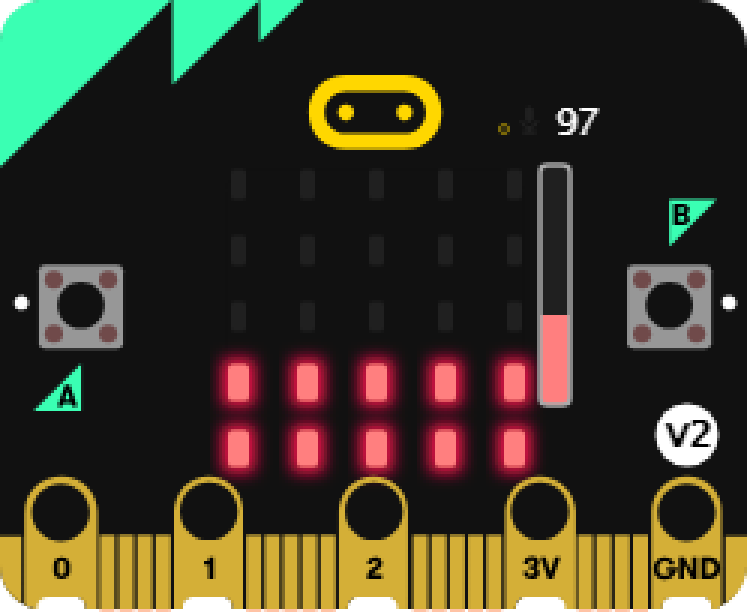
Gair o gyngor: Ar gyfer y Micro:Bit, ystyr tawel yw unrhyw lefel sŵn o dan 90.
Cofiwch fod canfod sain yn fewnbwn.
Mae modd newid y bloc 'ar sain uchel'.
Gallai adwaith fod yn sain, yn ddelwedd, yn eicon neu'n neges.
Os ydych chi'n dal i gael trafferth, defnyddiwch y botwm ateb isod.
Parhau i greu eich rhaglen trwy ychwanegu'r canlynol:
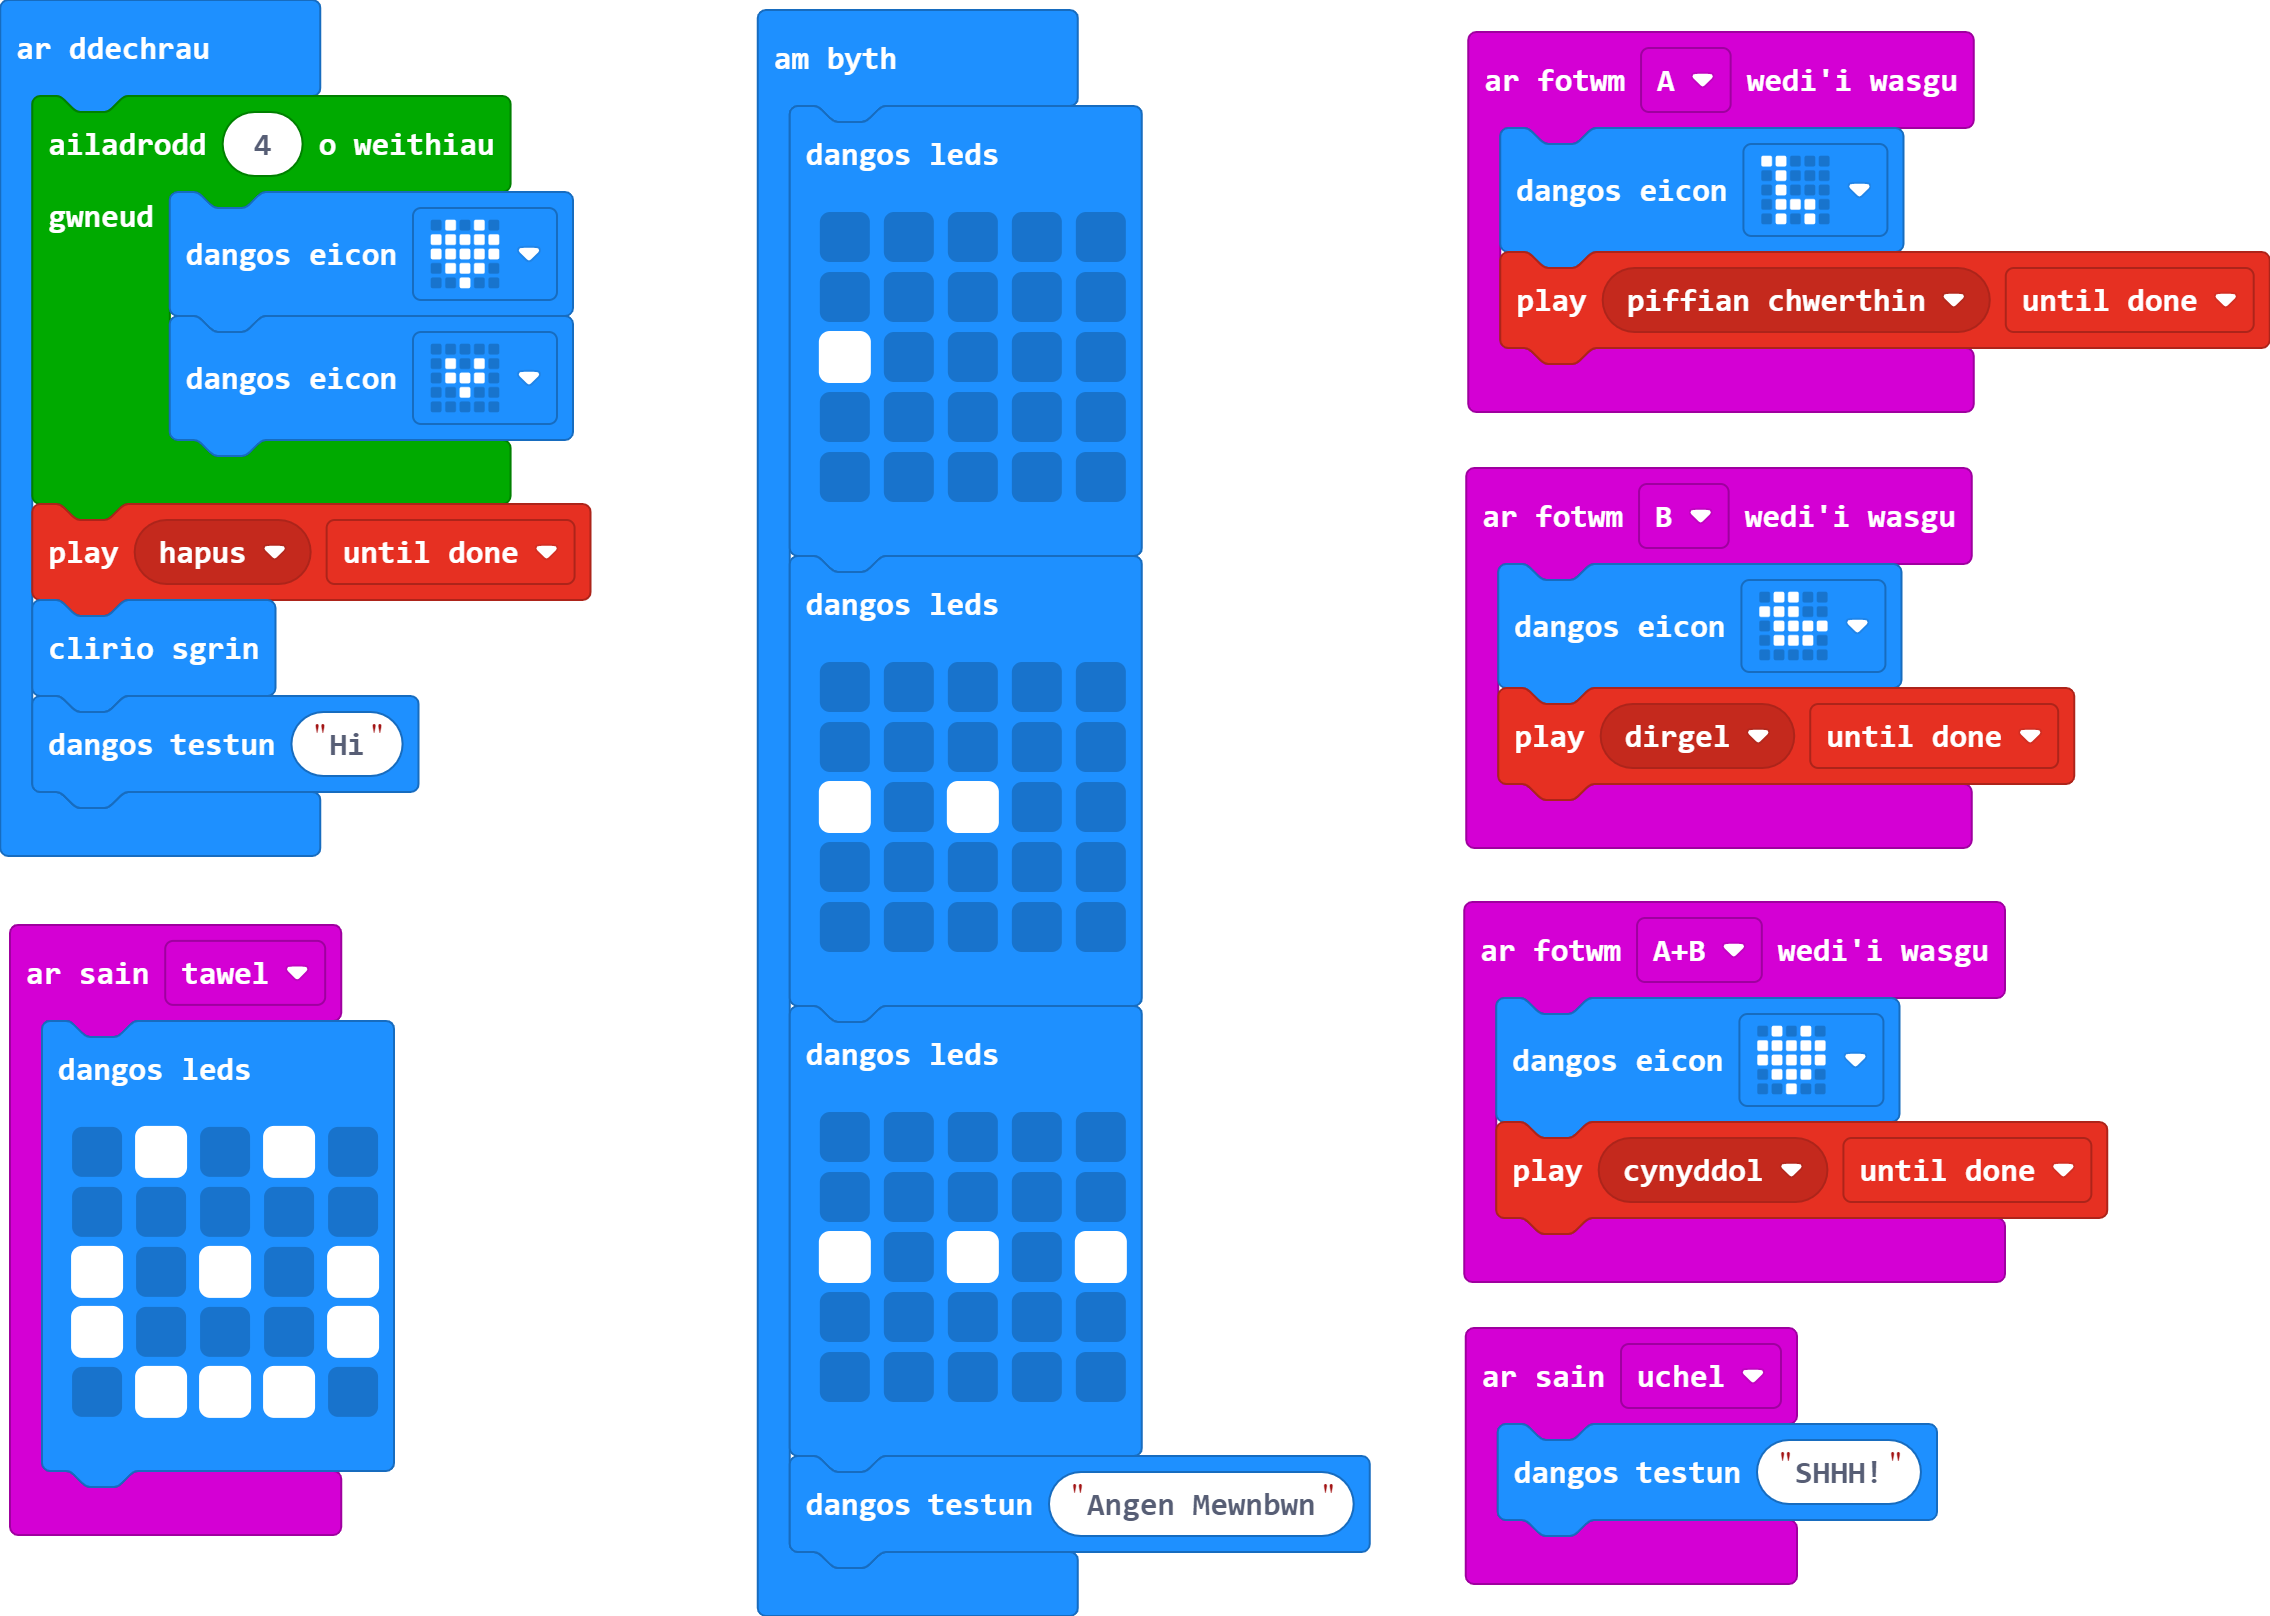
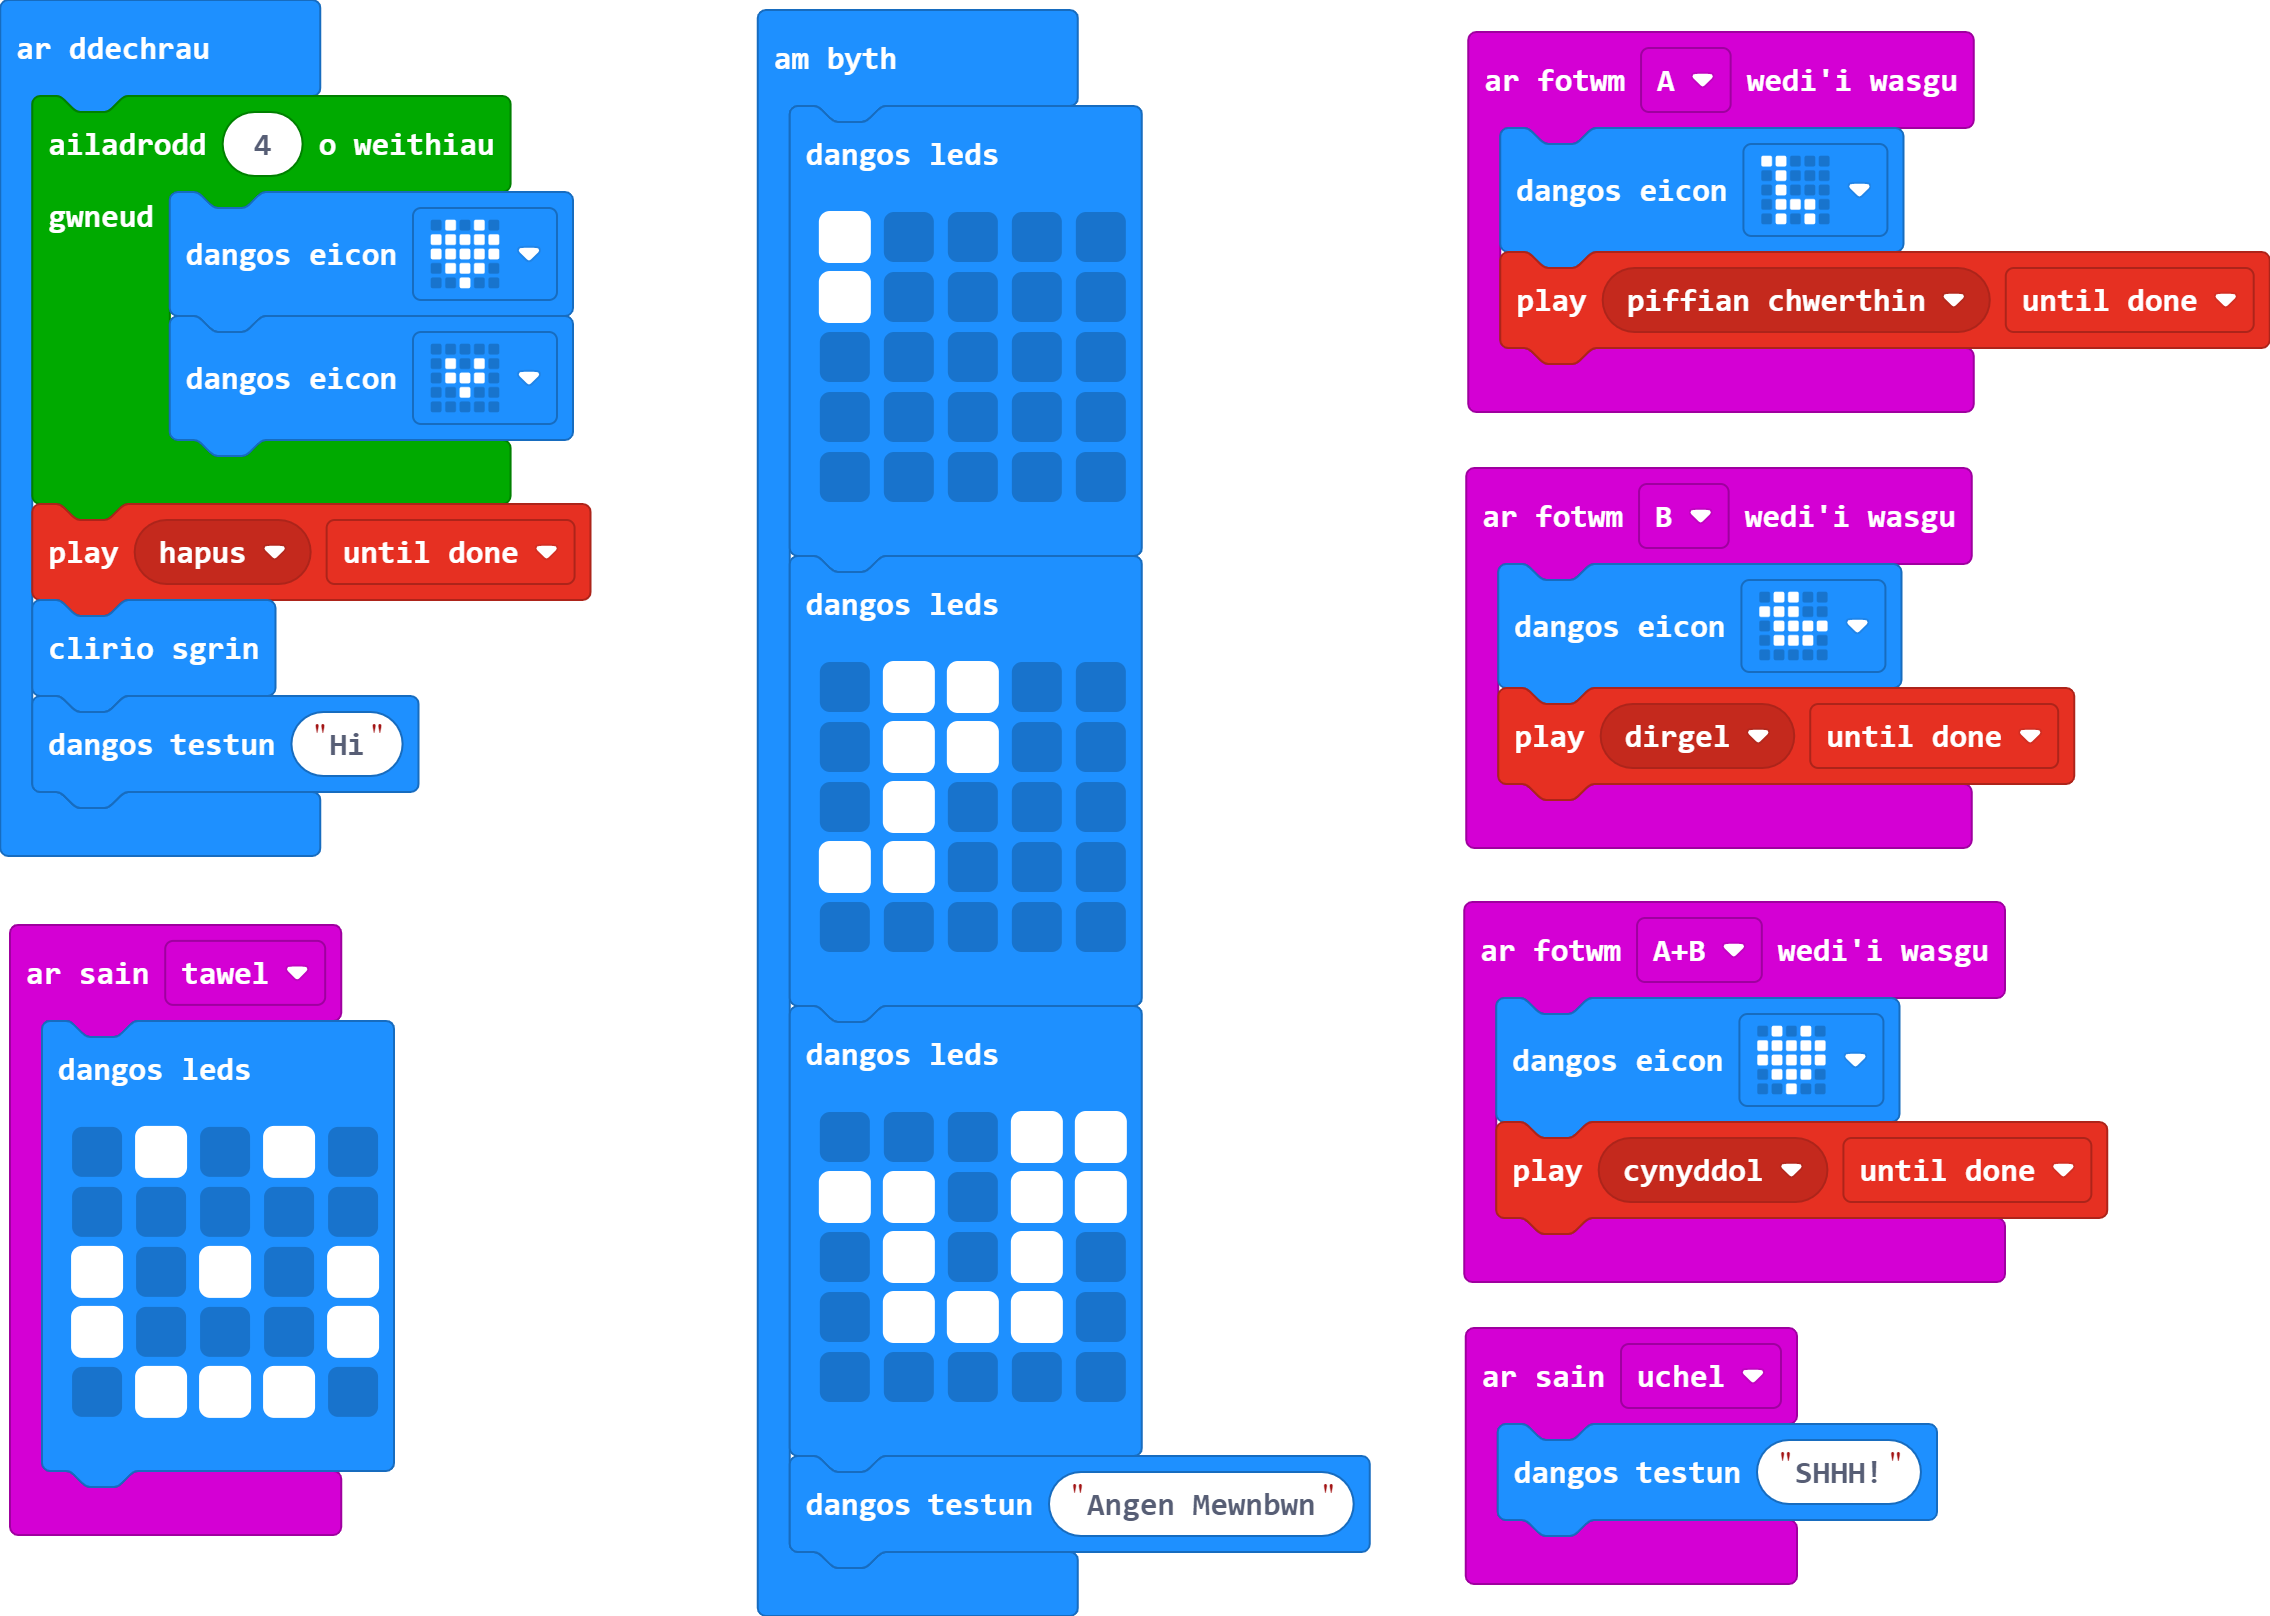
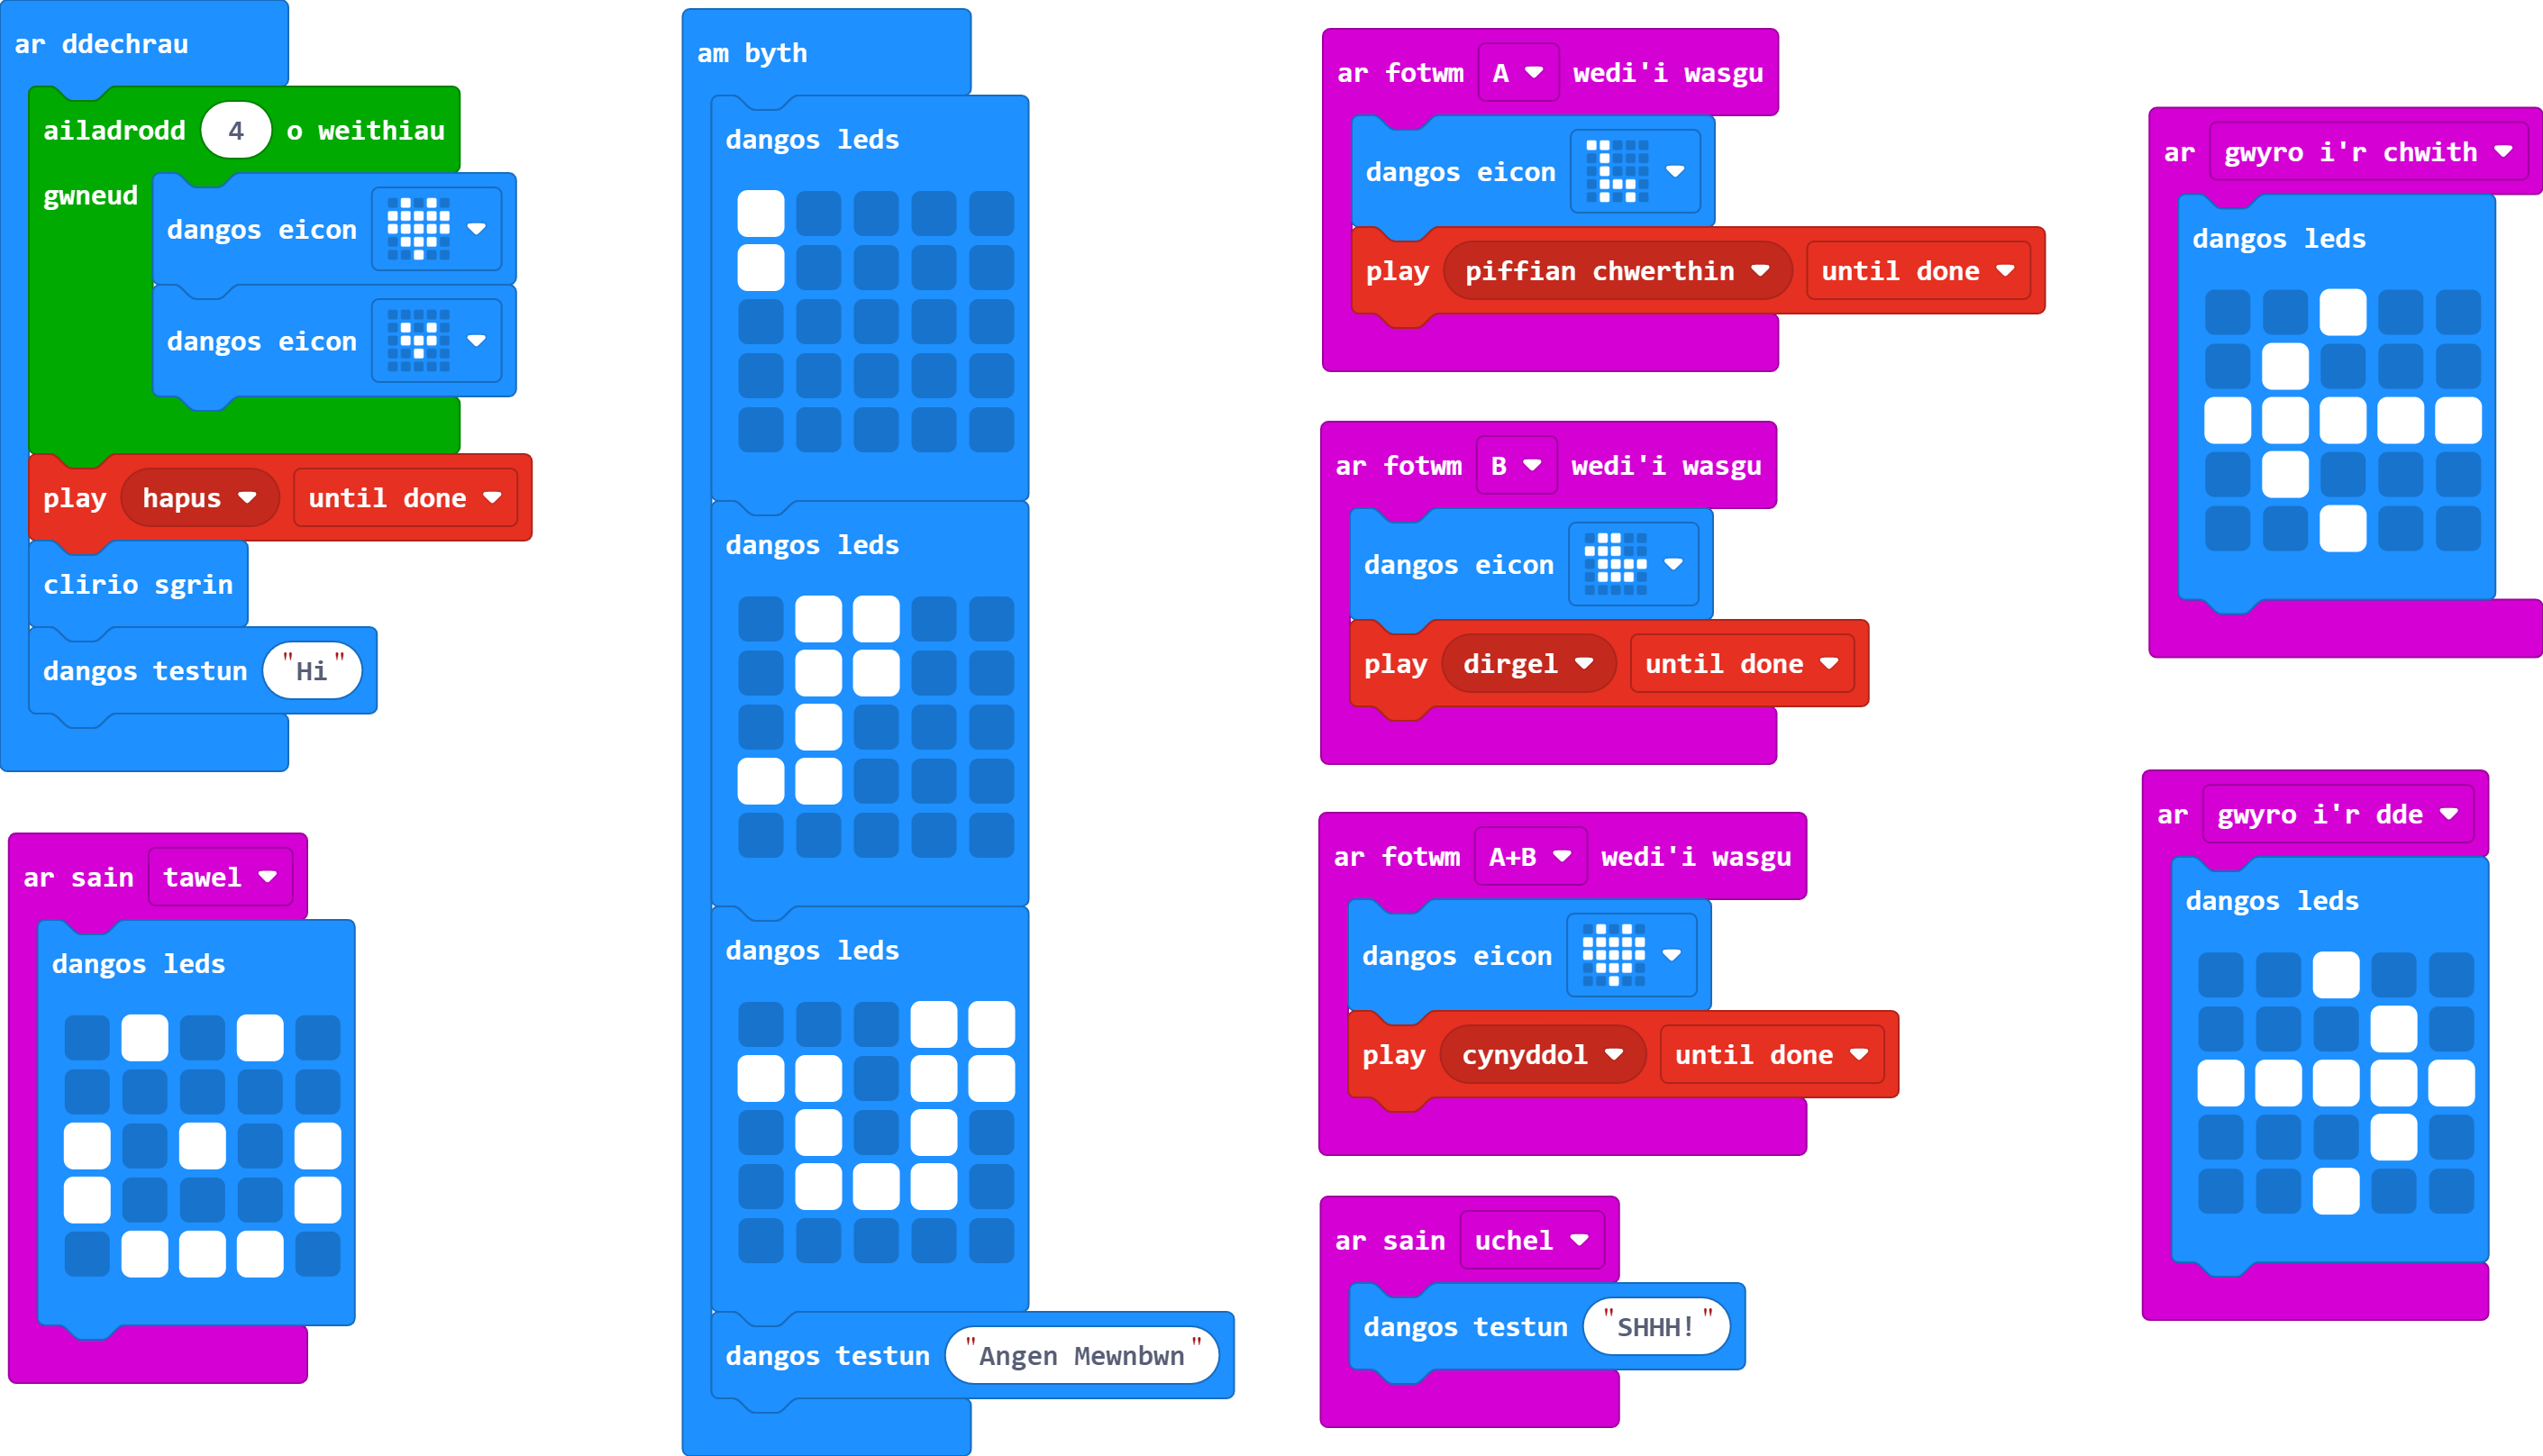
Newid y ddelwedd sy'n ymddangos wrth gychwyn gydag animeiddiad.
Gair o gyngor: Gallech ddefnyddio delweddau ailadroddus, neu efallai y byddwch am ddefnyddio bloc o'r ddewislen Dolennau i helpu gyda hyn.
Mae yna floc 'ailadrodd 4 o weithiau' yn y ddewislen Dolennau a gellir ei osod i ailadrodd faint fynnwch chi o weithiau. Mae hyn yn golygu mai dim ond unwaith y bydd angen i chi ddefnyddio pob delwedd.
Os ydych chi'n dal i gael trafferth, defnyddiwch y botwm ateb isod.
Mae animeiddiad cychwyn y rhaglen hon yn dangos calon yn curo.
Newidiwch eich animeiddiad dolen am byth i ddangos person neu anifail yn symud i'r sgrin.
Gair o gyngor: Ewch ati i ddewis neu greu delwedd lawn o'ch person/anifail yn gyntaf. Yna bydd hi'n haws i chi greu'r animeiddiad.
Gofalwch fod eich anifail/person yn ymddangos o ochr chwith eich sgrin gan ddefnyddio un golofn o oleuadau ar y tro cyn ei symud yr holl ffordd ar draws y sgrin.
Os ydych chi'n dal i gael trafferth, defnyddiwch y botwm ateb isod.
Newidiwch adwaith y Micro:Bit drwy ogwyddo i'r chwith a gogwyddo i'r dde.
Gair o gyngor: Mae gan rai blociau gwymplenni i newid gair allweddol.
Gair o gyngor: Mae'r Micro:Bit yn defnyddio ei fesurydd cyflymu ar gyfer hyn, sy'n synhwyrydd symudiadau. Ai allbwn neu fewnbwn yw hwn?
Bydd angen i chi ddefnyddio bloc o'r ddewislen Mewnbwn.
Oes bloc sy'n seiliedig ar symud y gallwch chi ei ddefnyddio? Pa opsiynau sydd ganddo ar gyfer y gair allweddol?
Os ydych chi'n dal i gael trafferth, defnyddiwch y botwm ateb isod.
Ychwanegwch effeithiau sain at y gogwydd i'r chwith a'r dde.
Mae'r un broses ar waith â phan wnaethom ni ychwanegu effeithiau sain at fewnbynnau'r botwm.
Os ydych chi'n dal i gael trafferth, defnyddiwch y botwm ateb isod.
Ar ddiwedd eich dolen am byth, ewch ati i ddisodli'r bloc 'dangos testun Need Input' â bloc sgrin glir ac yna dangoswch lefel y sain yn lle hynny.
Gair o gyngor: Mae lefel y sain ar Micro:Bit yn cael ei mesur ar ffurf rhif.
Gair o gyngor: Bydd angen i chi uno dau floc gyda'i gilydd i greu'r cyfarwyddyd hwn.
Mae'r ddewislen Sylfaenol yn cynnwys bloc 'dangos rhif'.
Mae'r synhwyrydd sain yn ddyfais fewnbynnu, felly bydd angen i chi edrych yn y ddewislen Mewnbwn ar gyfer y bloc a fydd yn mynd i mewn i'ch bloc 'dangos rhif'.
Os ydych chi'n dal i gael trafferth, defnyddiwch y botwm ateb isod.
Gwers Fideo (yn Saesneg):
Ymarferion:
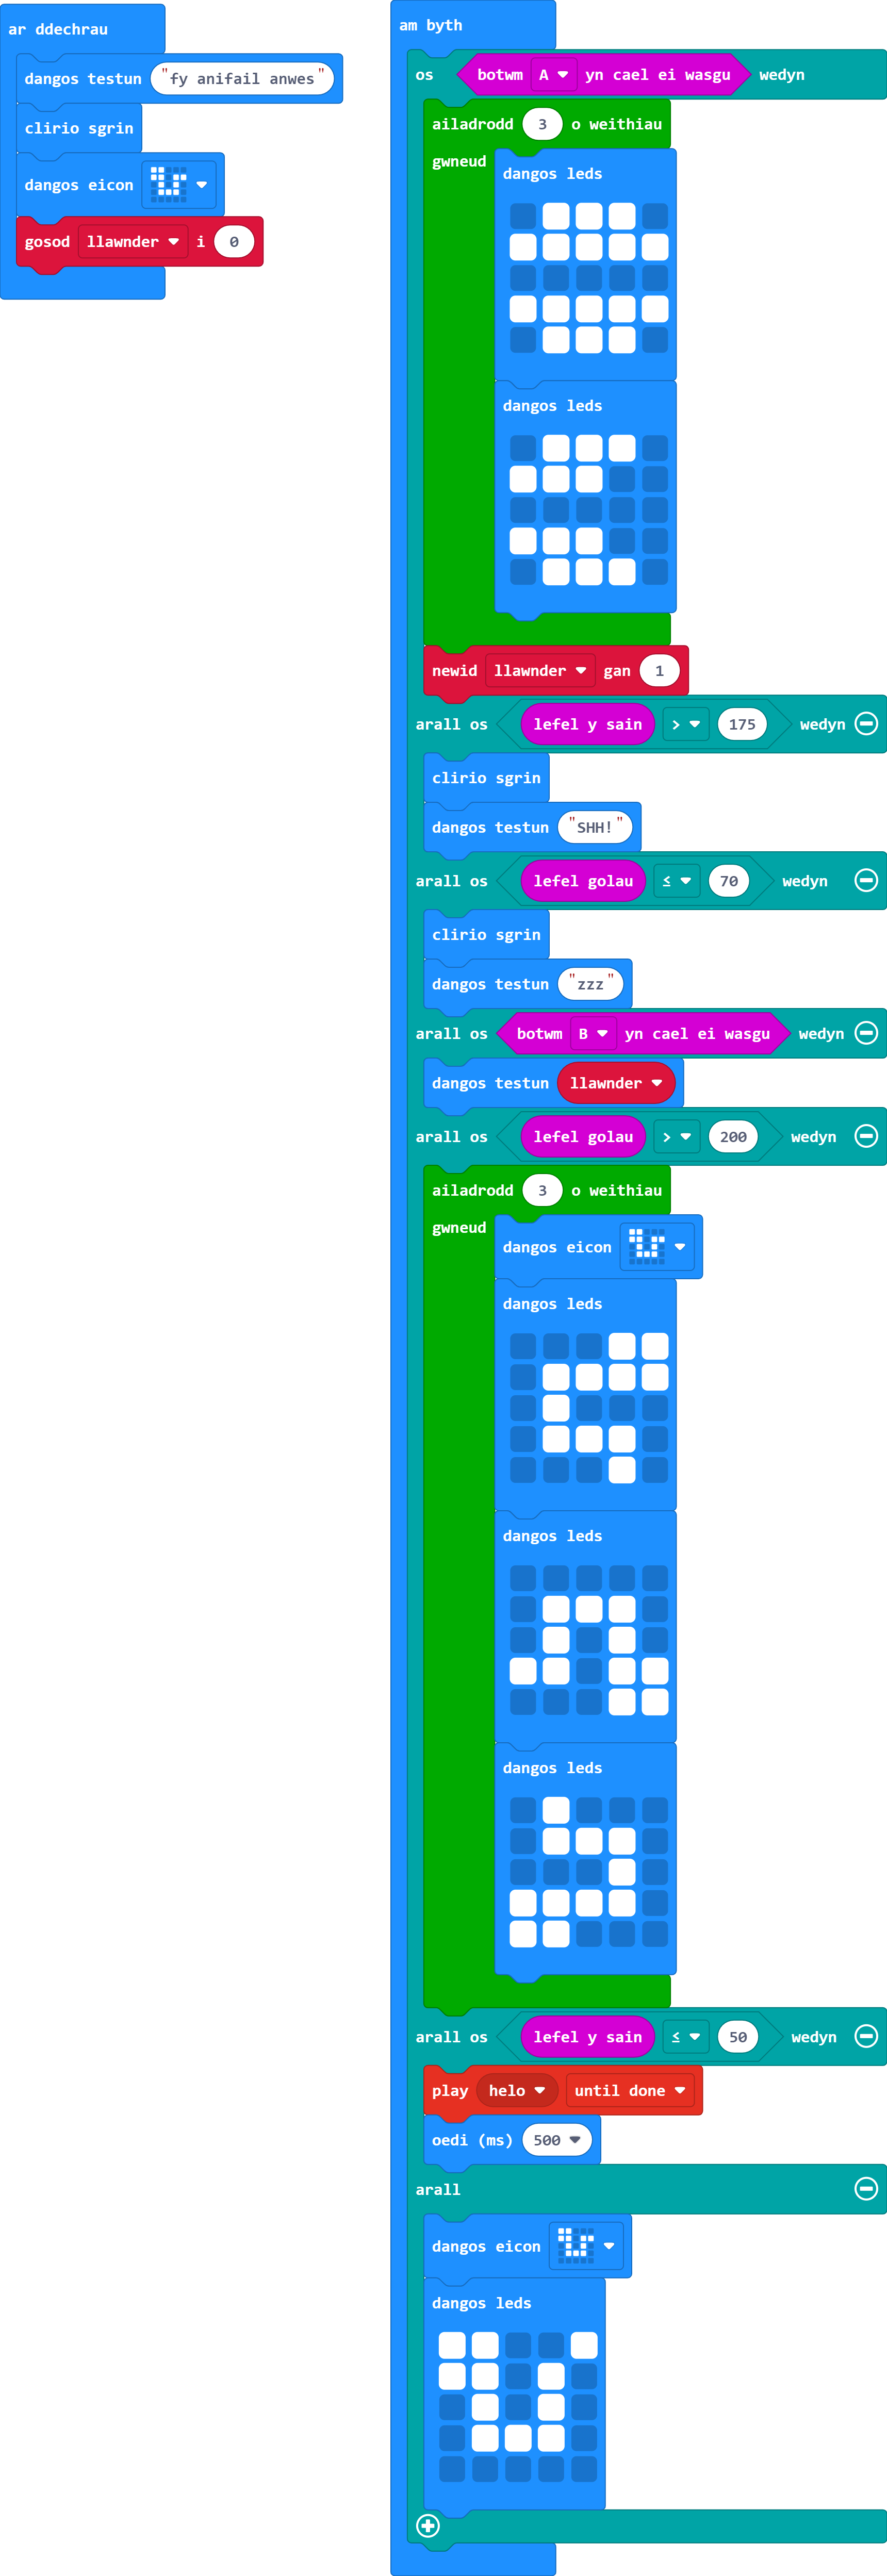
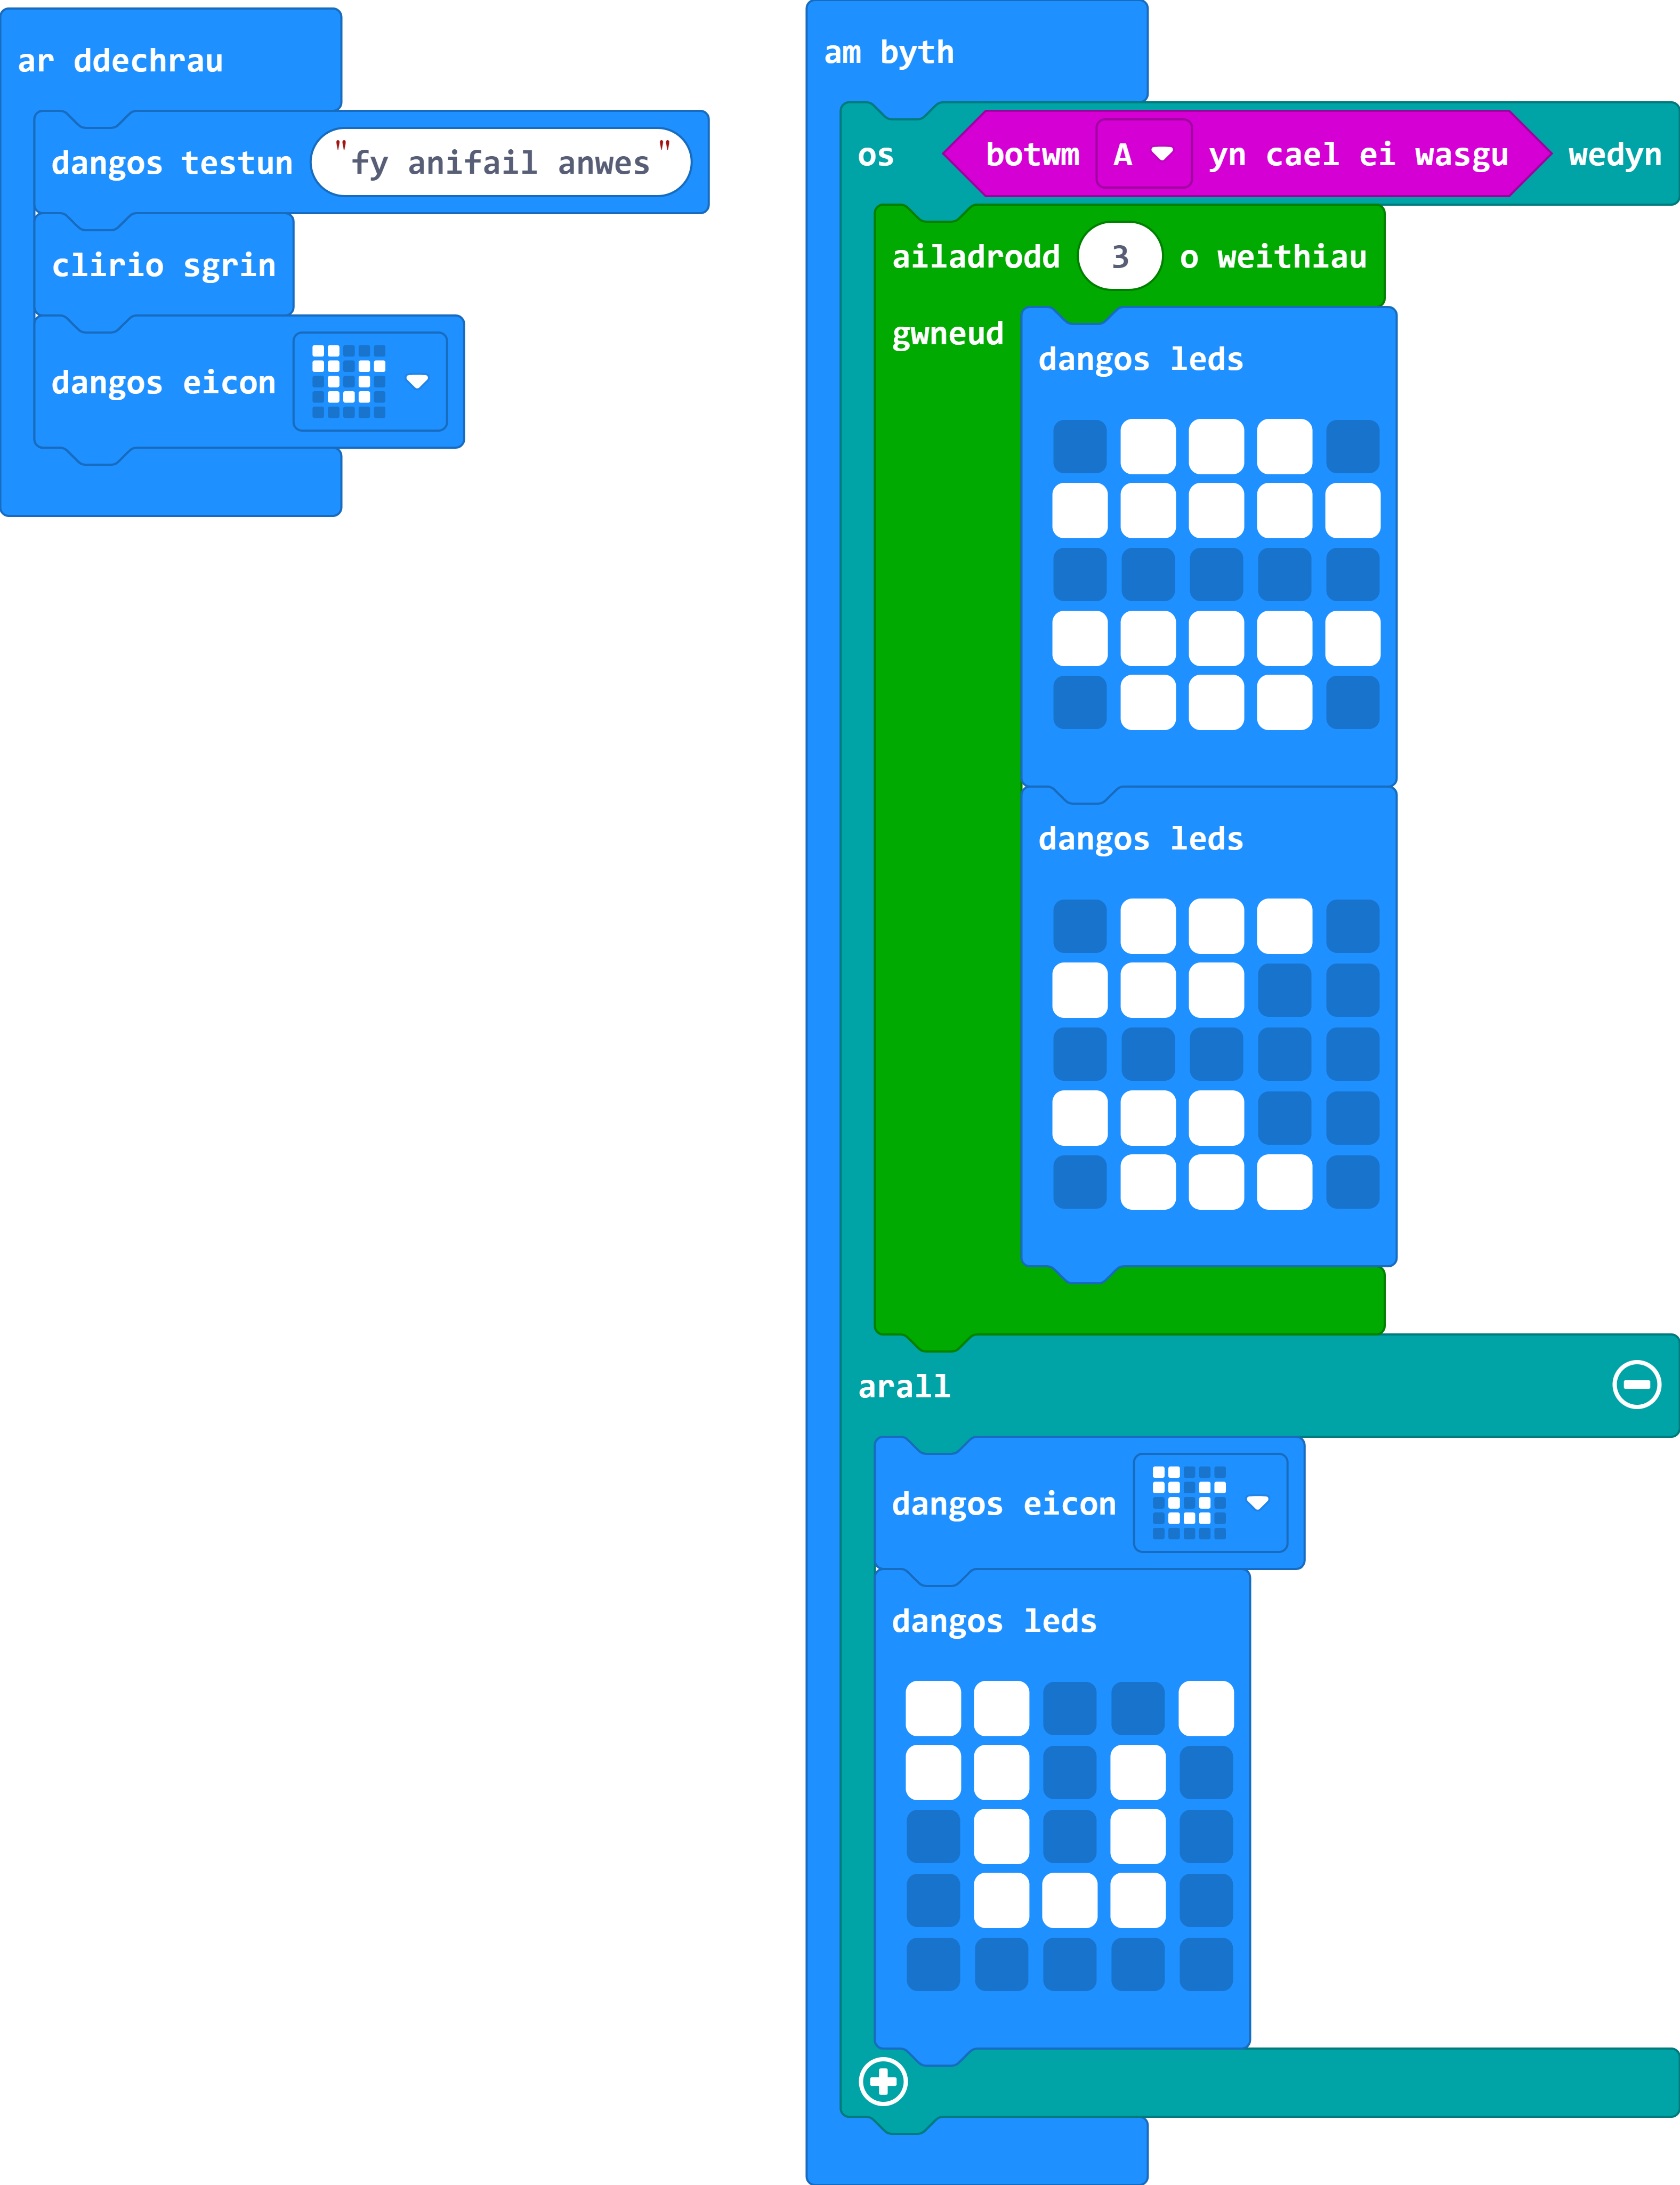
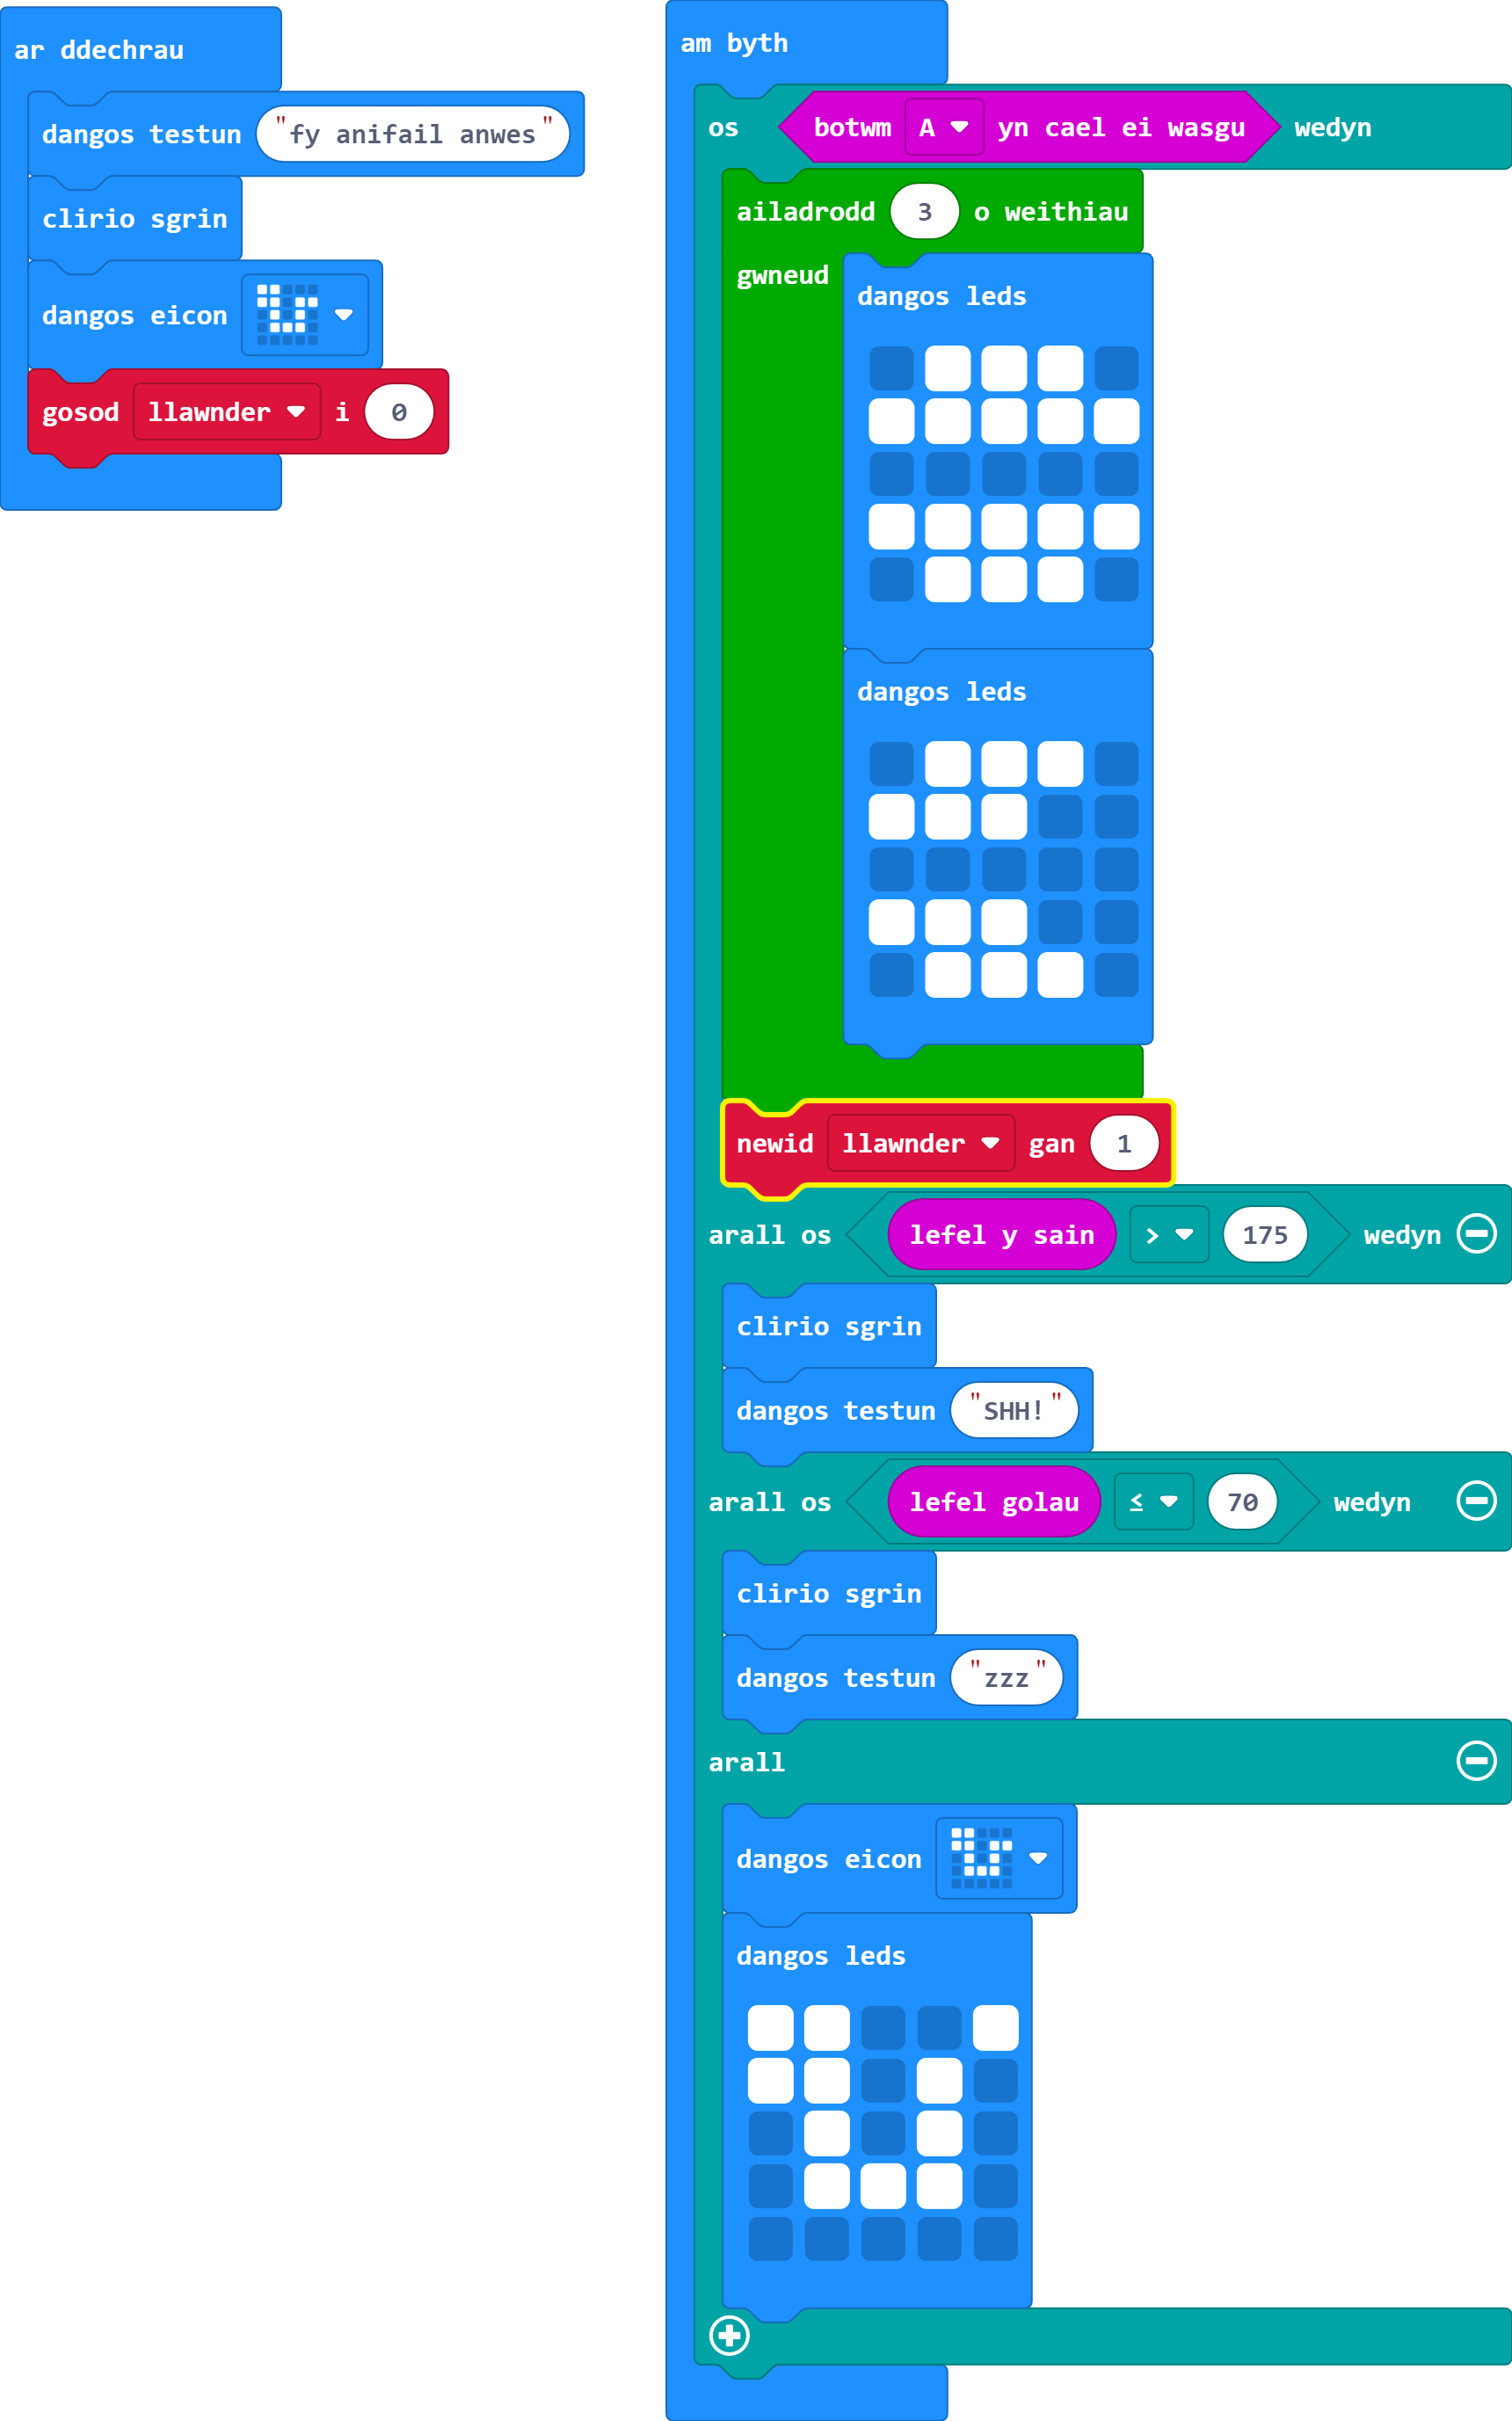
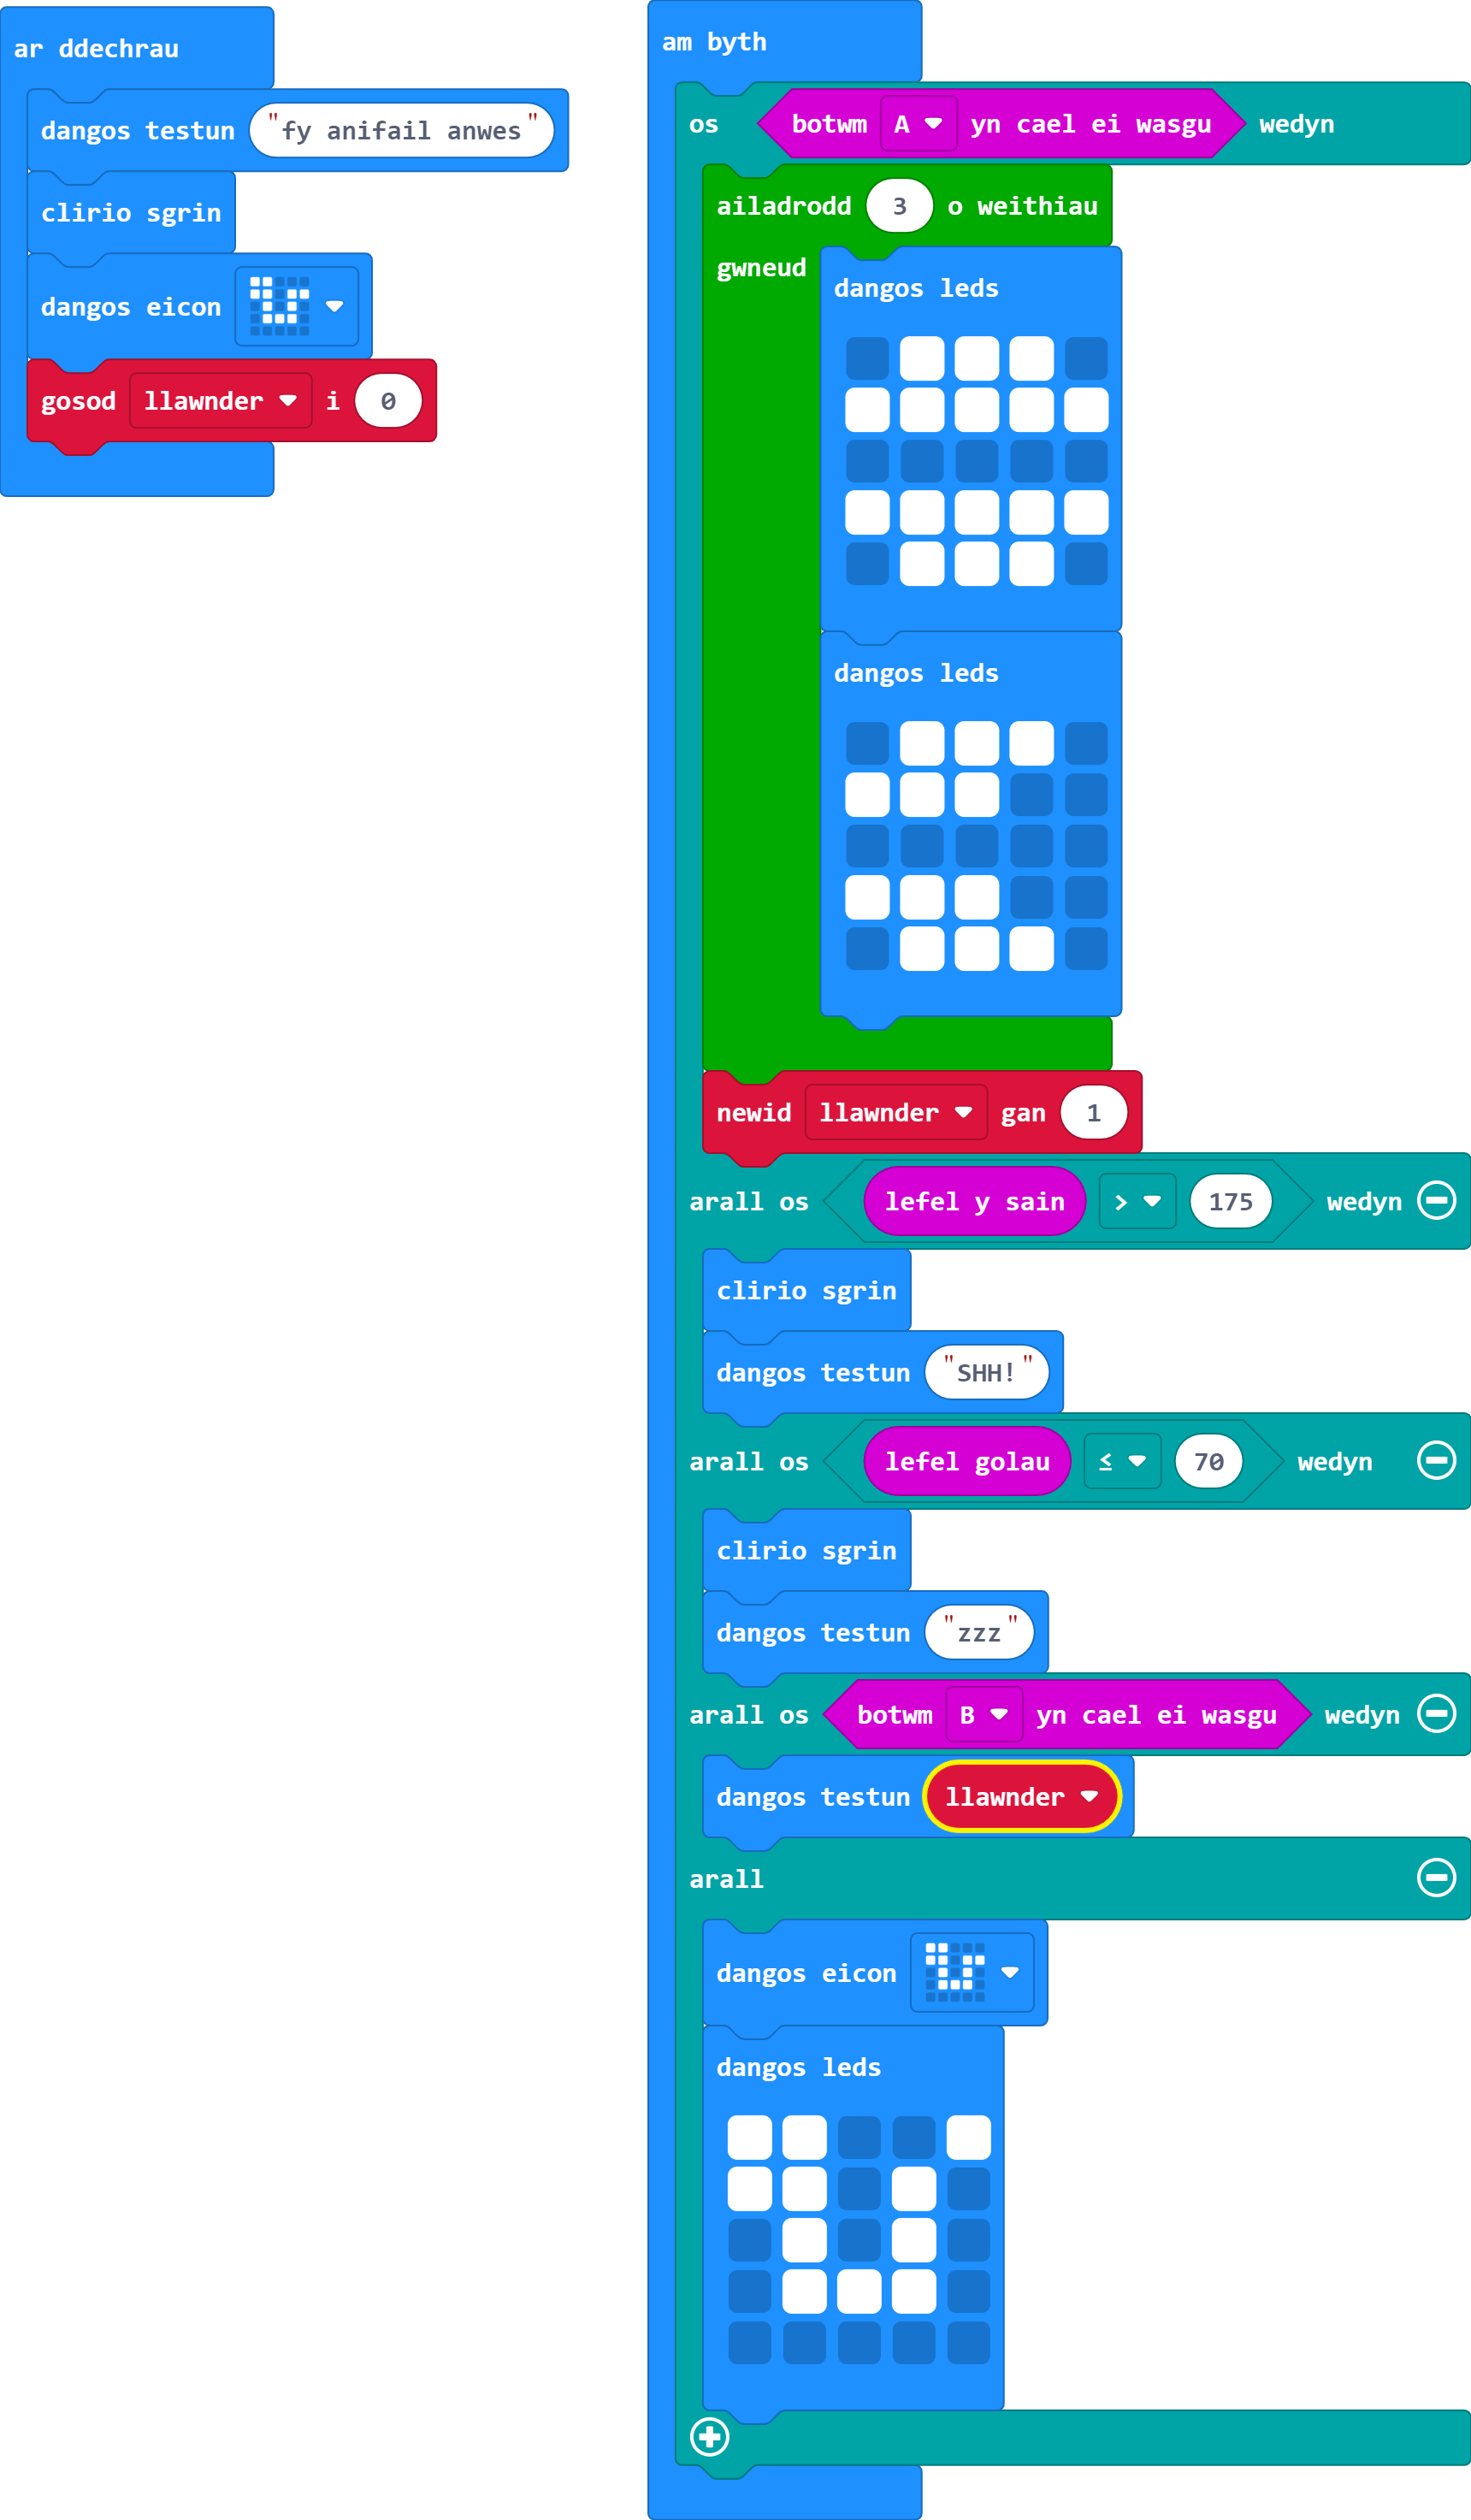
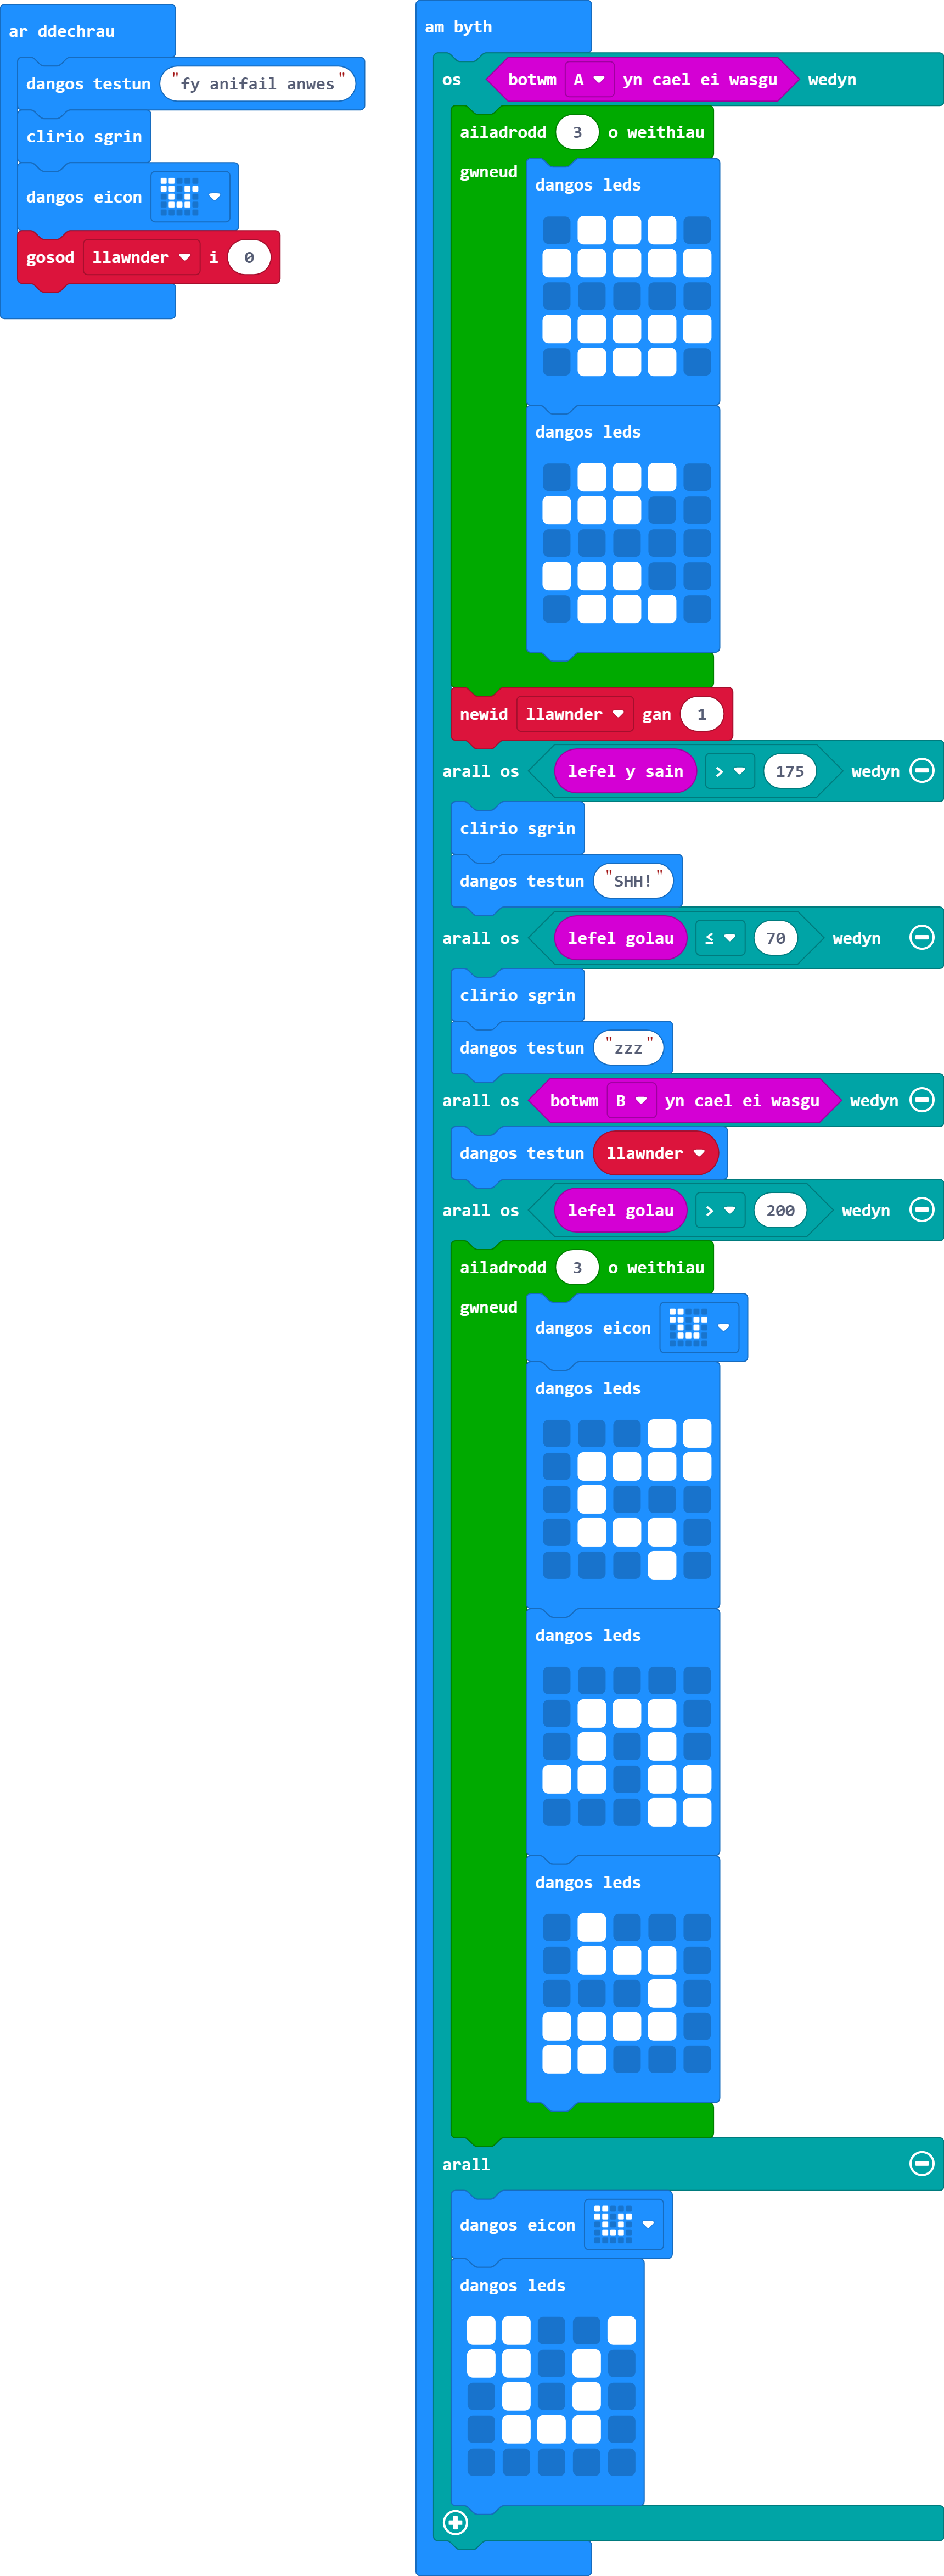
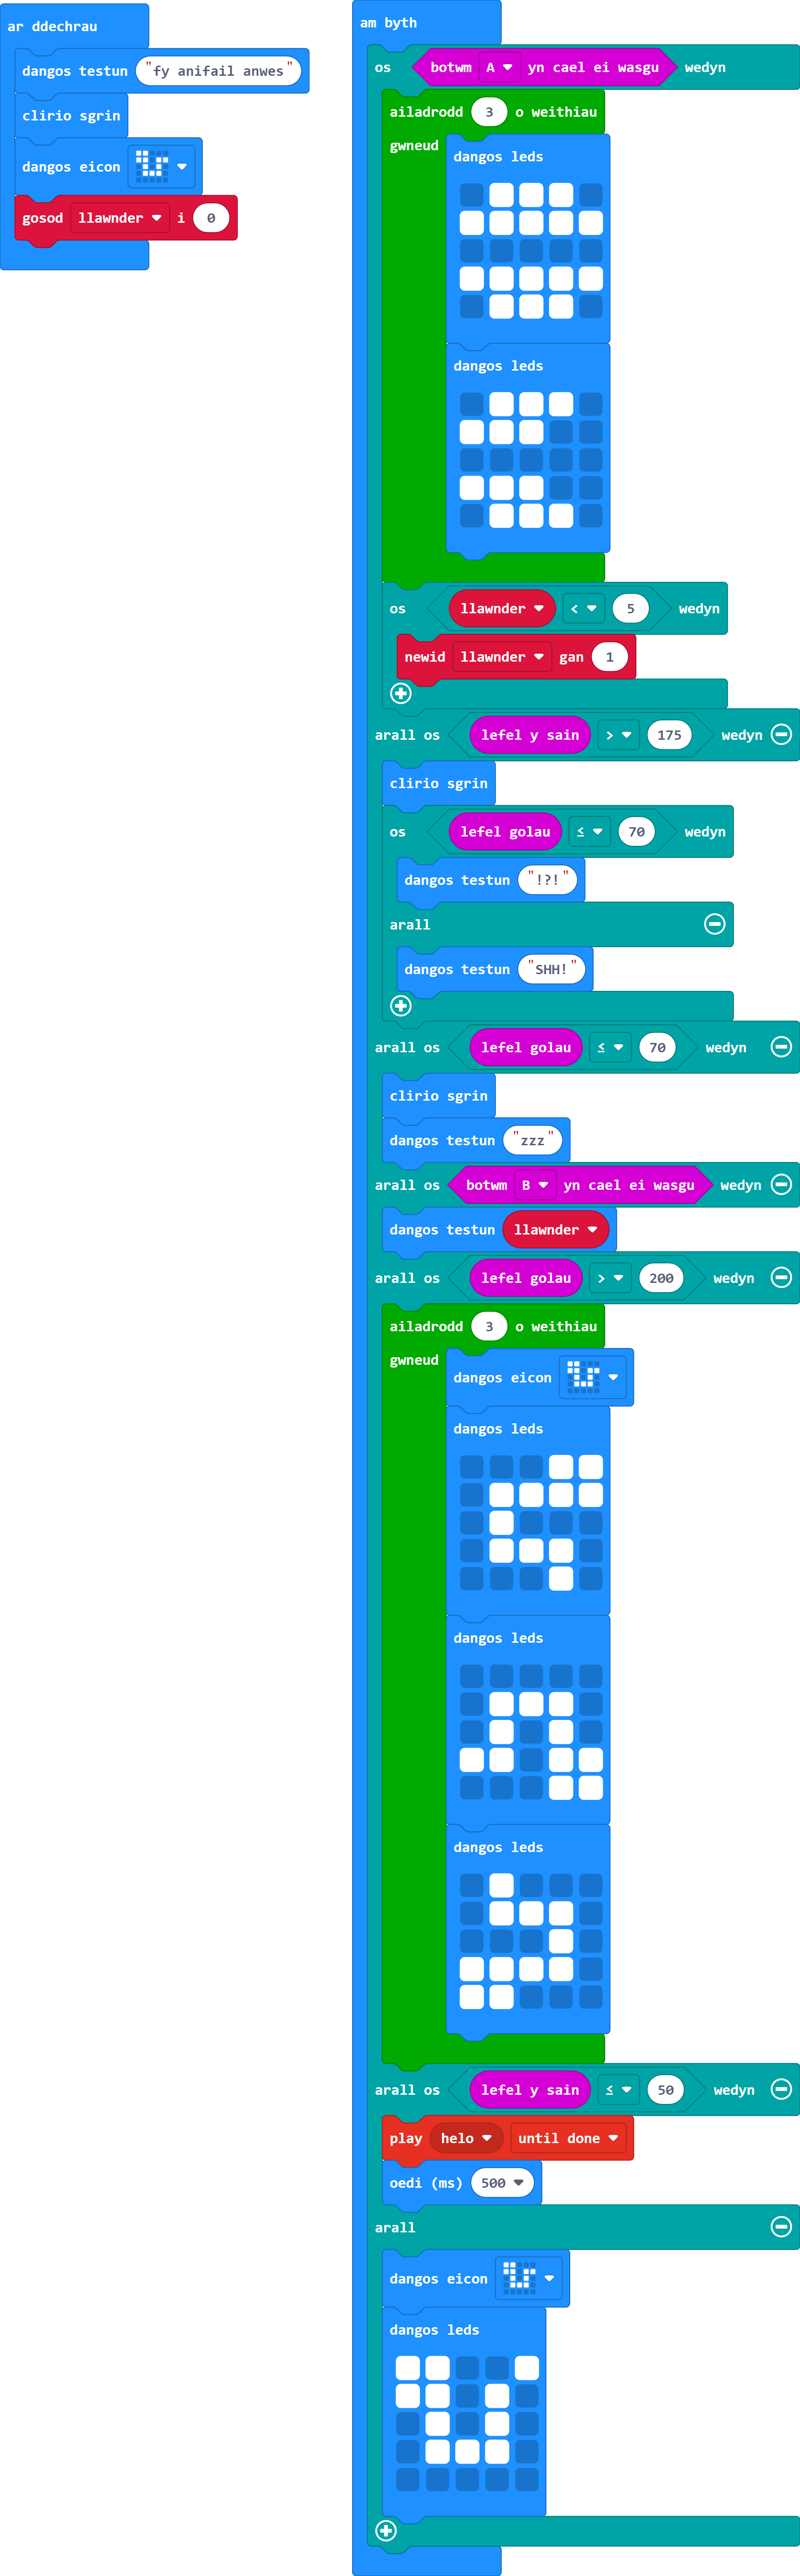
Ar gyfer y sesiwn hon byddwn yn creu rhaglen i droi eich BBC Micro:Bit yn anifail anwes rhithwir.
Fel sy'n wir am bob un o'n hymarferion, mae dysgwyr yn cwblhau un lefel cyn symud i'r nesaf. Fel arall, mae'n bosibl y bydd dysgwyr yn methu derbyn gwybodaeth neu'n gadael allan cam hanfodol sy'n atal y rhaglen rhag gweithio.
Cliciwch ar bennawd pob her i gael y manylion.
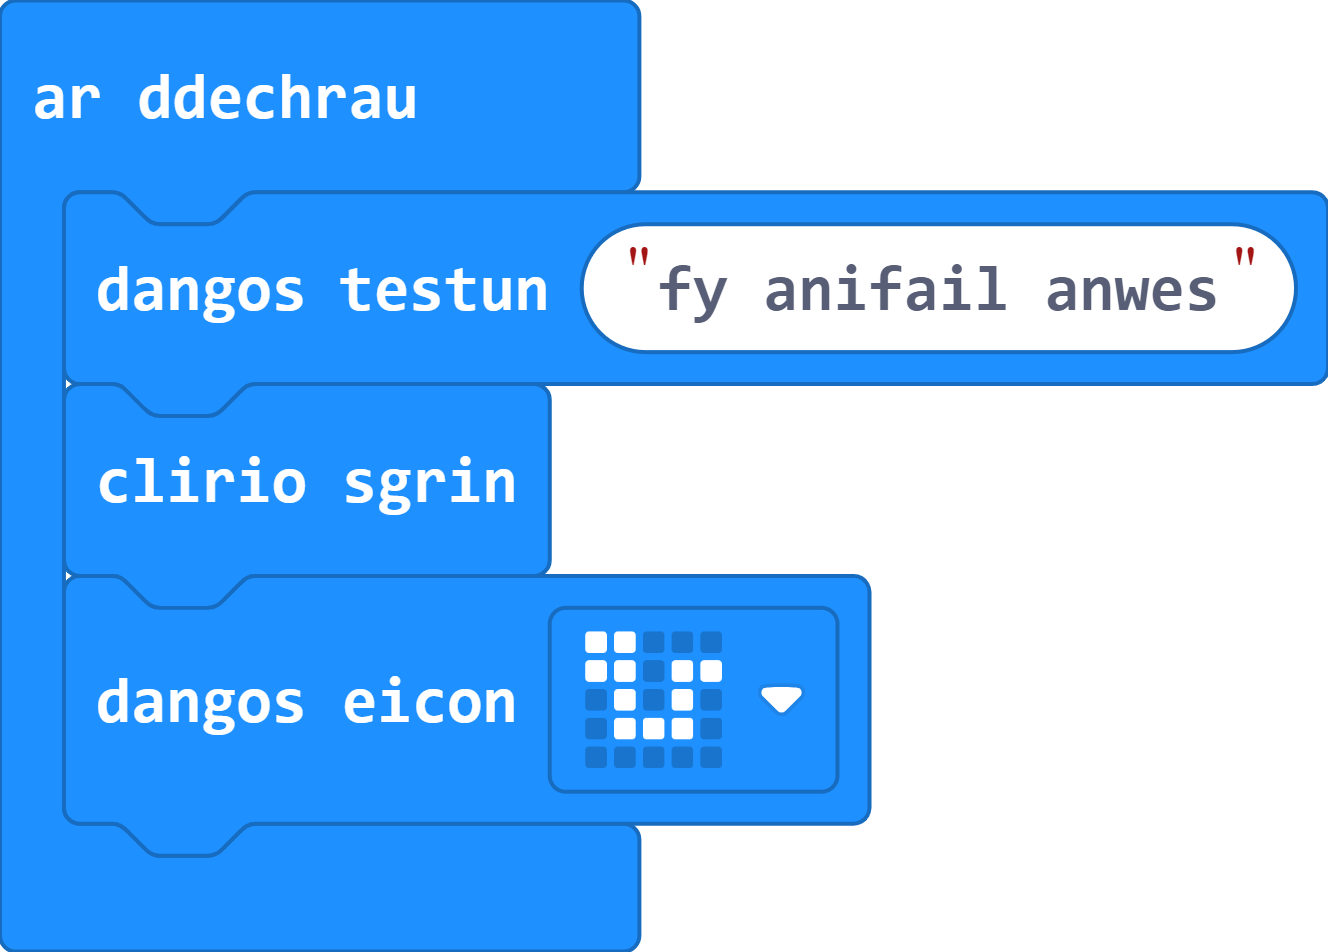
Dechreuwch raglen Micro:Bit newydd ar Makecode gan gwblhau'r camau canlynol.
Ewch ati i greu neges a/neu ddelwedd sy'n ymddangos ar ôl pwyso dechrau er mwyn helpu i nodi'r rhaglen.
Gair o gyngor: Cofiwch fod modd defnyddio'r bloc clirio'r sgrin i greu toriad rhwng delwedd a neges.
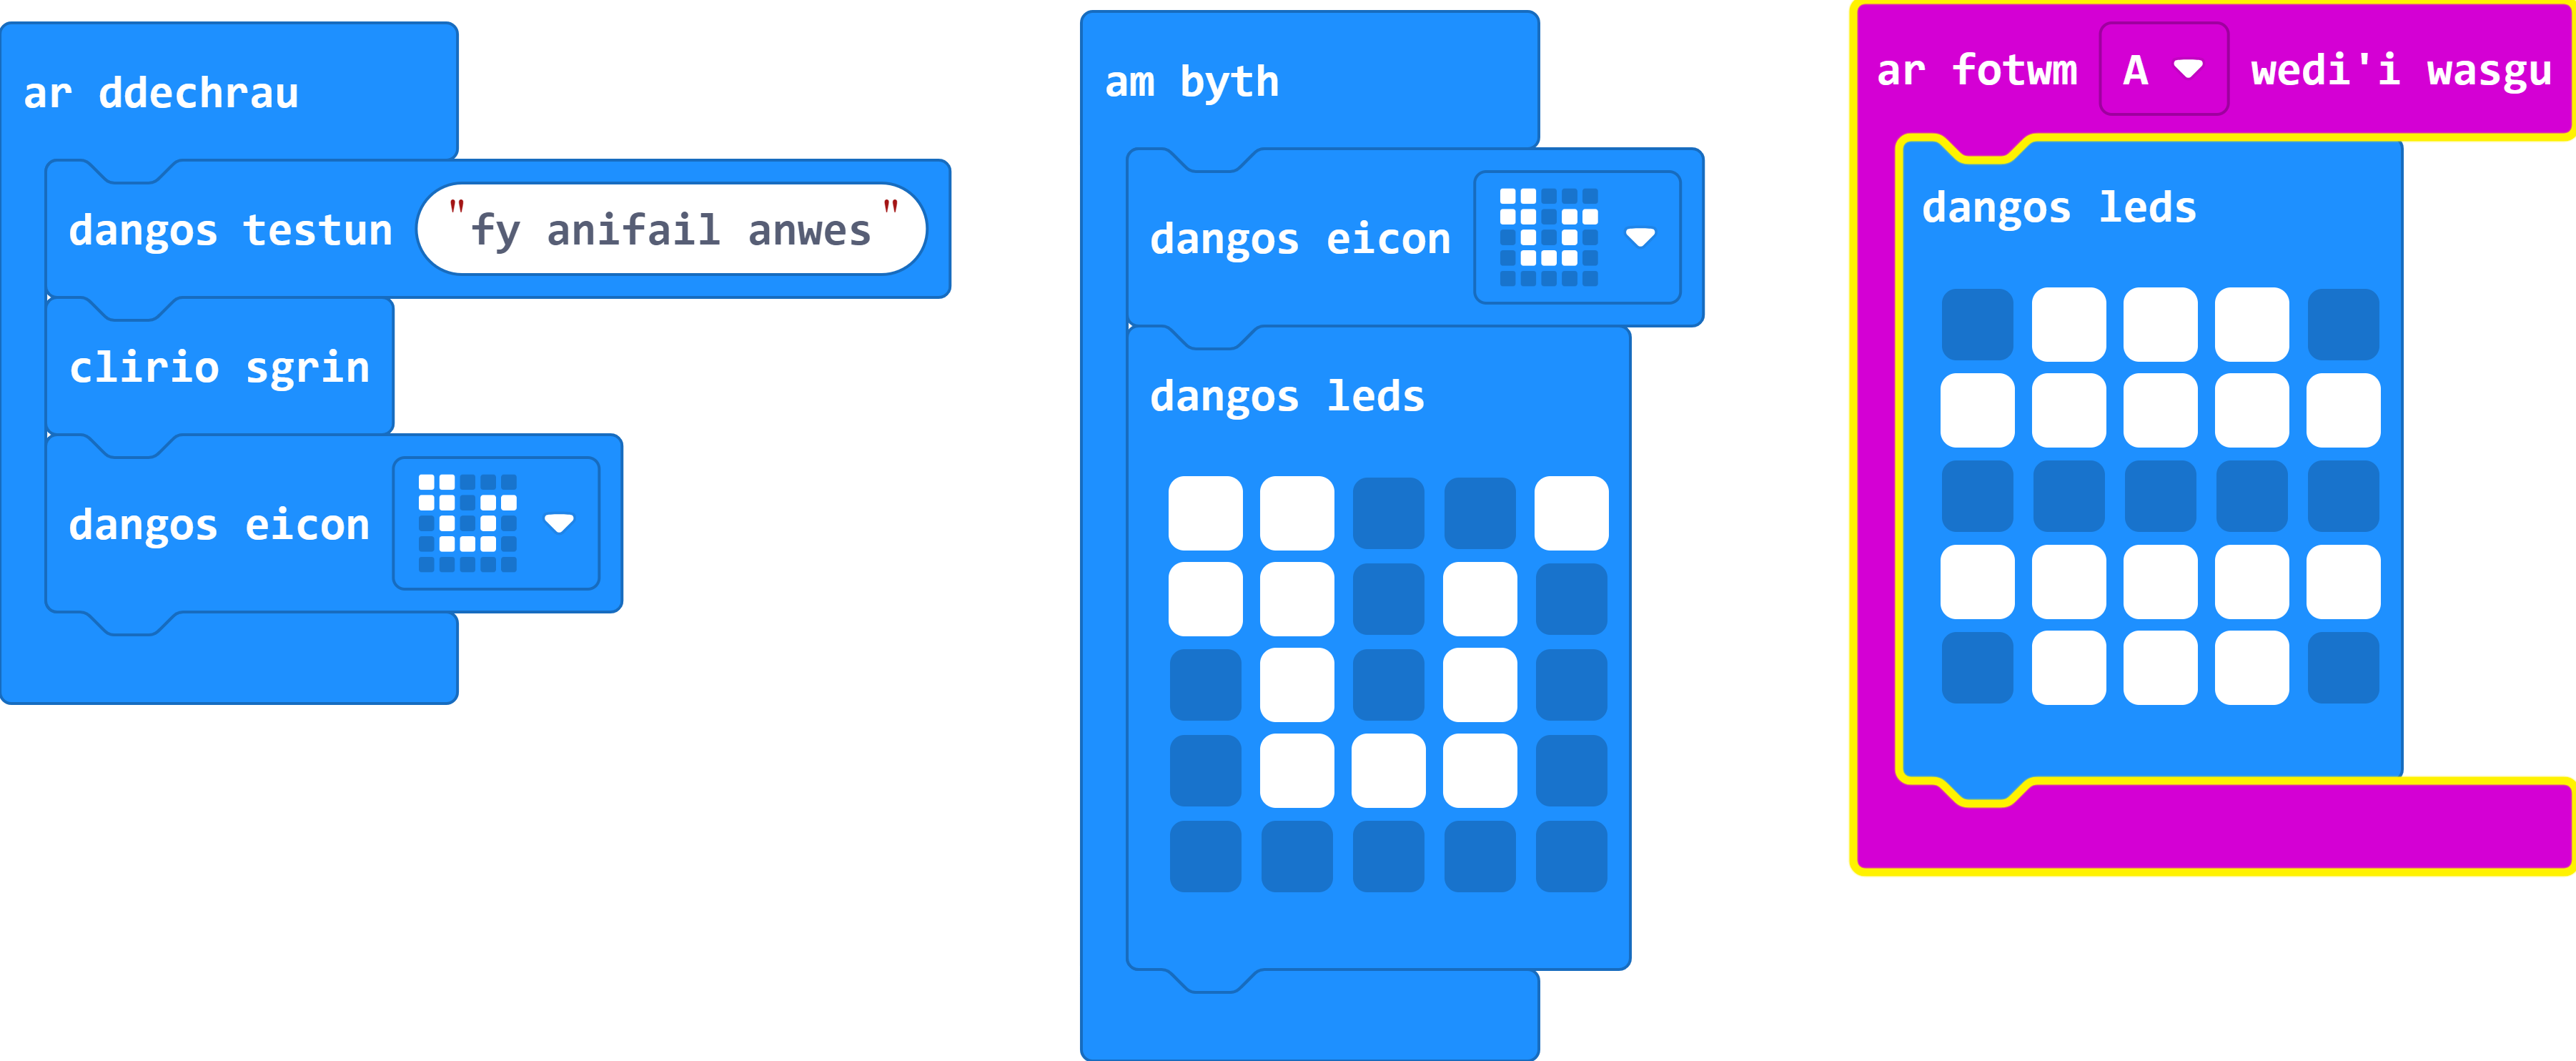
Ewch ati i greu animeiddiad bach o'ch anifail anwes yn aros y tu mewn i'r ddolen am byth.
Gair o gyngor: Efallai y gallwch ddefnyddio animeiddiad y gwnaethoch chi ei greu yn Sesiwn Un.
Cofiwch, dim ond dwy ddelwedd sydd eu hangen arnoch i wneud animeiddiad.
Gallwch ddefnyddio'r eiconau sydd wedi'u creu ymlaen llaw i'ch rhoi ar ben ffordd.
Po fwyaf o ddelweddau rydych chi'n eu defnyddio, y mwyaf o amser y bydd ei angen i gwblhau'r ddolen am byth - gallai hyn achosi problemau wrth i ni greu'r rhaglen.
Os ydych chi'n dal i gael trafferth, defnyddiwch y botwm ateb isod.
Defnyddiwch un o'r mewnbynnau (fel botwm A) i fwydo'ch anifail anwes ac ewch ati i'w ddefnyddio i ddangos delwedd o eitem fwyd ar y sgrin.
Efallai y bydd angen i chi glirio'r sgrin cyn dangos eich delwedd bwyd.
Cofiwch fod bloc rheoli botwm A wedi'i leoli yn y ddewislen Mewnbwn.
Os ydych chi'n dal i gael trafferth, defnyddiwch y botwm ateb isod.
Mae'r ateb hwn yn cynnwys fy ymgais i dynnu llun o fyrgyr ar gyfer fy anifail anwes.
Ewch ati i greu animeiddiad sy'n dangos yr anifail anwes yn bwyta.
Pwysig: Mae'n bosibl y byddwch yn dechrau gweld rhai mathau o ymddygiad digroeso wrth i'ch animeiddiadau wrthdaro. Trwy ddefnyddio ein blociau os-datganiad newydd, gallwn gywiro'r broblem a storio'r rhaglen gyfan y tu mewn i un ddolen am byth. Mae'r ddelwedd isod yn dangos sut i gynnwys botwm A fel amod mewn os-datganiad y tu mewn i'r ddolen am byth.
Nodwch: Hira'n byd fydd eich dolen am byth, mwya'n byd y bydd hi'n ei gymryd i'r rhaglen ymateb i fewnbwn. Mae'n bosibl y bydd angen i chi ddal y mewnbynnau am fwy o amser er mwyn eu cofnodi.
Cofiwch: Dim ond un ddolen am byth y dylech ei chael yn eich rhaglen.
Gair o gyngor: Defnyddiwch yr adran arall yn y bloc os-datganiad hwn fel cartref newydd i'ch anifail anwes sy'n aros am animeiddiad.
Gallwch animeiddio'r anifail anwes neu'r bwyd ar gyfer yr effaith hon.
Bydd bloc ailadrodd o'r ddewislen Dolennau yn helpu gyda'r animeiddiad.
Os ydych chi'n dal i gael trafferth, defnyddiwch y botwm ateb isod.
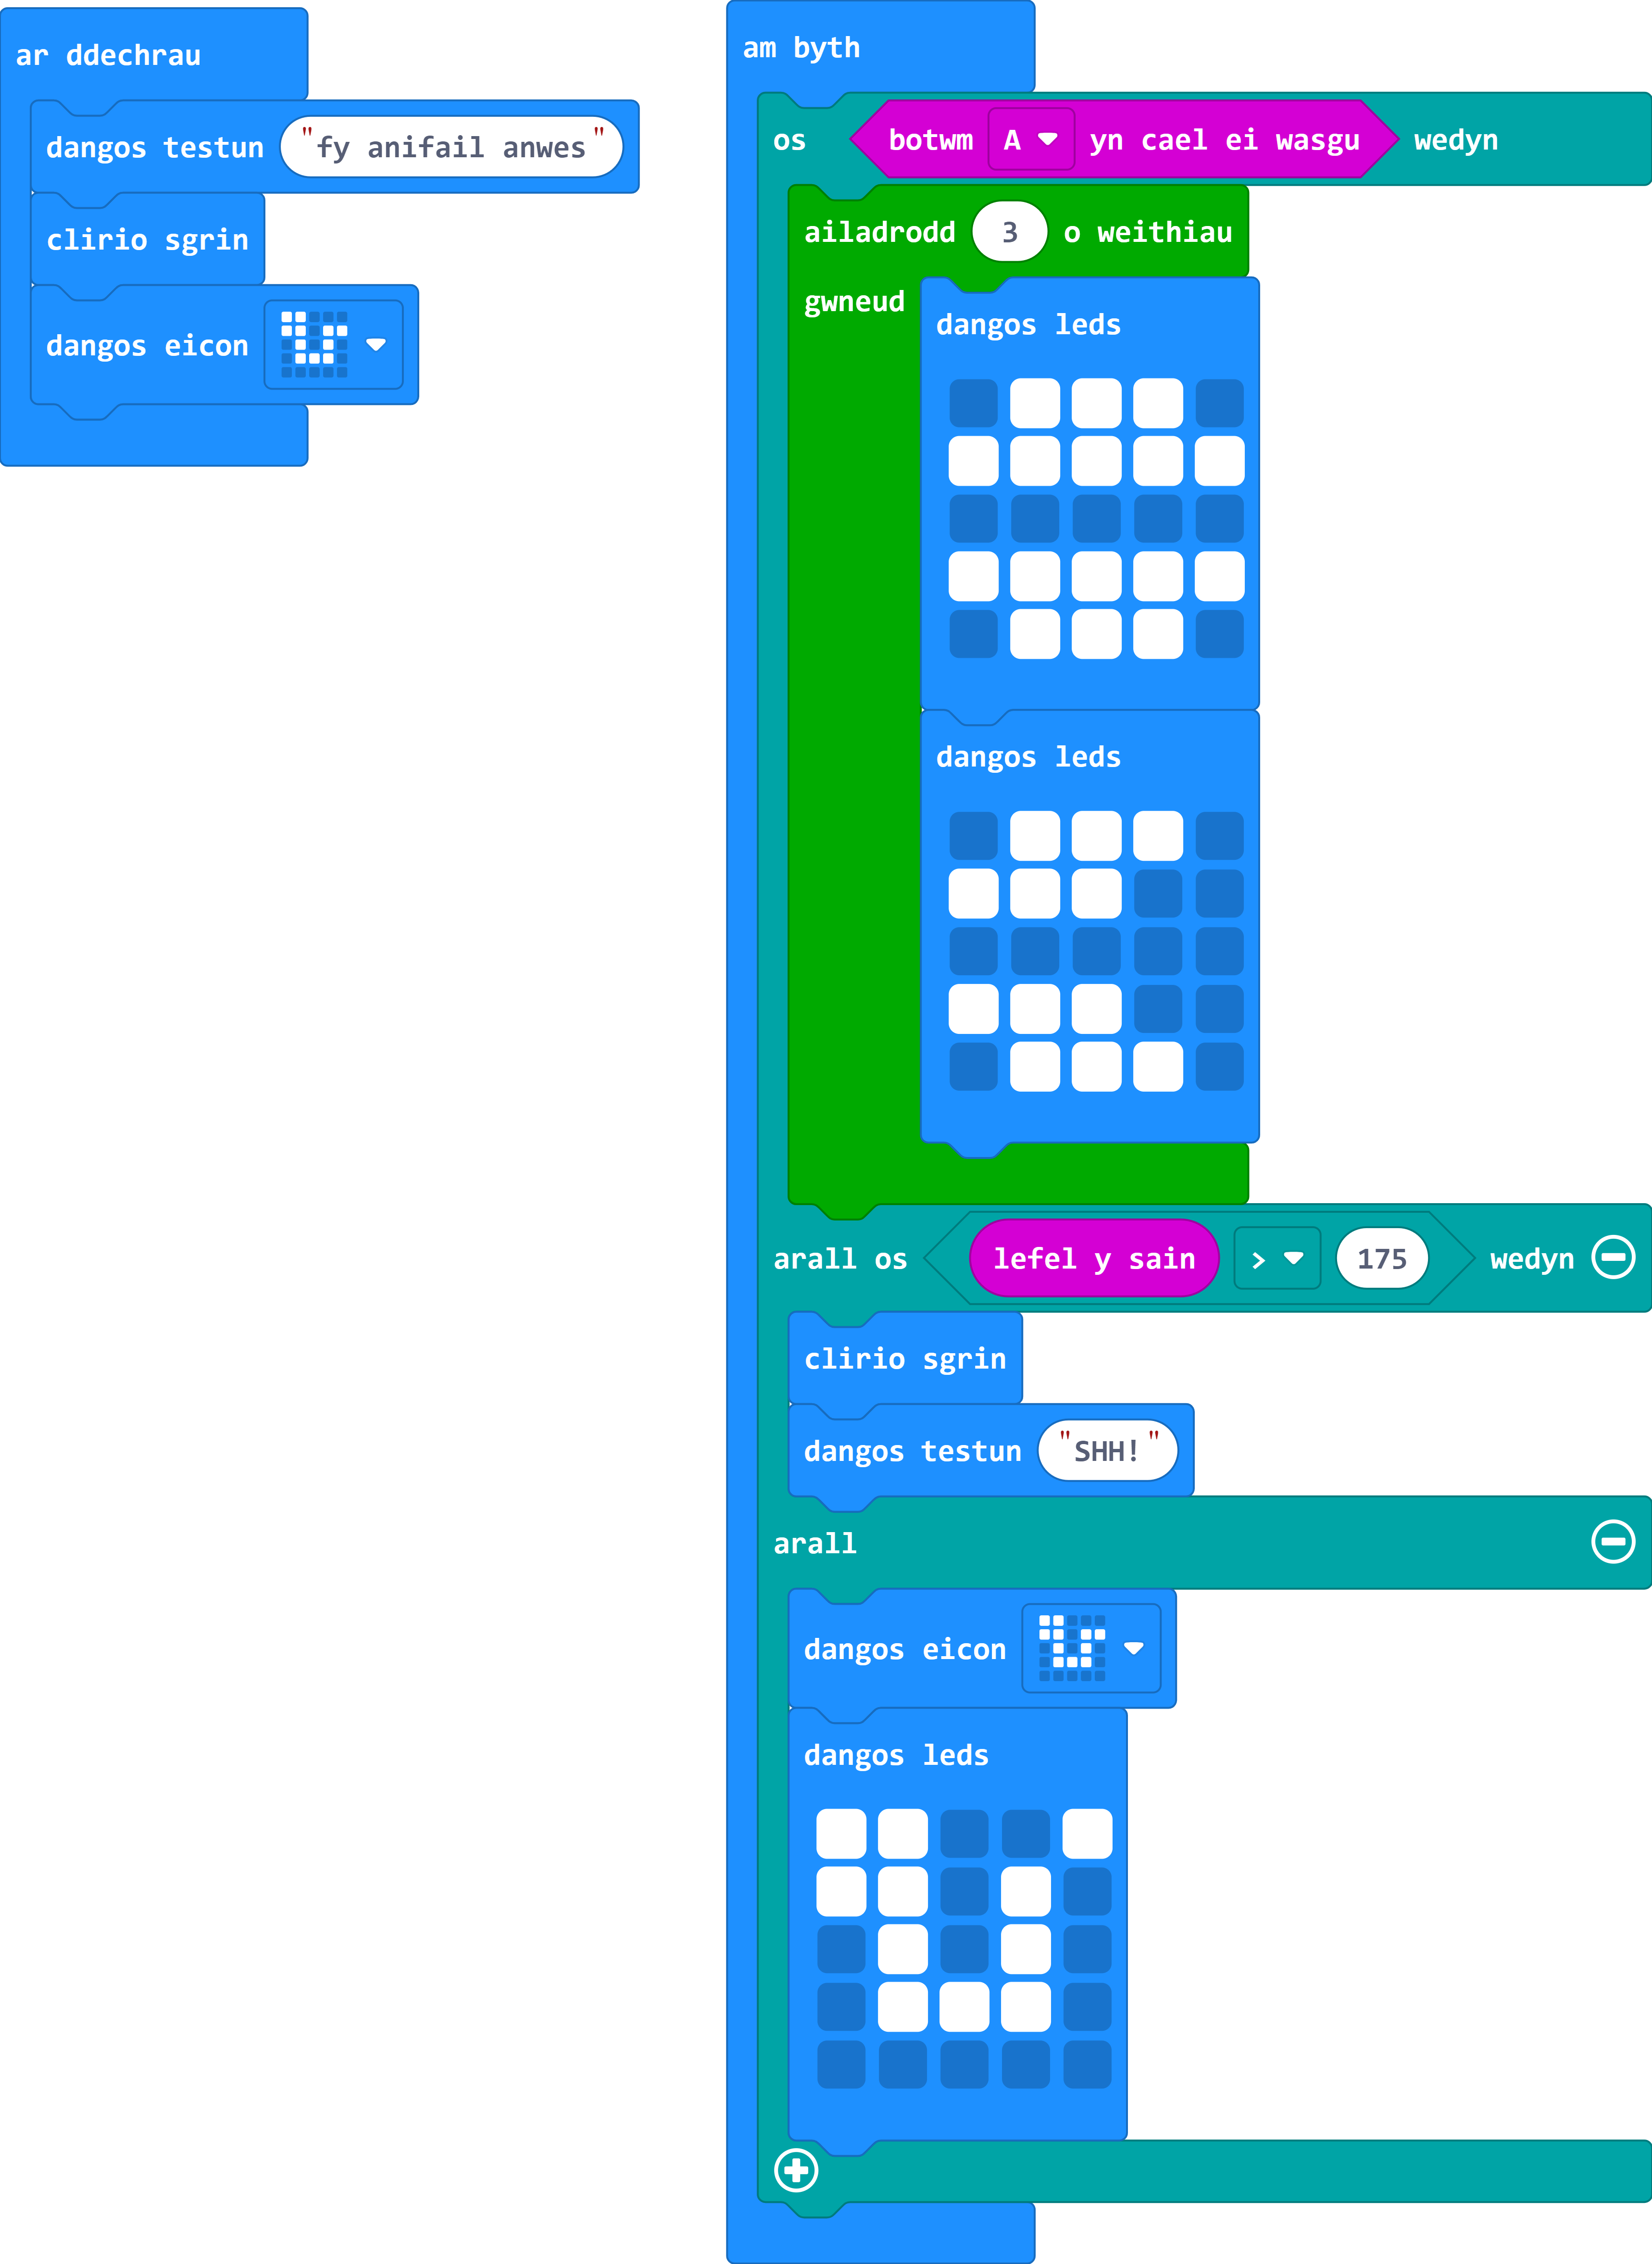
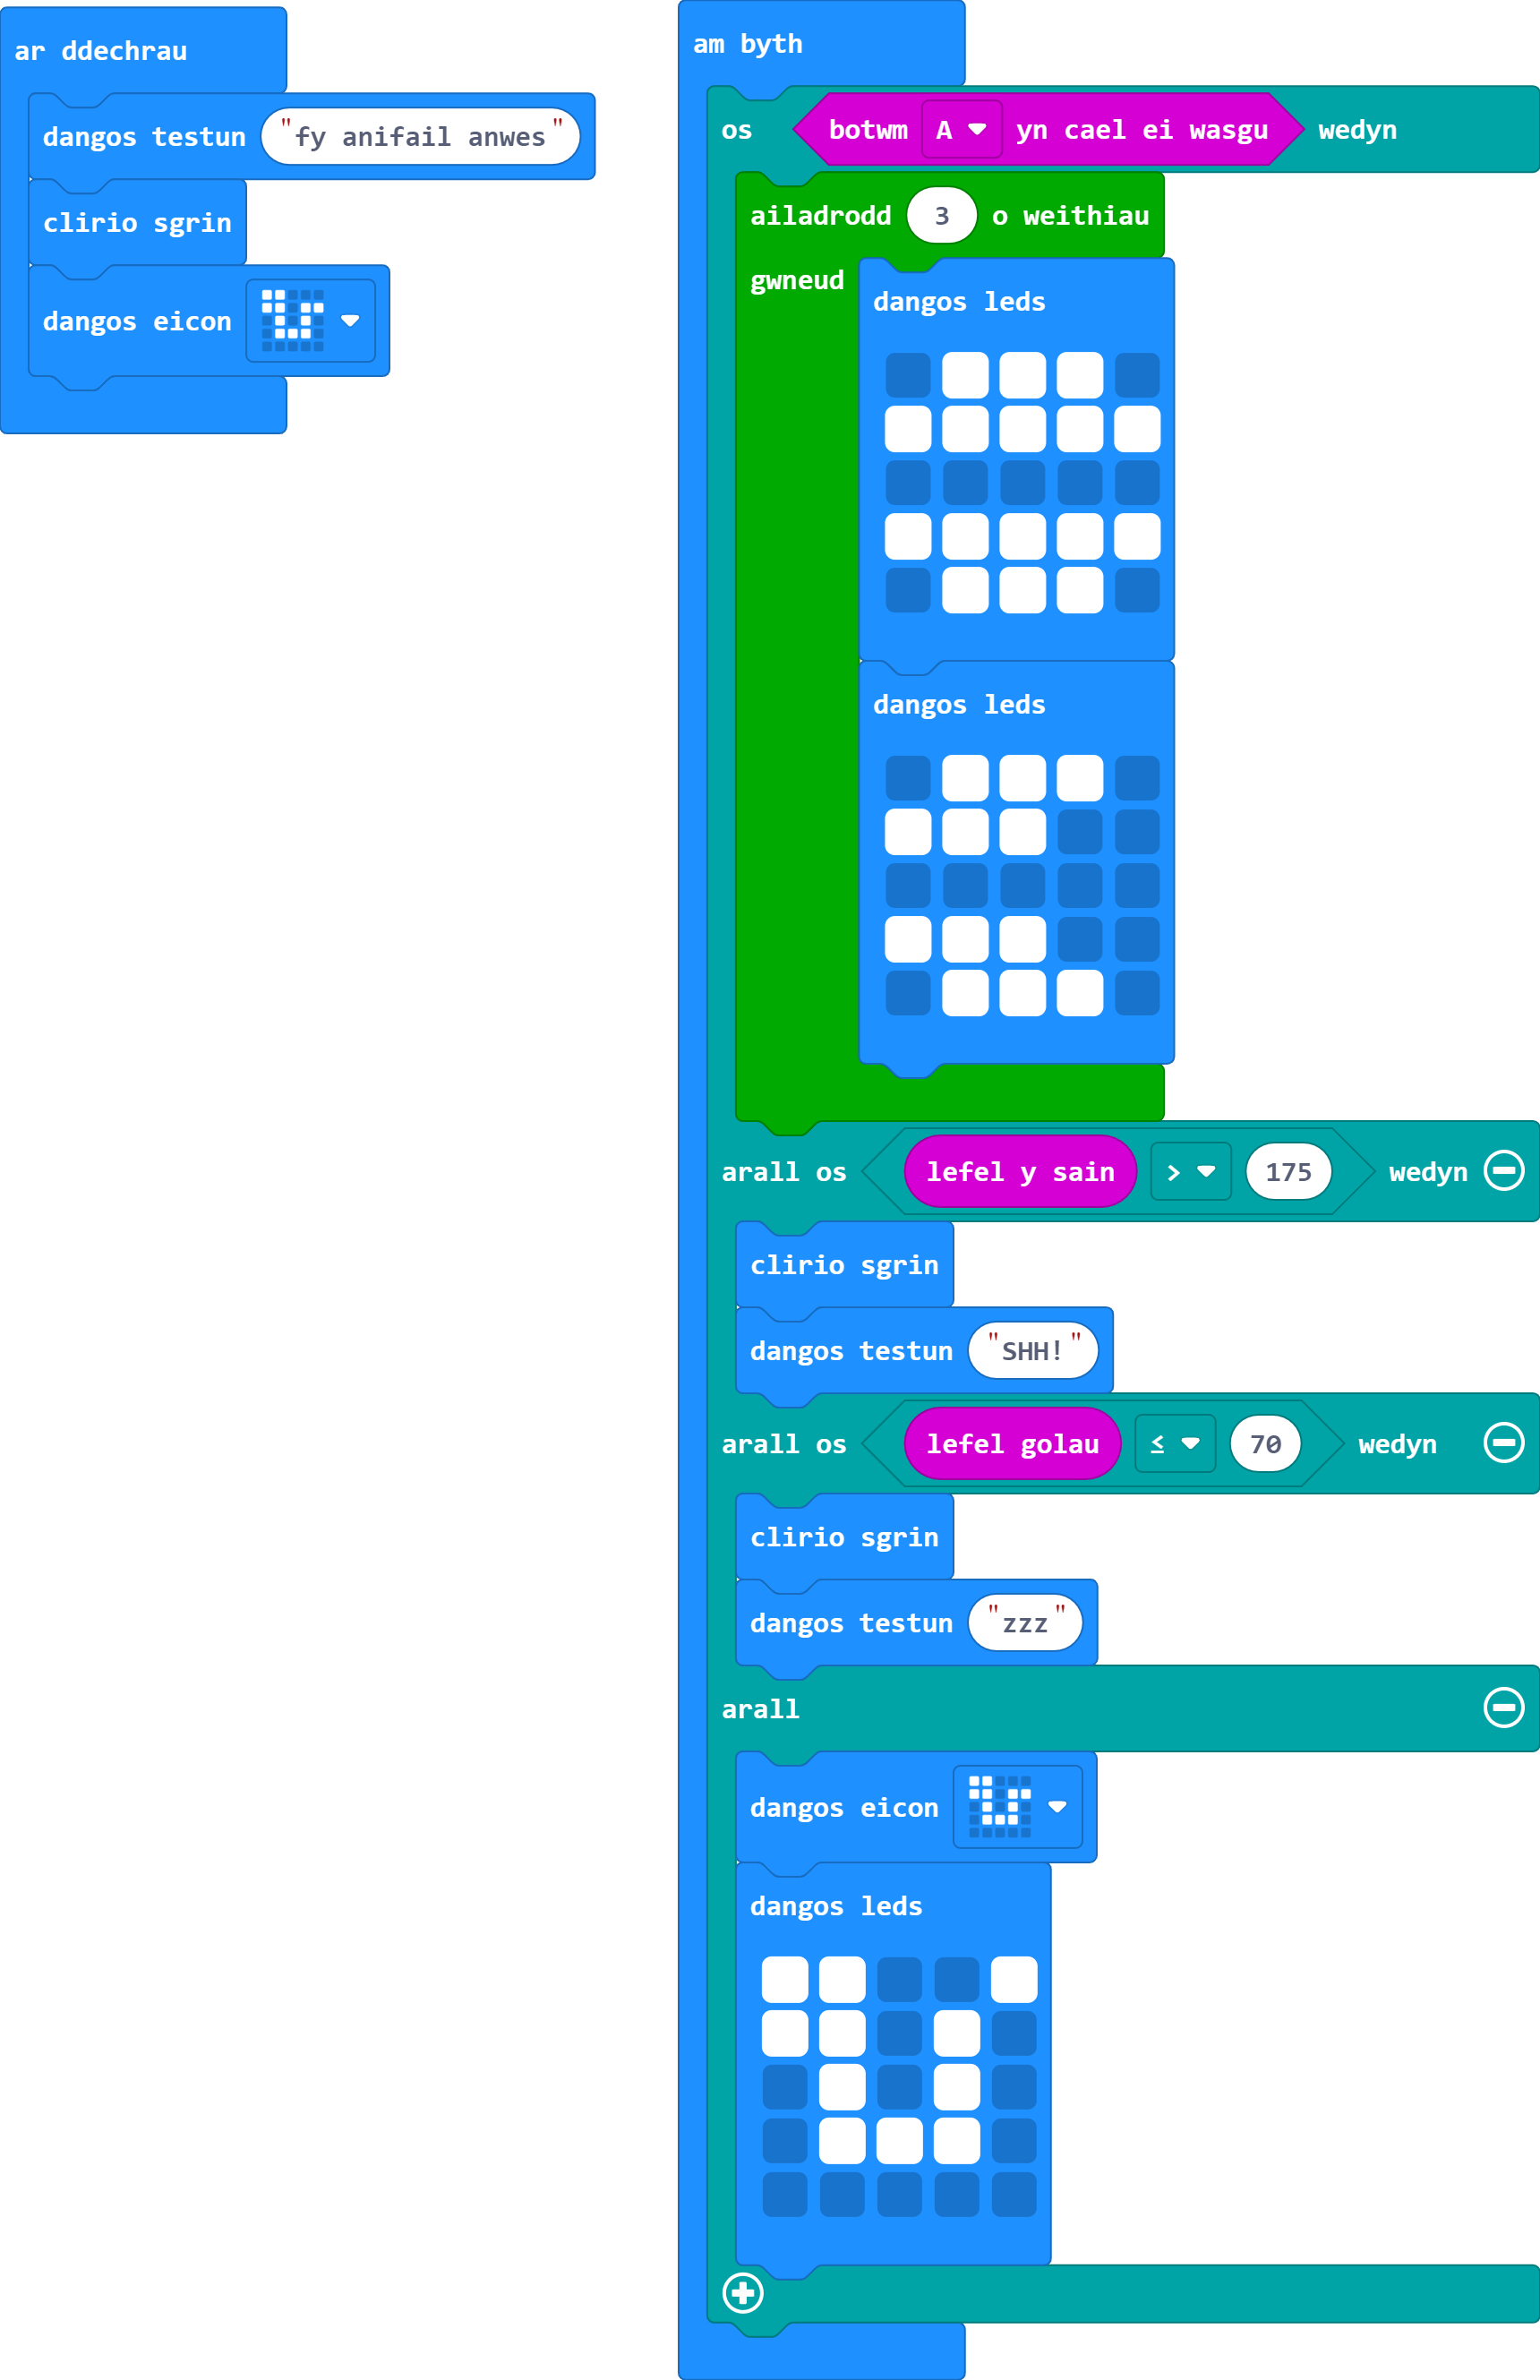
Ewch ati i greu ymateb gwael gan eich anifail anwes (gallwch ddefnyddio delwedd, animeiddio, a/neu sain) pan fydd yn clywed sŵn uchel.
Gair o gyngor: Yn hytrach na defnyddio'r bloc 'ar sain uchel', defnyddiwch os-datganiad arall y tu mewn i'ch dolen am byth ar gyfer lefel sain > 175.
Gallwch ehangu os-datganiad trwy glicio ar yr arwydd plws. Gallwch wneud hyn ar gyfer cynifer o os-datganiadau eraill ag y dymunwch.
Gallwch ddod o hyd i'r bloc mwy na yn y ddewislen Rhesymeg.
Er mwyn profi eich rhaglen, defnyddiwch y bar newydd ar gyfer lefel sain y meicroffon yn eich Micro:Bit wedi'i efelychu er mwyn newid y lefel. Pan fyddwch yn mynd dros 175 dylech weld y rhaglen - efallai y bydd ychydig o oedi.
Os ydych chi'n dal i gael trafferth, defnyddiwch y botwm ateb isod.
Gan barhau â'r un rhaglen, ewch ati i gynnwys yr ychwanegiadau isod.
Defnyddiwch y rhaglen i drefnu bod eich anifail anwes yn mynd i gysgu pan fydd hi'n tywyllu (defnyddiwch lai na 70 neu'n hafal i 70 ar gyfer y gwerth hwn).
Gair o gyngor: Gallwch gael cynifer o os-datganiadau ag y dymunwch mewn rhaglen Micro:Bit.
Defnyddiwch y botwm plws ar waelod eich os-datganiad i ychwanegu arall os-datganiad at eich rhaglen.
Gwiriwch pa symbol rydych chi'n ei ddefnyddio ar gyfer y gymhariaeth. Dylai edrych fel hyn ≤.
Gallech ddefnyddio testun o 'zzz' i ddangos bod eich anifail anwes wedi mynd i gysgu.
Cofiwch glirio'r sgrin yn gyntaf.
Os ydych chi'n dal i gael trafferth, defnyddiwch y botwm ateb isod.
Ewch ati i greu newidyn ar gyfer 'llawnder' sy'n cynyddu fesul un bob tro y caiff eich anifail anwes ei fwydo.
Gair o gyngor: Mae gosod newidyn newydd i sero wrth ddechrau yn arfer da bob tro.
Mae yna newidyn newid fesul bloc sy'n gwneud yr hyn sydd ei angen arnom.
Pa ran o'r cod y mae angen iddo fynd i mewn iddi?
Dylech sicrhau nad ydych chi'n ei osod y tu mewn i ddolen ailadrodd animeiddiad.
Os ydych chi'n dal i gael trafferth, defnyddiwch y botwm ateb isod.
Defnyddiwch fewnbwn (botwm B efallai) a fydd yn dangos gwerth 'llawnder' i'r defnyddiwr.
Gallwch roi newidyn y tu mewn i floc 'dangos testun'
Os ydych chi'n dal i gael trafferth, defnyddiwch y botwm ateb isod.
Defnyddiwch y rhaglen i wneud i'ch anifail anwes ymateb yn hapus i olau llachar (defnyddiwch fwy na 200 ar gyfer y gwerth hwn).
Os ydych chi wedi dewis gwneud animeiddiad, cofiwch am y bloc ailadrodd yn y ddewislen Dolennau.
Cofiwch sicrhau mai > yw eich symbol cymharu.
Os ydych chi'n dal i gael trafferth, defnyddiwch y botwm ateb isod.
Fe wnes i ddewis i'm nadredd ddathlu golau llachar gydag animeiddiad trosbennu.
Defnyddiwch y rhaglen i wneud i'ch anifail anwes wneud sŵn i gael sylw os yw'r lefel sŵn yn llai na neu'n hafal i 50.
Gair o gyngor: Gosodwch floc saib (o leiaf 500 milieiliad) ar ôl i'ch sŵn chwarae - coeliwch fi.
Cofiwch sicrhau bod pa bynnag sŵn rydych chi wedi dewis ei ddefnyddio yn y rhaglen yn chwarae unwaith yn unig neu hyd nes ei fod wedi gorffen.
Os ydych chi'n dal i gael trafferth, defnyddiwch y botwm ateb isod.
Nawr, gadewch i ni ddatblygu'r rhaglen ymhellach gyda'r tasgau canlynol.
Os yw eich anifail anwes yn cysgu wrth glywed sŵn uchel, rhaid iddo ymateb trwy ddangos mwy o ddicter/ofn/syndod na phan fydd yn effro.
Gair o gyngor: Gallwch roi os-datganiadau y tu mewn i'w gilydd, gan greu os-datganiad sydd wedi'i bentyrru.
Pwysig: Bydd eich rhaglen yn gweithio ei ffordd trwy'r rhestr o os-datganiadau a arall os-datganiadau yn y ddolen am byth. Bydd yn rhedeg y darn cyntaf o god os bodlonir yr amodau, ac yn gadael y gweddill.
Meddyliwch am hyn fel rhestr wirio lle rydych chi'n dychwelyd i frig y rhestr a dechrau eto ar ôl gwirio rhywbeth.
Mae hyn yn golygu bod angen i chi wirio pa un o'r amodau (sŵn uchel neu dywyllwch) sy'n dod gyntaf yn eich rhaglen a mewnosod y os-datganiad newydd yn yr amod perthnasol.
Defnyddiwch os ac arall ddatganiad ar gyfer hyn er mwyn penderfynu pa ymateb sŵn uchel sy'n cael ei ddangos.
Gan ein bod am glirio'r sgrin cyn y ddau opsiwn, gallwn ddefnyddio'r gorchymyn hwn unwaith cyn y os/arall-datganiad newydd.
Fel arall, gallech ystyried defnyddio blociau rhesymeg uwch sy'n caniatáu sawl amod mewn os/arall os-datganiad.
Os ydych chi'n dal i gael trafferth, defnyddiwch y botwm ateb isod.
Yn ein rhaglen atebion, mae'r amod s&wcirc:n uchel uwchben yr amod tywyll, felly mae'r os-datganiad newydd yn mynd yno.
Mae angen i'ch newidyn 'llawnder' fod ag uchafswm gwerth o 5.
Gair o gyngor: : Mae hyn yn golygu eich bod ond eisiau ychwanegu un at y gwerth llawnder pan fydd yn llai na 5 (neu'n llai na ac yn hafal i 4).
Mae angen os-datganiad arnoch pan fydd y llawnder yn llai na 5 er mwyn ychwanegu at y gwerth pan fydd yn wir yn unig.
Ar hyn o bryd, does dim angen os-datganiad i wneud hyn gan nad oes unrhyw gam gweithredu ar gyfer os-datganiad nad yw'n wir.
Cofiwch gadw'r os-datganiad hwn y tu allan i unrhyw ddolennau ailadrodd a ddefnyddir ar gyfer yr animeiddiad bwydo.
Os ydych chi'n dal i gael trafferth, defnyddiwch y botwm ateb isod.
Yn hytrach na dangos gwerth llawnder i'r defnyddiwr gan ddefnyddio'r mewnbwn a ddewiswyd yn yr heriau arian, defnyddiwch y rhaglen i ddangos lefel mesurydd.
Gair o gyngor: Gallwch roi arall os-datganiadau y tu mewn i os / arall os / arall-datganiad.
I wneud hyn, bydd angen delwedd ar gyfer pob lefel lawnder i greu effaith mesurydd/medrydd.
Mewn rhestr datganiadau o'r fath, mae angen i chi gynnwys arall-datganiad i gofnodi 0 a/neu unrhyw werthoedd annisgwyl. Gall hyn weithredu fel sgrin gwall i ni wedyn.
Os ydych chi'n dal i gael trafferth, defnyddiwch y botwm ateb isod.
Fe wnaethom ddewis siâp mesurydd crwn sy'n mynd yn fwy cyflawn pan fydd y lefel lawnder yn uwch.
Gair o gyngor: Gallai helpu i symud yr animeiddiad bwyta i'r un os-datganiad â phan fydd y newidyn llawnder yn cynyddu, gan sicrhau o ganlyniad bod gennych animeiddiad gwahanol pan fydd arall-datganiad yn llawn.
Cofiwch fod angen dolennau ailadrodd y tu mewn i'r datganiadau hyn er mwyn ailadrodd animeiddiadau.
Wrth ddatblygu rhaglen, yn aml mae'n rhaid i ni newid lleoliadau adrannau cod er mwyn cynnwys nodweddion newydd.
I wneud hyn, mae angen atodi 'arall' i'n datganiad 'os llawnder < 5'.
Os ydych chi'n dal i gael trafferth, defnyddiwch y botwm ateb isod.
Dylai'r gwerth llawnder ostwng yn araf dros amser wrth i chwant bwyd eich anifail anwes gynyddu eto.
Gair o gyngor: Gan fod hon yn broses gefndirol na fydd yn dioddef ymyrraeth gan y ddolen am byth, gallwch ddefnyddio dolen amserydd ar wahân i wneud hyn.
Gallwch ddod o hyd i floc amserydd yn y ddewislen Dolennau.
Yr amser diofyn yw 500 ms - sef bob hanner eiliad - bydd angen i chi newid hyn (fe wnaethom ni weld bod munud - neu 60000 ms - yn addas iawn ar gyfer hyn).
Rydym am dynnu un i ffwrdd o'r llawnder fel y gallwn ddefnyddio bloc 'newid llawnder gan' gyda -1 yn hytrach nag 1.
Dydyn ni ddim eisiau gwerthoedd negyddol, felly rydym ond eisiau tynnu i ffwrdd o'r gwerth llawnder os yw dros 0 (neu'n fwy nag 1 ac yn hafal i 1).
Os ydych chi'n dal i gael trafferth, defnyddiwch y botwm ateb isod.
Mae gennych chi nawr anifail anwes rhithwir. Dyma rai syniadau ar gyfer ychwanegiadau a nodweddion eraill y gallwch chi roi cynnig arnyn nhw. Gweithgareddau i chi ymchwilio iddyn nhw a'u harchwilio yw'r rhain - does dim atebion ar gael.
Defnyddiwch y rhaglen i wneud i'r anifail anwes ddangos pan fydd chwant bwyd arno (llawnder ≤ 1).
Gair o gyngor: Gellir gwneud hyn trwy ychwanegu arall os-datganiad i'ch dolen am byth.
Ychwanegwch lefel hapusrwydd a mewnbynnau chwarae yn y rhaglen. Mwya'n byd y byddwch chi'n chwarae gyda'r anifail anwes, hapusa'n byd fydd e'n teimlo.
Gair o gyngor: Efallai y byddwch am symud y mesurydd chwant bwyd fel ei fod yn dangos yn awtomatig ar ôl bwydo'r anifail anwes er mwyn rhyddhau botwm B ar gyfer hyn.
Gosodwch werth uchaf ac amser oeri ar gyfer y gwerth hapusrwydd. Sut fydd eich anifail anwes yn ymateb pan fydd y gwerth hapusrwydd yn gostwng yn rhy isel?
Gair o gyngor: Bydd hyn yn defnyddio'r un fframwaith â'n mesurydd llawnder.
Defnyddiwch y rhaglen fel bod yr anifail anwes yn tyfu dros amser os yw'n derbyn gofal priodol.
Gair o gyngor: Gallech greu newidyn sgôr ar gyfer hyn a threfnu bod yr anifail anwes yn gwella wrth i'r sgôr gyrraedd nodau penodol.
Gwers Fideo (yn Saesneg):
Ymarferion:
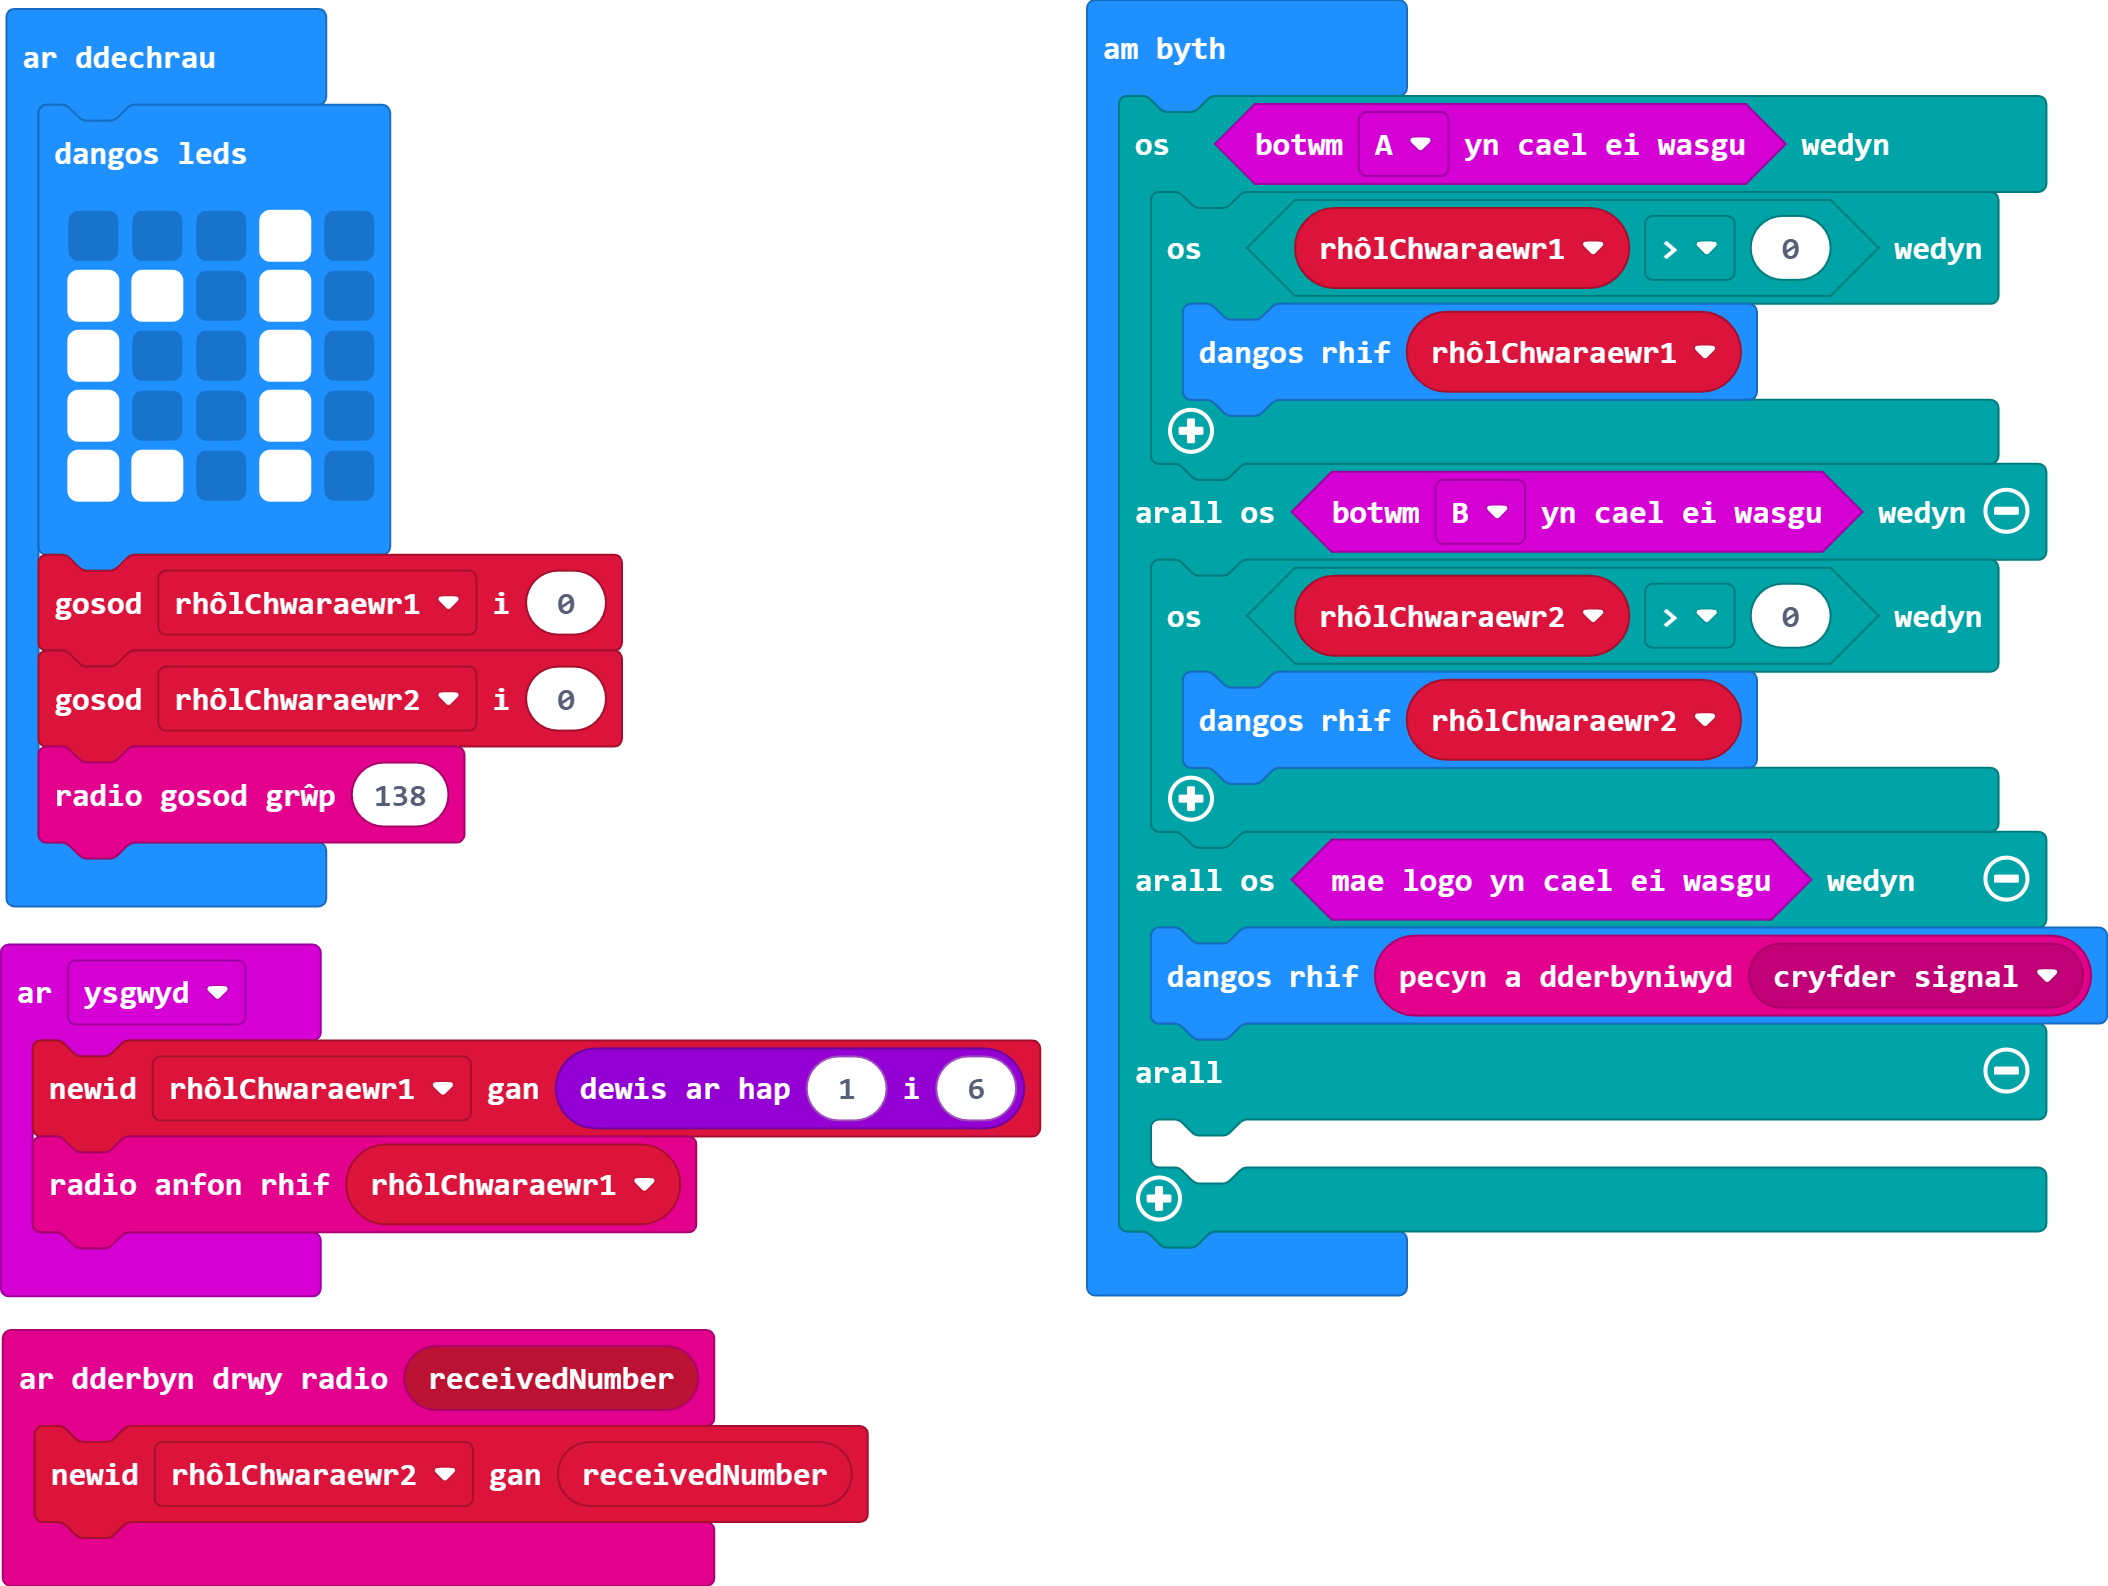
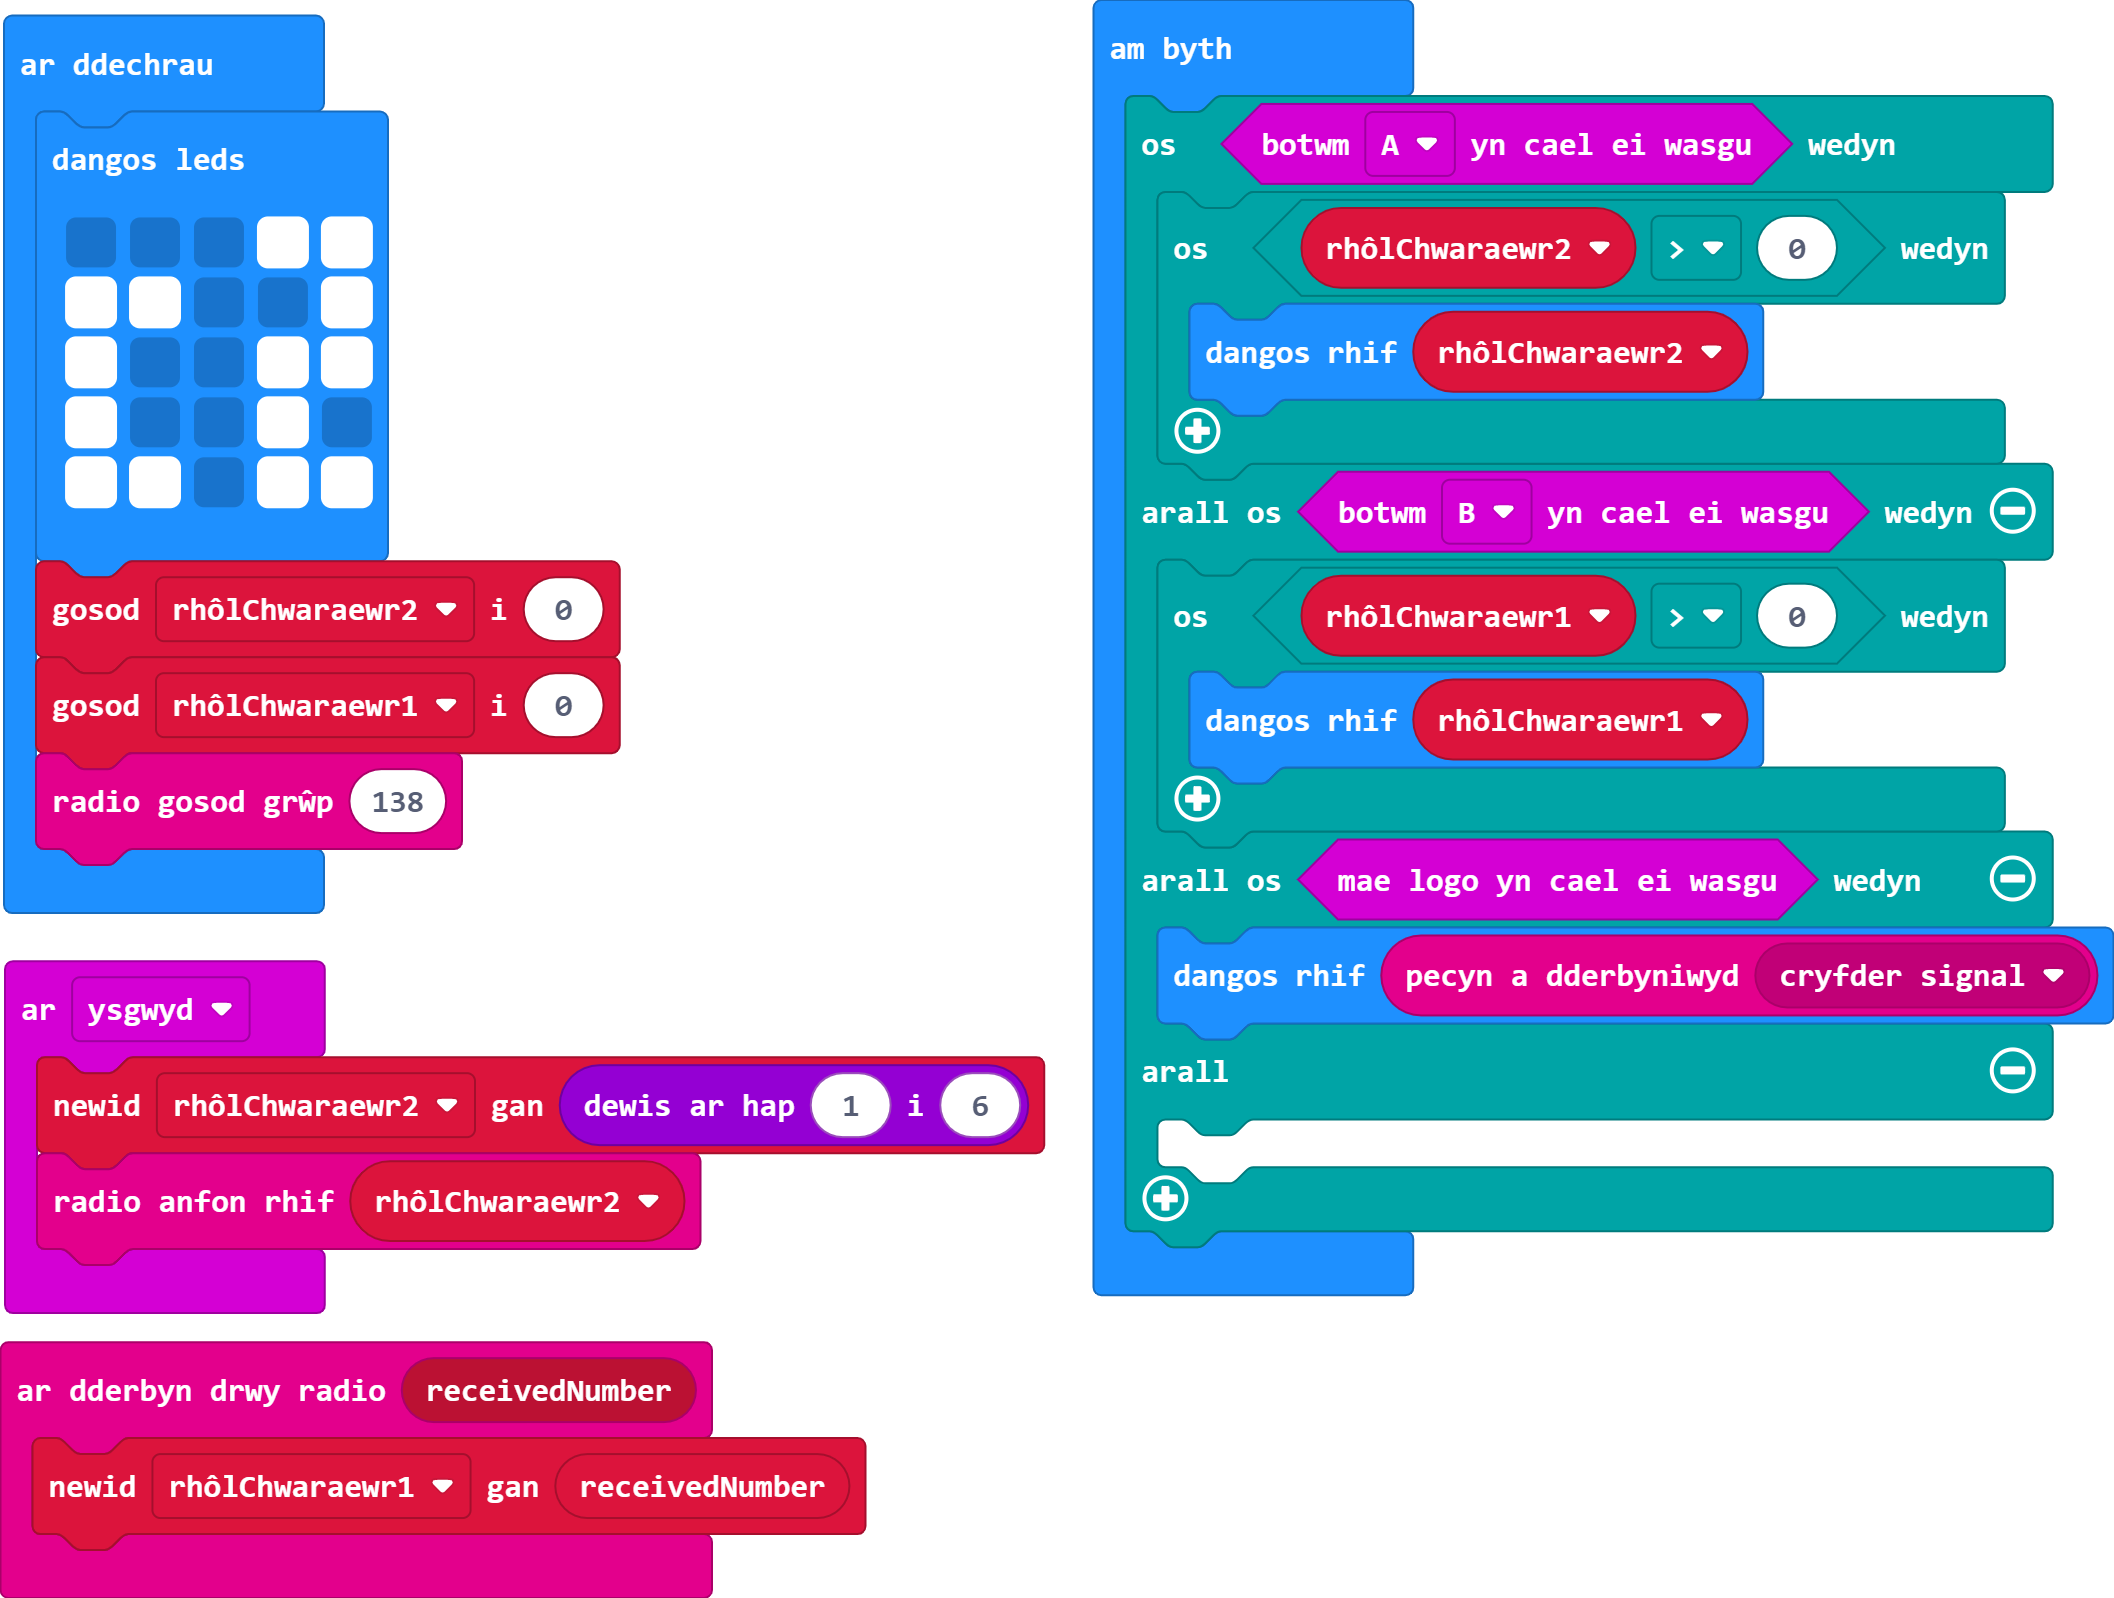
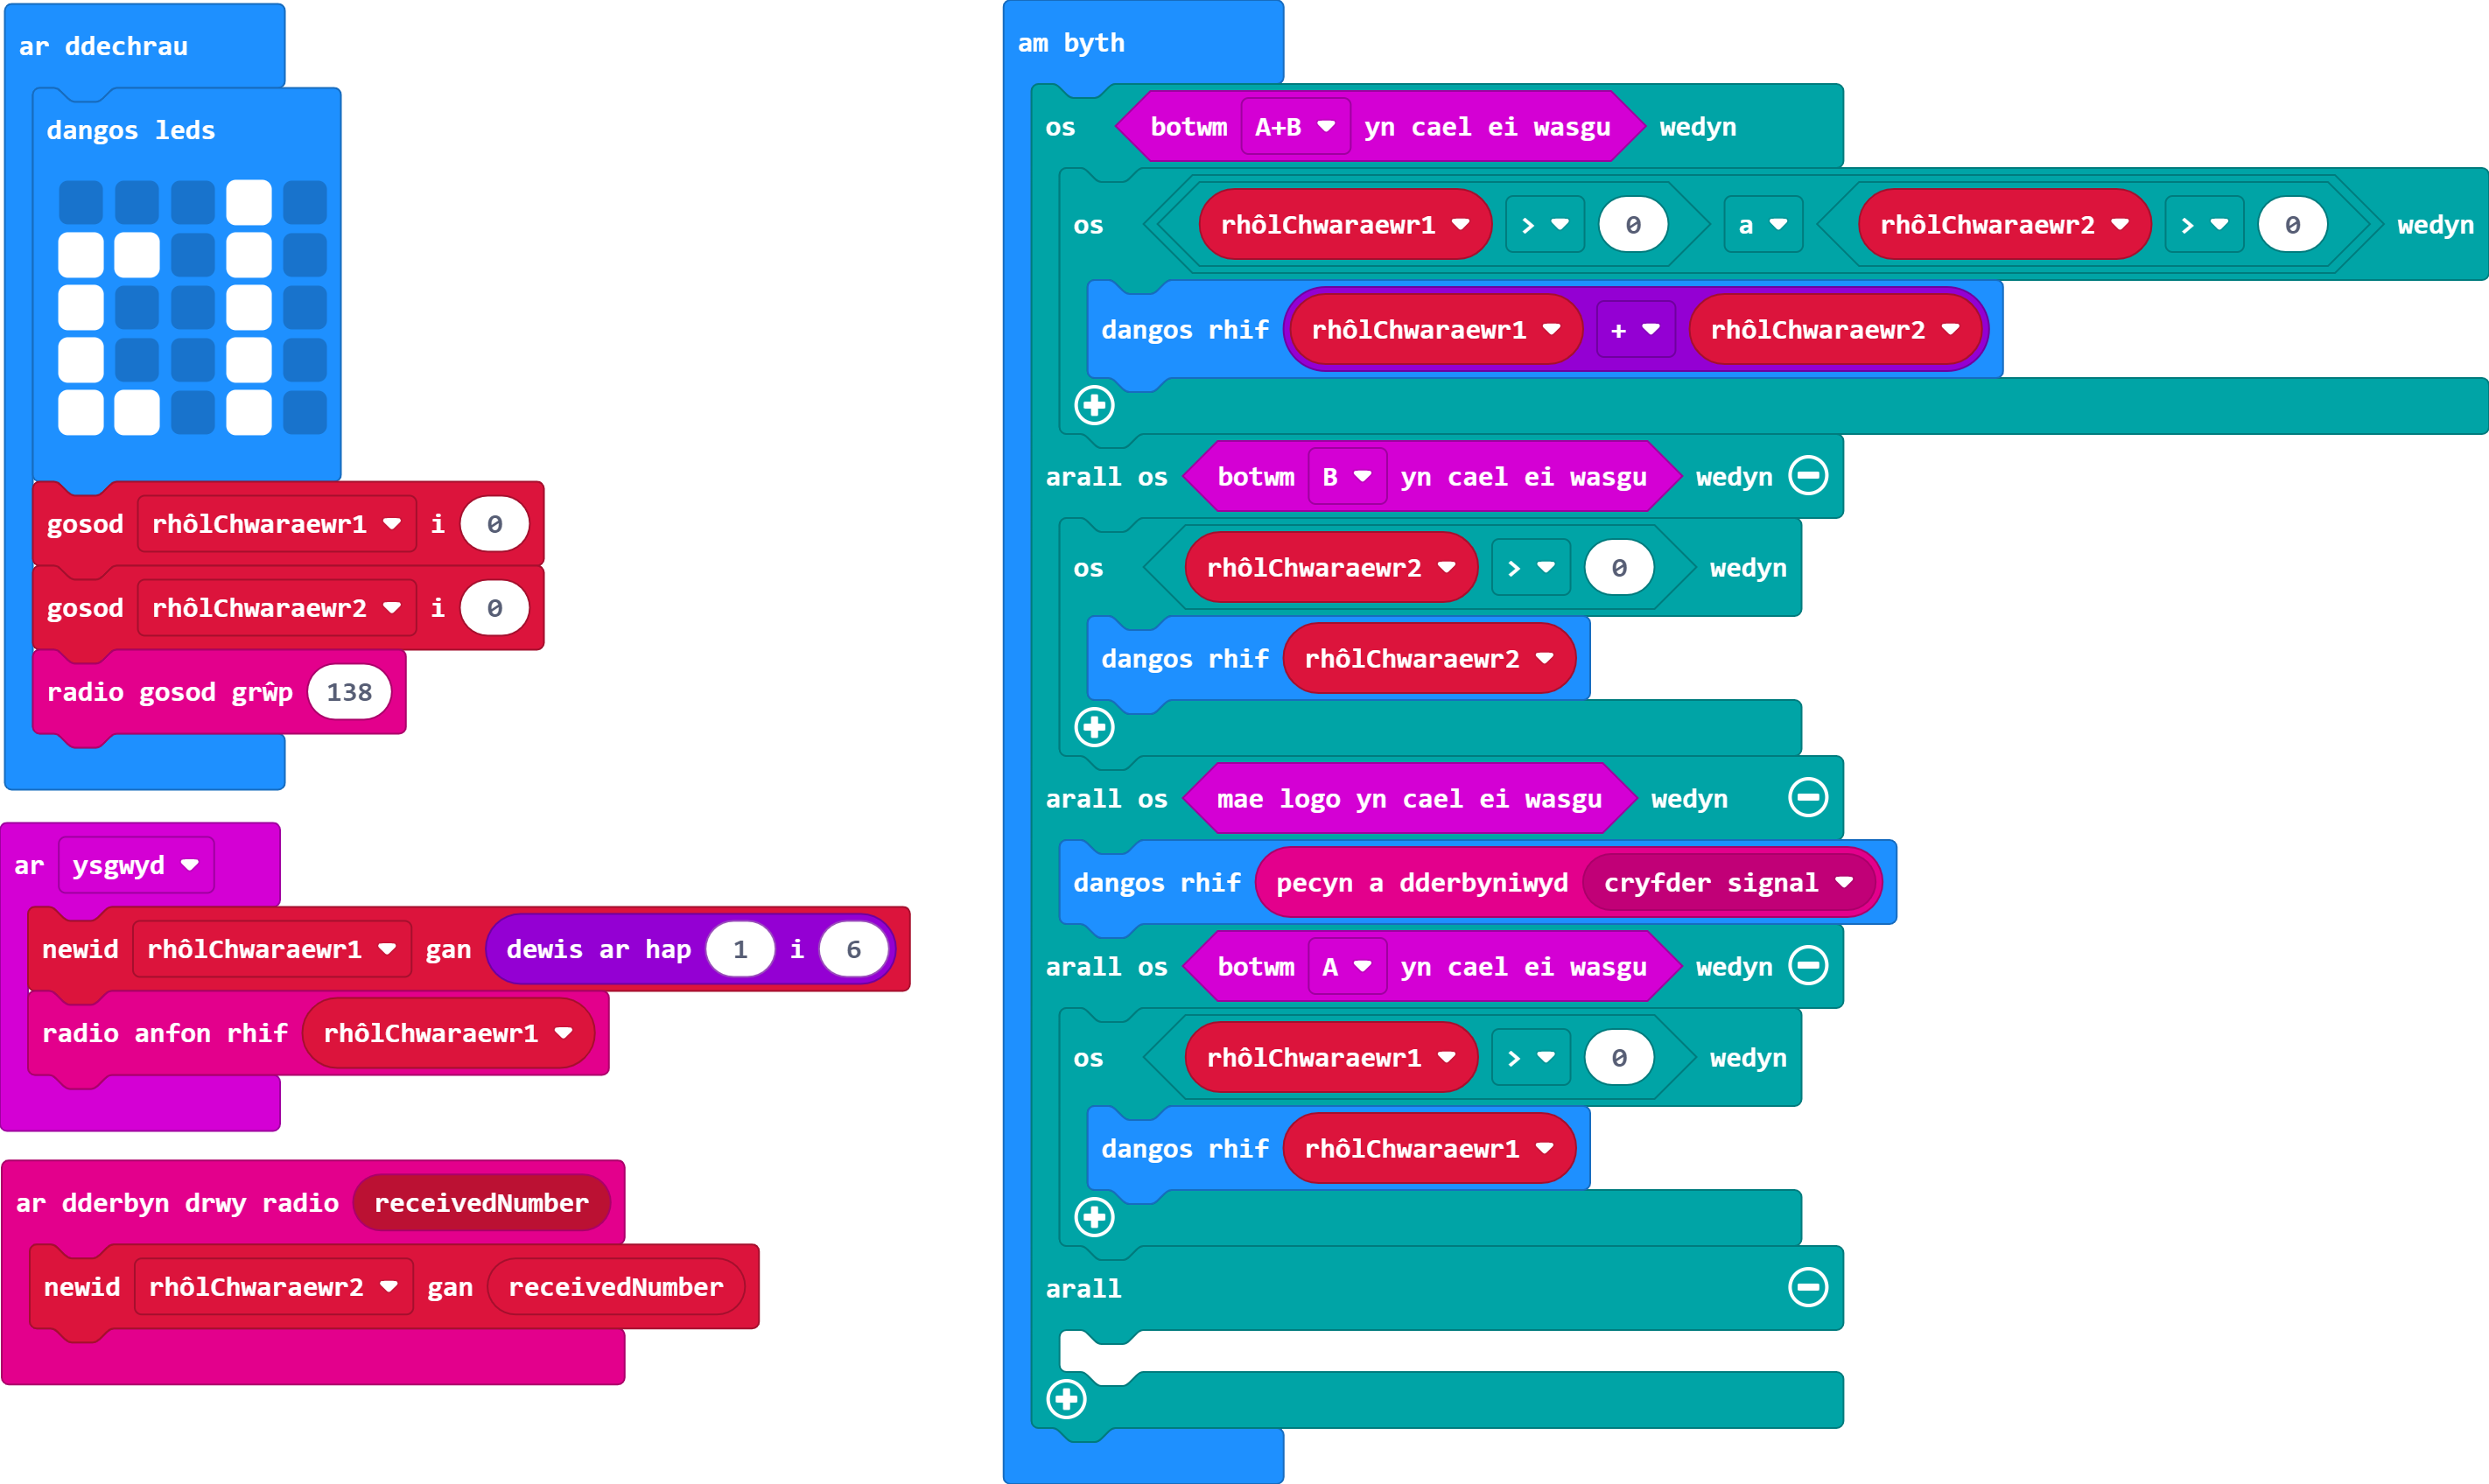
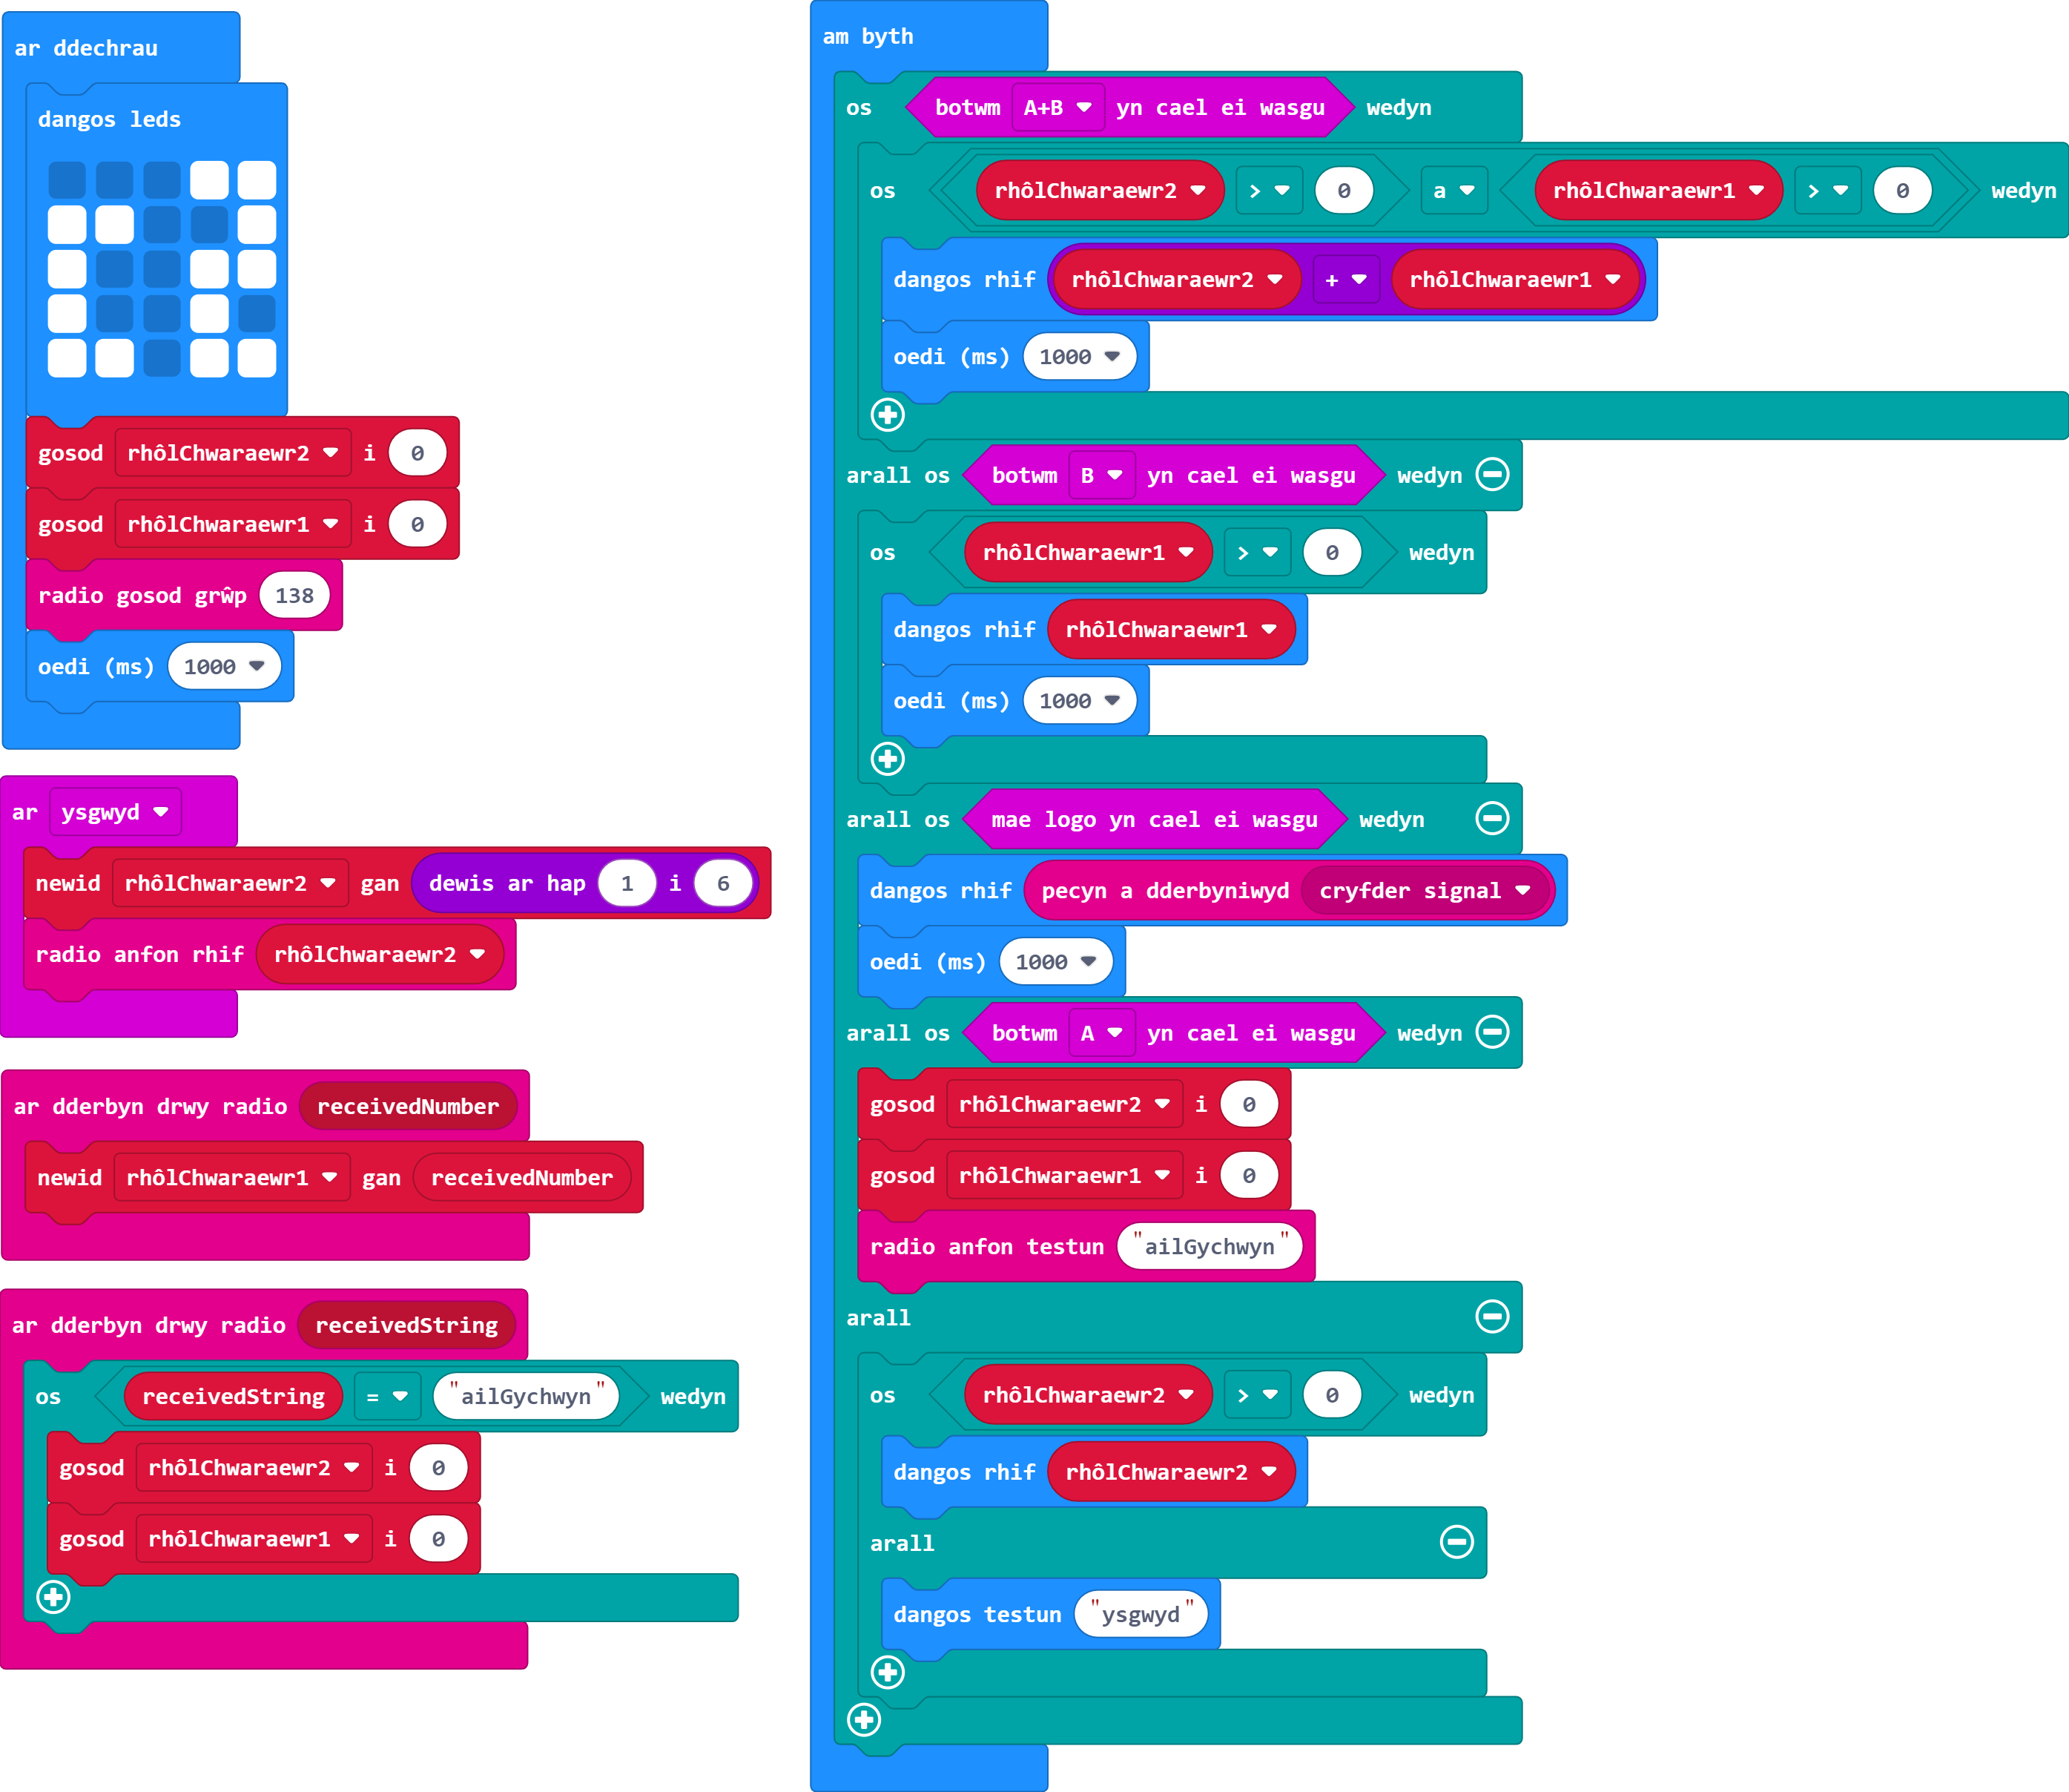
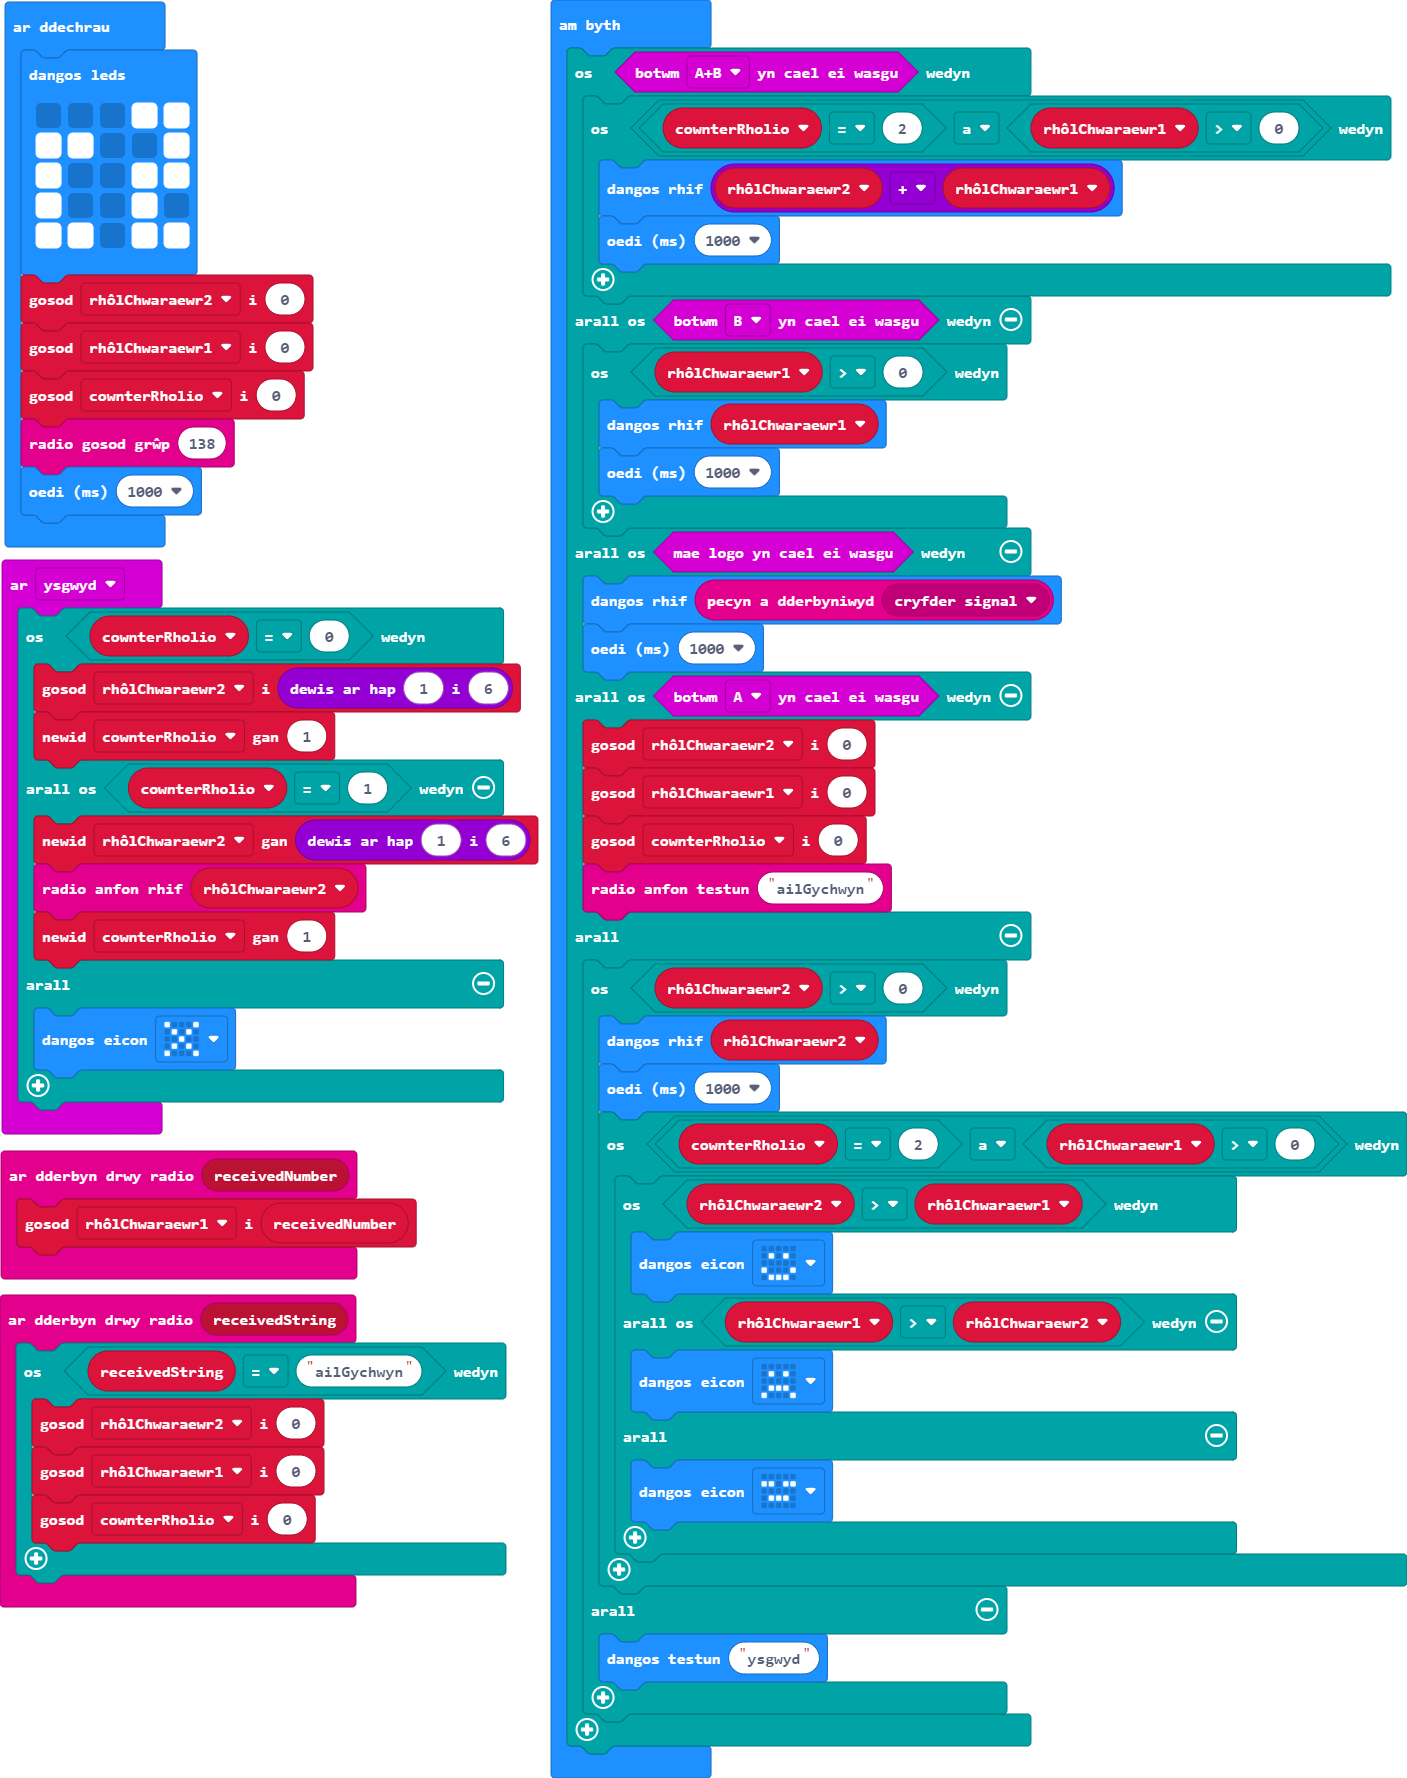
Ar gyfer y sesiwn hon byddwn ni'n creu gêm gornest dis ar gyfer dau chwaraewr gan ddefnyddio dau BBC Micro:Bit. Rydym yn argymell defnyddio'r multi-editor ar gyfer yr ymarferion hyn. Enwch y rhaglen ar y chwith yn Chwaraewr Un a'r rhaglen arall yn Chwaraewr Dau.
Fel sy'n wir am bob un o'n hymarferion, mae dysgwyr yn cwblhau un lefel cyn symud i'r nesaf. Oni wneir hynny, mae'n bosibl y bydd dysgwyr yn methu derbyn gwybodaeth neu'n hepgor cam hanfodol sy'n atal y rhaglen rhag gweithio.
Cliciwch ar bennawd pob her i gael y manylion.
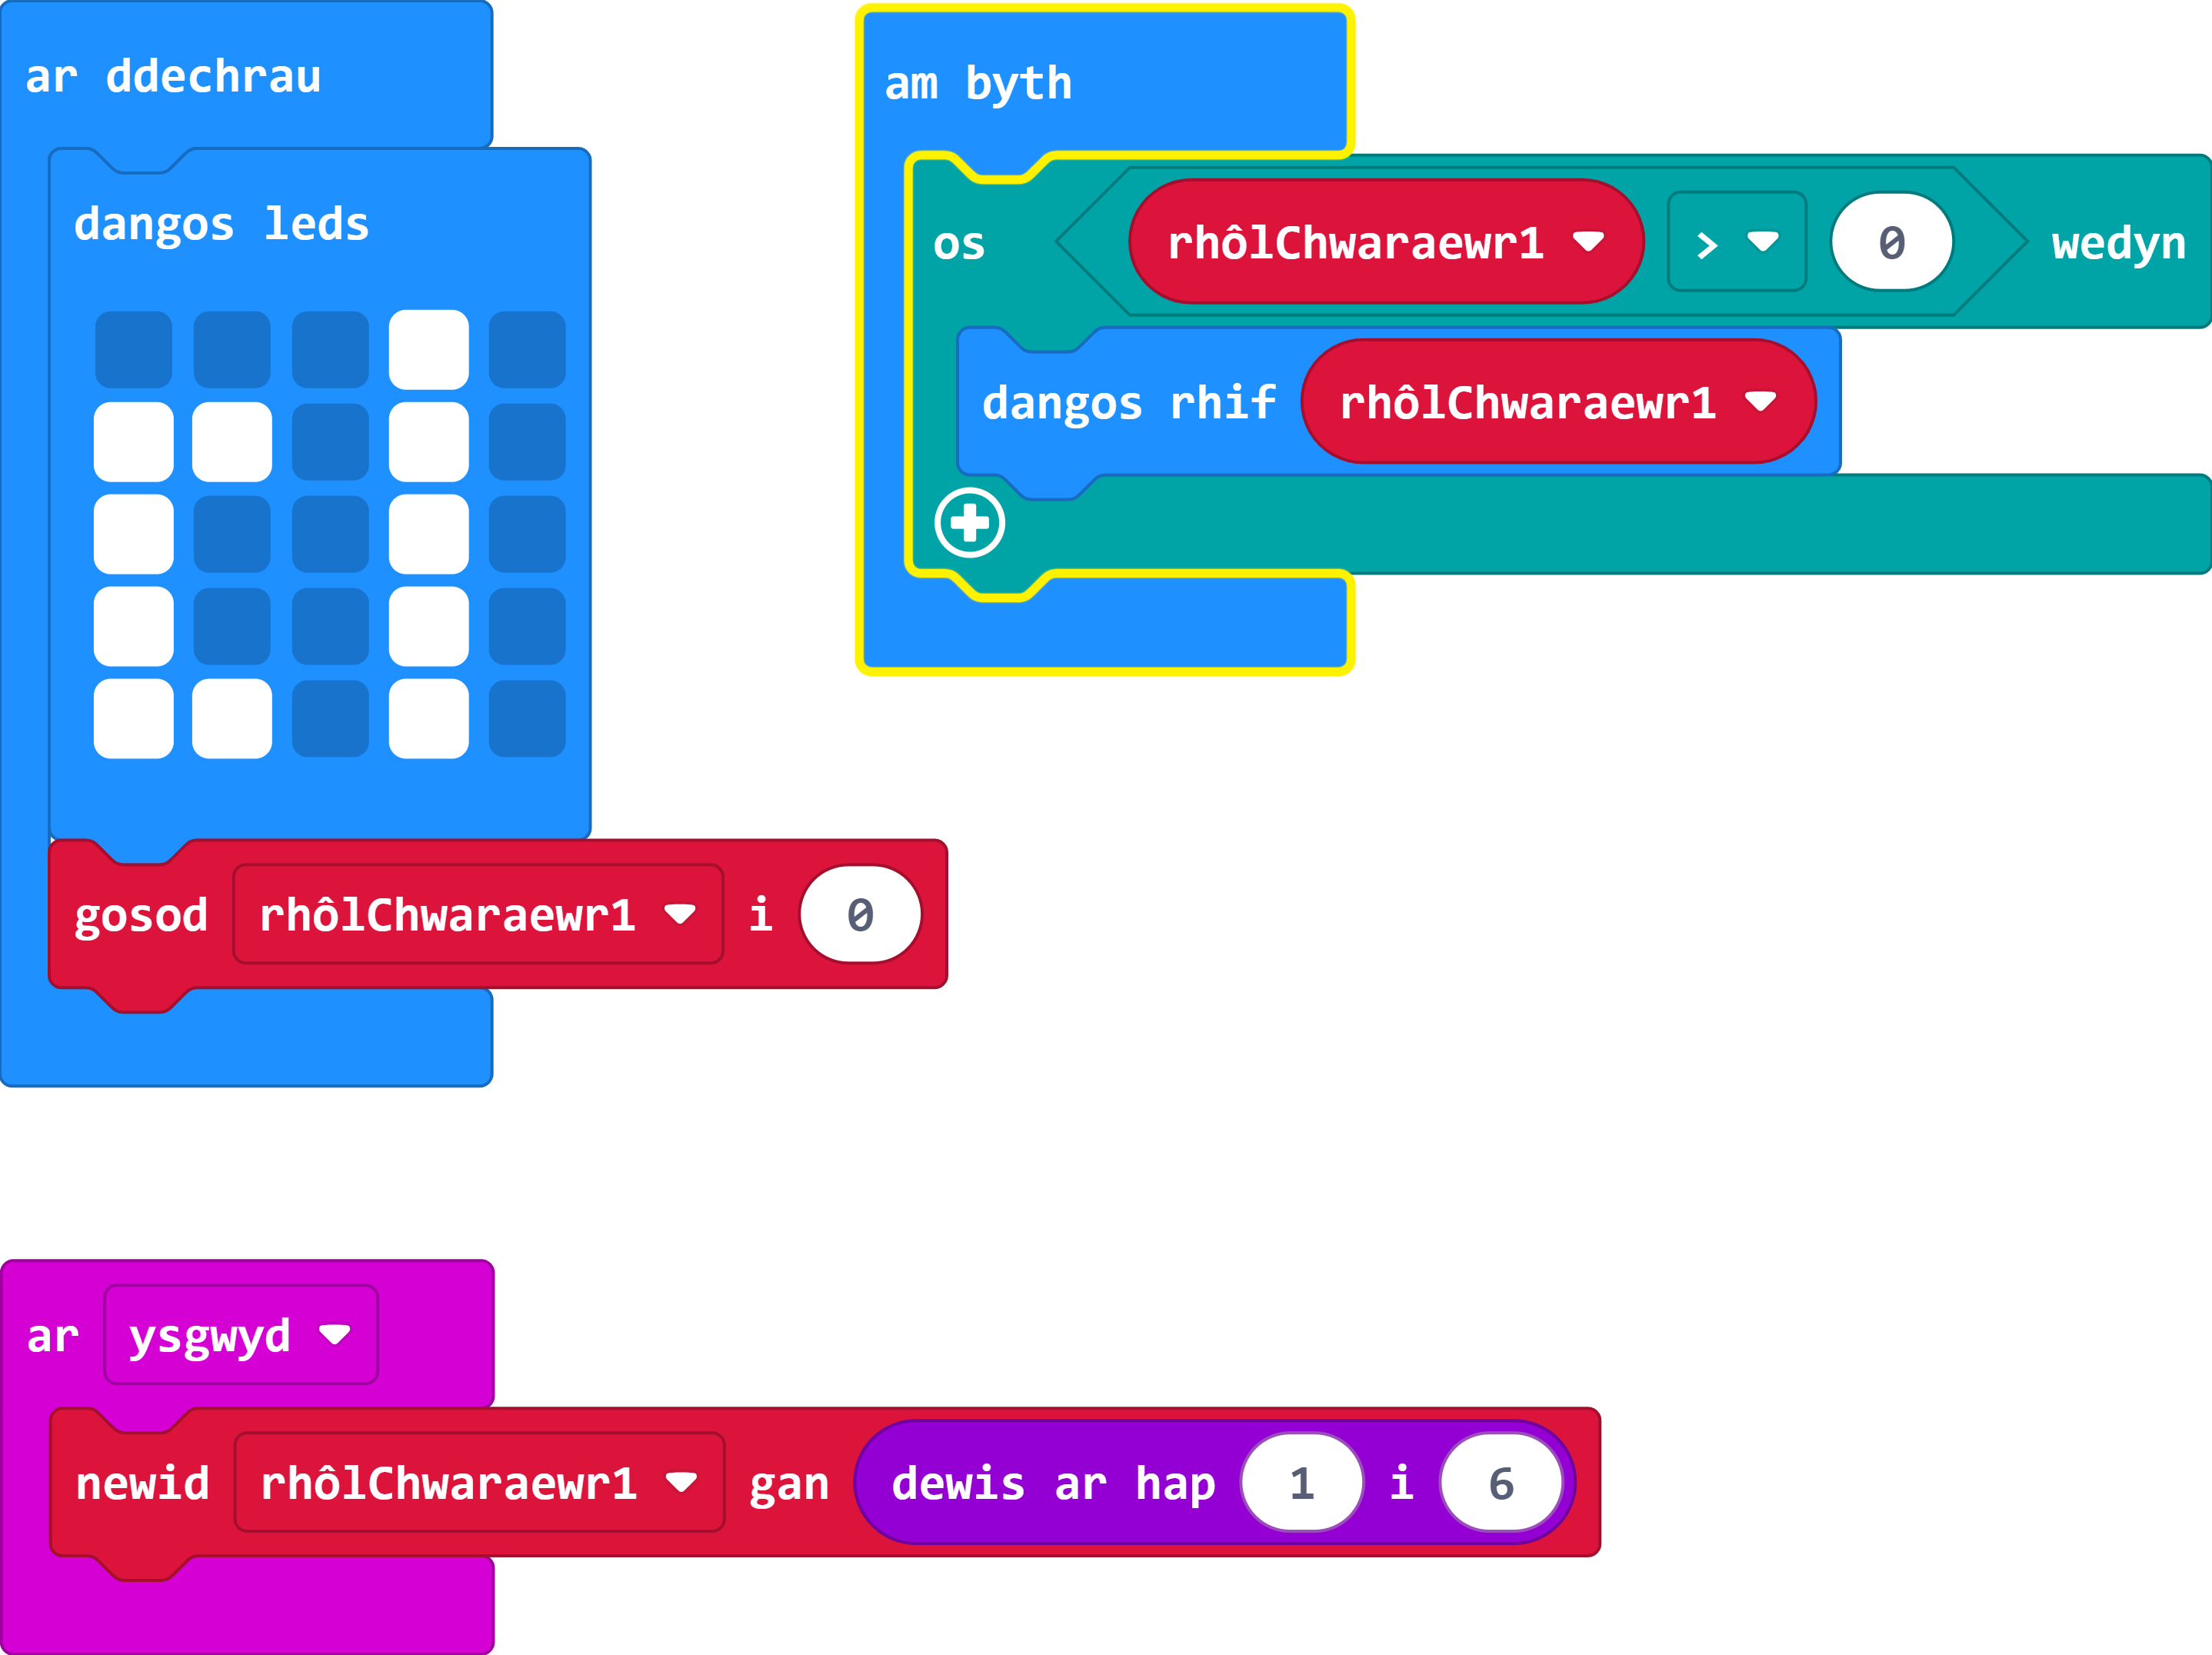
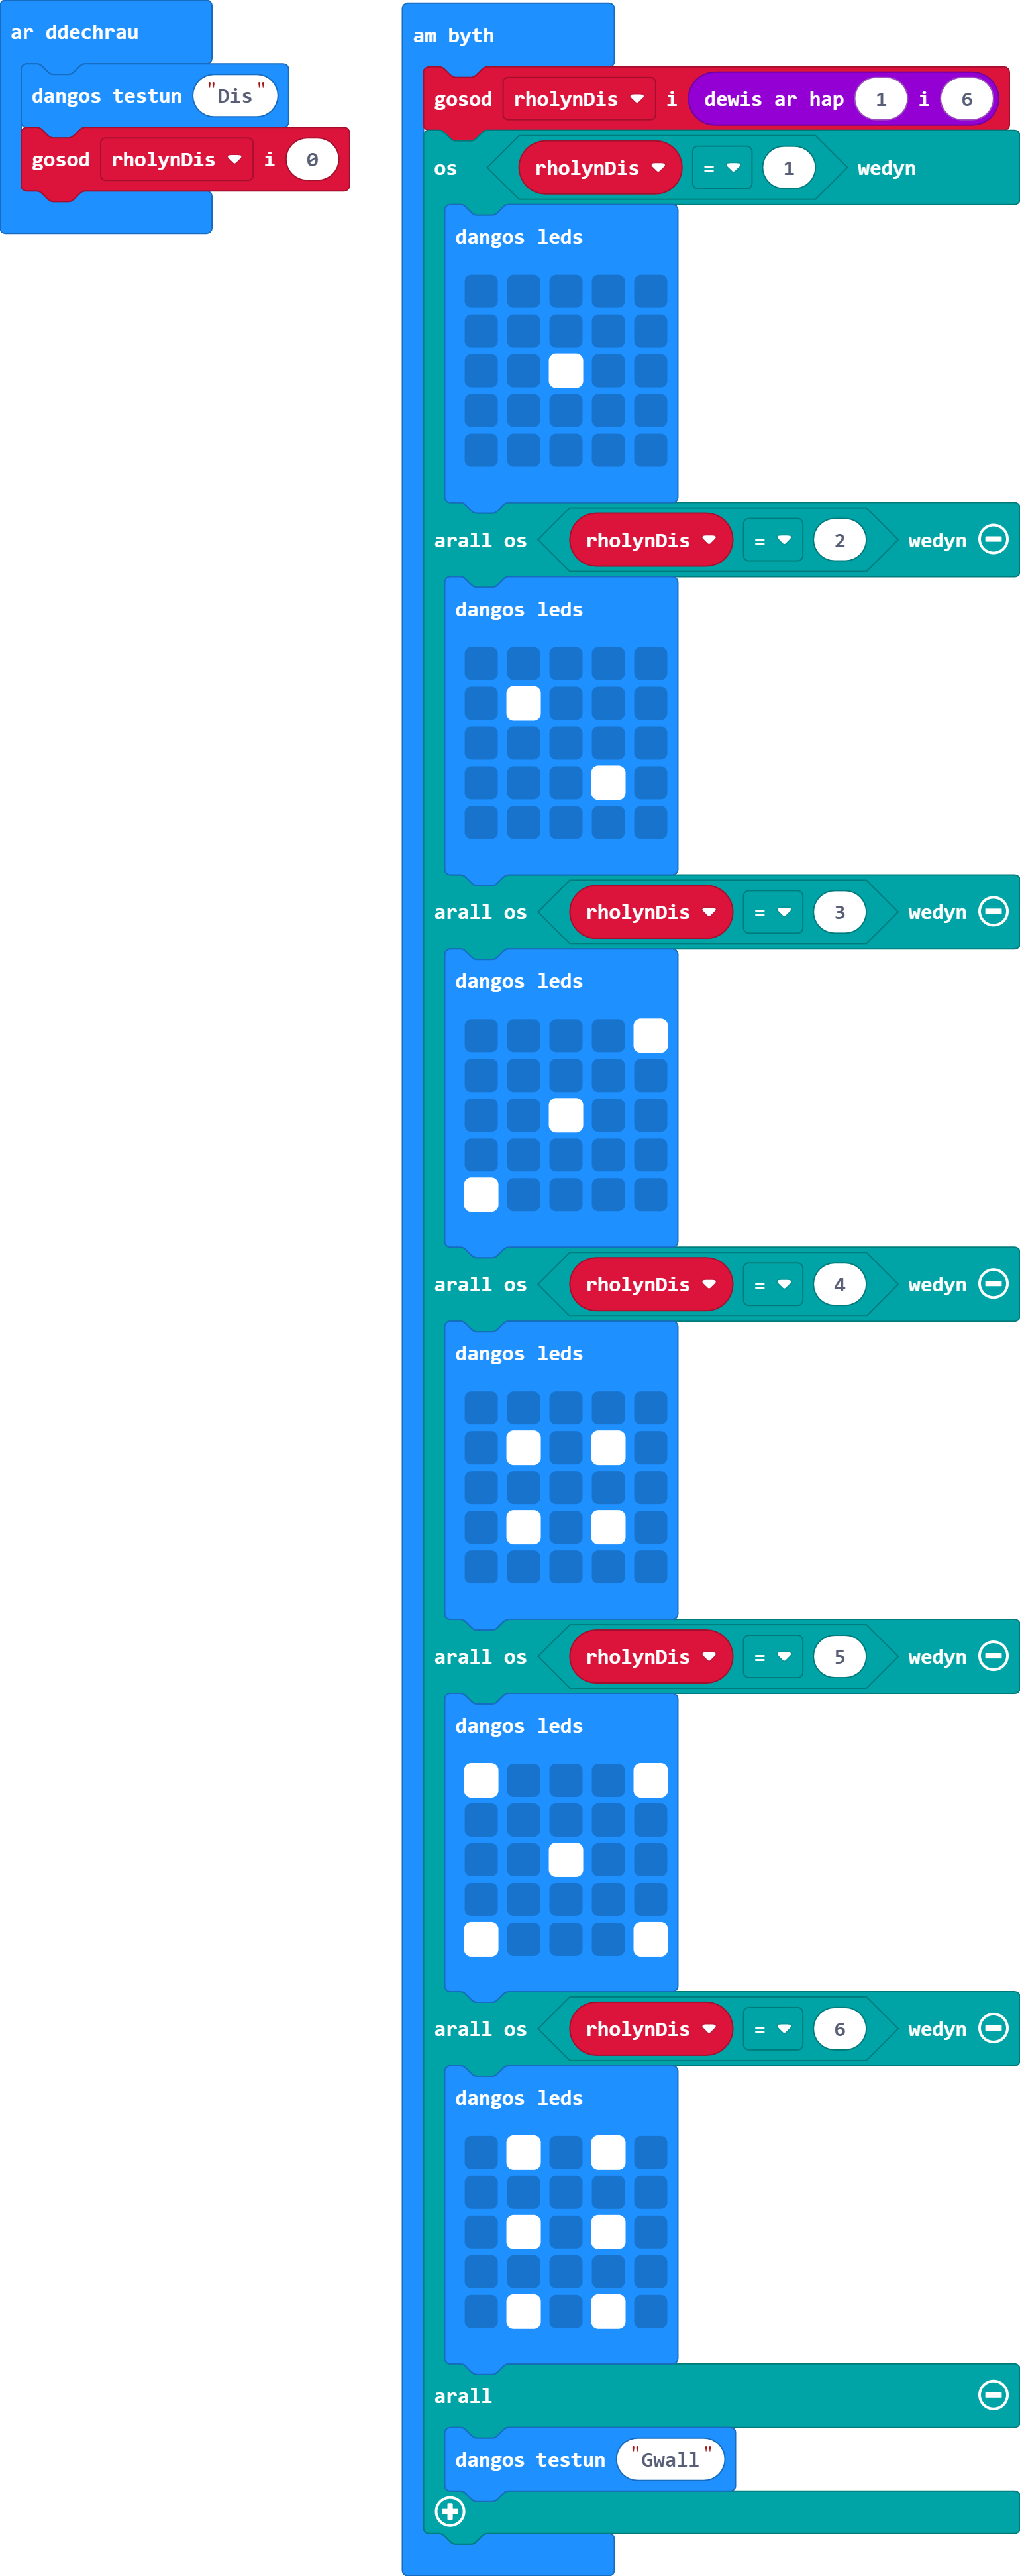
Ewch ati i raglennu'r ddau Micro:Bit i ddangos rhif ar hap rhwng 1 a 6 bob tro y caiff ei ysgwyd - fel rholio dis.
Gair o gyngor: Er mwyn osgoi ymyrraeth rhwng dolenni, mae angen i'r holl allbynnau fod y tu mewn i'r ddolen am byth.
Roedd y fideo ar gyfer Sesiwn Dau yn cynnwys gwybodaeth am sut i greu rhaglen ddis sylfaenol.
Defnyddiwch enw newidyn rholio dis gwahanol ar gyfer pob chwaraewr - bydd hyn yn lleihau dryswch yn nes ymlaen.
Dim ond ar ôl rholio'r dis am y tro cyntaf y byddwch am i werth y dis ddangos (felly pan nad yw'r newidyn yn 0 bellach).
Chwaraewr Un
Chwaraewr Dau
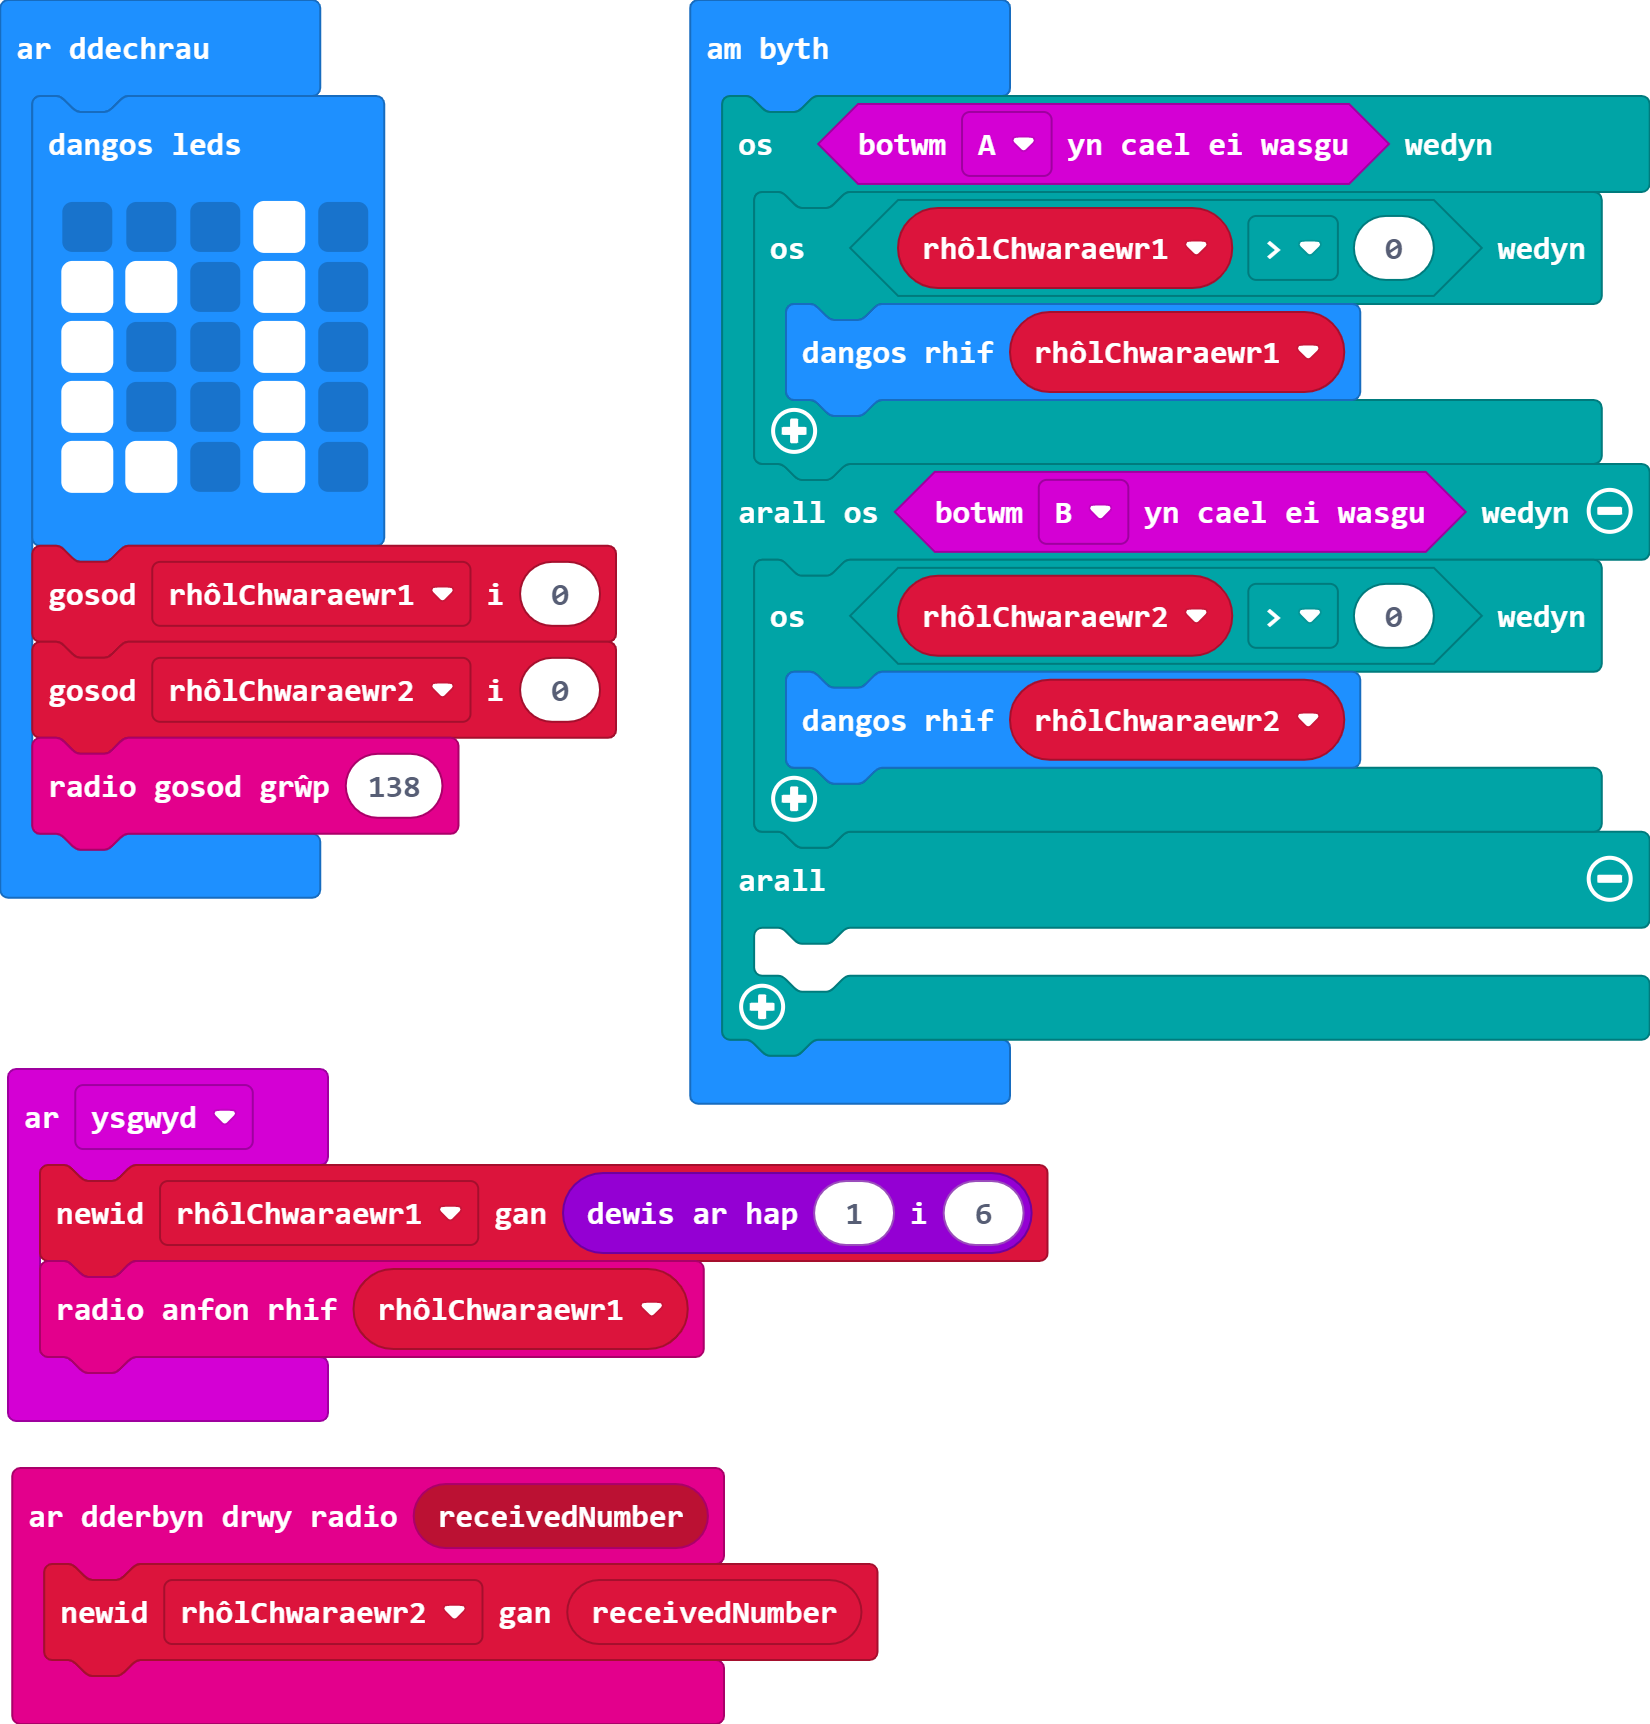
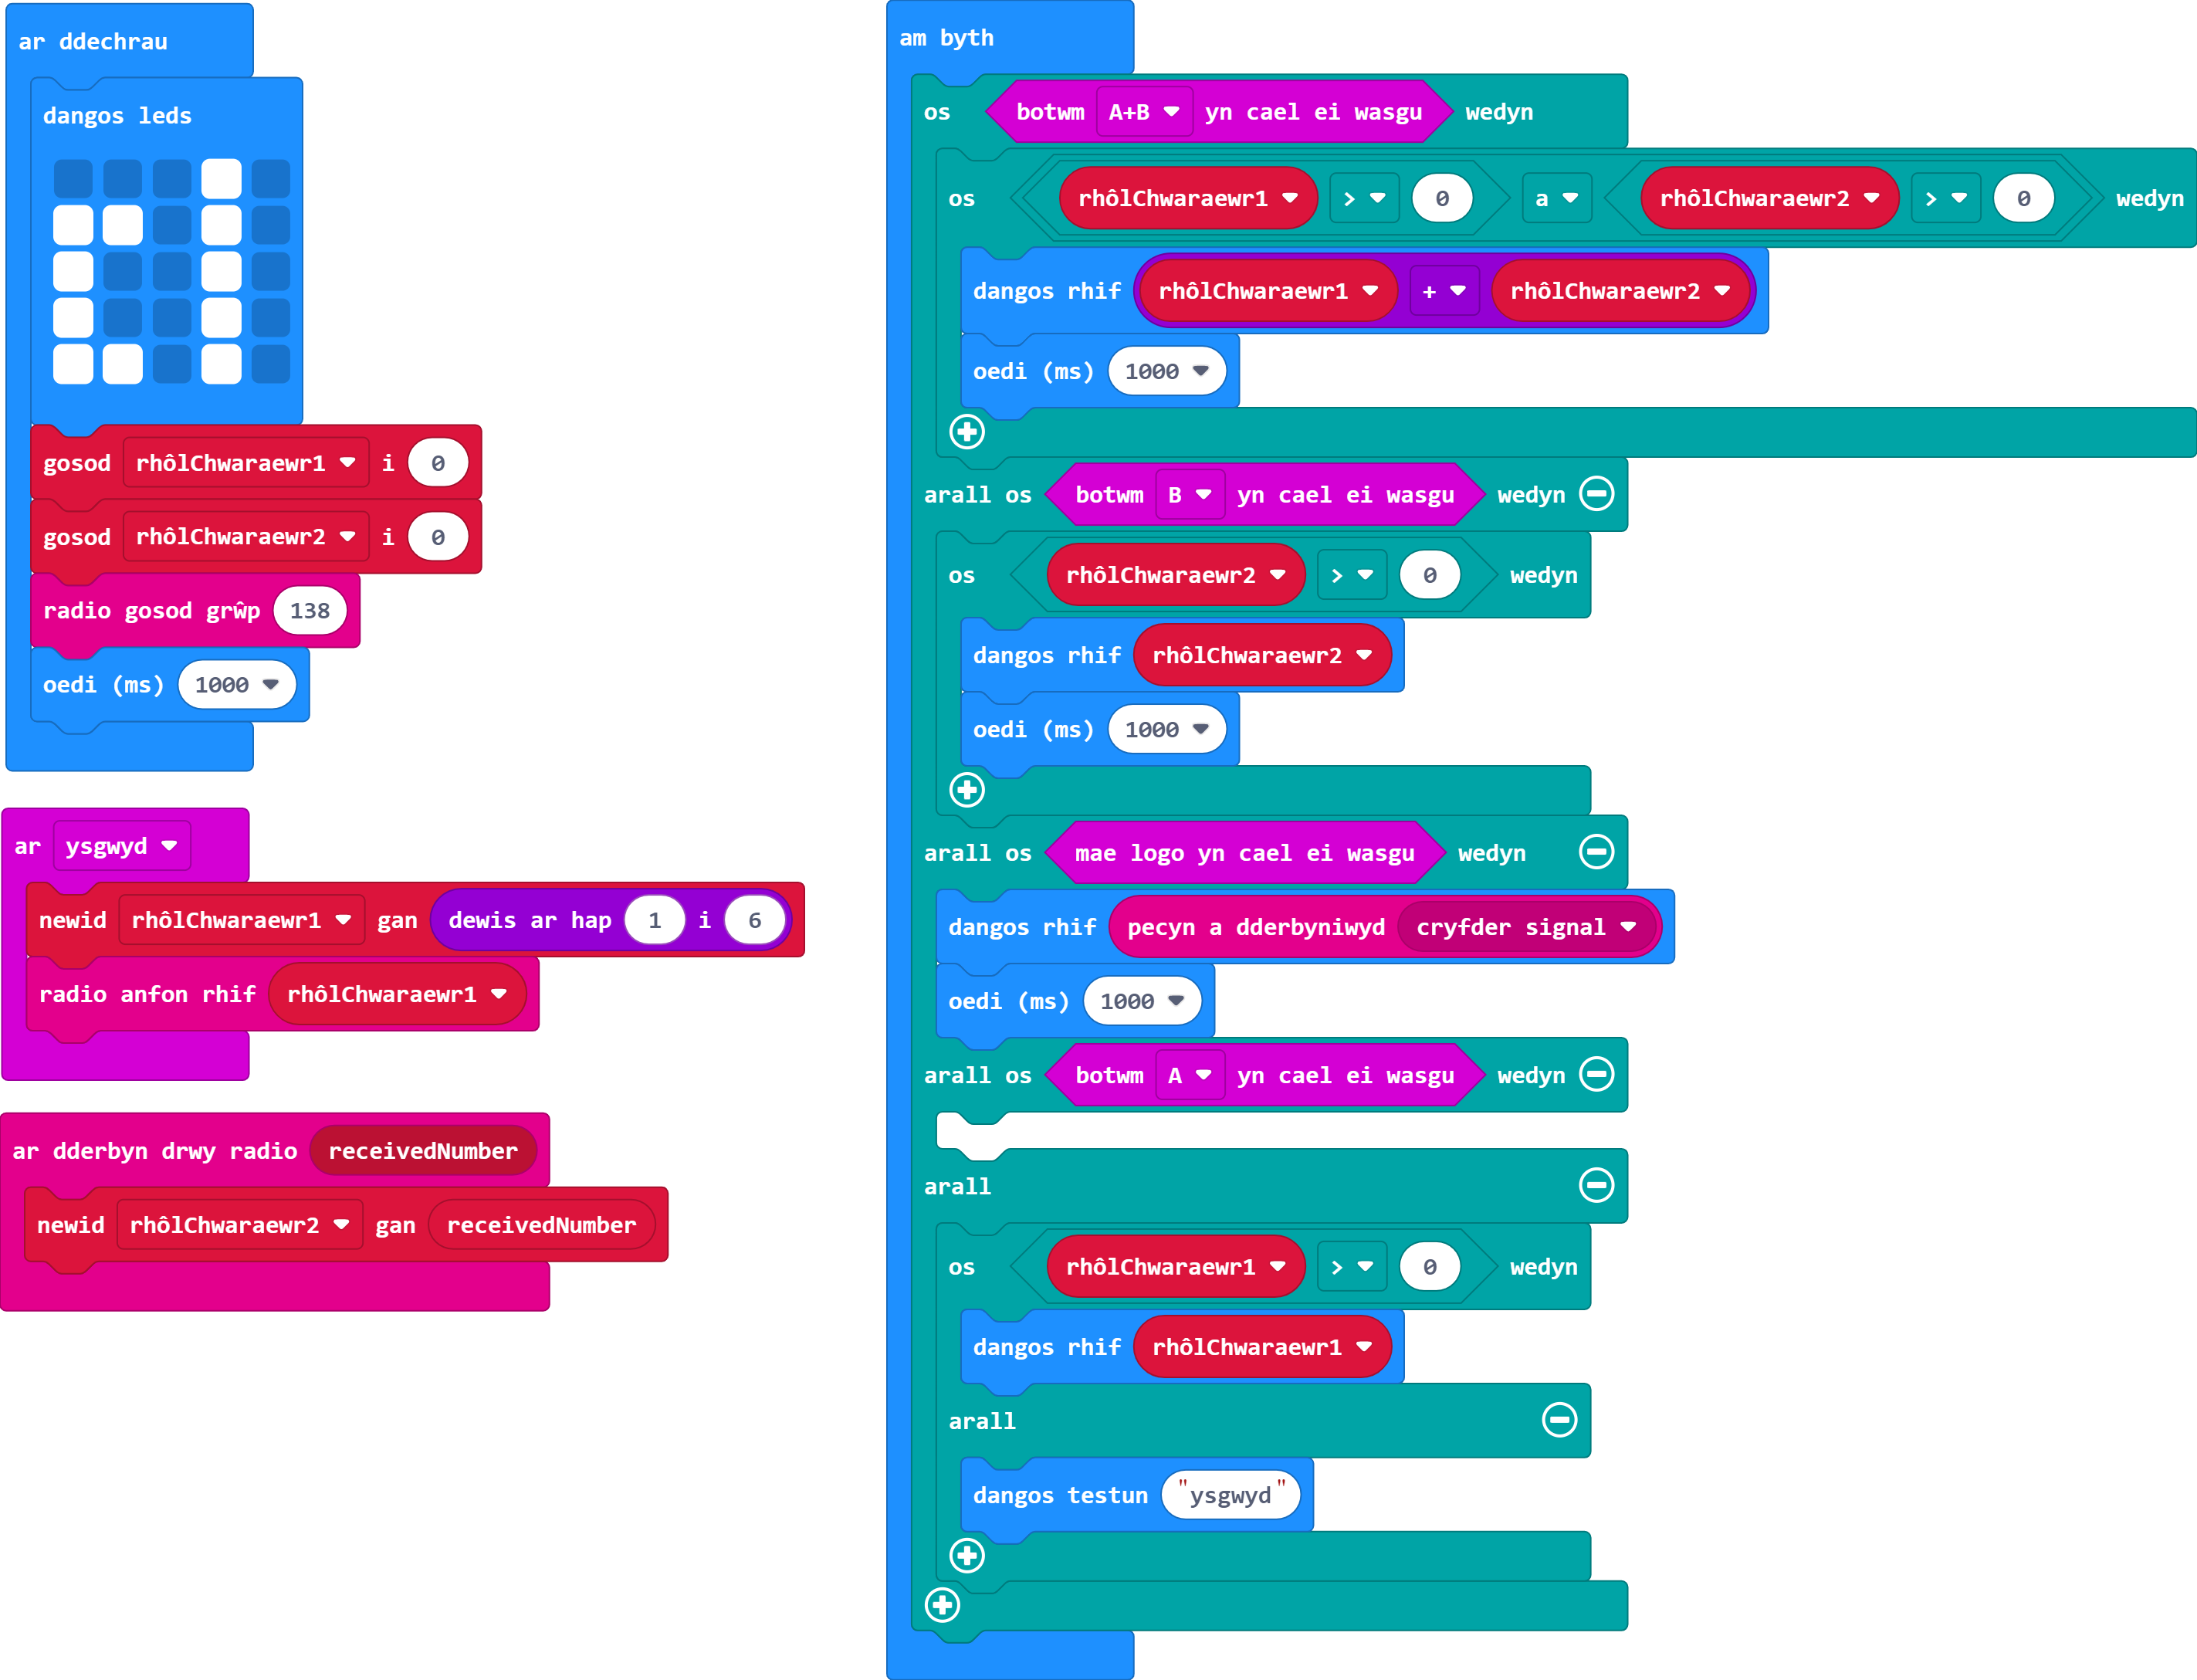
Ar gyfer Chwaraewr Un, gwnewch i fotwm A ddangos eich sgôr diwethaf ar ôl rholio'r dis tra bod botwm B yn dangos sgôr diwethaf y chwaraewr arall. Gwnewch yr un peth ar gyfer Chwaraewr Dau.
Gair o gyngor: Cofiwch osod y ddau Micro:Bit yn yr un grŵp radio er mwyn iddynt allu siarad â'i gilydd - dylid gwneud hyn yn ystod y dilyniant cychwyn.
Defnyddiwch os-datganiadau y tu mewn i'r ddolen am byth er mwyn pwyso botwm, yn hytrach na'r blociau 'ar fotwm A wedi'i wasgu' neu 'ar fotwm B wedi'i wasgu' ar wahân.
Cofiwch, gallwch bentyrru os-datganiadau y tu mewn i'w gilydd.
Gallwch greu arall-datganiad nad yw'n cynnwys unrhyw beth, neu gallwch ei ddefnyddio i adrodd gwall.
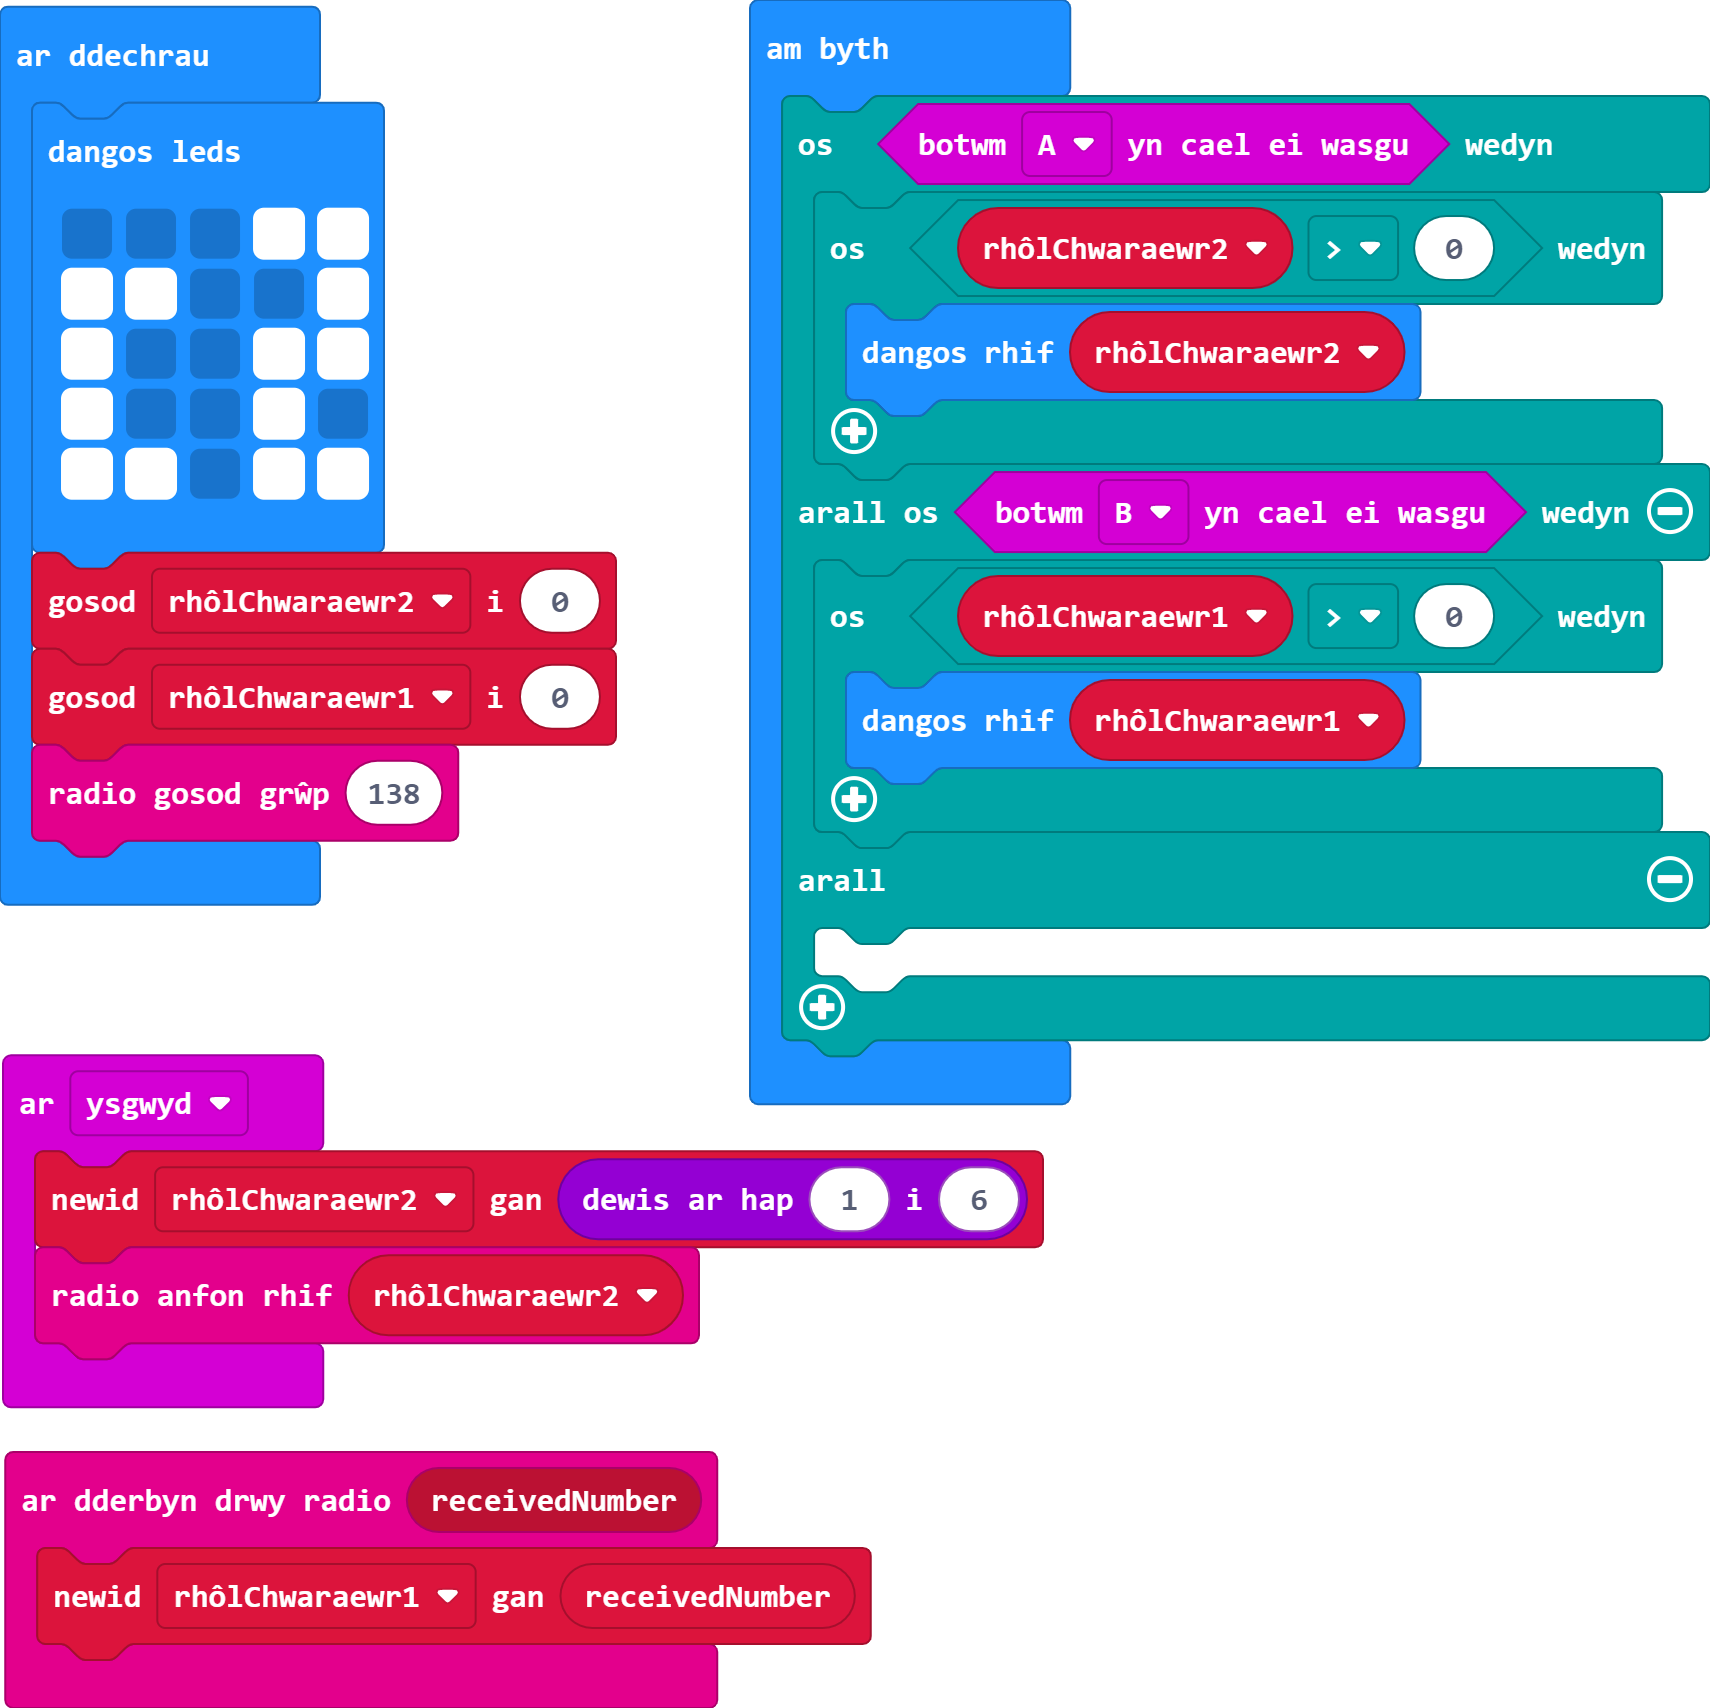
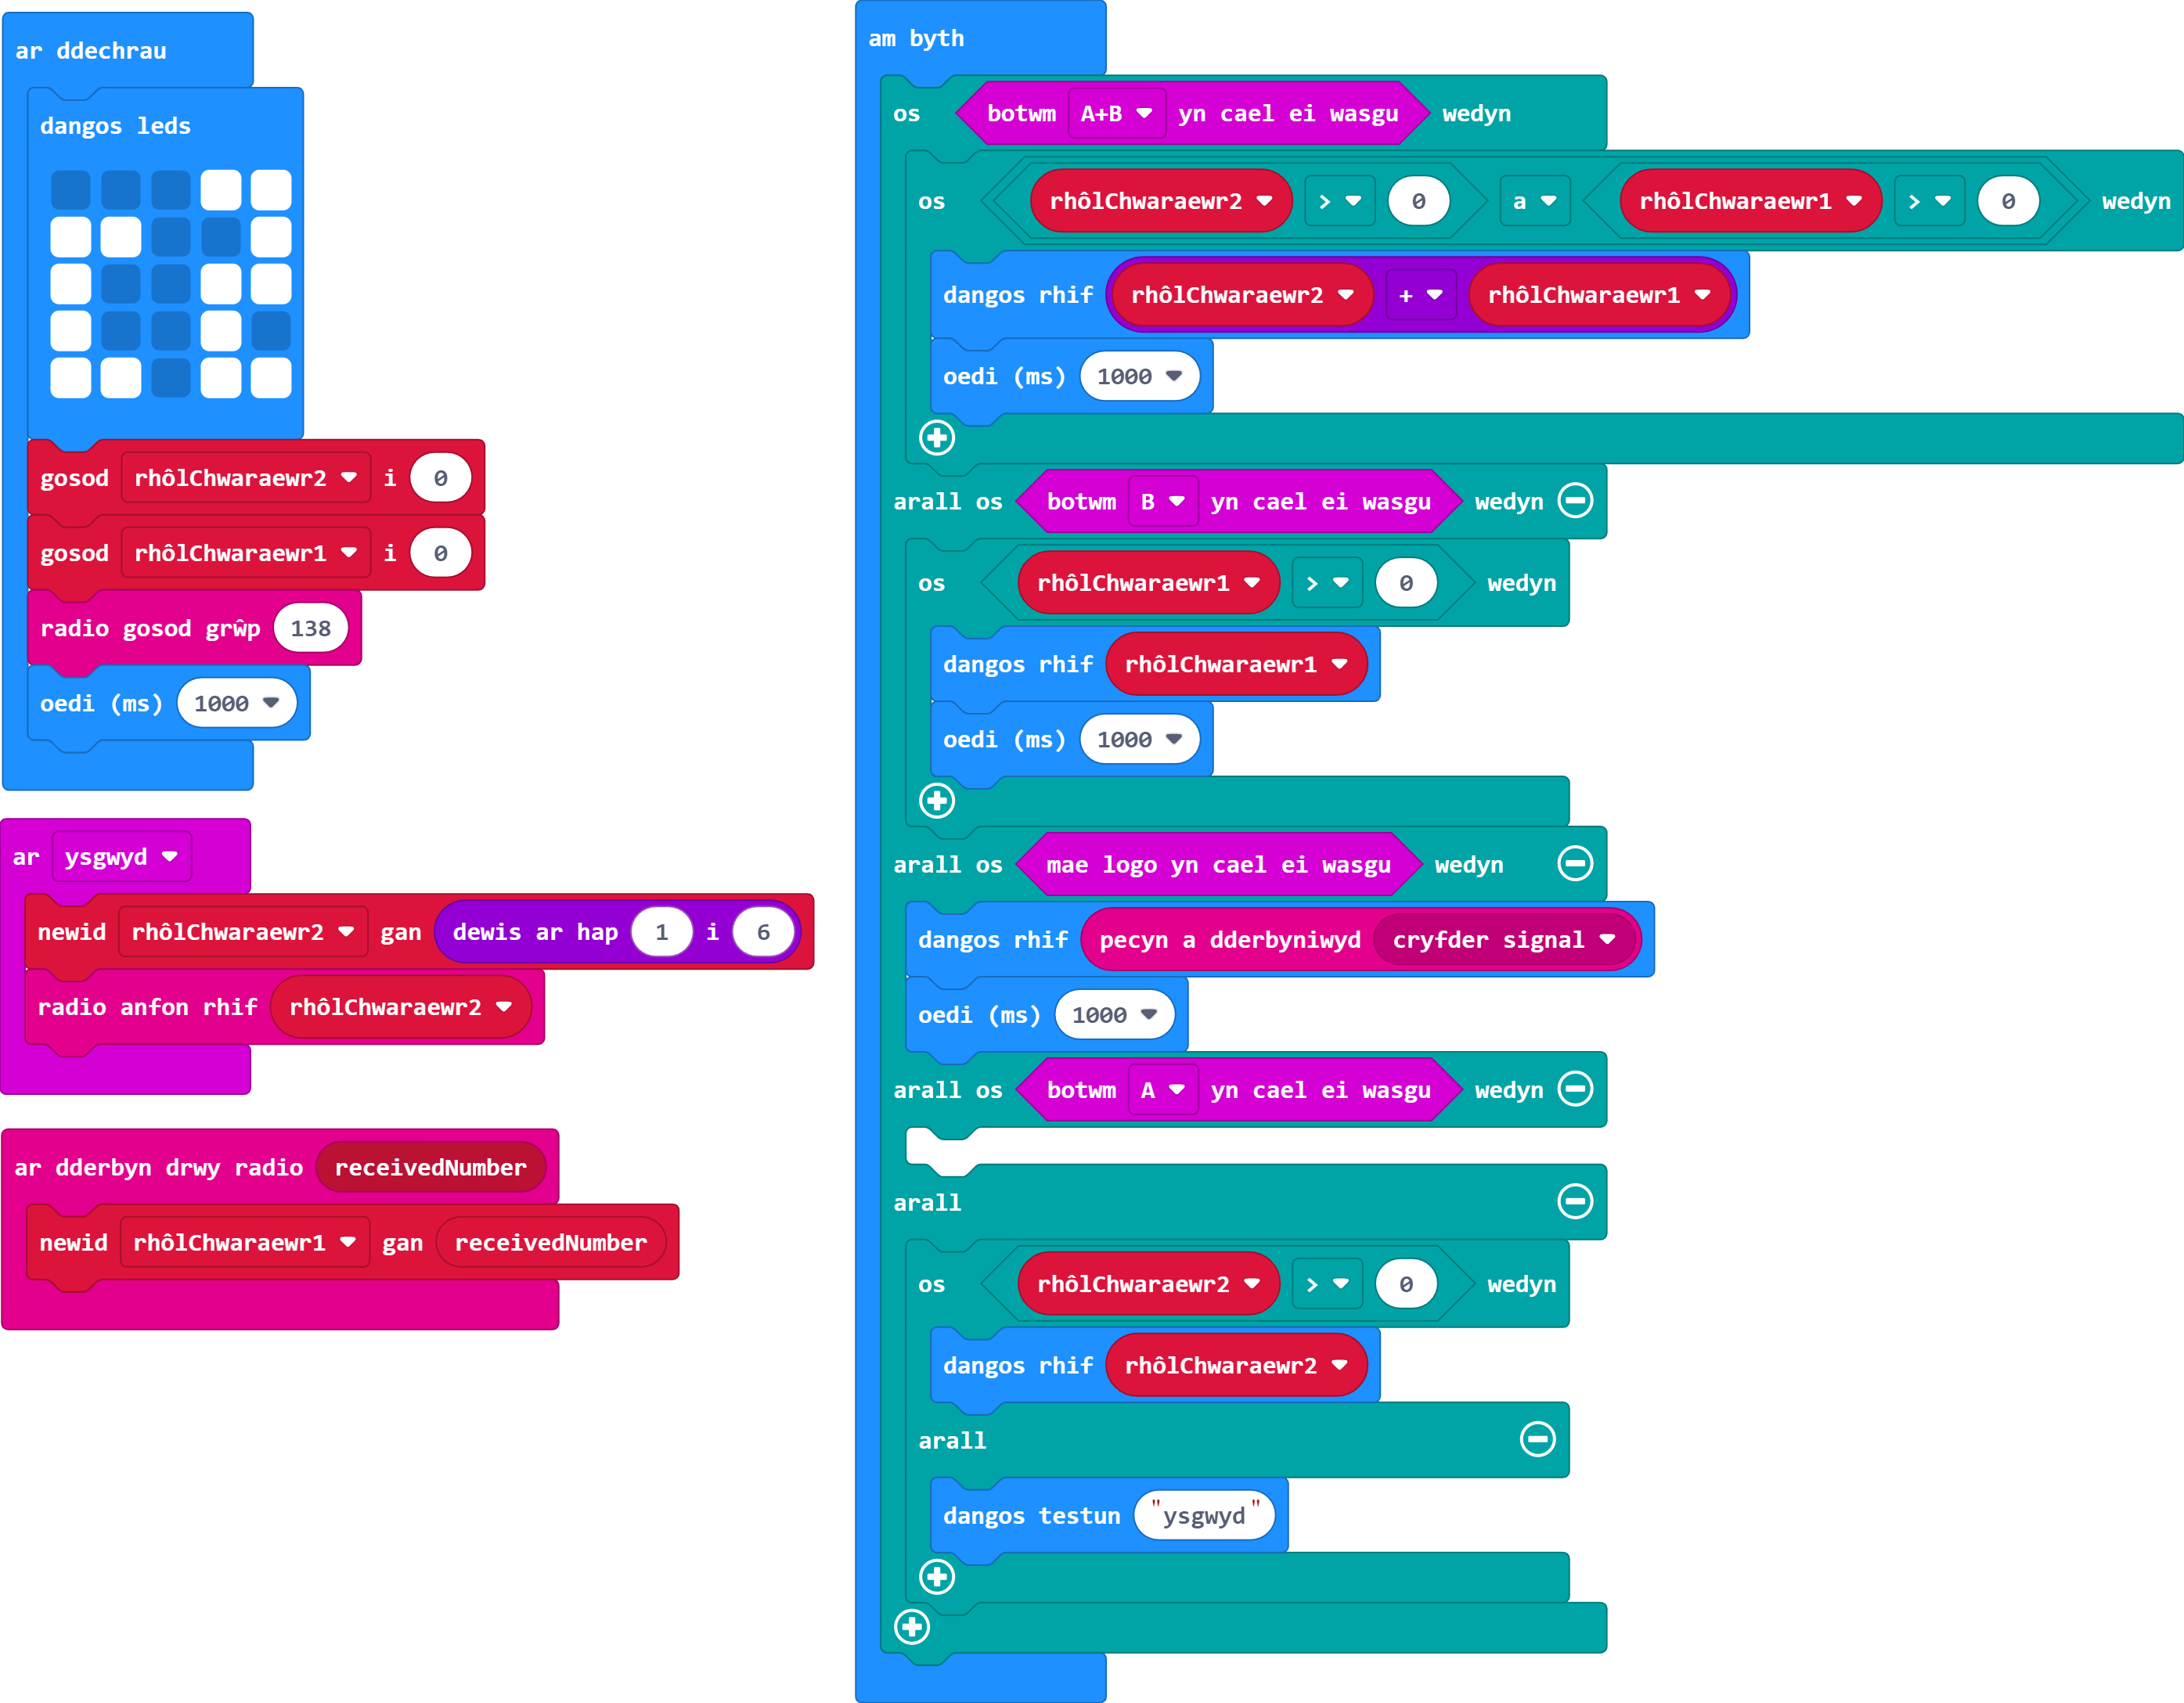
Chwaraewr Un
Chwaraewr Dau
Pan fydd y naill chwaraewr neu'r llall yn pwyso'r logo cyffwrdd, gwnewch i'r sgrin ddangos cryfder y signal.
Mae'r logo cyffwrdd ar gael ar Micro:Bit V2 yn unig - felly edrychwch ar adran V2 o'r ddewislen fewnbynnu.
Mae'n anodd profi hwn yn yr efelychydd oherwydd dim ond pan fydd yn anfon gwybodaeth y gellir newid cryfder y signal (yn yr achos hwn pan fyddwn yn ei ysgwyd).
Chwaraewr Un
Chwaraewr Dau
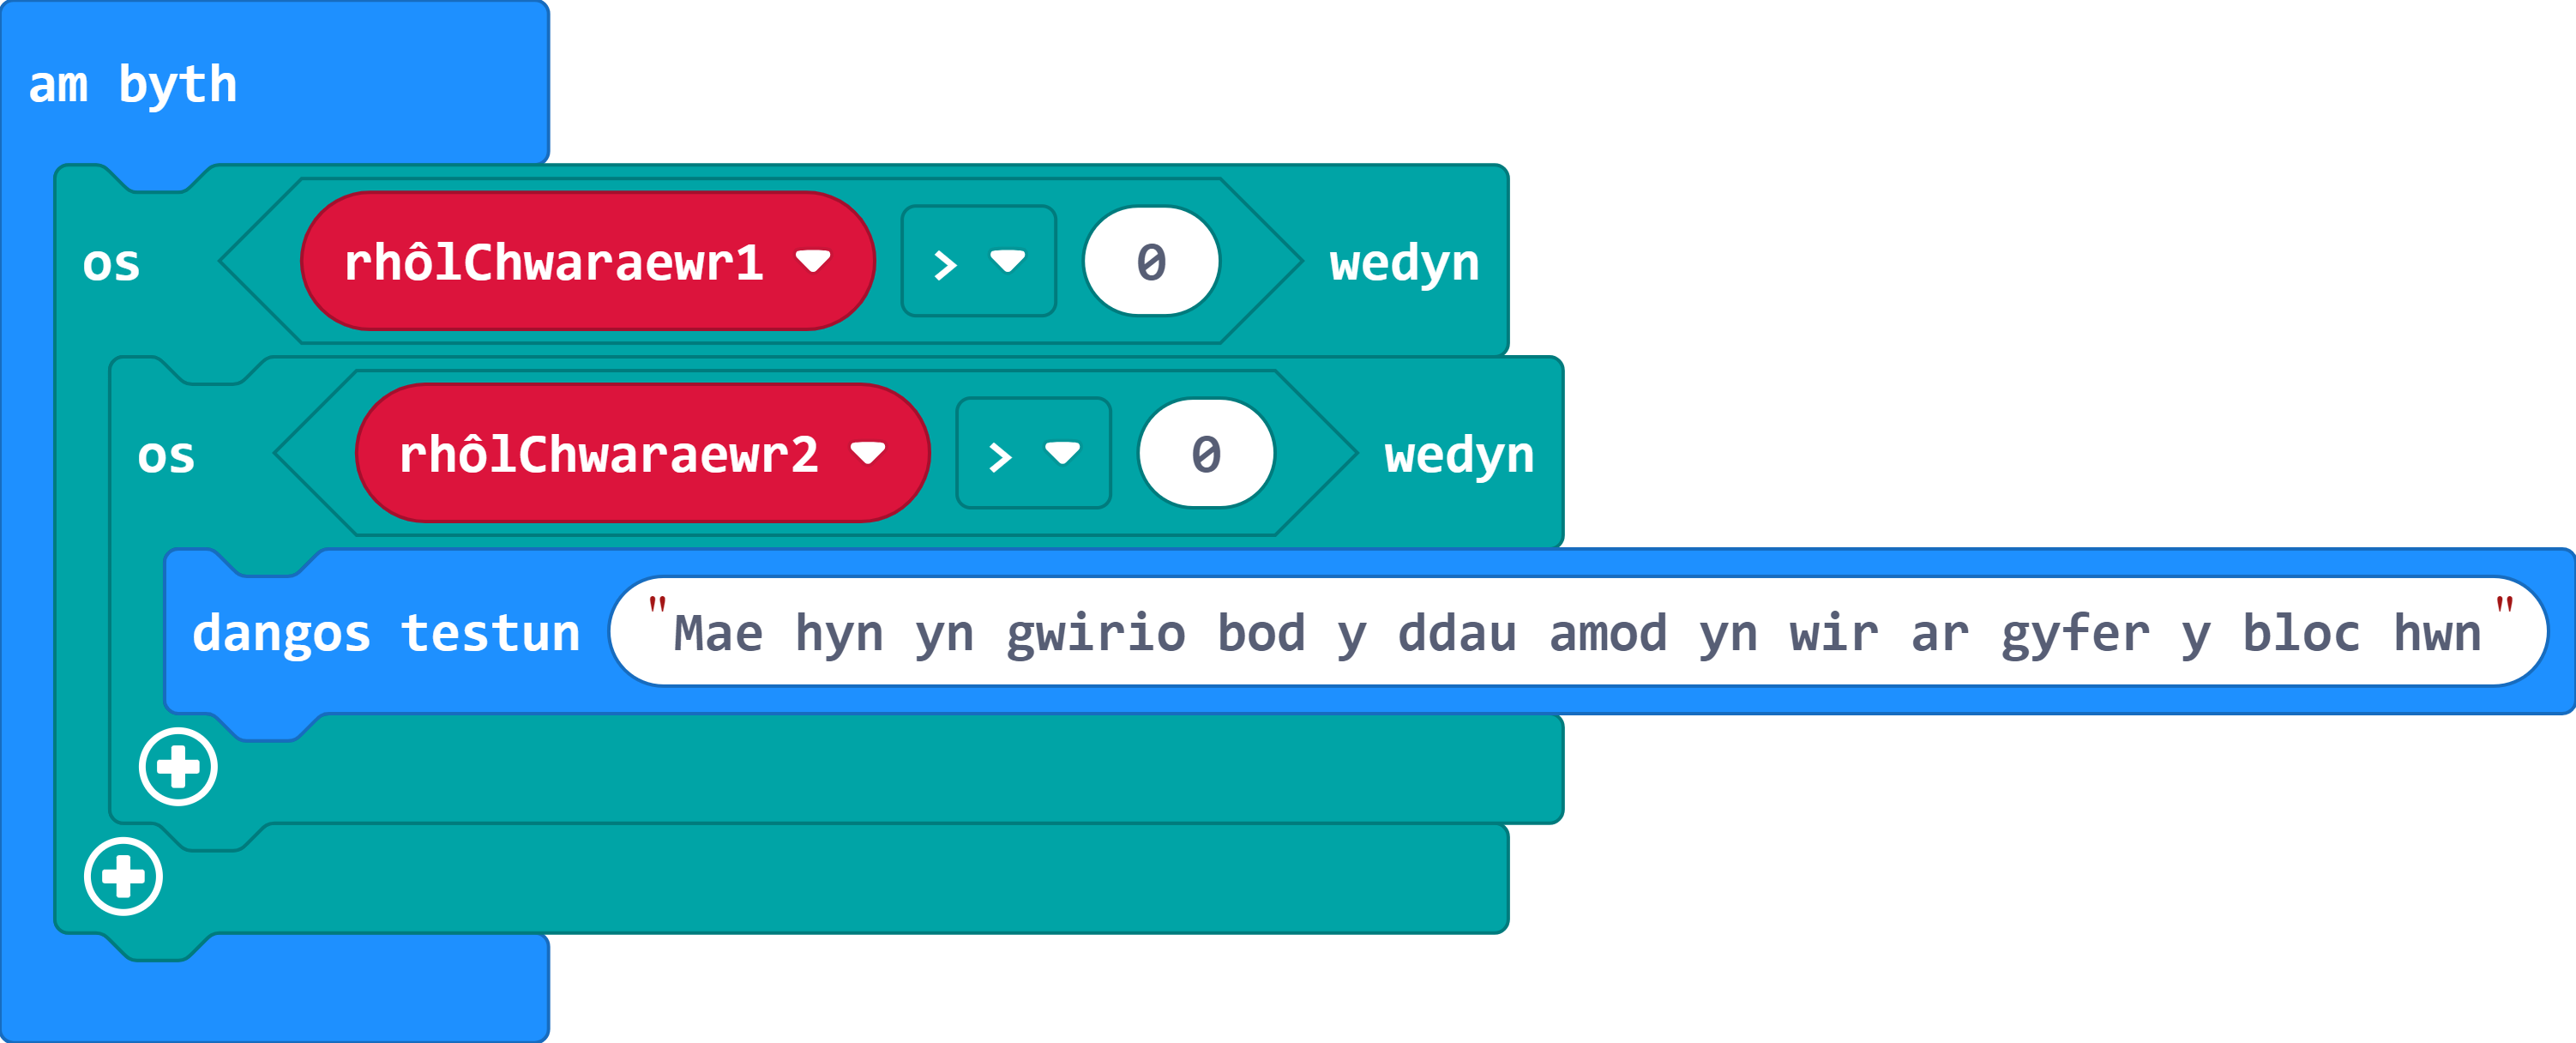
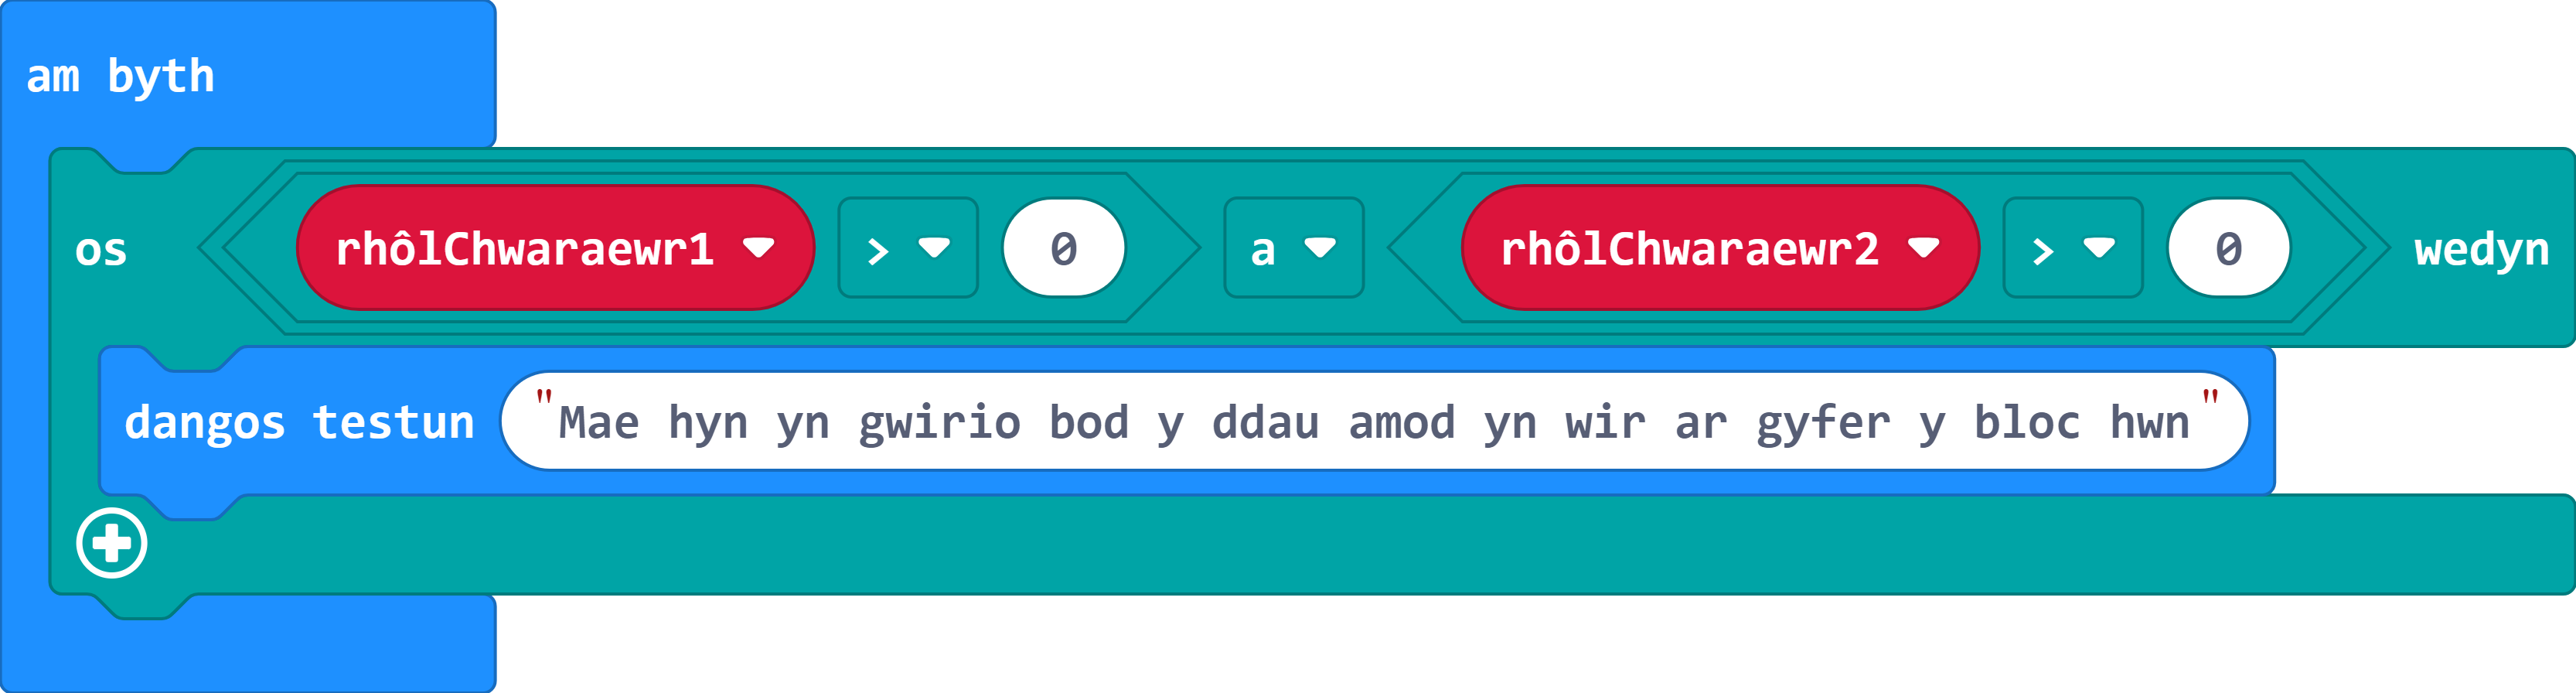
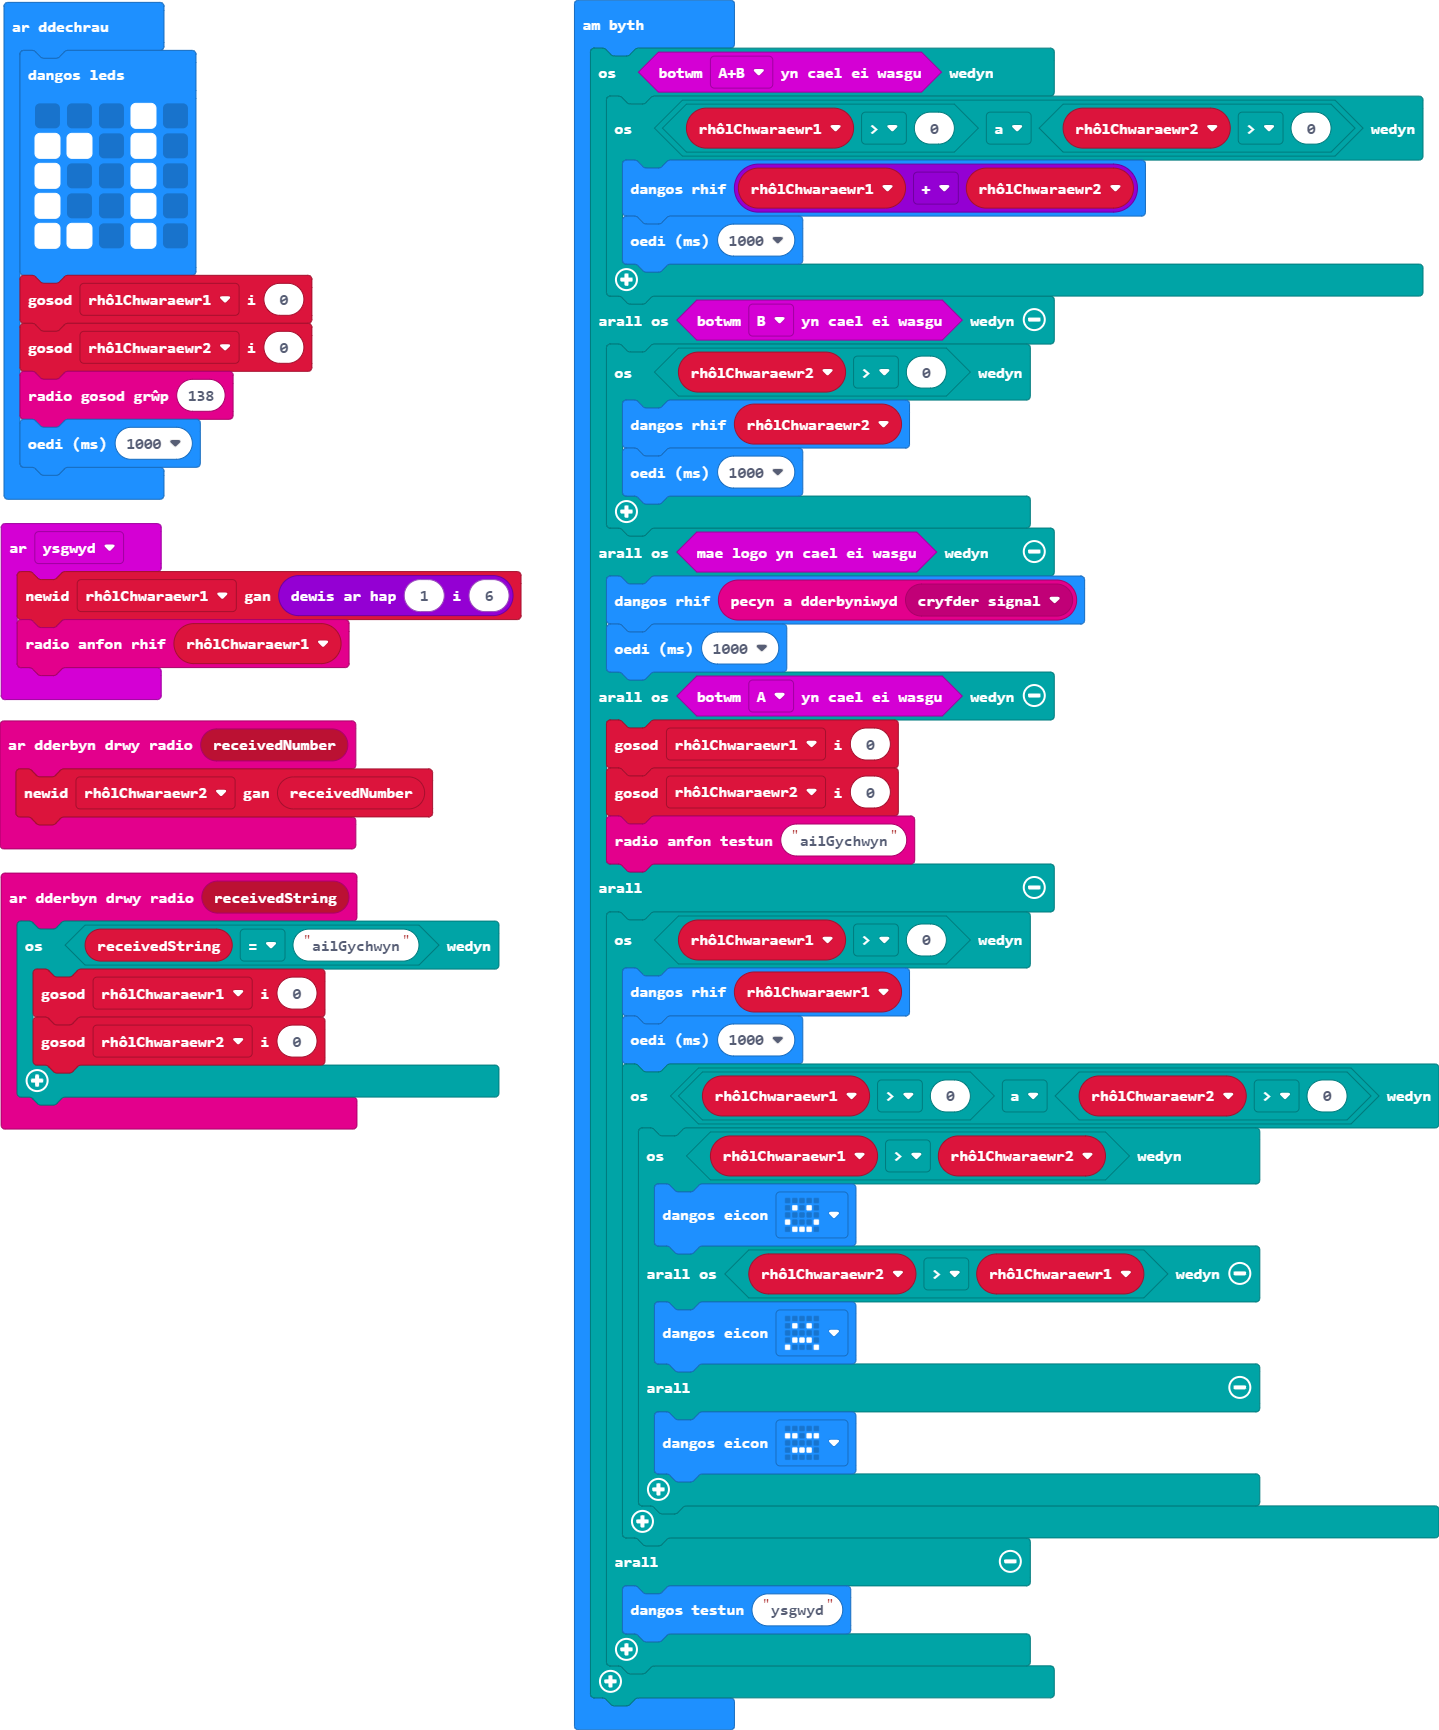
Dylai pwyso botwm A a B ar yr un pryd roi cyfanswm y ddau chwaraewr ar ôl rholio'r dis.
Gair o gyngor: Bydd angen i chi gael rhywbeth i wirio bod y ddau chwaraewr wedi rholio'r dis.
Pwysig: I wirio yn erbyn dau amod (yn yr achos hwn, bod y ddau chwaraewr wedi rholio'r dis), gallech bentyrru'r os-datganiadau neu ddefnyddio bloc 'and'.
Amodau wedi'u Pentyrru
Gweithredwr Boole 'a'
Noder: Mae gwerth Boole yn wir neu'n anwir. Mae Gweithredwr Boole yn cymharu dau fewnbwn i greu un allbwn gwir neu anwir.
Gair o gyngor:Mae angen gosod y datganiad 'os btwm A a B yn cael ei wasgu' yn y ddolen am byth uwchben y os-datganiadau ar gyfer botwm A a B.
Pwysig: Wrth ddefnyddio datganiadau 'arall os', mae'r rhaglen yn mynd trwy'r rhestr o amodau ac yn stopio wrth yr amod cyntaf sy'n wir. Yna bydd yn hepgor y gweddill. Wrth ddefnyddio 'os btwm A a B yn cael ei wasgu', mae unrhyw amodau sy'n gwirio a yw'r naill fotwm neu'r llall yn cael ei bwyso yn dod yn wir. Felly, bydd 'os botwm A yn cael ei wasgu' yn wir, bydd 'os botwm B yn cael ei wasgu' yn wir a bydd 'os botwm A+B yn cael ei wasgu' yn wir. Mae hyn yn amlygu pwysigrwydd gosod amodau mewn trefn.
Mae'r ddewislen Mathemateg yn cynnwys blociau sy'n gwneud y cyfrifiadau i ni.
Efallai yr hoffech ychwanegu arall-datganiad er mwyn dangos nad yw pob chwaraewr wedi rholio'r dis eto.
Chwaraewr Un
Chwaraewr Dau
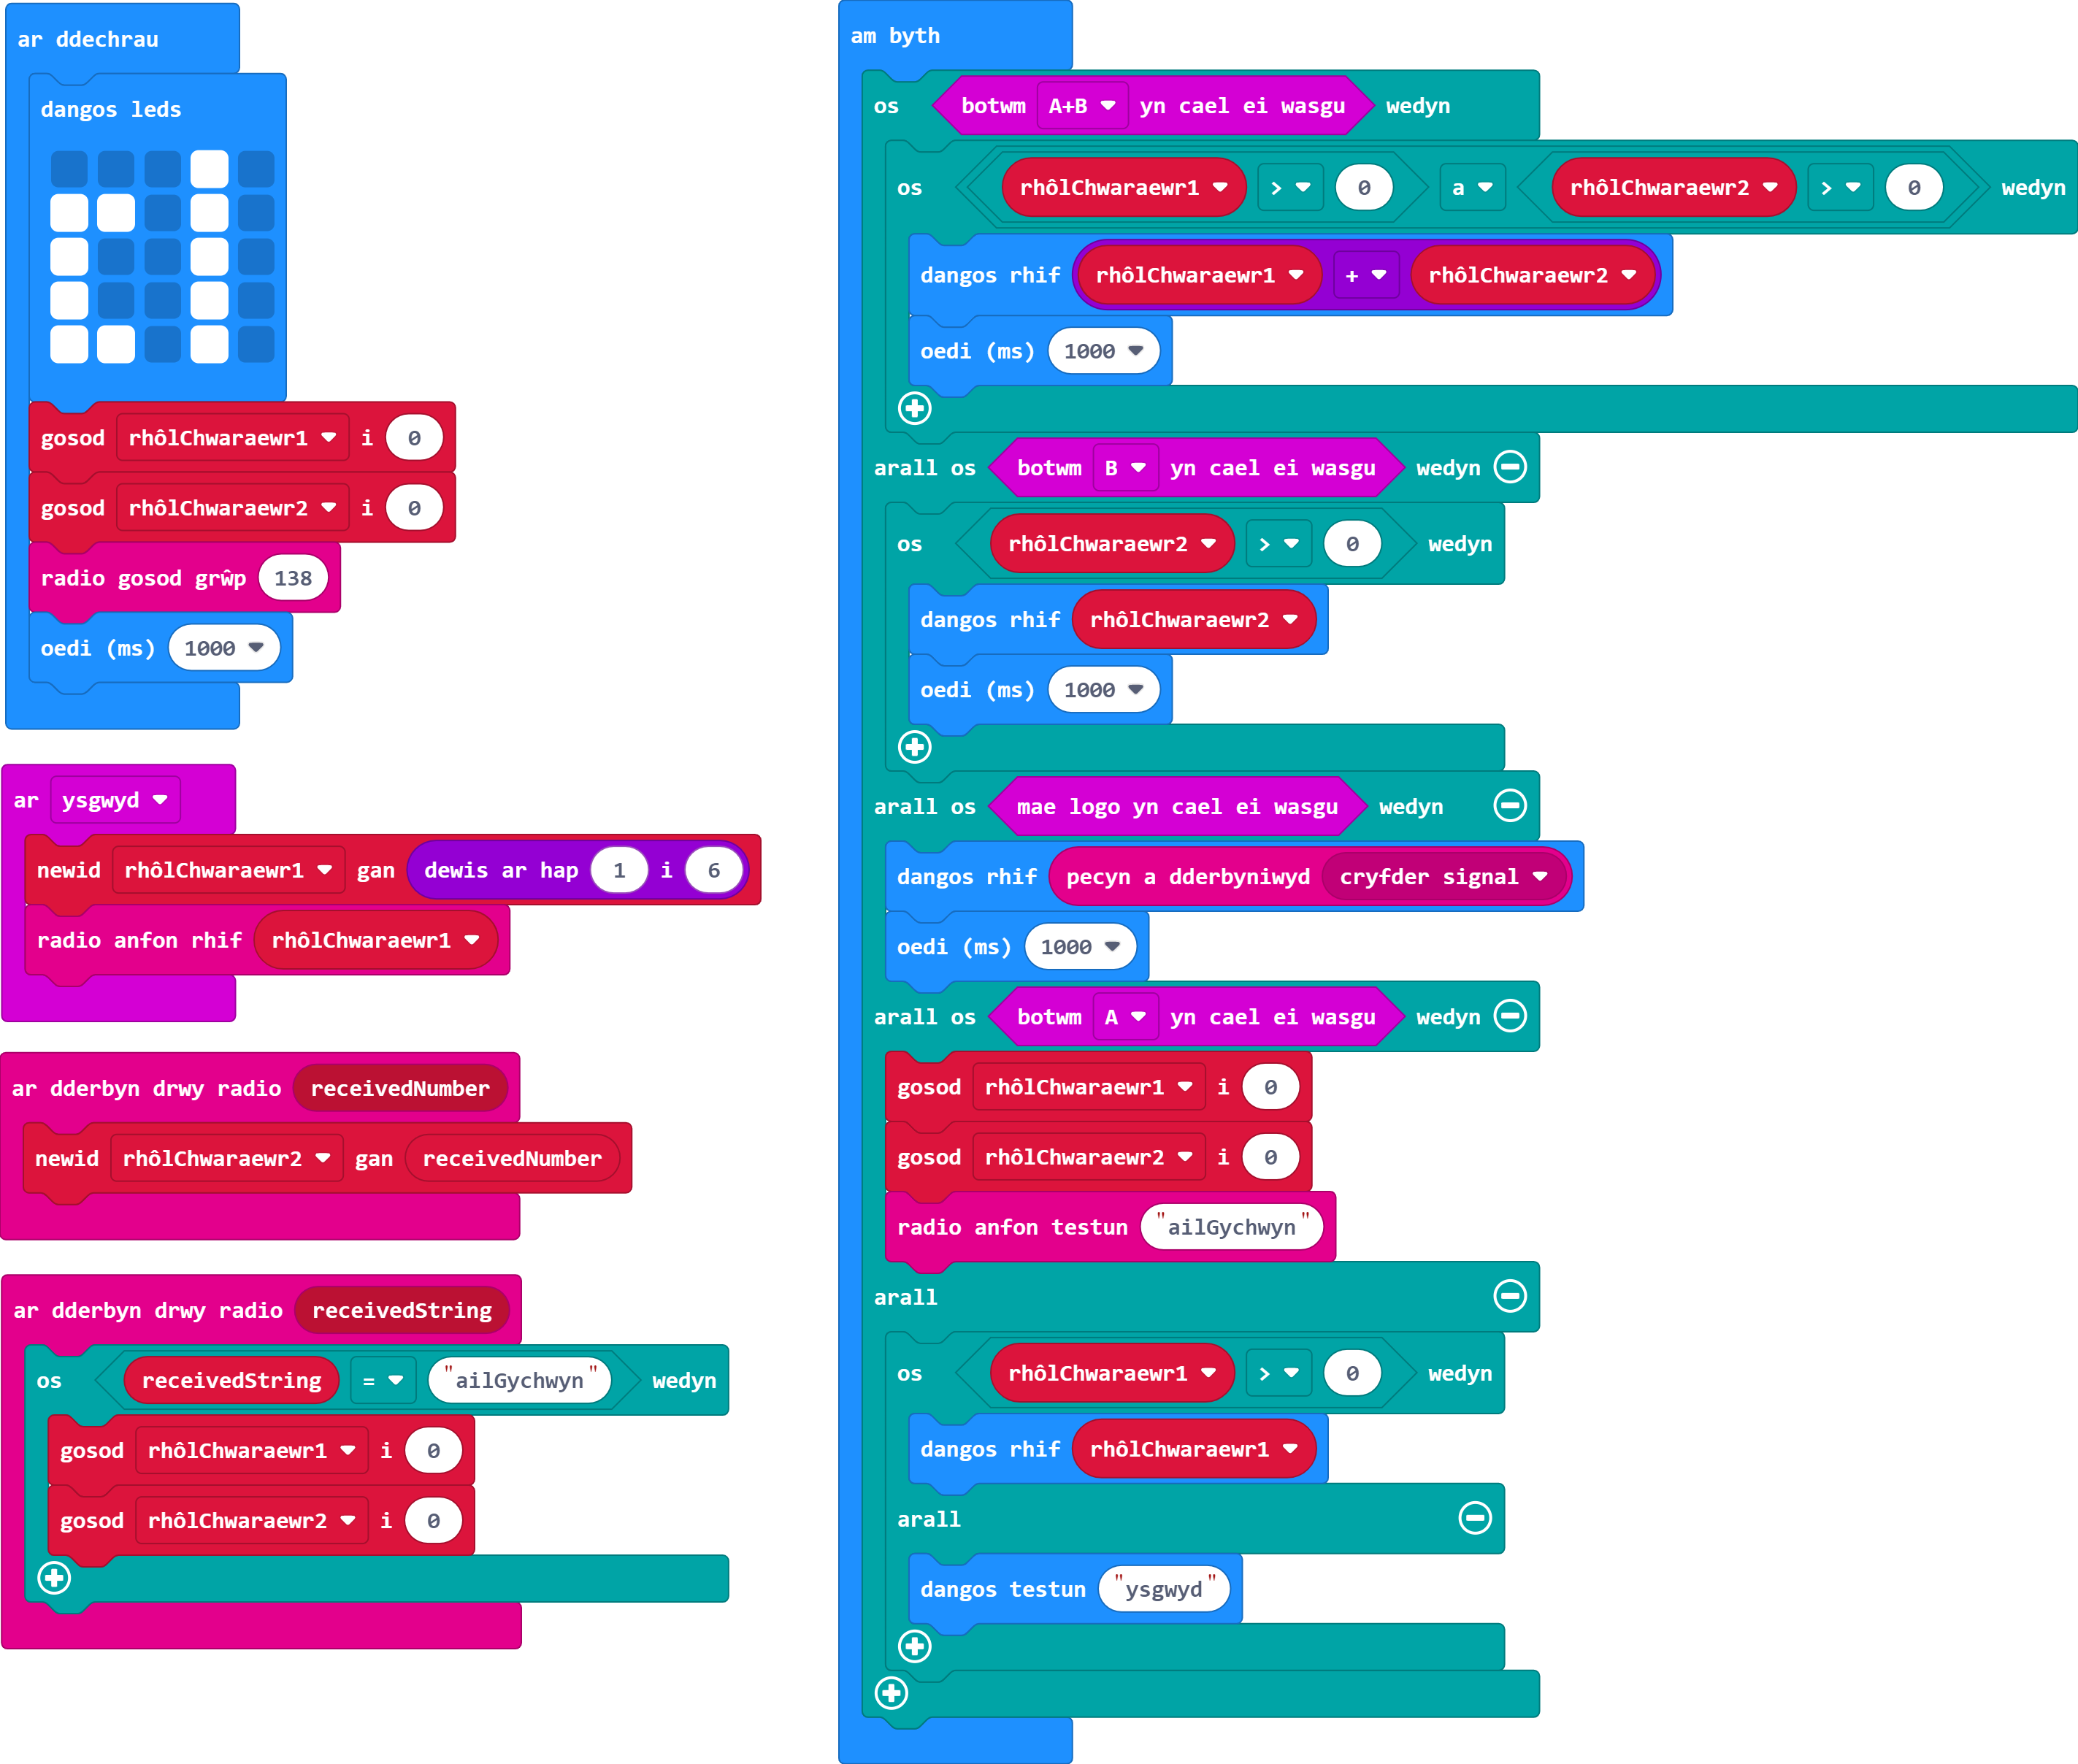
Symudwch y rhaglen ar gyfer botwm A er mwyn i'r Micro: Bit ddangos rhif y dis ar y sgrin yn awtomatig, a chynnwys arall-datganiad ar gyfer gwerth sero ar y dis. Gallai hyn fod yn animeiddiad, delwedd, neu neges/cyfarwyddyd sydd i ymddangos.
Gair o gyngor: Bydd angen saib arnoch nawr er mwyn cadw gwerthoedd heblaw rhif dis y chwaraewr ei hun ar y sgrin am gyfnod hirach.
Gallwch symud rhaglen dangos y chwaraewr ei hun i'r arall-datganiad ar gyfer hyn.
Defnyddiwch saib 1 eiliad (1000ms) lle bo angen.
Mae'n bosibl y bydd angen i chi bwyso botymau am ychydig mwy o amser wrth brofi. Bydd hyn yn berthnasol iawn os ydych chi'n defnyddio testun i ddangos neges gan na fydd yn gwrando am fotymau nes bod y neges wedi gorffen sgrolio.
Gadewch y datganiad 'arall os botwm A yn cael ei wasgu wedyn' yn wag am y tro.
Chwaraewr Un
Chwaraewr Dau
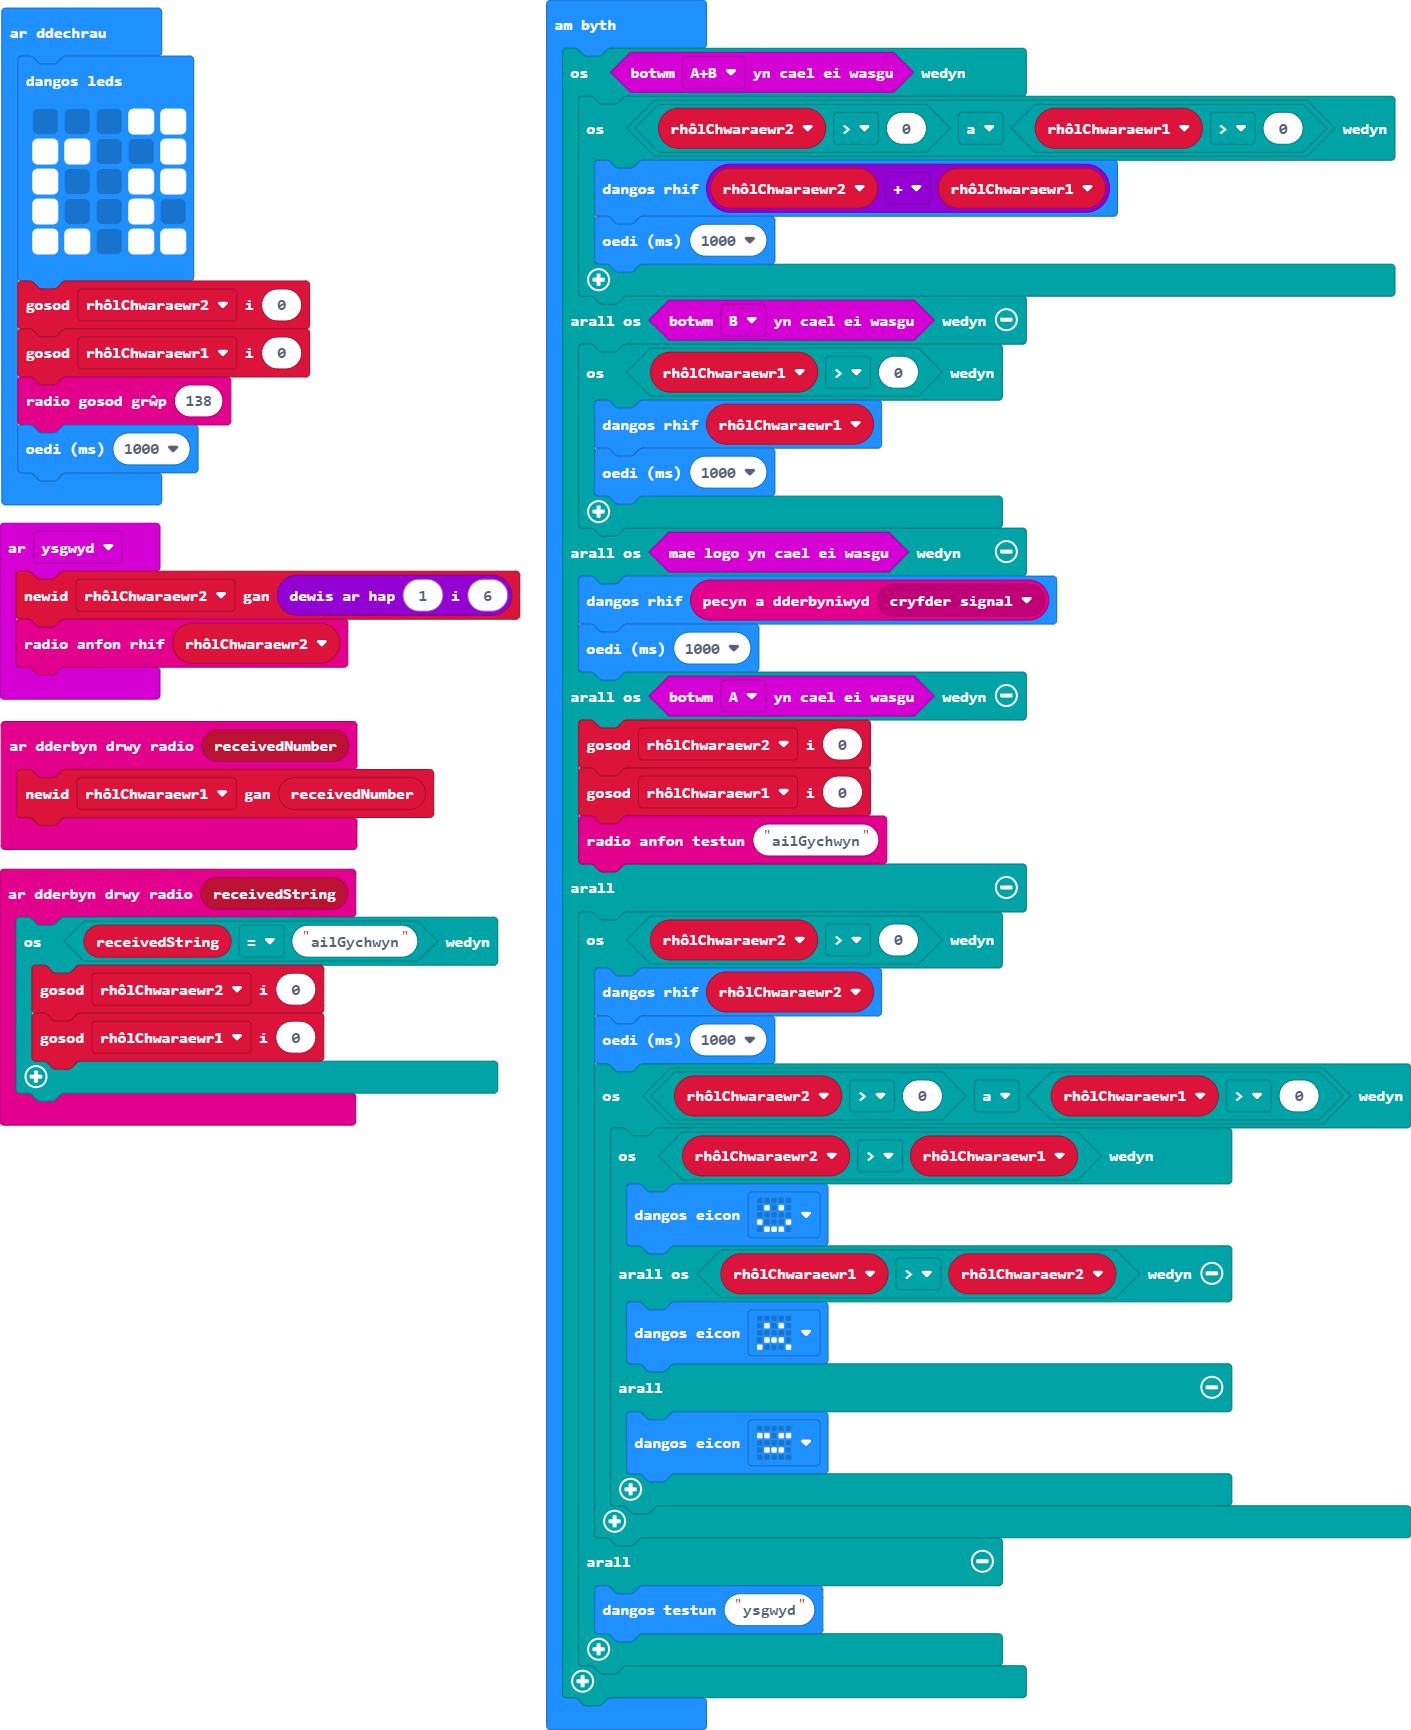
Nawr defnyddiwch fotwm A i ailosod y gêm.
Gair o gyngor: Bydd angen i chi anfon y gorchymyn ailosod i Micro:Bit y chwaraewr arall hefyd.
Gallwch anfon testun, fel gair, dros y grŵp radio.
Os ydych chi'n defnyddio testun ar gyfer hyn, mae angen i chi ddefnyddio'r bloc cymharu testun - dyma'r bloc sydd â dyfynodau y tu mewn i'r bocsys gwerth.
Fel arall, gallech anfon rhif gwahanol sy'n sbarduno'r gorchymyn ailosod.
Cofiwch gadarnhau eich bod yn defnyddio'r blociau derbyn cywir ar gyfer y math o wybodaeth rydych chi'n ei hanfon.
Chwaraewr Un
Chwaraewr Dau
Mae'n amser cynnal gornest rhwng y chwaraewyr. Yr enillydd yw'r chwaraewr sy'n rholio'r dis â'r sgôr uchaf. Gwnewch i'r Micro:Bits ddangos a wnaeth eu chwaraewr ennill neu golli.
Gair o gyngor: Gallwch ddefnyddio'r gweithredydd Boole 'and' yma i sicrhau bod y ddau chwaraewr wedi rholio'r dis cyn gweld pwy sydd wedi ennill.
Mae angen i chi benderfynu ble i osod hyn yn eich rhaglen.
Cymharwch sgôr dis y ddau chwaraewr i gyfrifo pa un yw'r uchaf.
Beth sy'n digwydd pan fydd y ddau chwaraewr yn rholio'r un rhif?
Gallwch ddefnyddio delweddau, testunau, a/neu animeiddiadau ar gyfer y rhain.
Ychwanegwch seibiau lle mae angen eu cynnwys yn eich barn chi.
Chwaraewr Un
Chwaraewr Dau
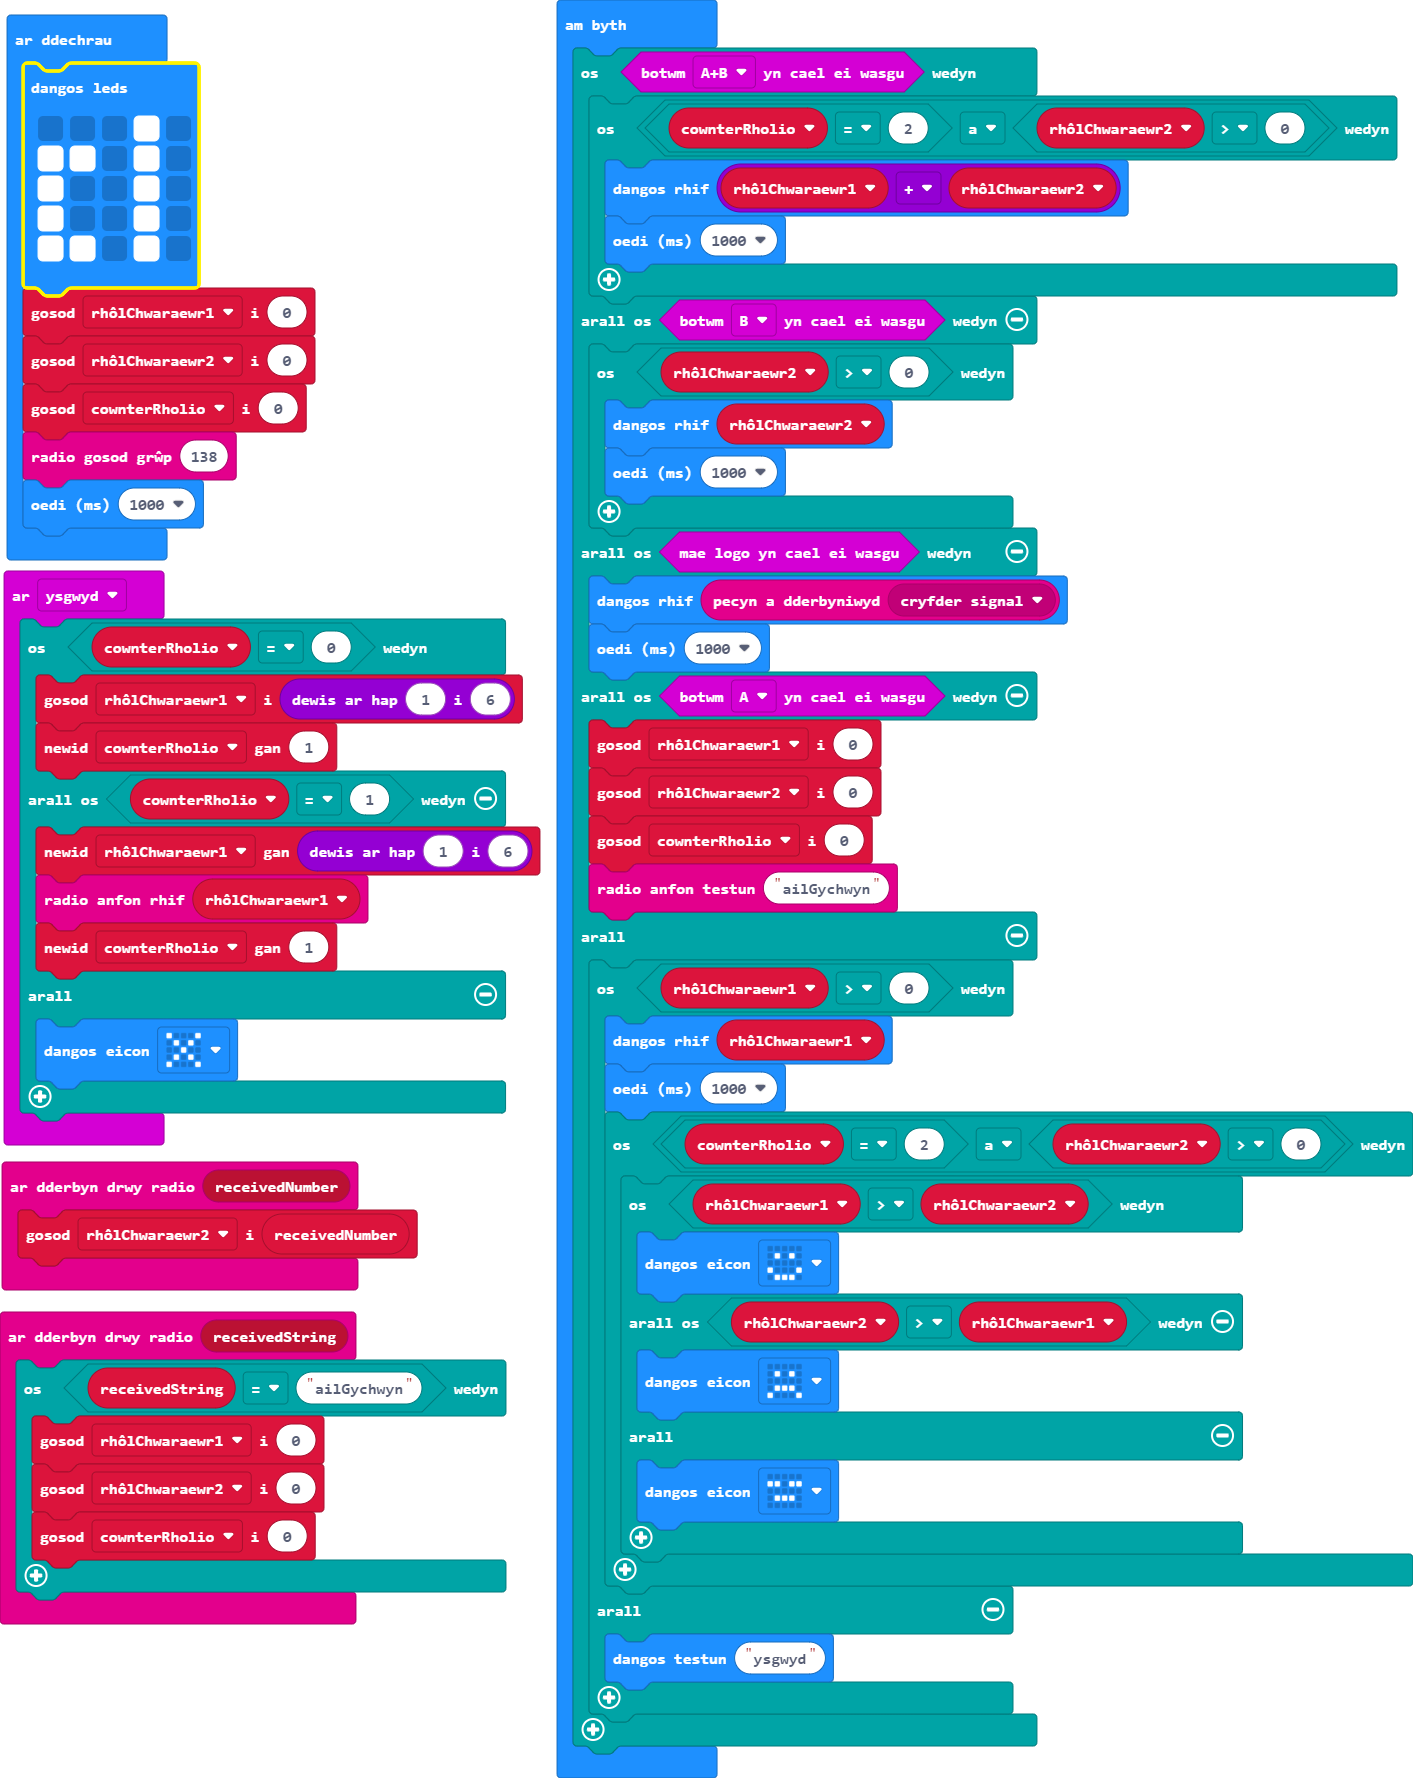
Uwchraddio'r rhaglen fel bod yn rhaid i'r ddau chwaraewr rolio'r dis dwywaith cyn cymharu eu cyfansymiau i benderfynu pwy sydd wedi ennill. Ni ddylai chwaraewyr allu rholio mwy na dwywaith.
Gair o gyngor: Bydd angen newidyn newydd arnoch ar sail sawl gwaith y mae'r dis yn cael ei rolio.
Bydd angen defnyddio'ch newidyn rhifo newydd yn lle'r holl amodau sy'n cadarnhau ar hyn o bryd a yw cyfanswm dis y chwaraewr ei hun dros 0.
Gwnewch i neges neu ddelwedd ymddangos os yw chwaraewr yn ceisio rholio'r dis mwy na dwywaith - bydd yn haws profi hyn wedyn.
Gellir defnyddio'r ddolen 'ar ysgwyd' i ddefnyddio a newid newidyn rhifo.
Bydd angen i chi osod y newidyn newydd hwn i sero yn y dechrau ac yn ystod y broses ailosod.
Ni fydd newid y rhif ar hap fel ei fod rhwng 1 a 12 neu luosi'r rhif cyntaf a roliwyd â dau yn cyfateb i'r un tebygolrwydd â rholio'r dis ar wahân dwywaith - felly, bydd angen i chi ddefnyddio newidyn cyfrif dis. Am ragor o wybodaeth am debygolrwydd rholio'r dis, gallwch edrych ar ein gweithgaredd Gornest Ddisiau.
Chwaraewr Un
Chwaraewr Dau
Dyma rai nodweddion ychwanegol y gallwch eu cynnwys yn eich gêm ornest dis. Gweithgareddau i chi ymchwilio iddynt a'u harchwilio yw'r rhain - nid oes atebion ar gael.
Ychwanegwch gyfarwyddiadau i sgriniau chwaraewr.
Gair o gyngor: Defnyddiwch gyfarwyddiadau byr neu ar ffurf lluniau.
Defnyddiwch system sgôr sy'n olrhain sawl gwaith y mae pob chwaraewr wedi ennill neu golli.
Gair o gyngor: Gallwch ddisodli'r rhaglenni ar gyfer botwm neu ddefnyddio'r synhwyrydd cyffwrdd.
Rhowch wybod i'r chwaraewyr os ydyn nhw'n ysgwyd y Micro:Bit yn rhy galed.
Gair o gyngor: I wneud hyn, mae angen mesur cyflymiad y Micro:Bit, ac mae unrhyw beth dros werth cryfder o 1700mg yn ormod.
Ychwanegwch animeiddiadau wrth rolio'r dis.
Allwch chi ddylunio fersiwn o'r gêm hon ar gyfer dau chwaraewr gan ddefnyddio un BBC Micro:Bit yn unig?
Gair o gyngor: Ni fydd angen unrhyw gyfathrebu radio i wneud hyn.
Gwers Fideo (yn Saesneg):
Ymarferion:
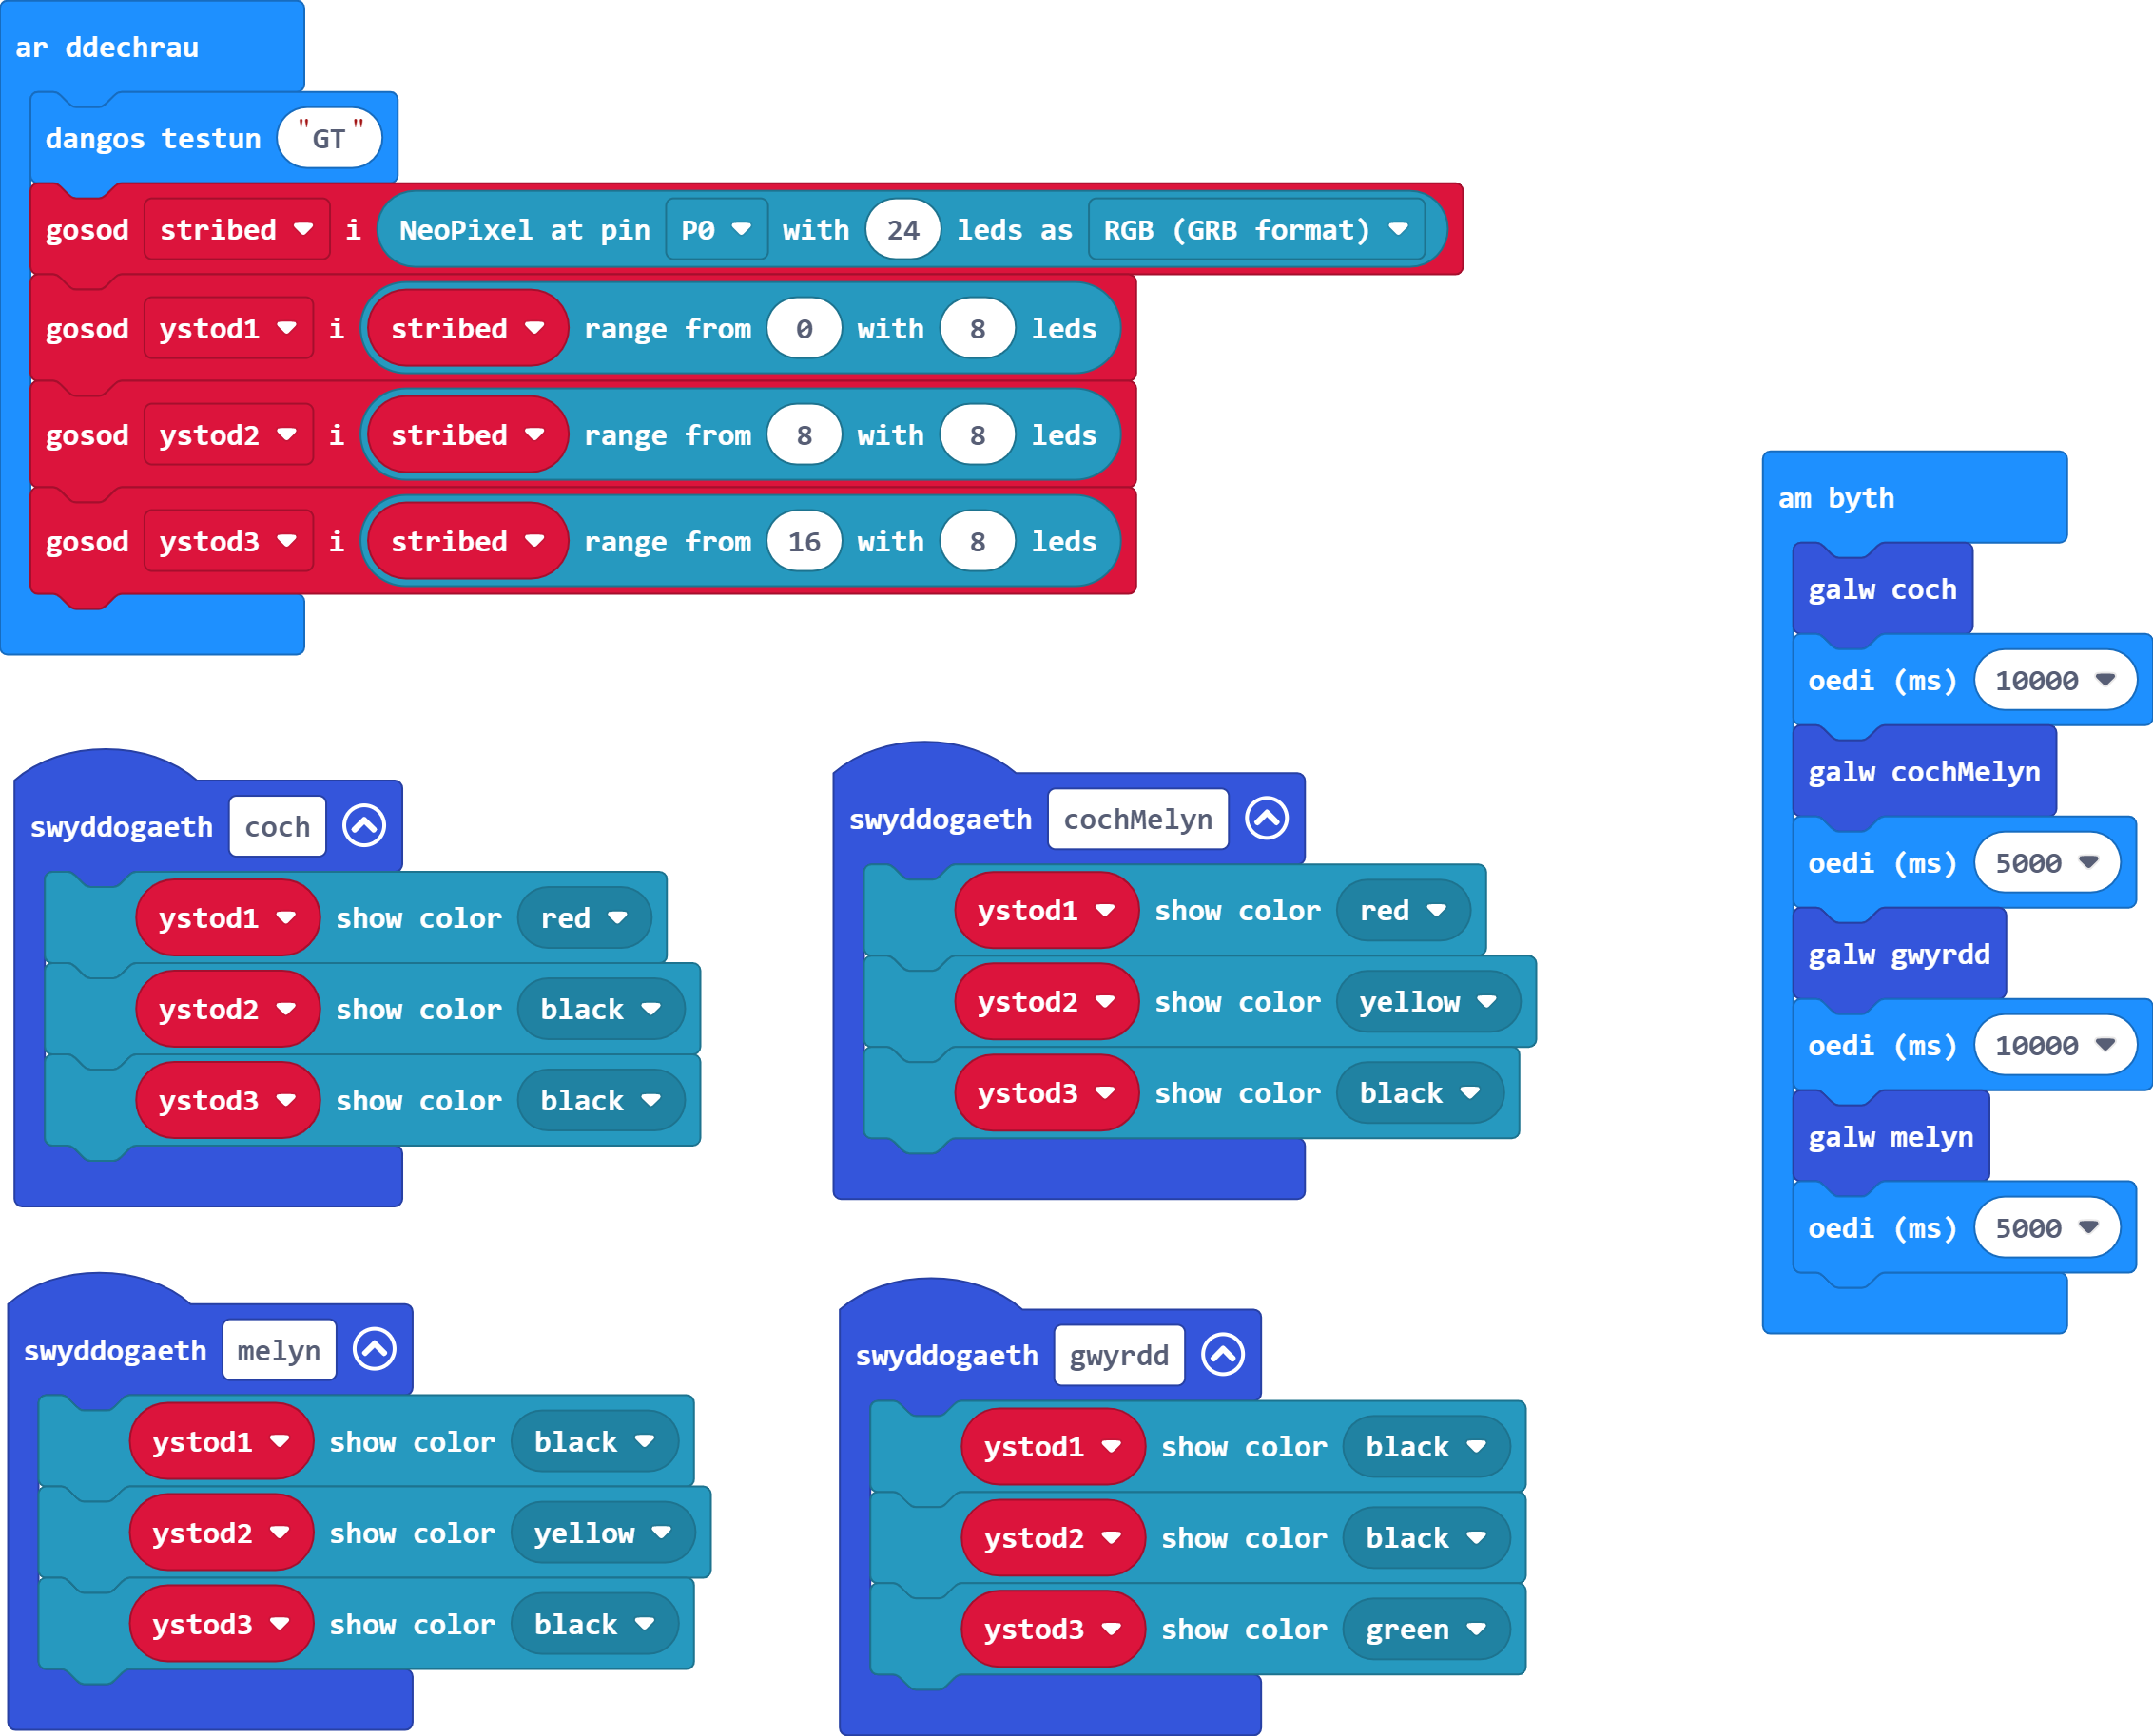
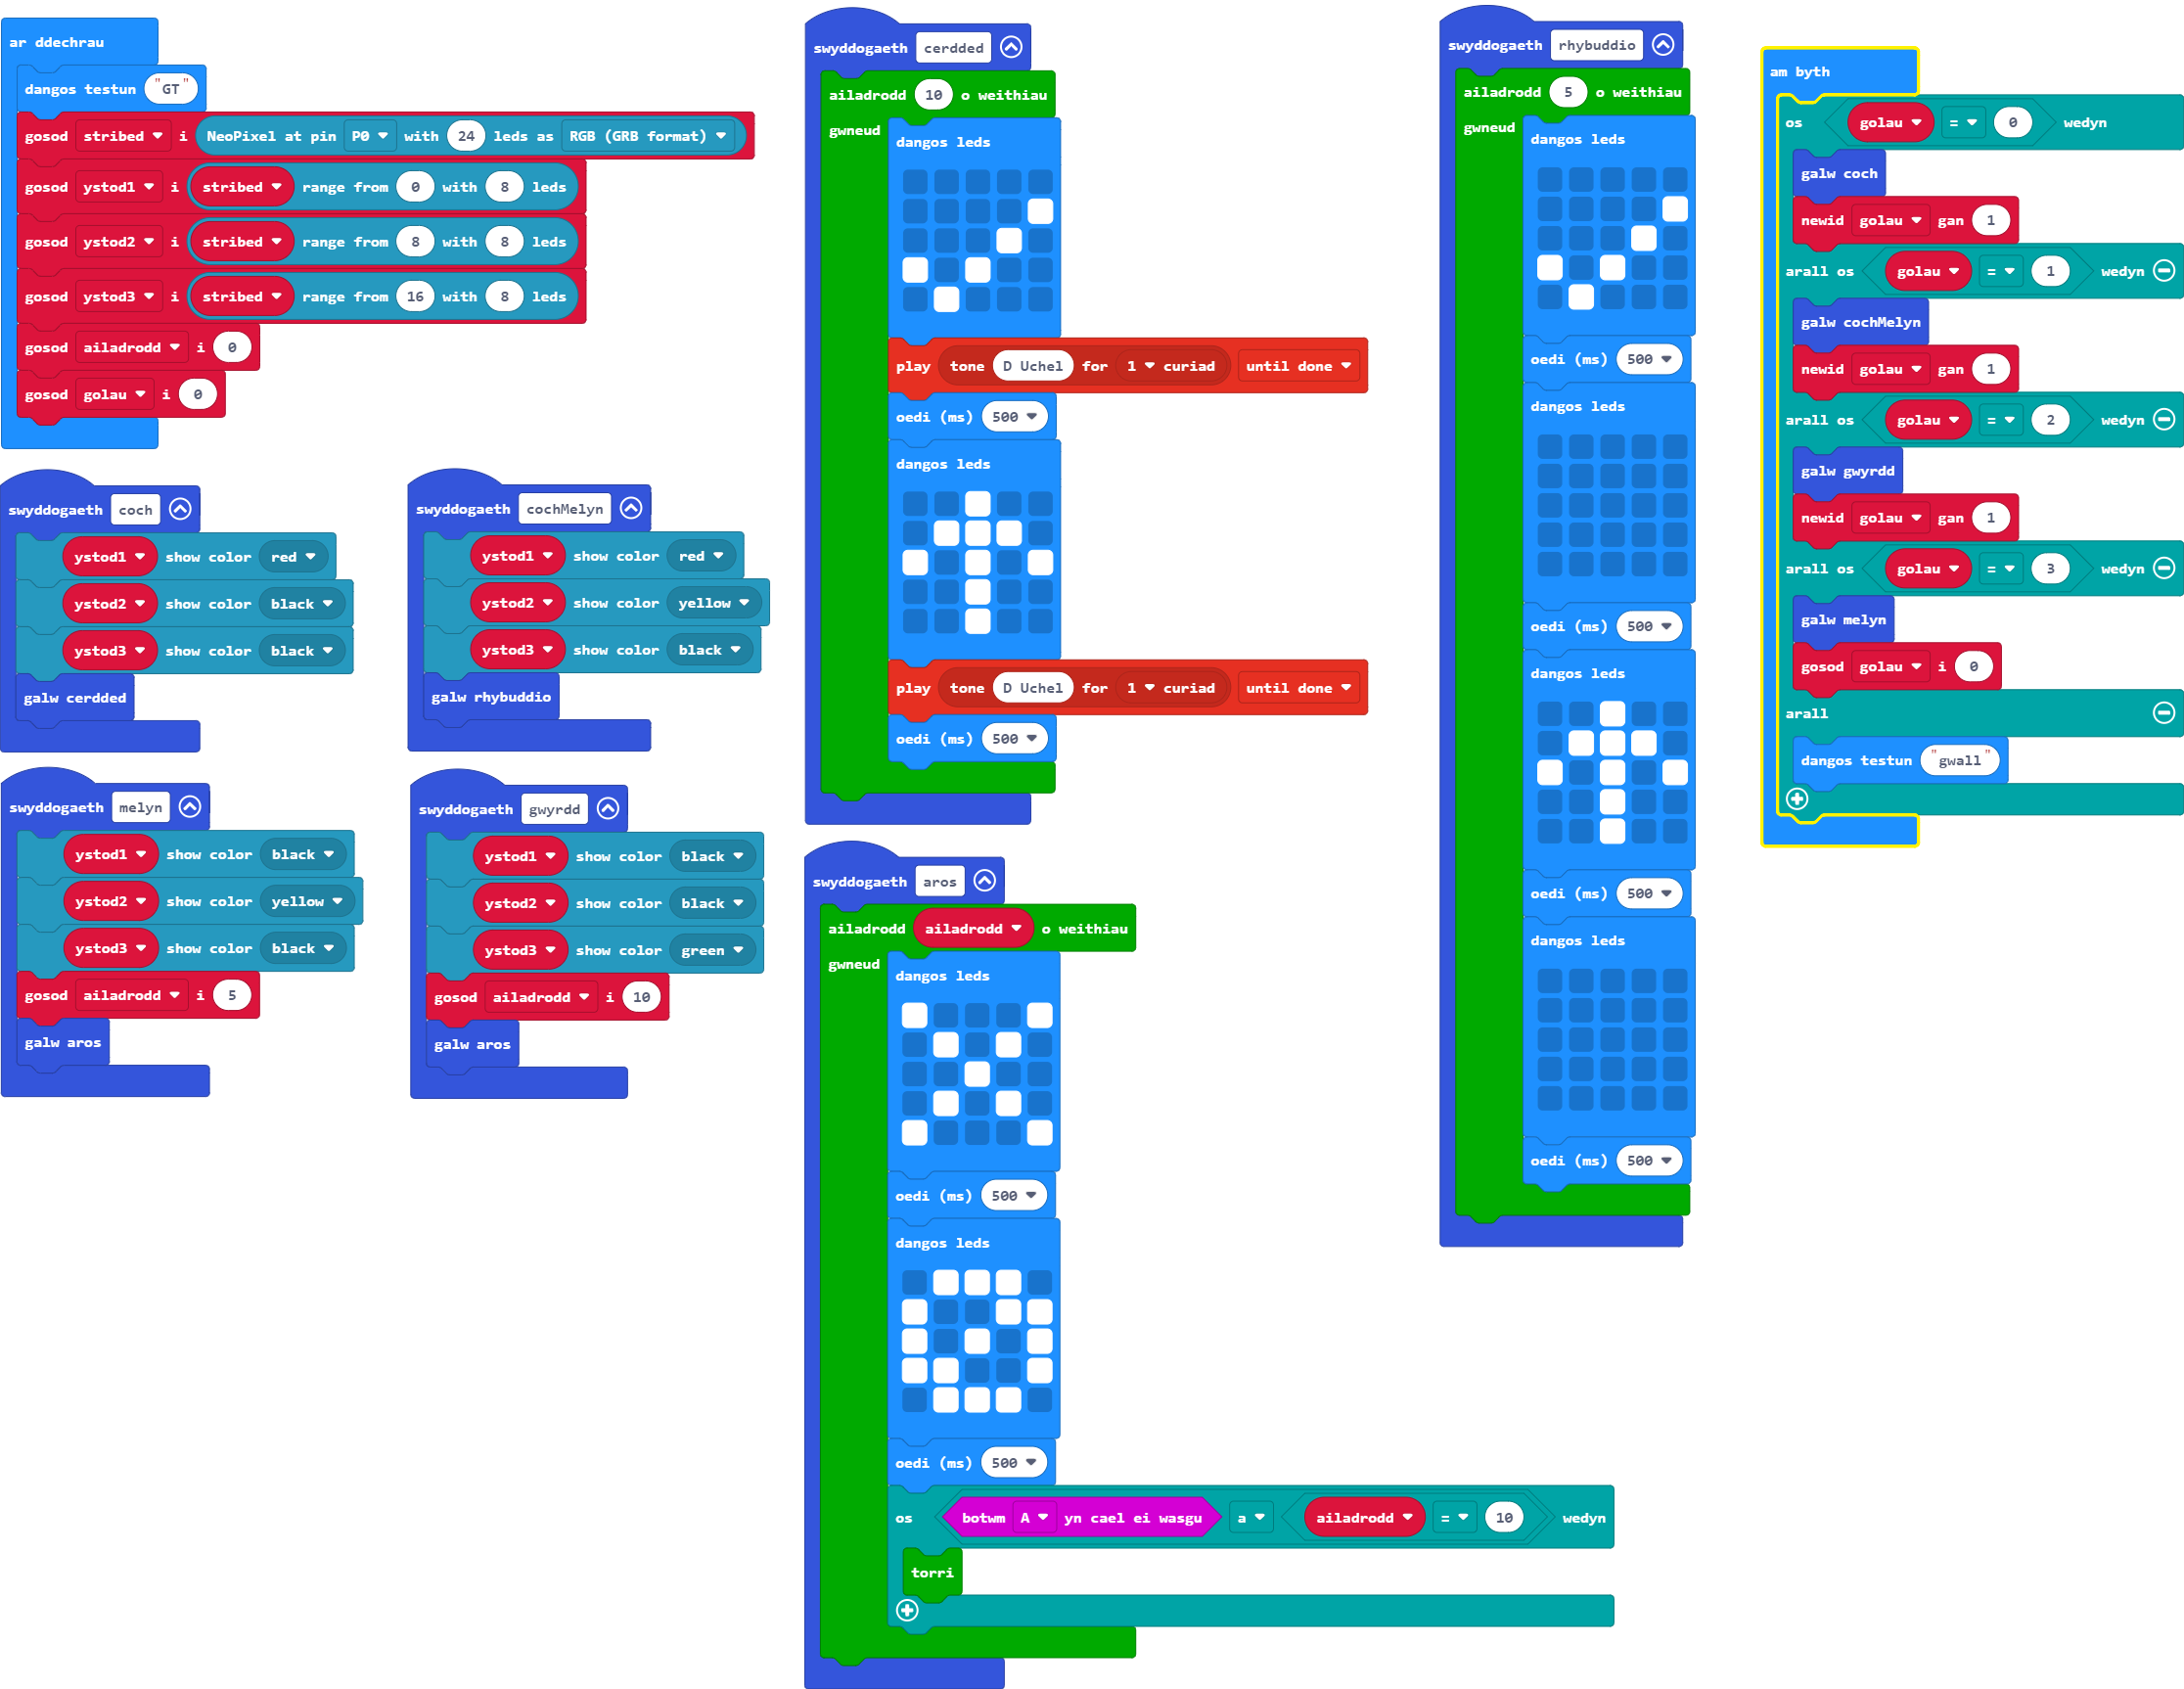
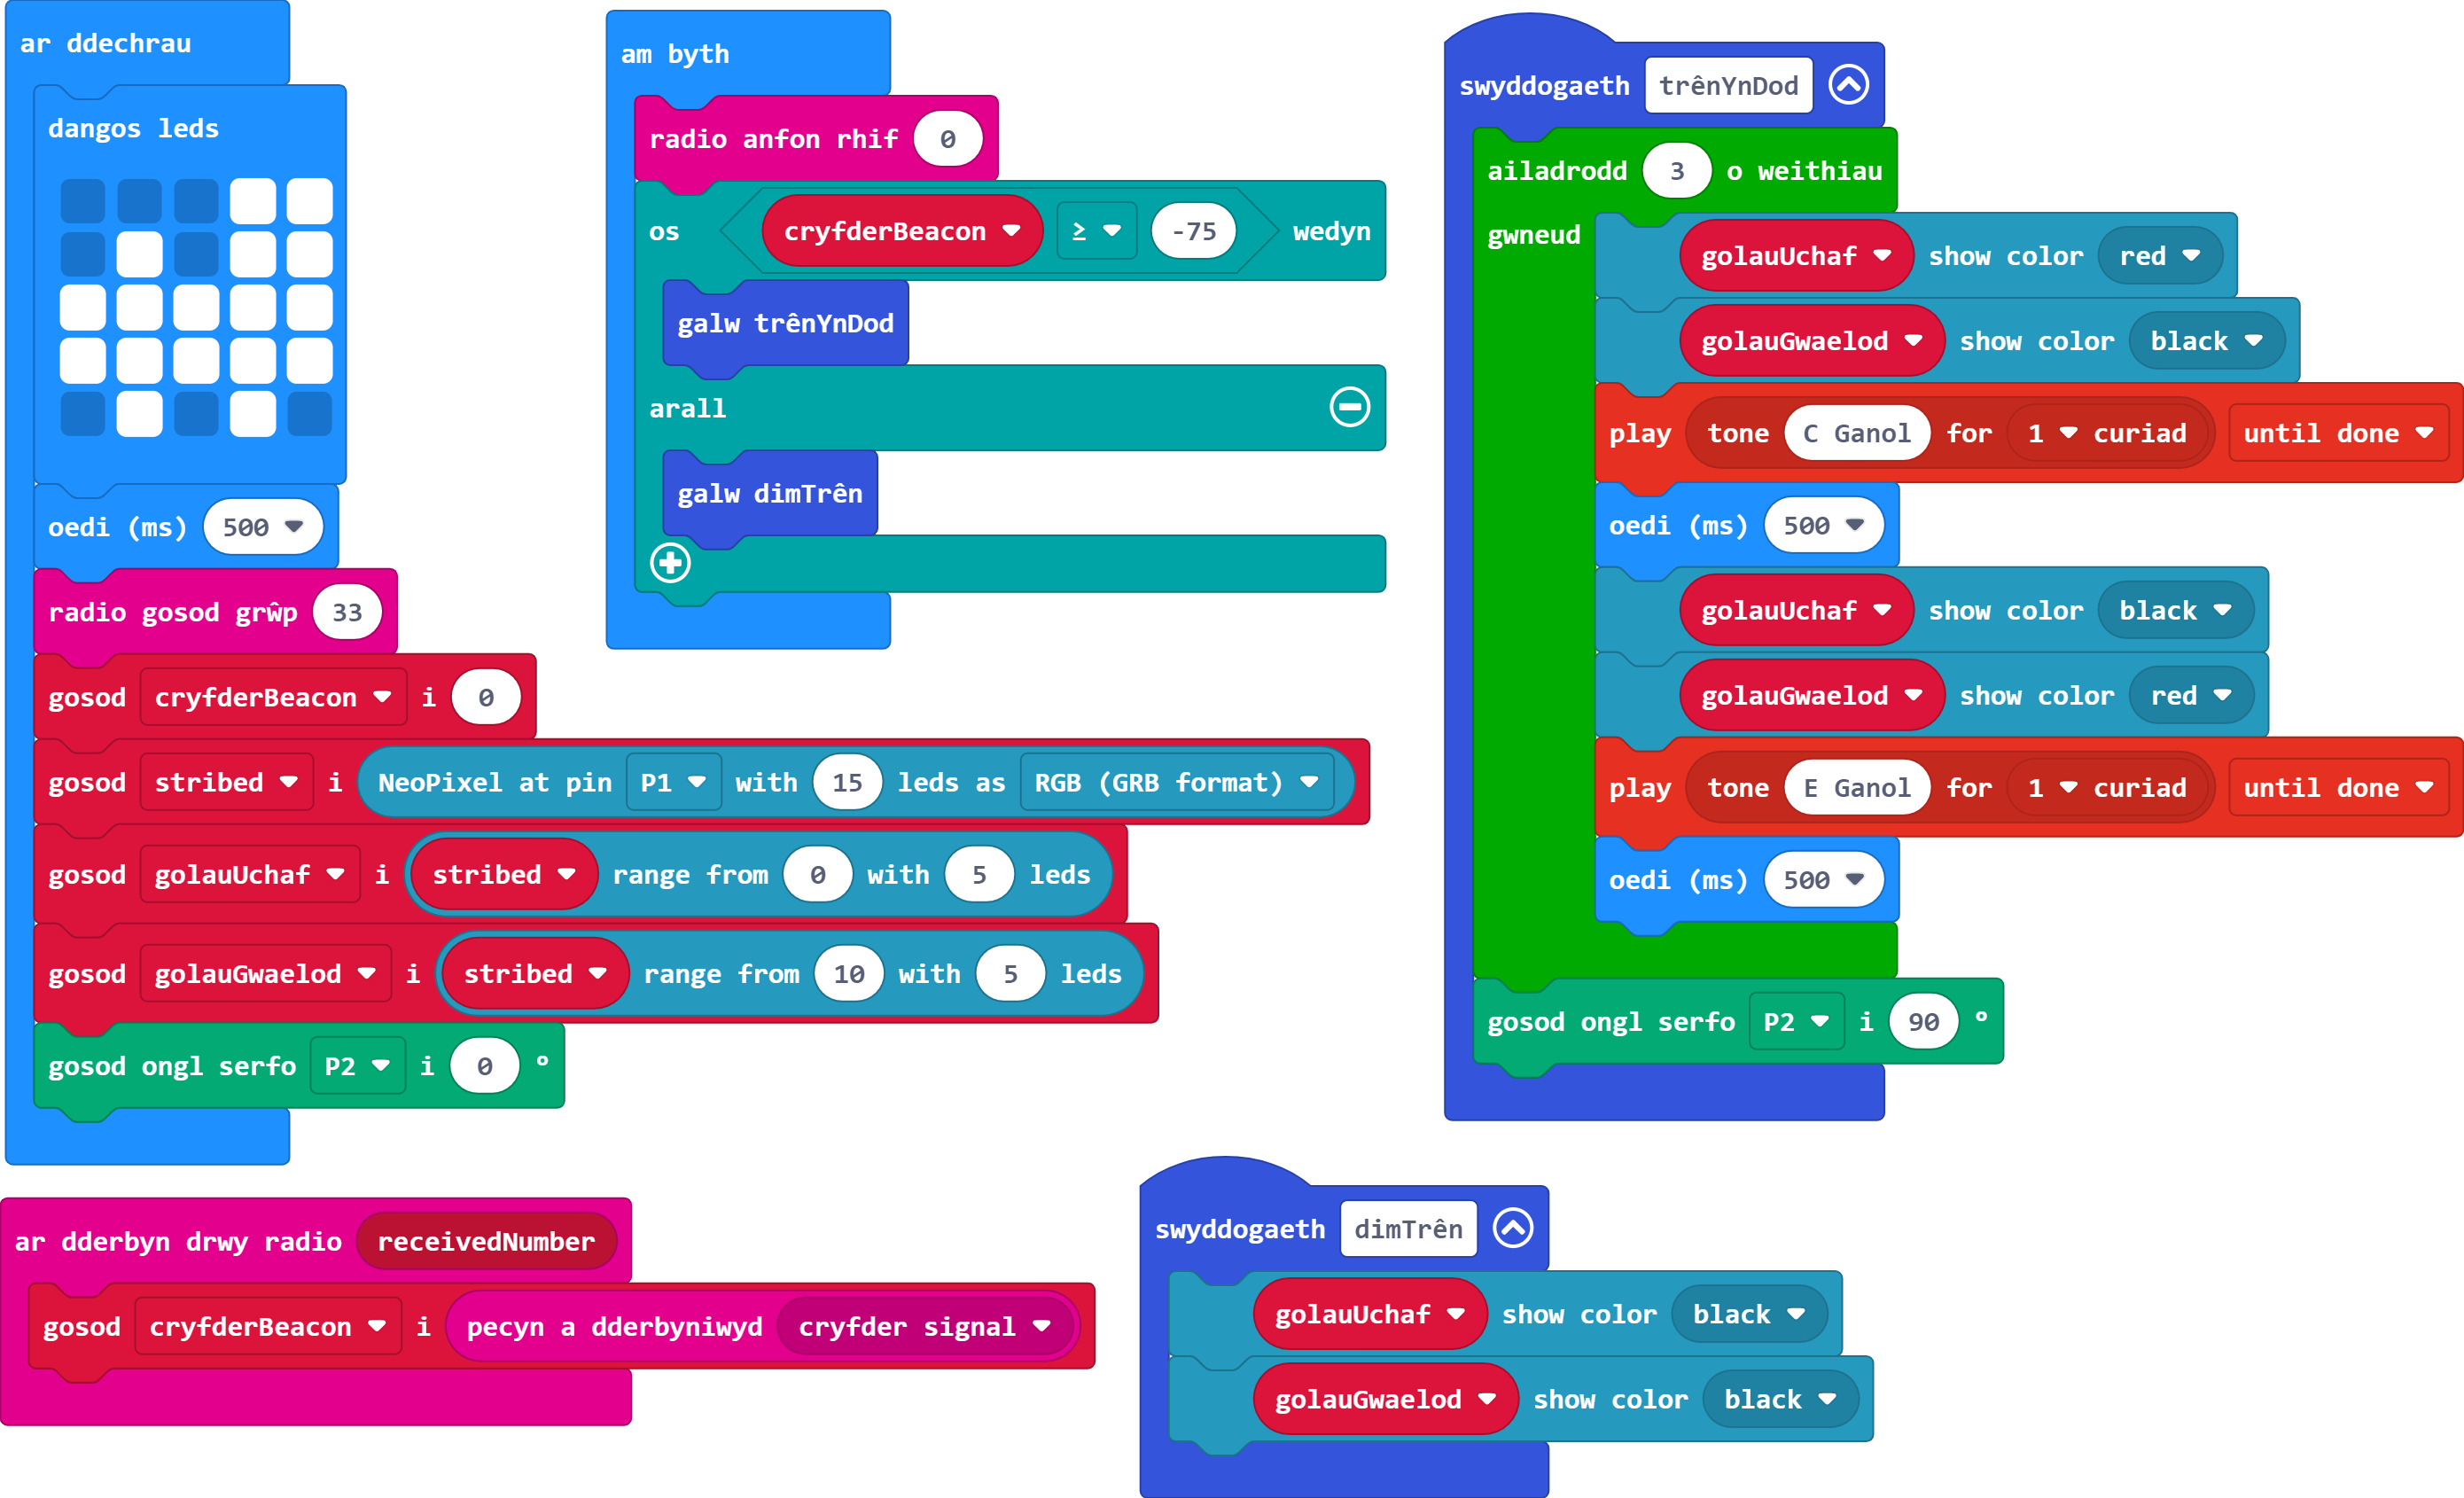
Ar gyfer y sesiwn hon byddwn yn creu rhaglen goleuadau traffig gan ddefnyddio stribed Neopicsel.
Fel sy'n wir am bob un o'n hymarferion, mae dysgwyr yn cwblhau un lefel cyn symud i'r nesaf. Oni wneir hynny, mae'n bosibl y bydd dysgwyr yn methu derbyn gwybodaeth neu'n hepgor cam hanfodol sy'n atal y rhaglen rhag gweithio.
Cliciwch ar bennawd pob her i gael y manylion.
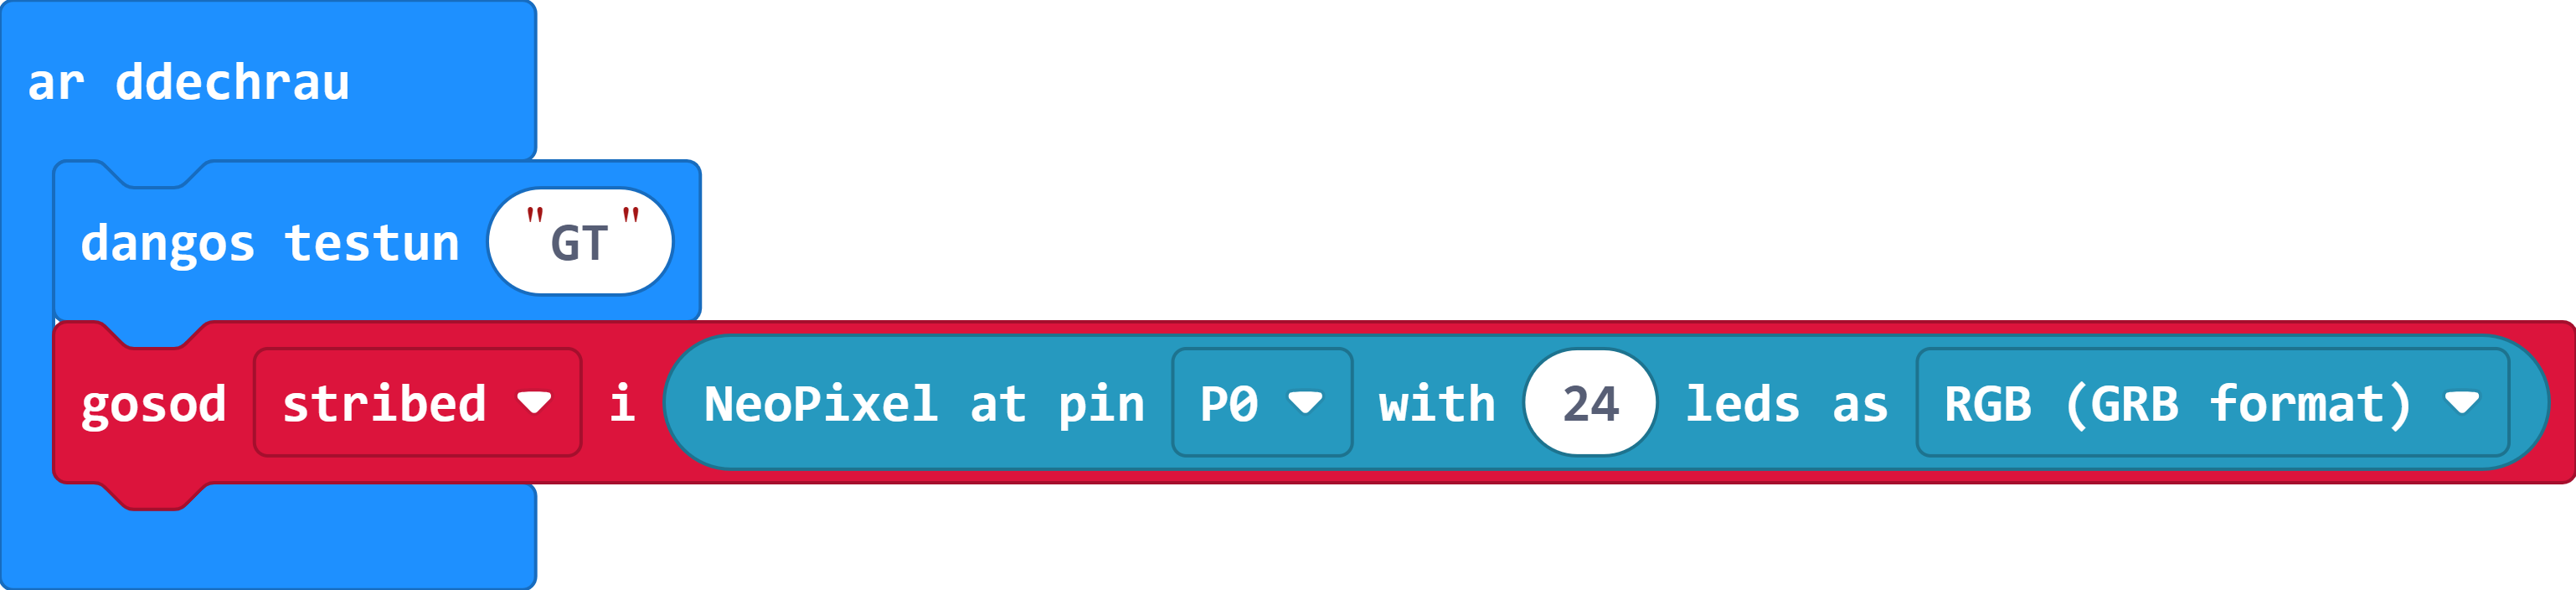
Defnyddiwch y blociau sydd wedi'u darparu gan yr estyniad Neopicsel i gysylltu stribed 24 LED i bin 1.
Gair o gyngor: Cofiwch greu eich dilyniant cychwyn eich hun ar gyfer y rhaglen newydd hon er mwyn gallu ei hadnabod.
Mae'r cam hwn yn rhan o'r broses o sefydlu eich rhaglen, felly mae angen defnyddio'r bloc 'ar ddechrau' i wneud hyn.
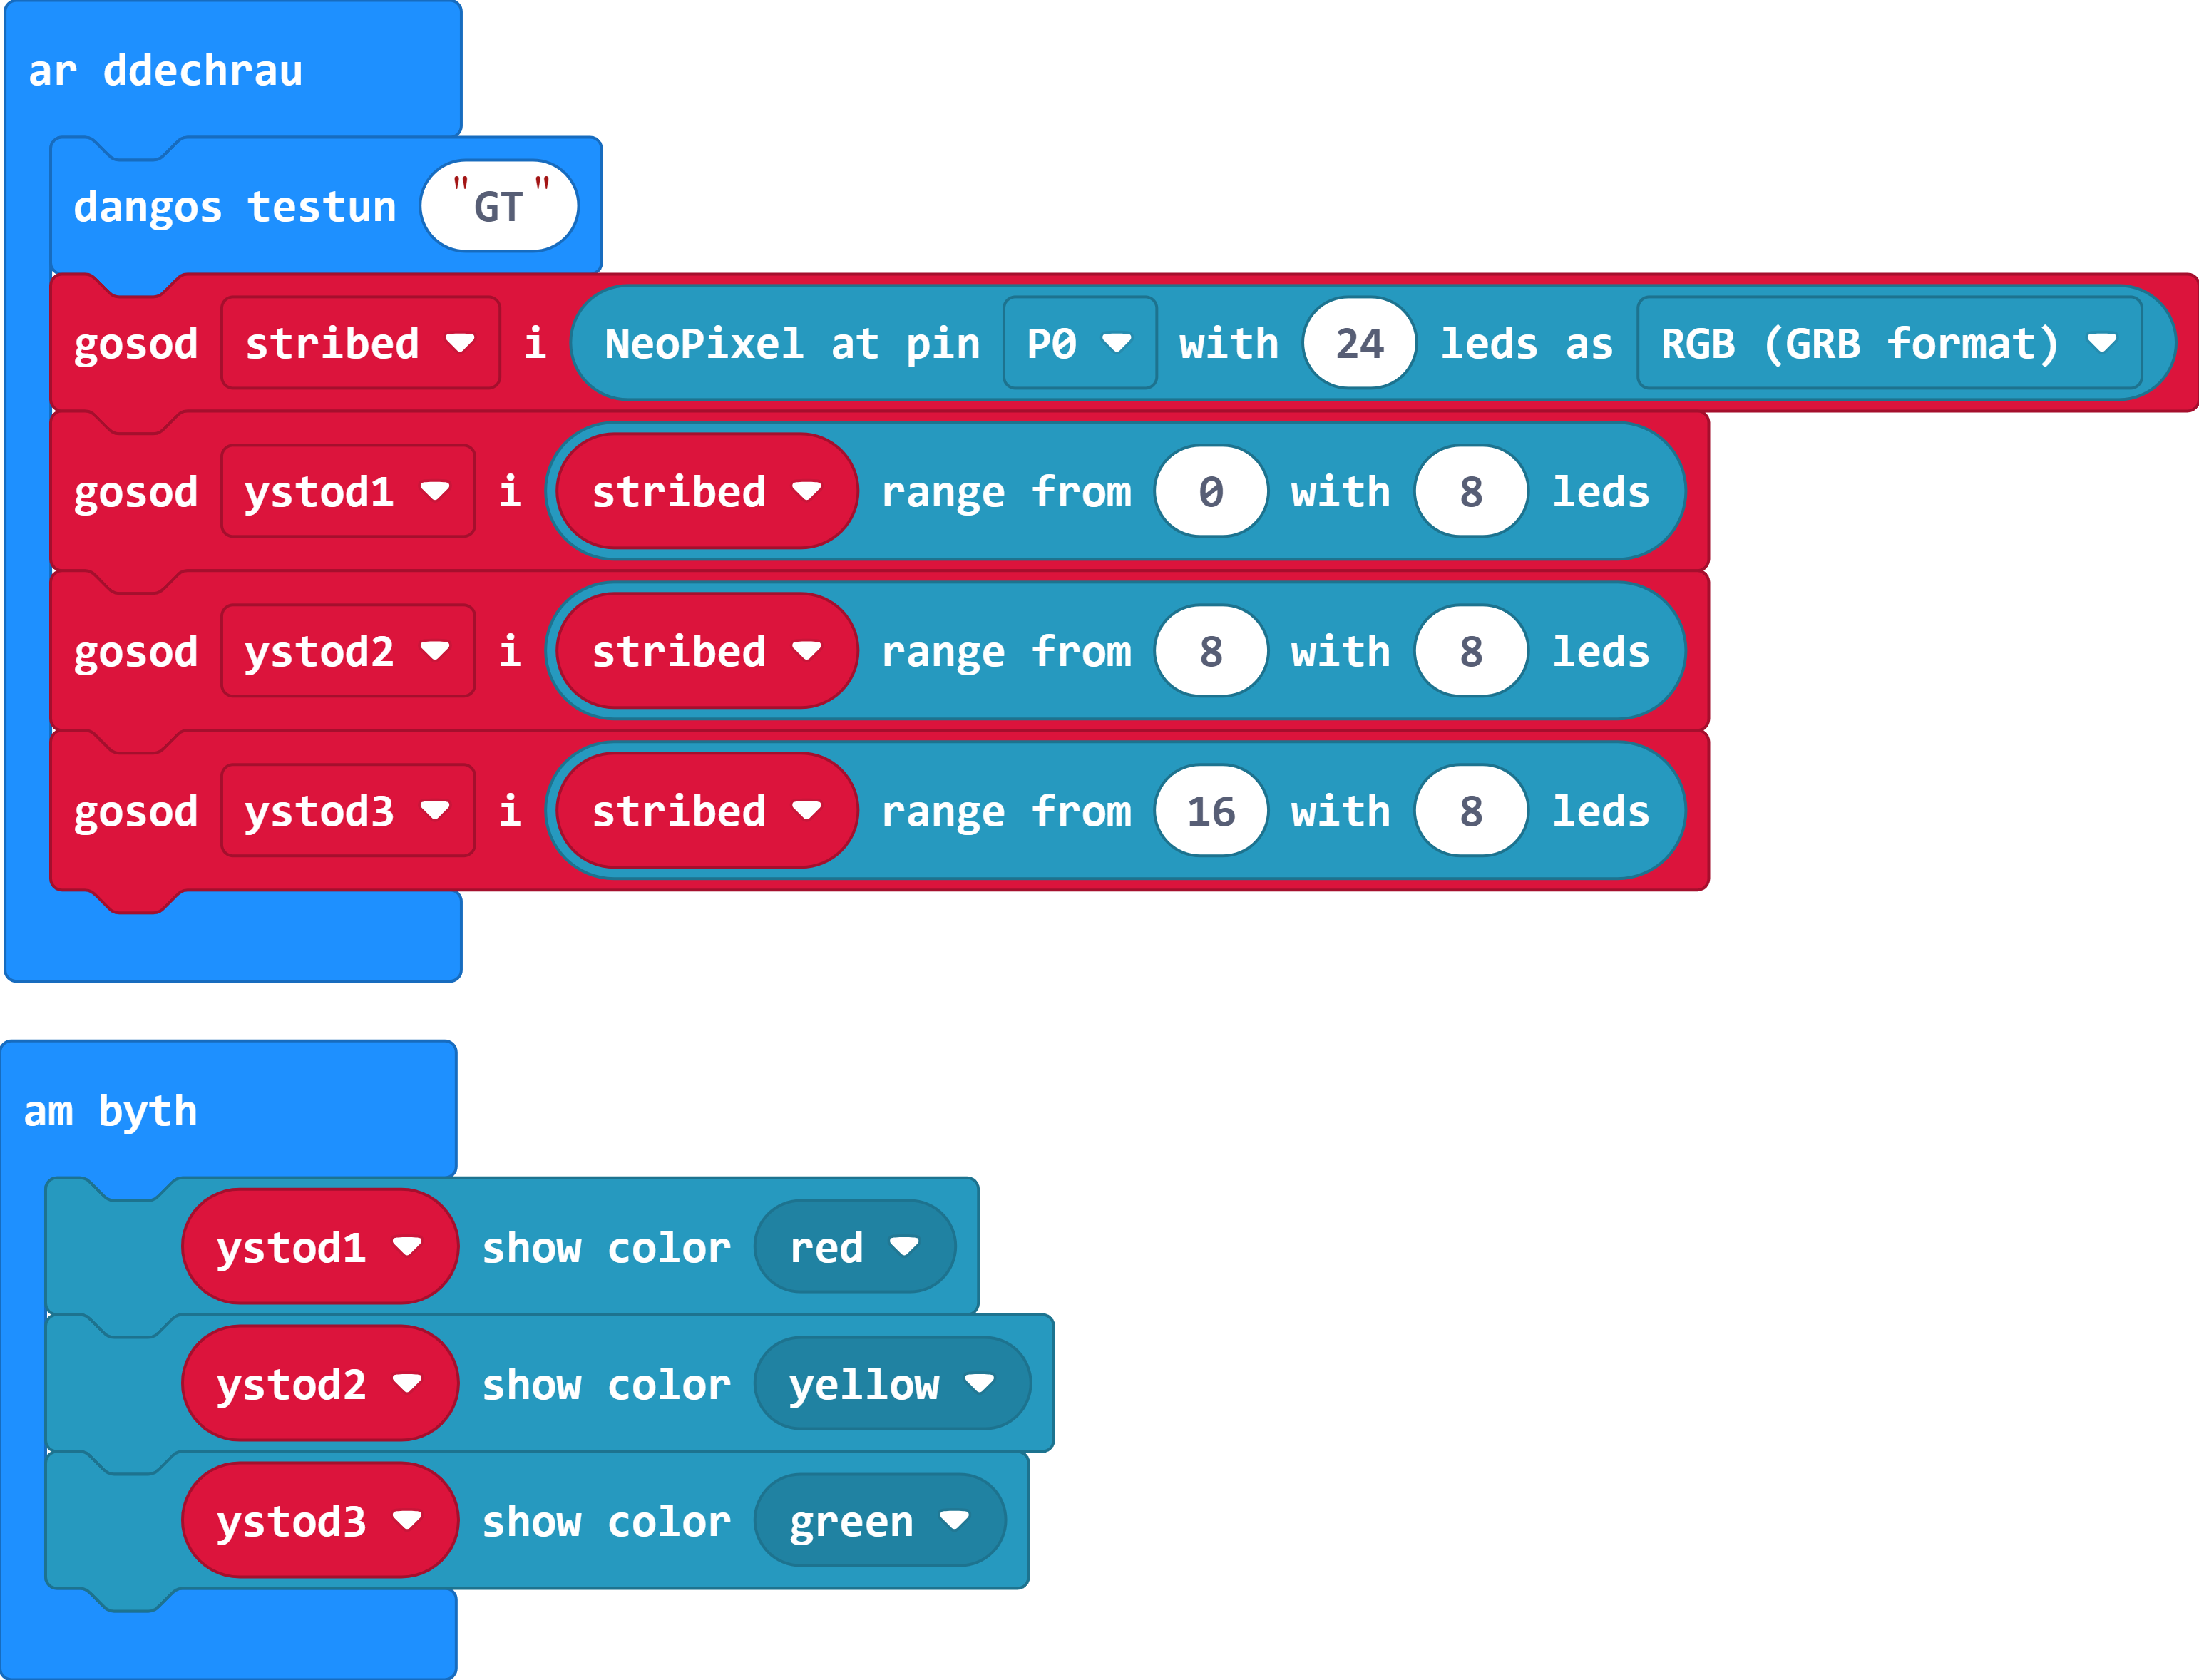
Gosodwch 3 ystod o faint cyfartal er mwyn ail-greu goleuadau traffig gan roi coch ar y brig, melyn yn y canol, a gwyrdd ar y gwaelod.
Gair o gyngor: Mae'r rhifau stribed LED yn dechrau ar 0.
Mae modd rhannu 24 â 3, sy'n golygu y bydd angen i chi sicrhau bod yr ystodau yn cwmpasu 8 LED yr un.
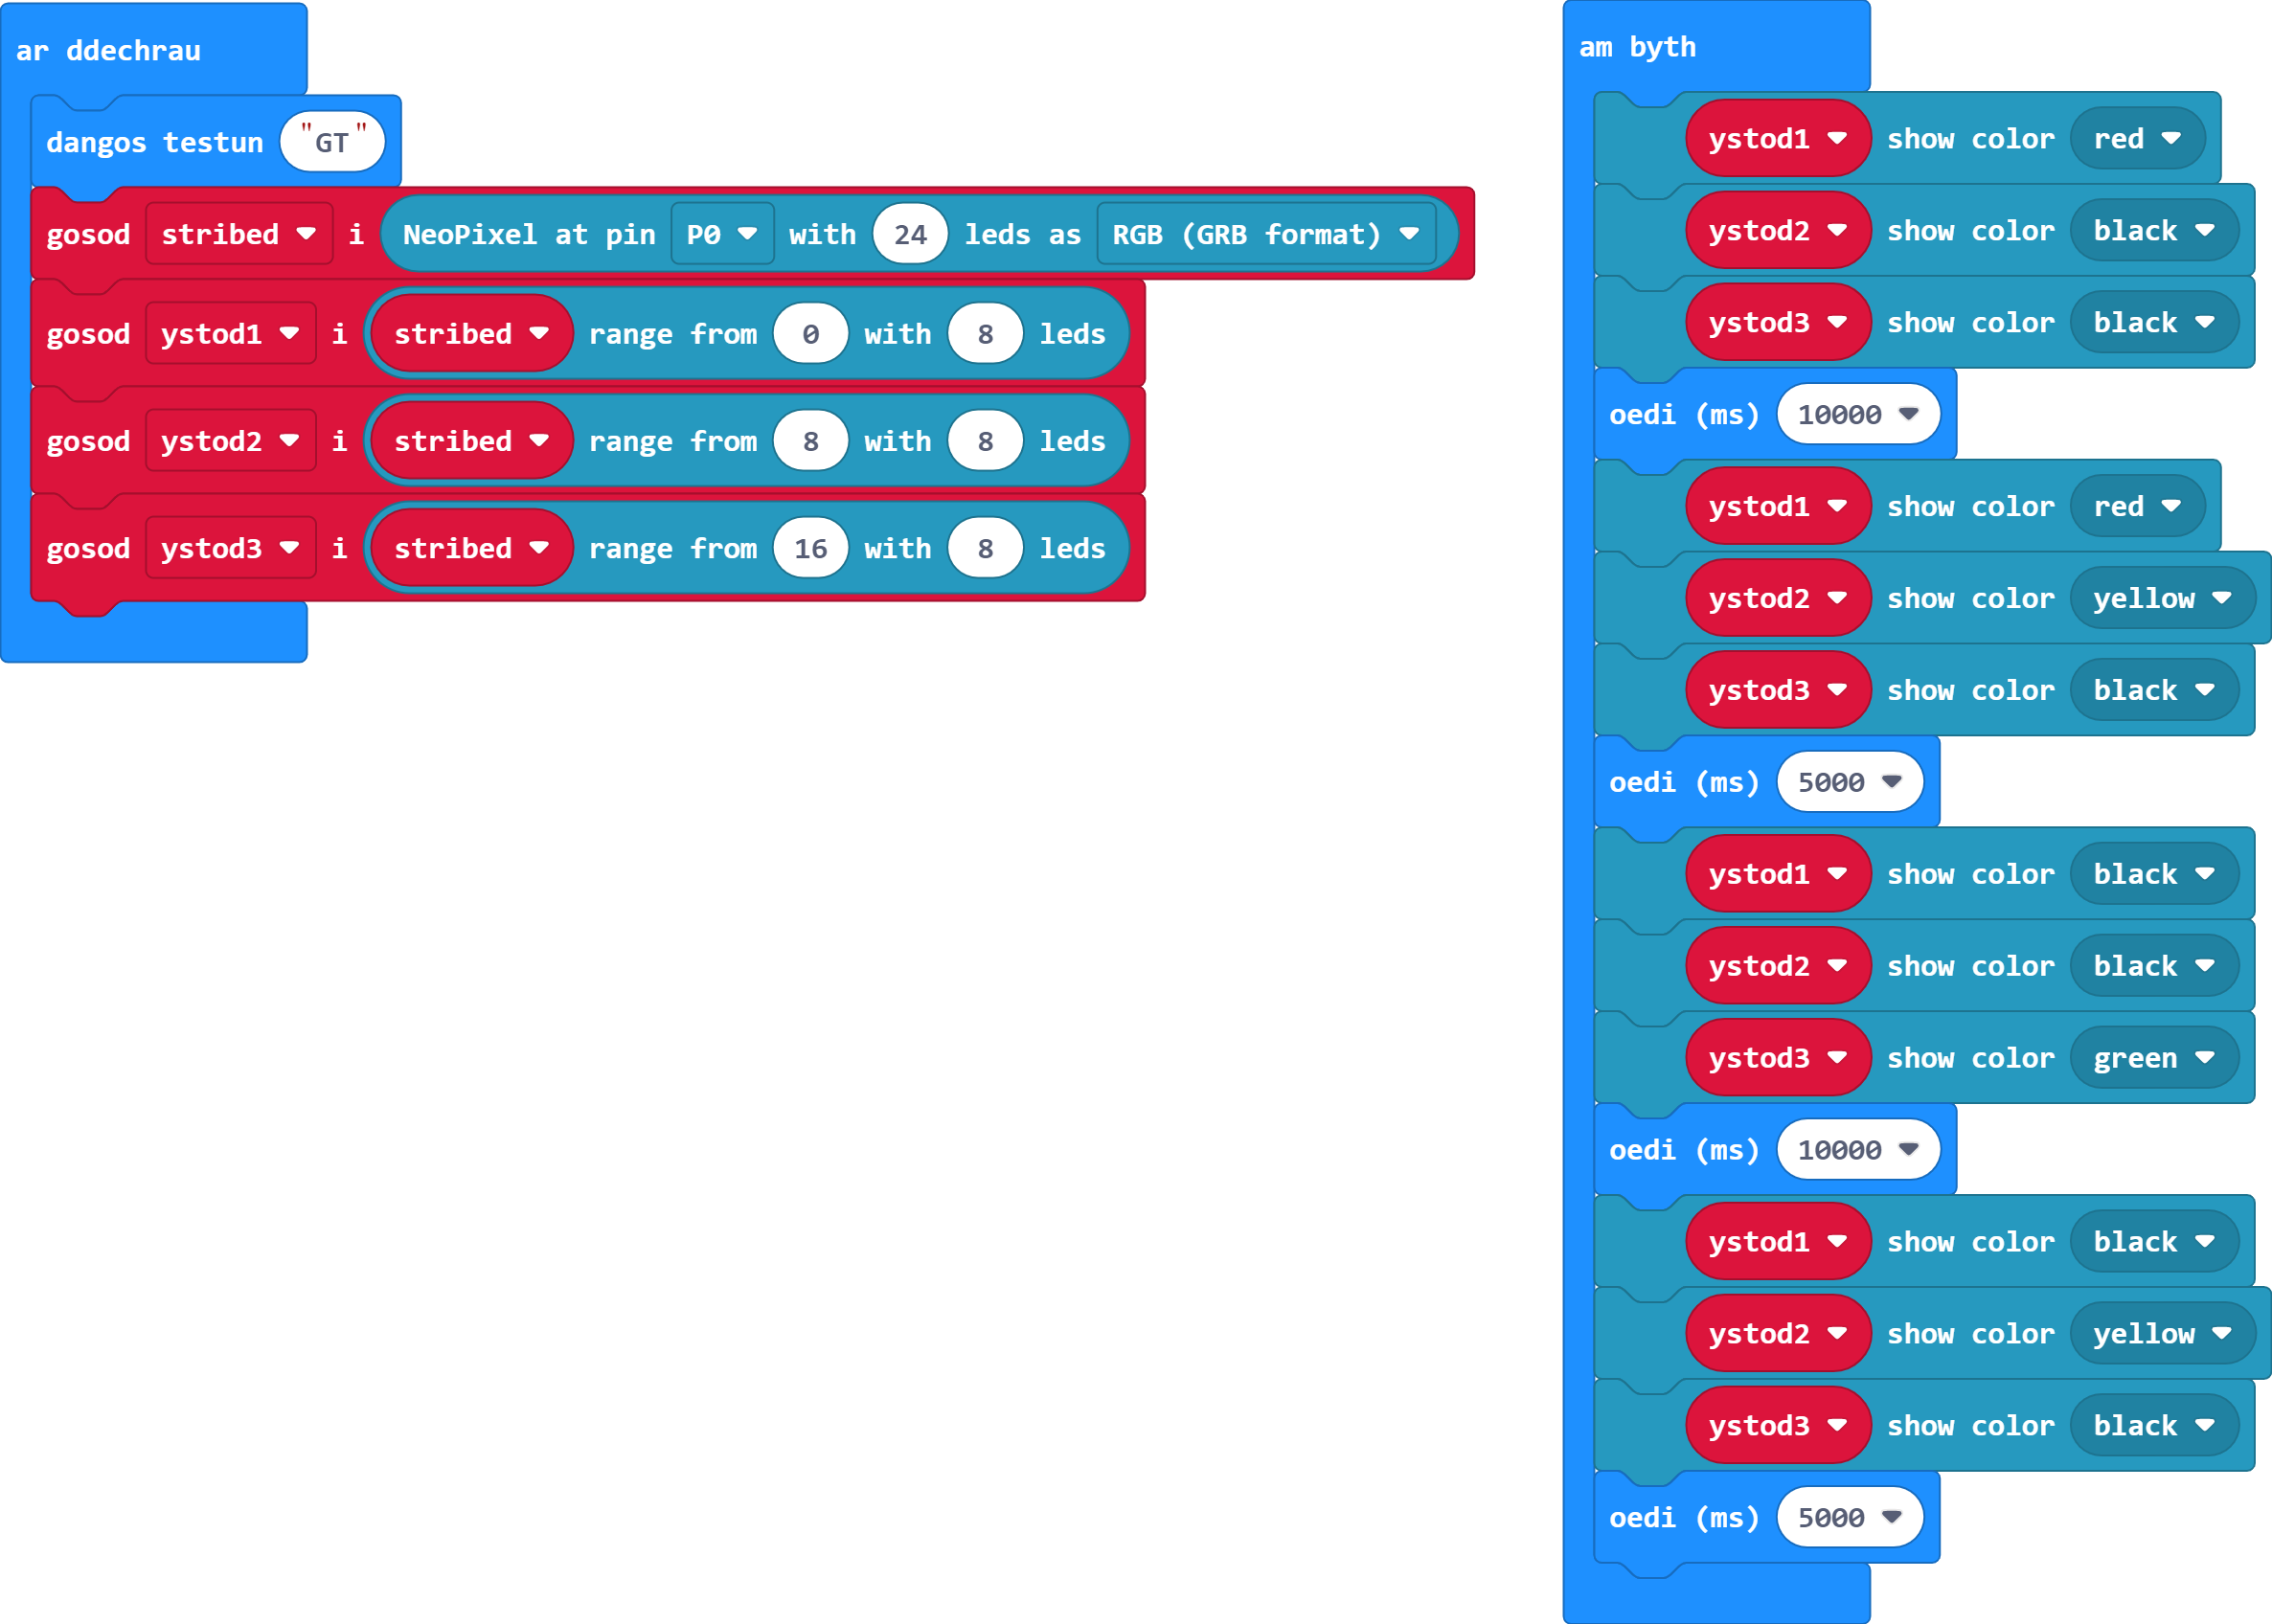
Defnyddiwch y rhaglen i greu goleuadau traffig sy'n symud trwy ddilyniant croesi dro ar ôl tro - mae'r golau yn goch am 10 eiliad, yn goch a melyn am 5 eiliad, yn wyrdd am 10 eiliad, ac yna'n felyn am 5 eiliad.
Trwy osod y dilyniant hwn yn y ddolen am byth bydd modd sicrhau ei fod yn ailadrodd yn am byth.
Cofiwch ddiffodd y lliwiau nad oes eu hangen bob tro (eu gosod i ddu).
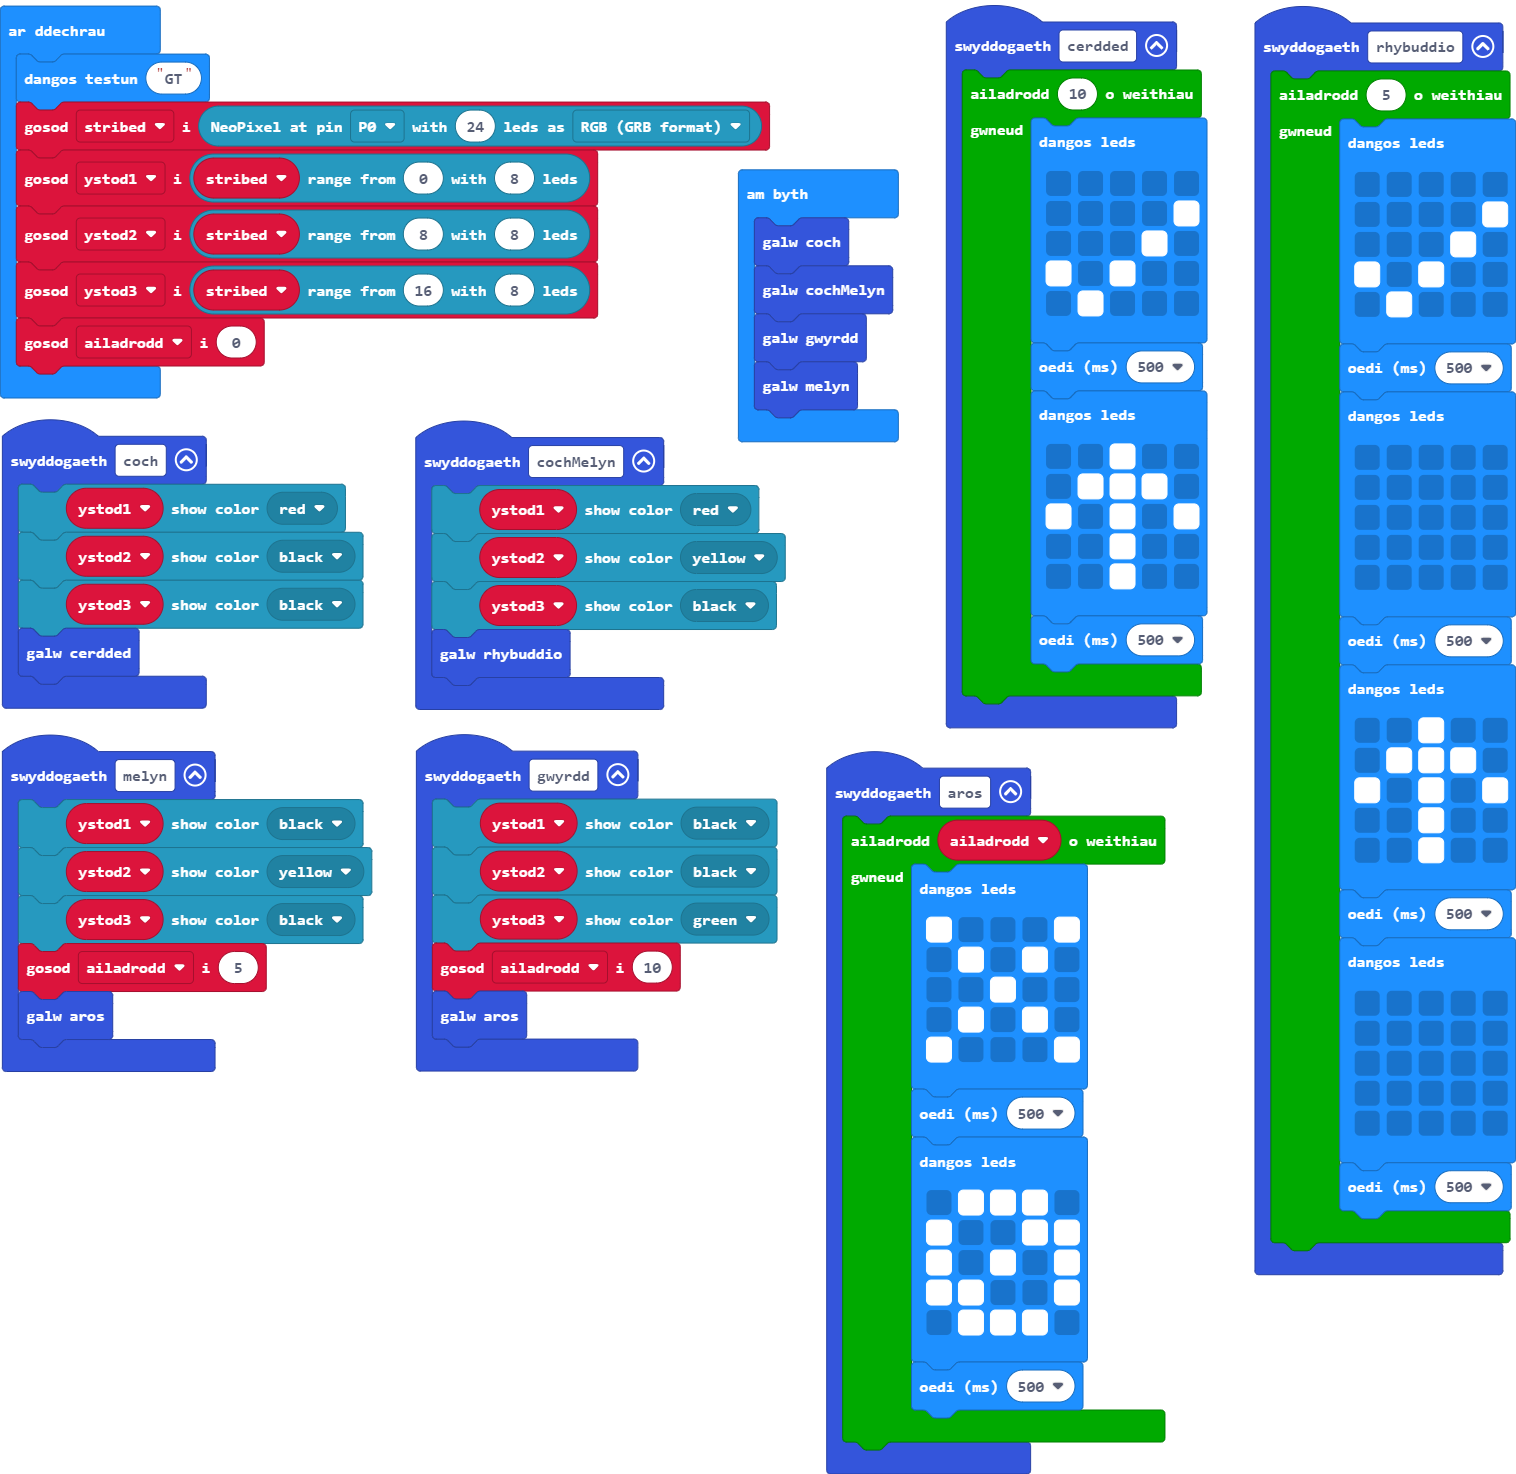
Symudwch bob newid golau i'w swyddogaethau eu hunain, gan gofio eu galw yn y ddolen am byth wedyn.
Rhowch enw addas i bob swyddogaeth.
Ychwanegwch animeiddiadau i'r Micro:Bit i ddangos pryd y mae'n ddiogel ac yn anniogel i gerddwyr groesi'r ffordd. Defnyddiwch dair swyddogaeth newydd i wneud hyn - un ar gyfer cerdded, un ar gyfer aros, ac un i rybuddio bod y goleuadau'n newid i wyrdd ar gyfer y traffig.
Gair o gyngor: Bydd angen i chi amseru eich animeiddiad i ddisodli'r defnydd presennol o flociau saib ar gyfer amseru'r goleuadau.
Gair o gyngor: Bydd newidyn yn golygu mai dim ond un swyddogaeth sydd ei hangen arnoch i aros, a gellir ei defnyddio pan fydd y golau yn wyrdd a phan fydd yn felyn.
Mae hwn yn gyfle da i ymarfer gweithio gyda'r blociau ailadrodd oddi mewn i'r swyddogaethau.
Gallwch alw swyddogaeth o'r tu mewn i swyddogaeth arall.
Os ydych chi'n defnyddio dwy ddelwedd ar gyfer eich animeiddiadau, bydd angen i chi eu hailadrodd 10 gwaith gyda seibiau hanner eiliad ar ôl pob un ar gyfer y golau coch a'r golau gwyrdd. Mae angen ailadrodd 5 gwaith yn unig pan fydd y golau melyn yn weithredol.
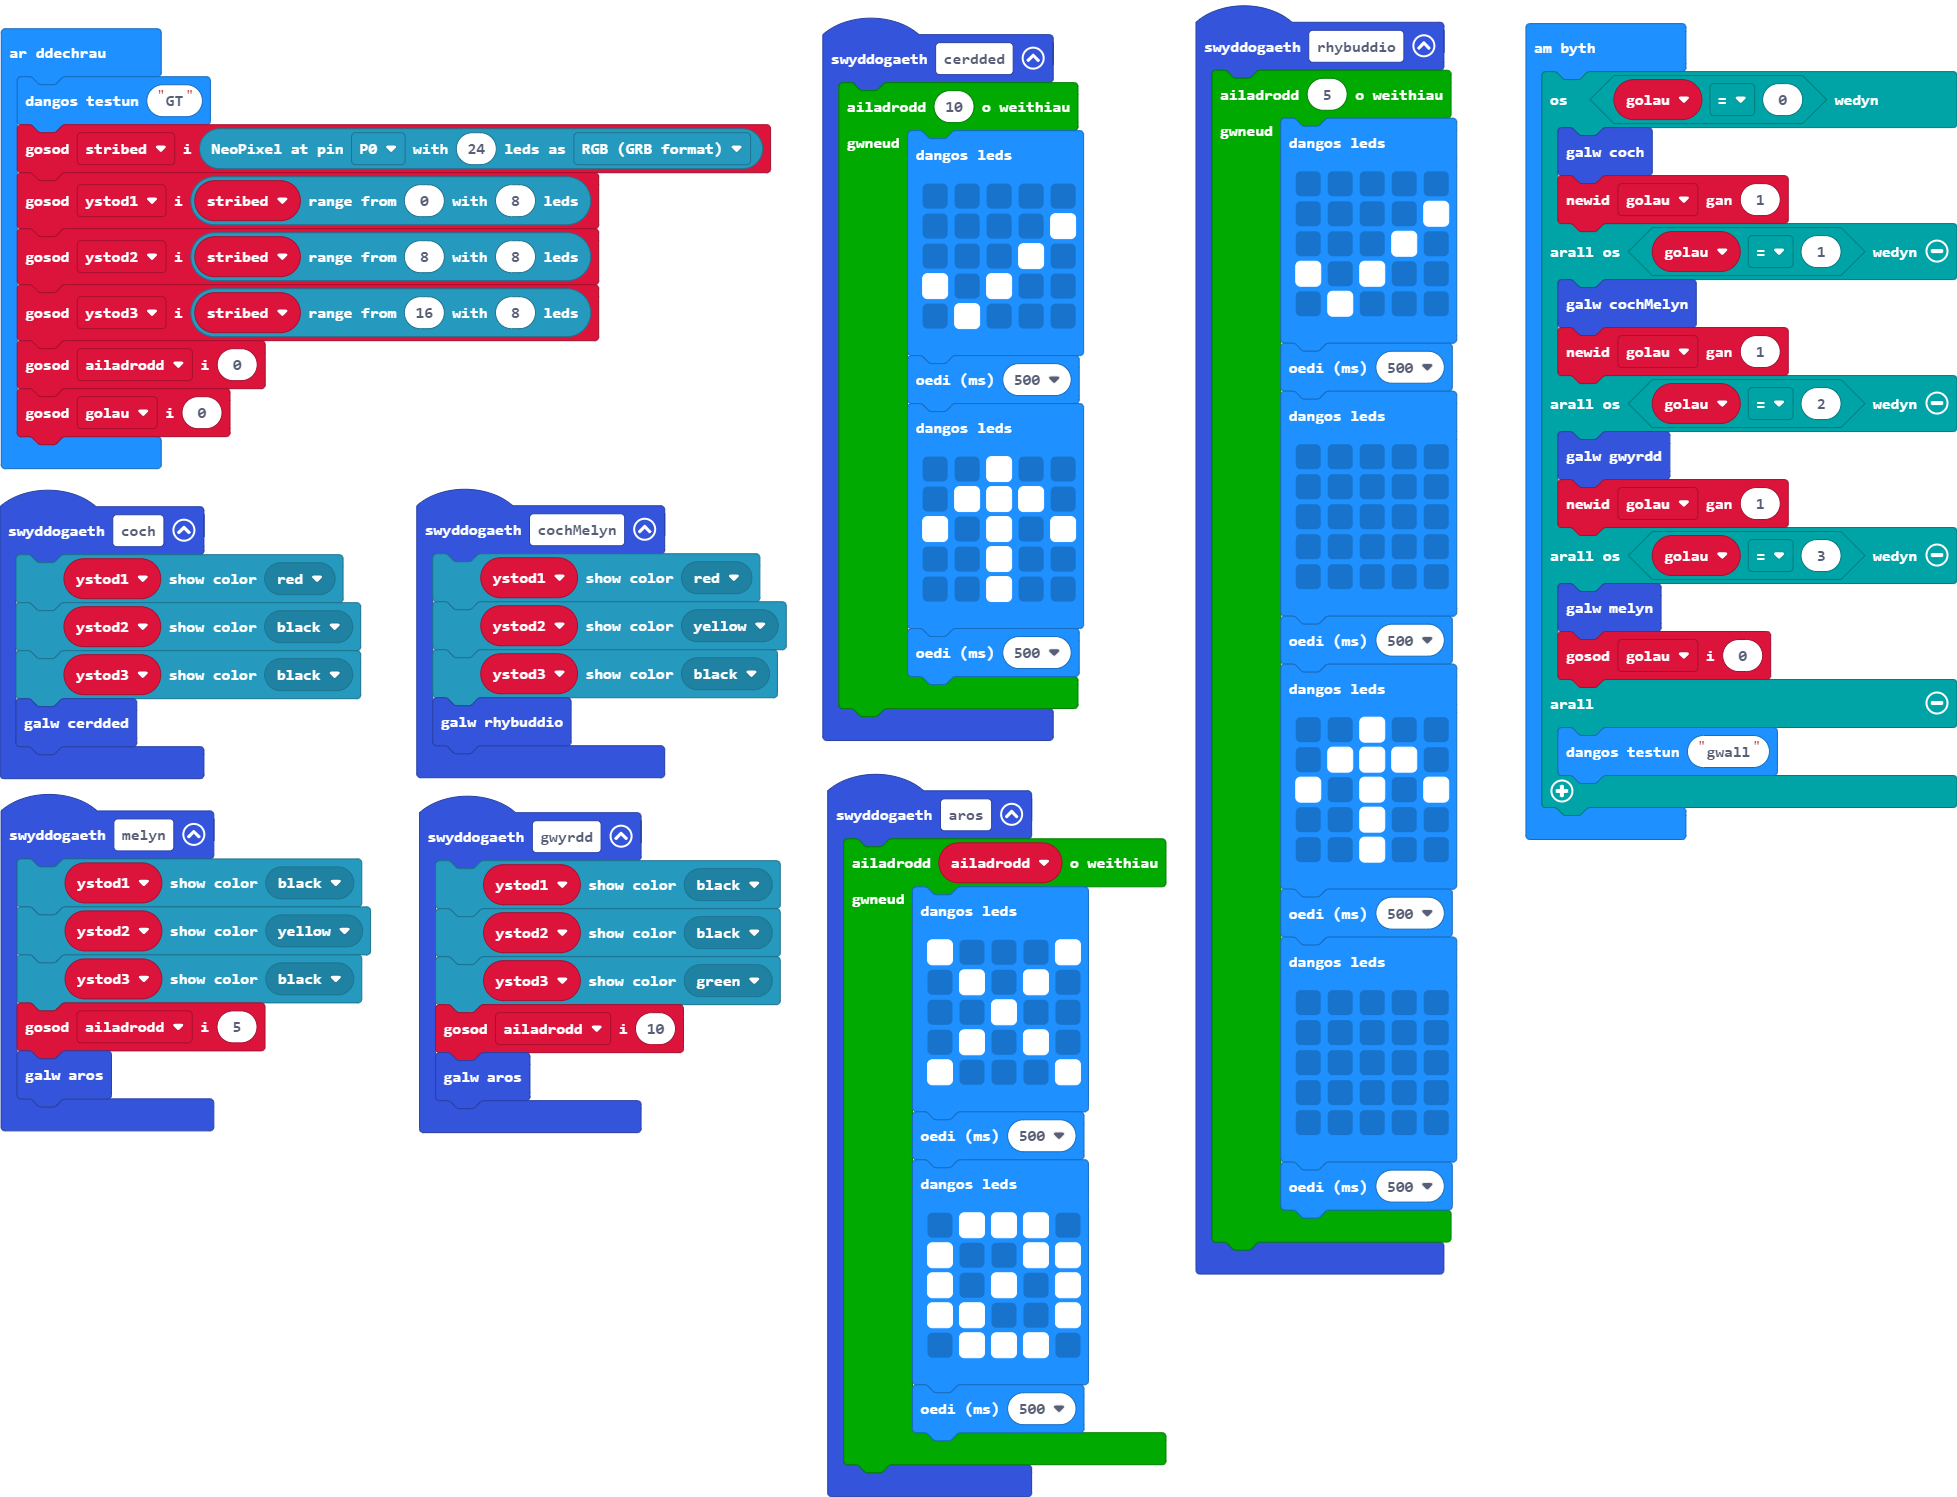
Defnyddiwch y rhaglen i greu newidyn lliw golau traffig i'w ddefnyddio i nodi pa olau sy'n weithredol ar hyn o bryd a defnyddiwch hyn yn y datganiadau 'os/arall' er mwyn gosod y goleuadau.
Gair o gyngor: Cofiwch osod y newidyn yn y bloc 'ar ddechrau'.
Bydd angen i chi ddefnyddio rhifau i gynrychioli gosodiadau gwahanol y goleuadau.
Defnyddiwch arall-datganiad i nodi unrhyw wallau yn ymwneud â gwerth y newidyn.
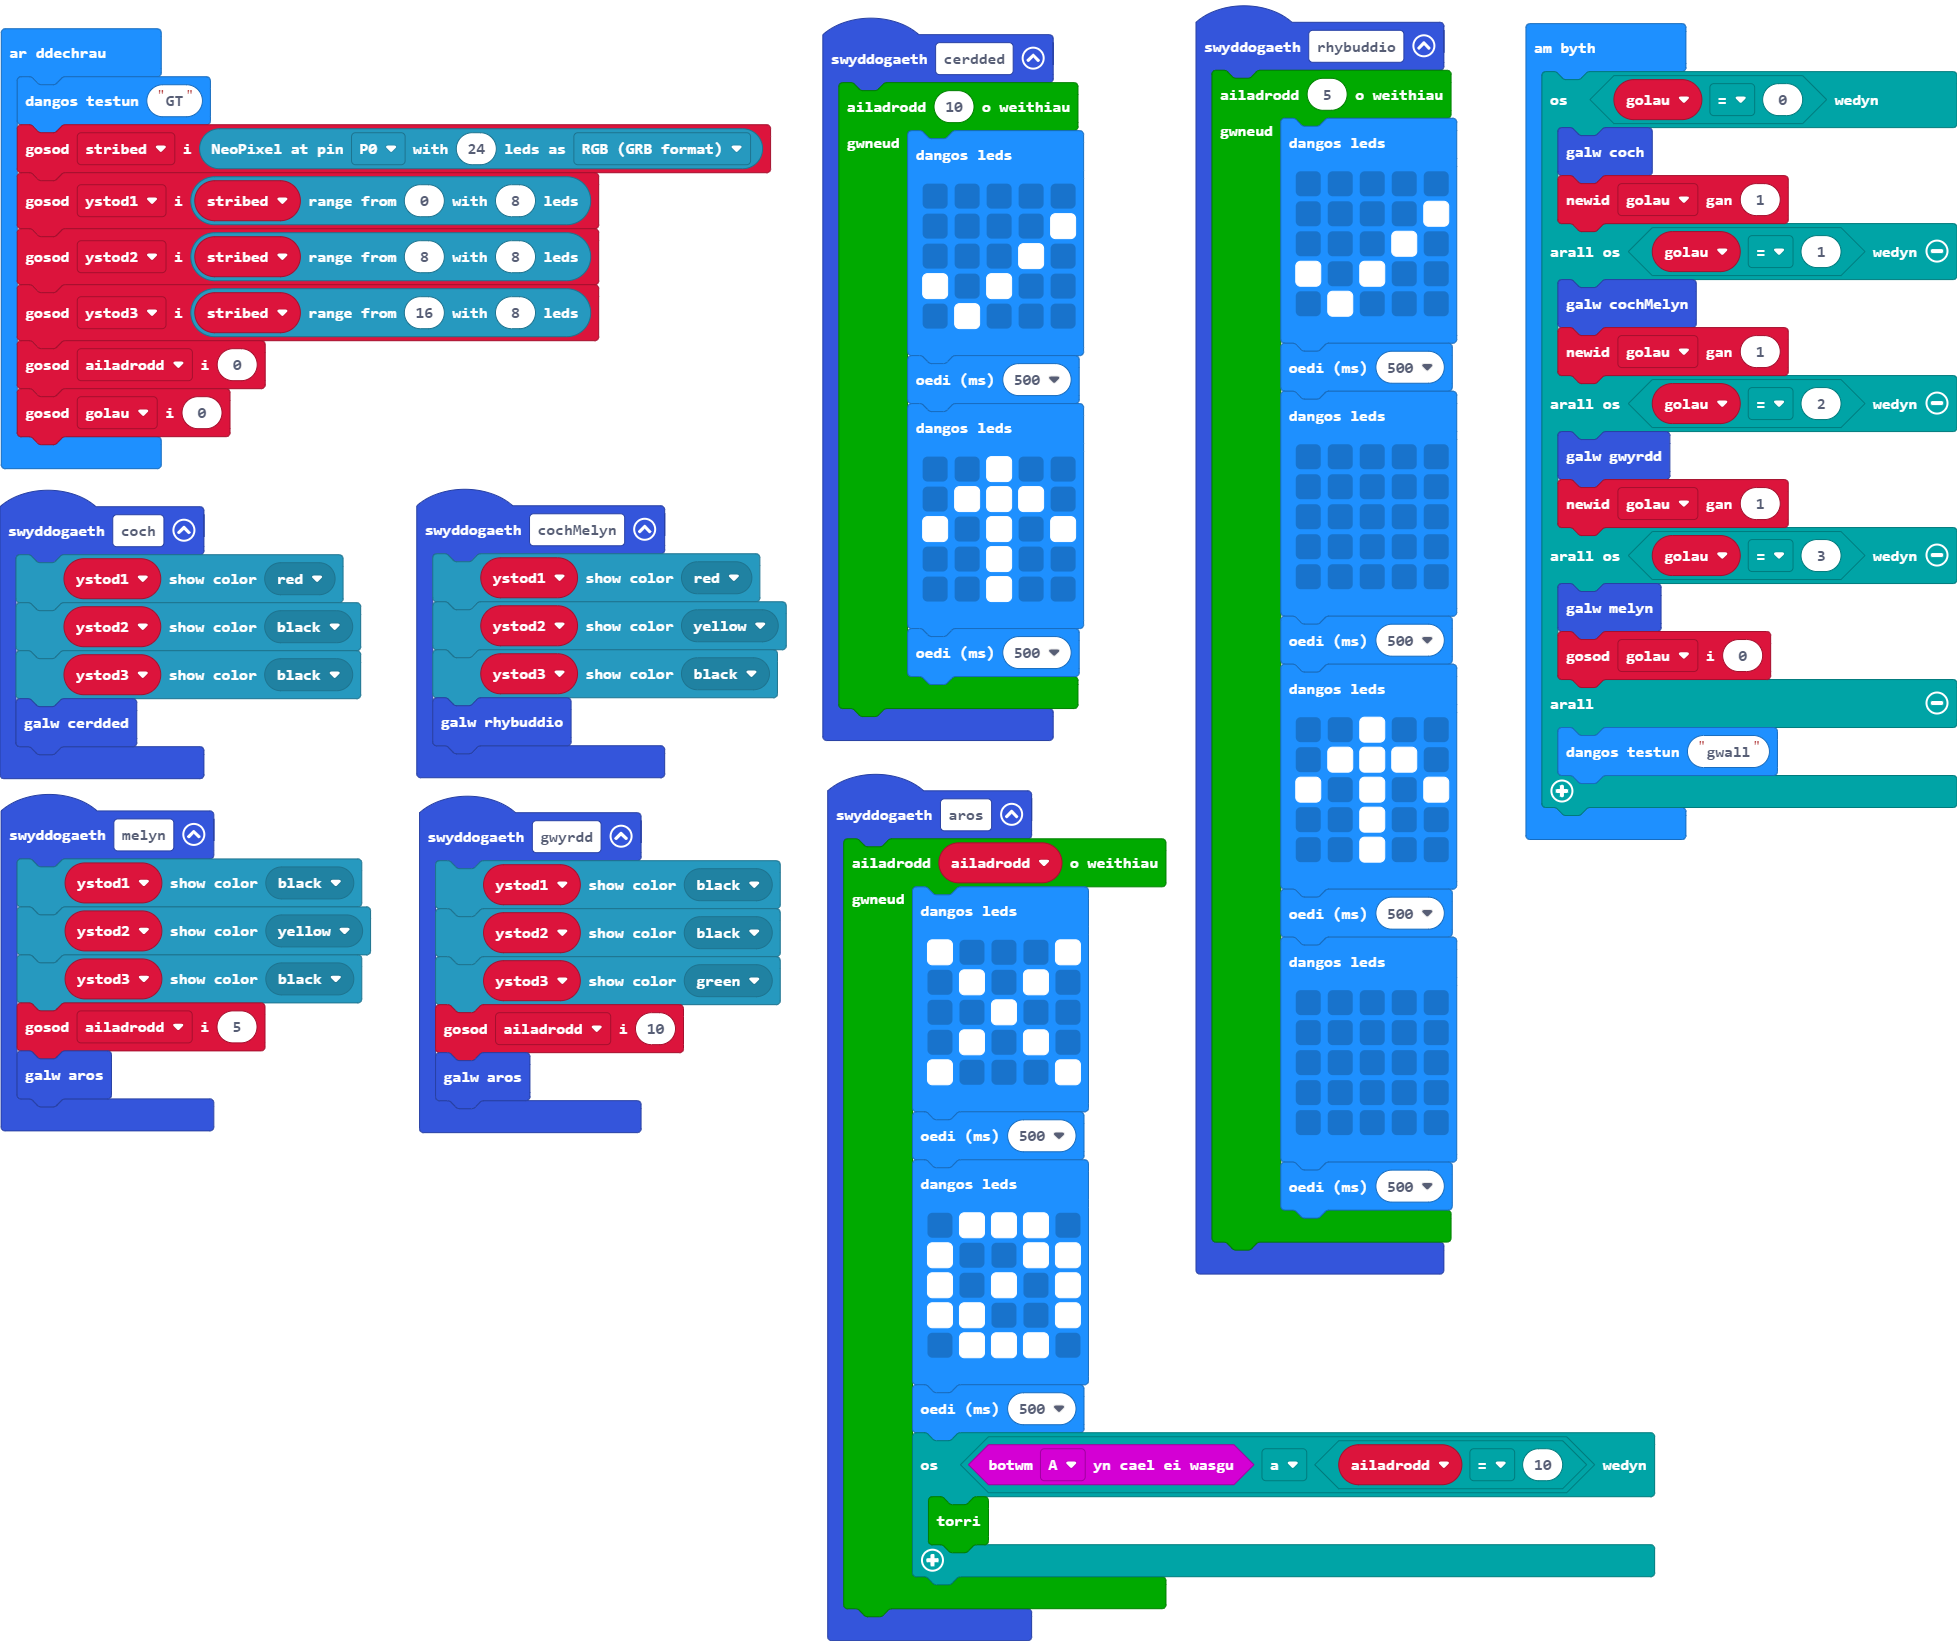
Defnyddiwch y botwm A ar y Micro:Bit i atal y traffig.
Gair o gyngor: Dim ond tra bod y goleuadau traffig yn wyrdd y mae angen i'r swyddogaeth ddisodli hon weithio.
Pwysig: Gallwch atal dolen yn gynnar trwy ddefnyddio'r bloc 'break' yn y ddewislen Dolenni.
Mae angen i chi ddweud wrth y rhaglen am newid i felyn pan fydd botwm A yn cael ei bwyso.
Er mwyn disodli'r rhaglen yn y modd hwn, bydd angen i chi gadarnhau bod botwm A wedi'i bwyso y tu mewn i floc ailadrodd yr animeiddiad perthnasol.
Mae'n bosibl y bydd angen i chi wirio yn erbyn newidyn arall hefyd; gall hyn ddefnyddio os-datganiad wedi'i bentyrru neu weithredwr Boole 'a'.
Ychwanegwch sain i nodi pryd mae'n ddiogel i groesi ar gyfer y rhai na allant weld y cyfarwyddiadau gweledol.
Y cwbl sydd angen ei wneud yw chwarae un nodyn pan fydd pob delwedd yn yr animeiddiad yn newid er mwyn dangos ei bod yn ddiogel dechrau croesi (pan fydd y goleuadau traffig yn goch).
Nod yr ymarferiad isod yw ehangu'r rhaglen ymhellach. Gweithgaredd i chi ymchwilio iddo a'i archwilio yw hwn - nid oes atebion ar gael.
Ychwanegwch ail Neopicsel i bin 2 ac ewch ati i wneud iddo weithredu fel goleuadau traffig ar gyfer traffig sy'n llifo i'r cyfeiriad arall.
I ba raddau gallwch chi dacluso eich cod trwy ddefnyddio swyddogaethau, dolennau wrth, blociau ailadrodd, a newidynnau?
Gwers Fideo (yn Saesneg):
Ymarferion:
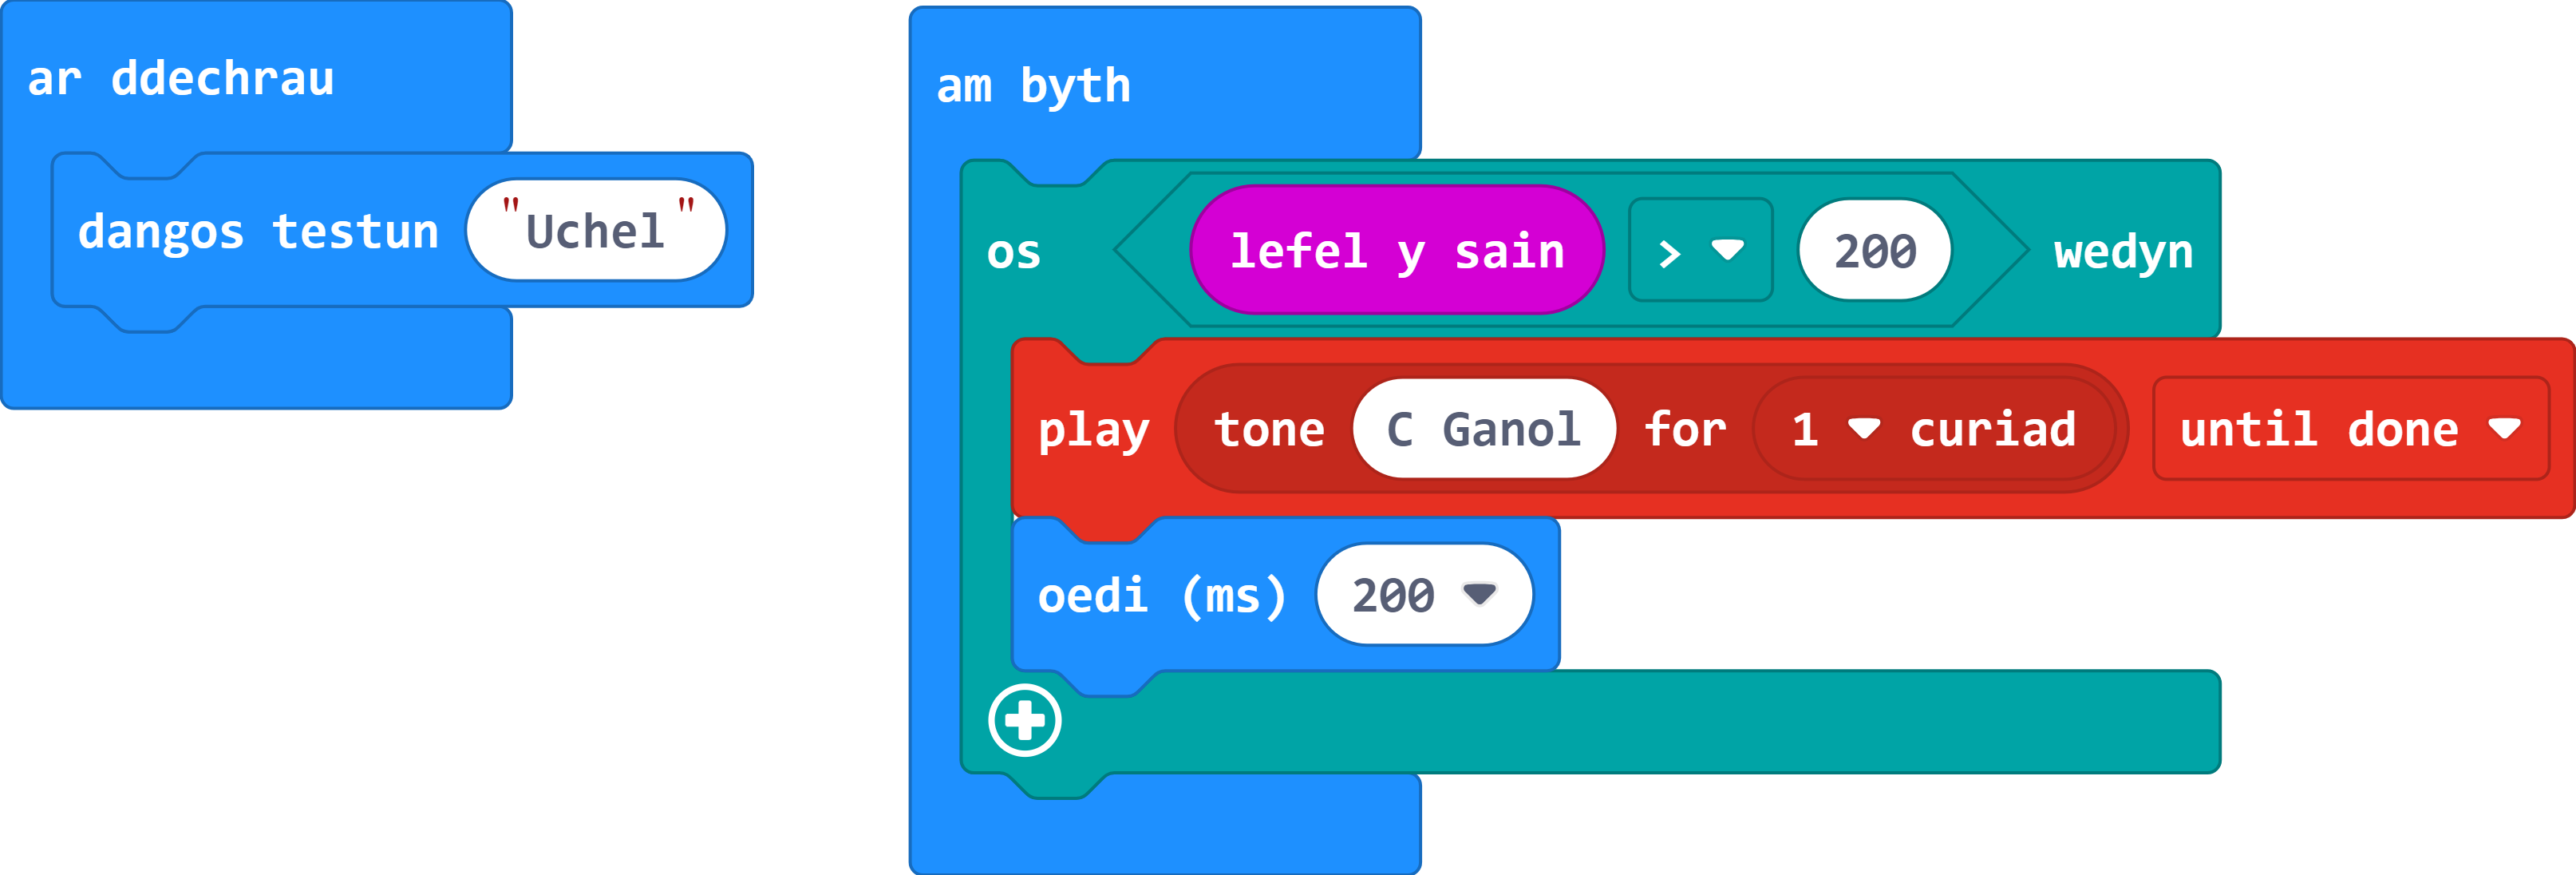
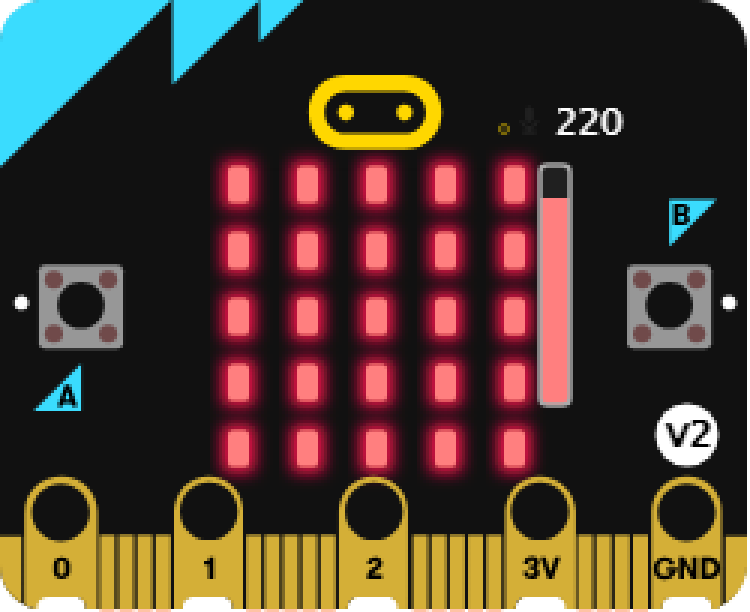
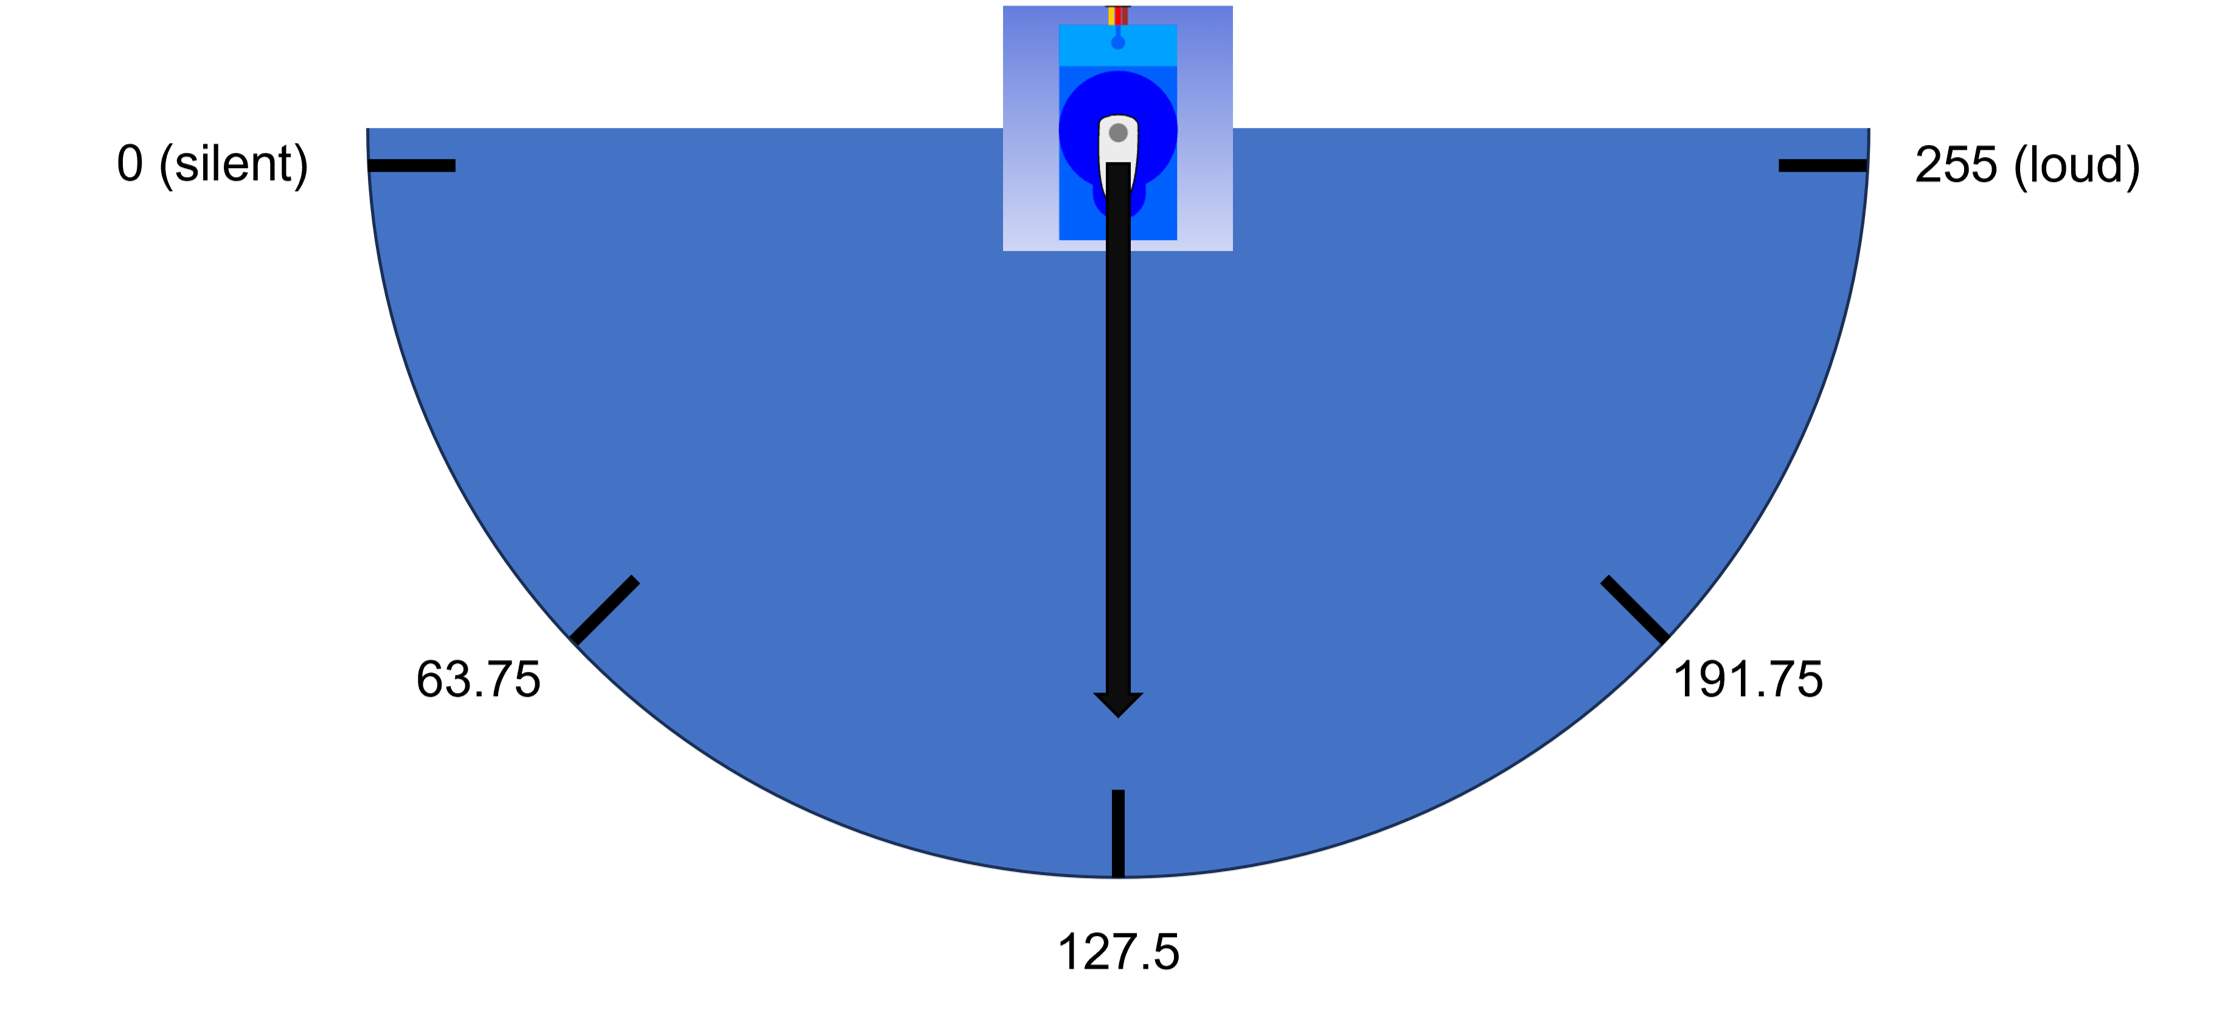
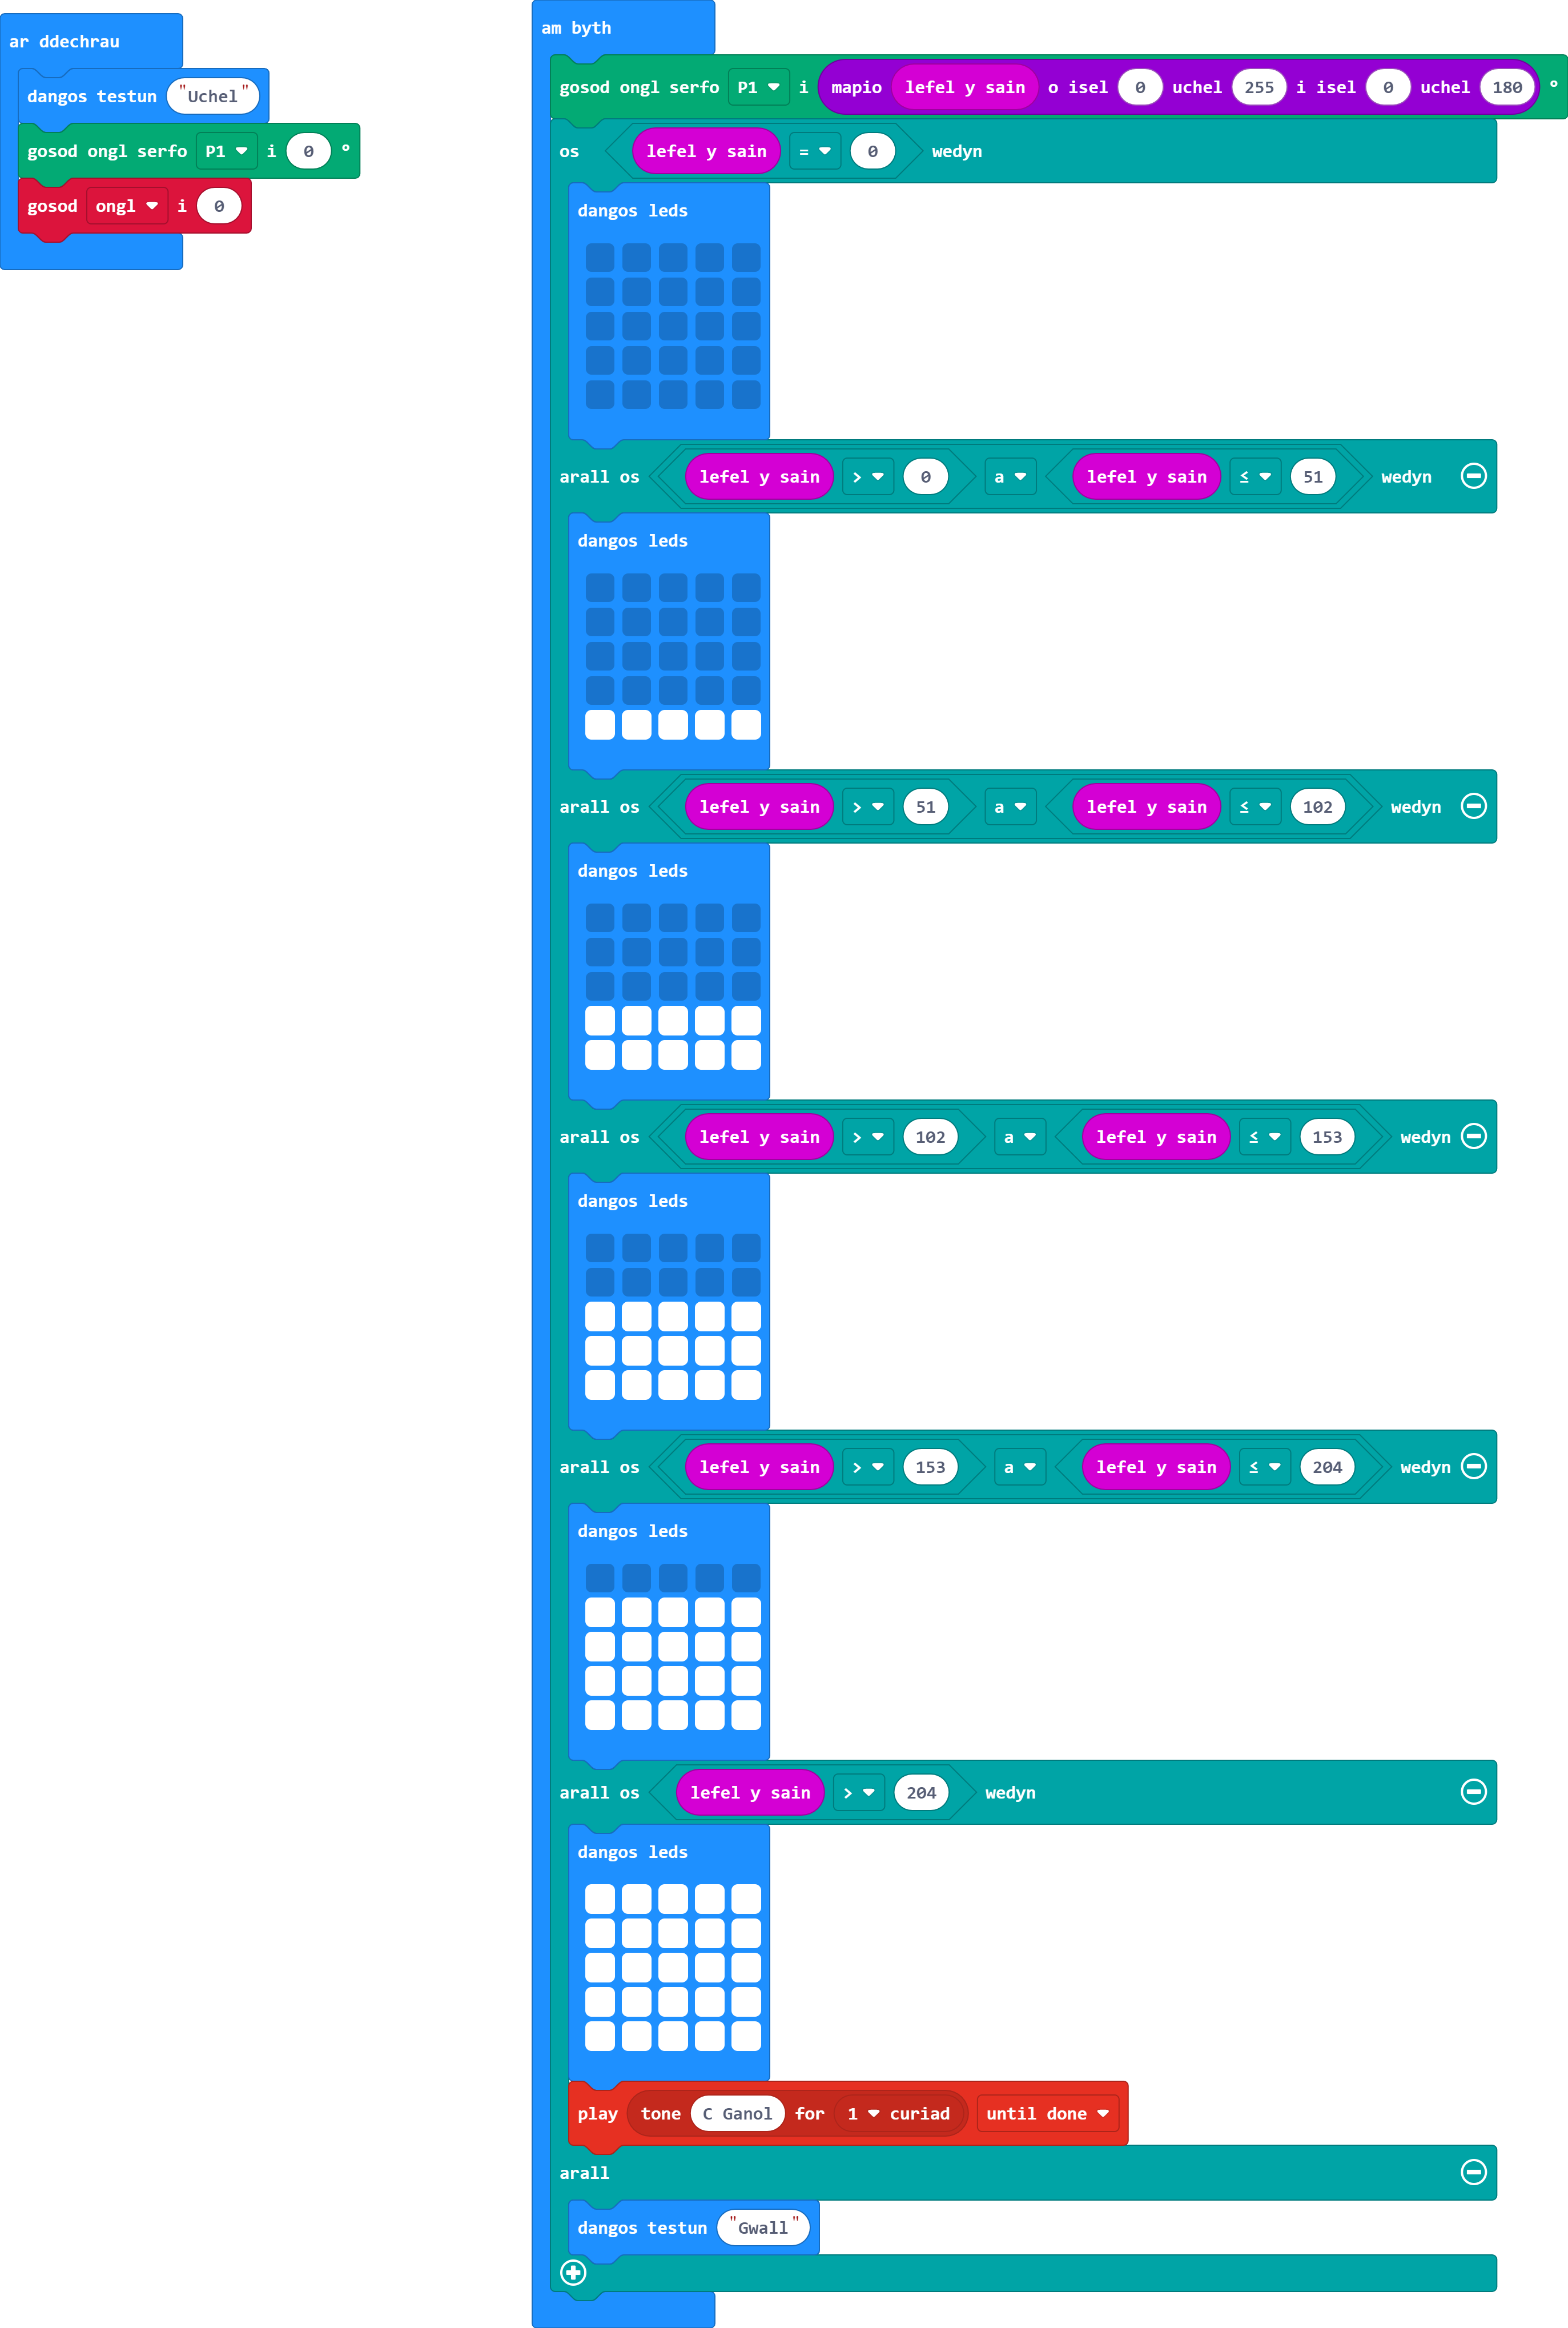
Ar gyfer y sesiwn hon byddwn yn creu rhaglen i droi eich BBC Micro:Bit yn fesurydd sain trwy ddefnyddio serfo.
Fel sy'n wir am bob un o'n hymarferion, mae dysgwyr yn cwblhau un lefel cyn symud i'r nesaf. Oni wneir hynny, mae'n bosibl y bydd dysgwyr yn methu derbyn gwybodaeth neu'n hepgor cam hanfodol sy'n atal y rhaglen rhag gweithio.
Cliciwch ar bennawd pob her i gael y manylion.
Ysgrifennwch raglen sy'n canu larwm pan fydd lefel y sain dros 200.
Gair o gyngor: Cofiwch am y drefn 'start-up' i adnabod y rhaglen.
Mae angen defnyddio os-datganiad gydag amod lefel sain > 200.
Mae yna floc newidiol ar gyfer lefel y sain yn y ddewislen Mewnbwn ar gyfer y V2.
Ychwanegwch rai oediadau i leihau cyfradd y sain/nodyn o'ch dewis.
Defnyddiwch y rhaglen fel bod Micro:Bit yn arddangos lefel y sain ar ei sgrin.
Gair o gyngor: Gallwch wneud hyn trwy ddefnyddio bloc 'dangos testun'.
Mae angen rhoi'r bloc hwn yn y ddolen am byth, y tu allan i'r os-datganiad presennol.
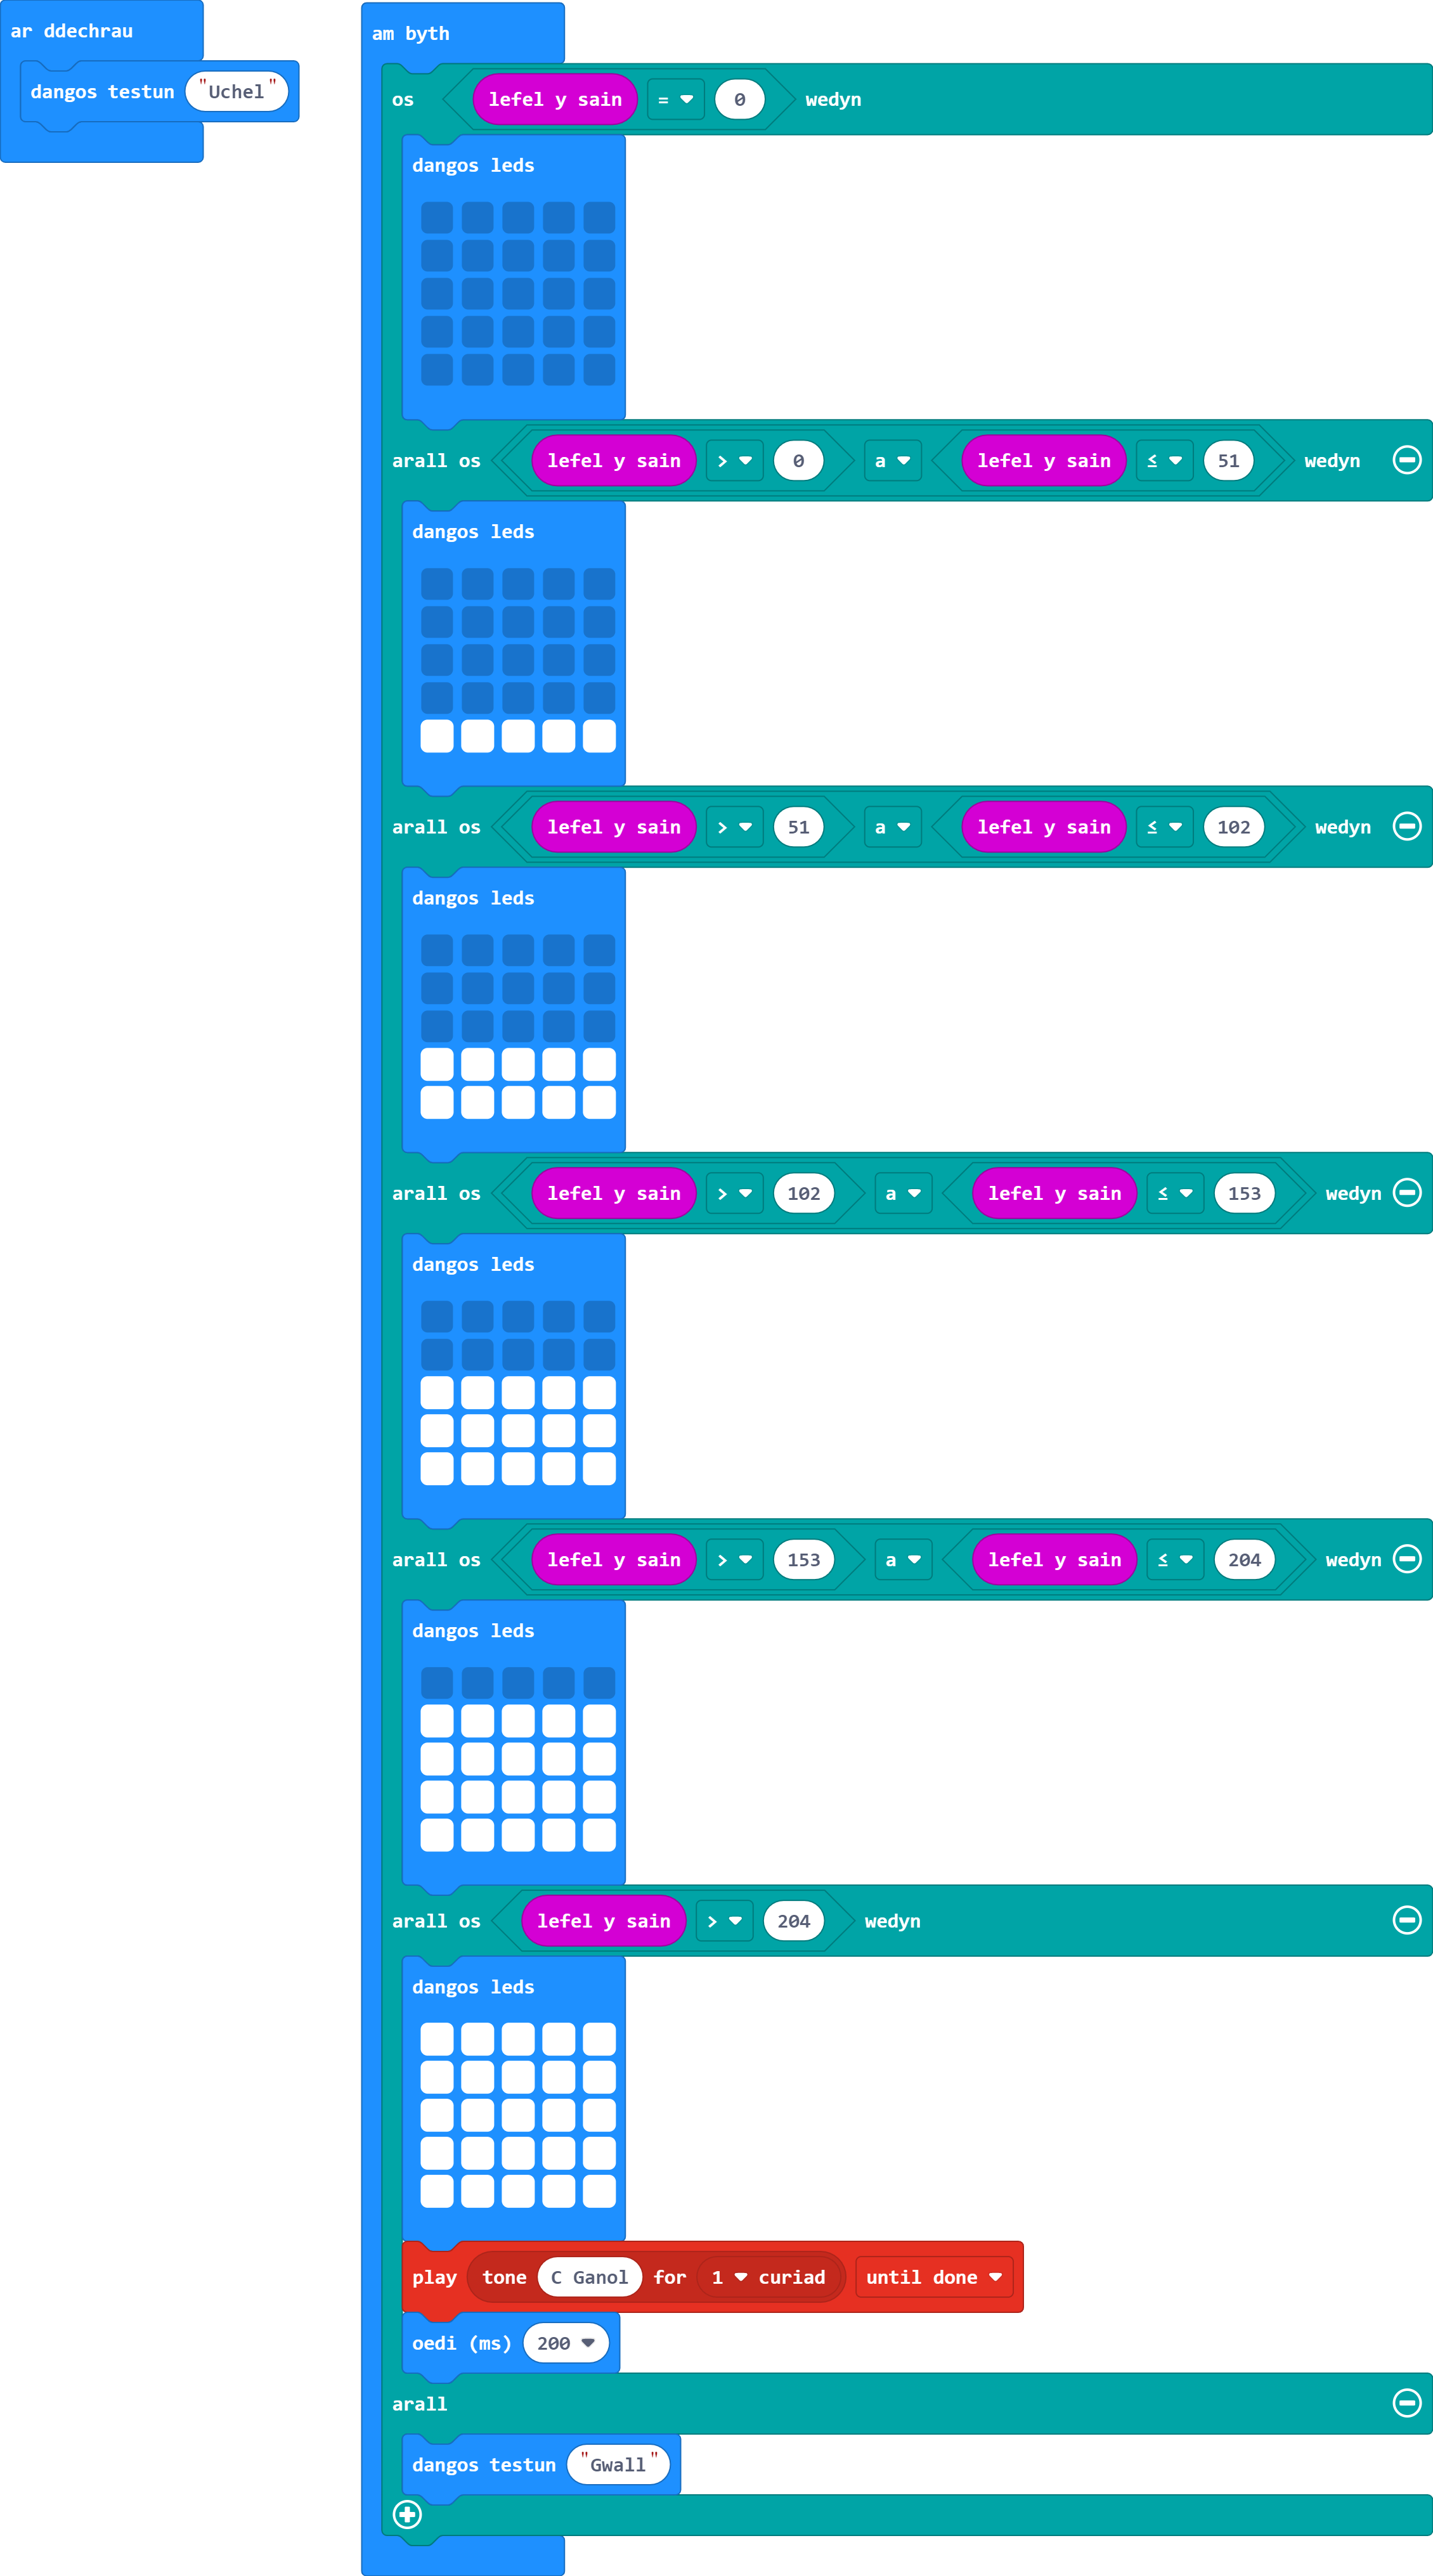
Nodwch fod y bloc 'dangos testun' yn arafu sŵn y larwm. Gadewch i ni ddatrys hyn trwy ddisodli'r rhif â'r delweddau a'r amodau hyn:
Lefel y sain yw 0.
Mae lefel y sain dros 0 ac yn llai na neu'n hafal i 51.
Mae lefel y sain dros 51 ac yn llai na neu'n hafal i 102.
Mae lefel y sain dros 102 ac yn llai na neu'n hafal i 153.
Mae lefel y sain dros 153 ac yn llai na neu'n hafal i 204.
Mae lefel y sain dros 204.
Dylai'r larwm ddim ond canu pan fydd y mesurydd yn llawn.
I wneud hyn, bydd angen cyfres newydd o ddatganiadau 'os' ac 'arall os'.
Cofiwch y gallwch ddefnyddio'r gweithredwr Boole 'a' yn hytrach na phentyrru os-datganiadau.
Defnyddiwch y arall-datganiad ar y diwedd ar gyfer unrhyw wallau yn y rhaglen.
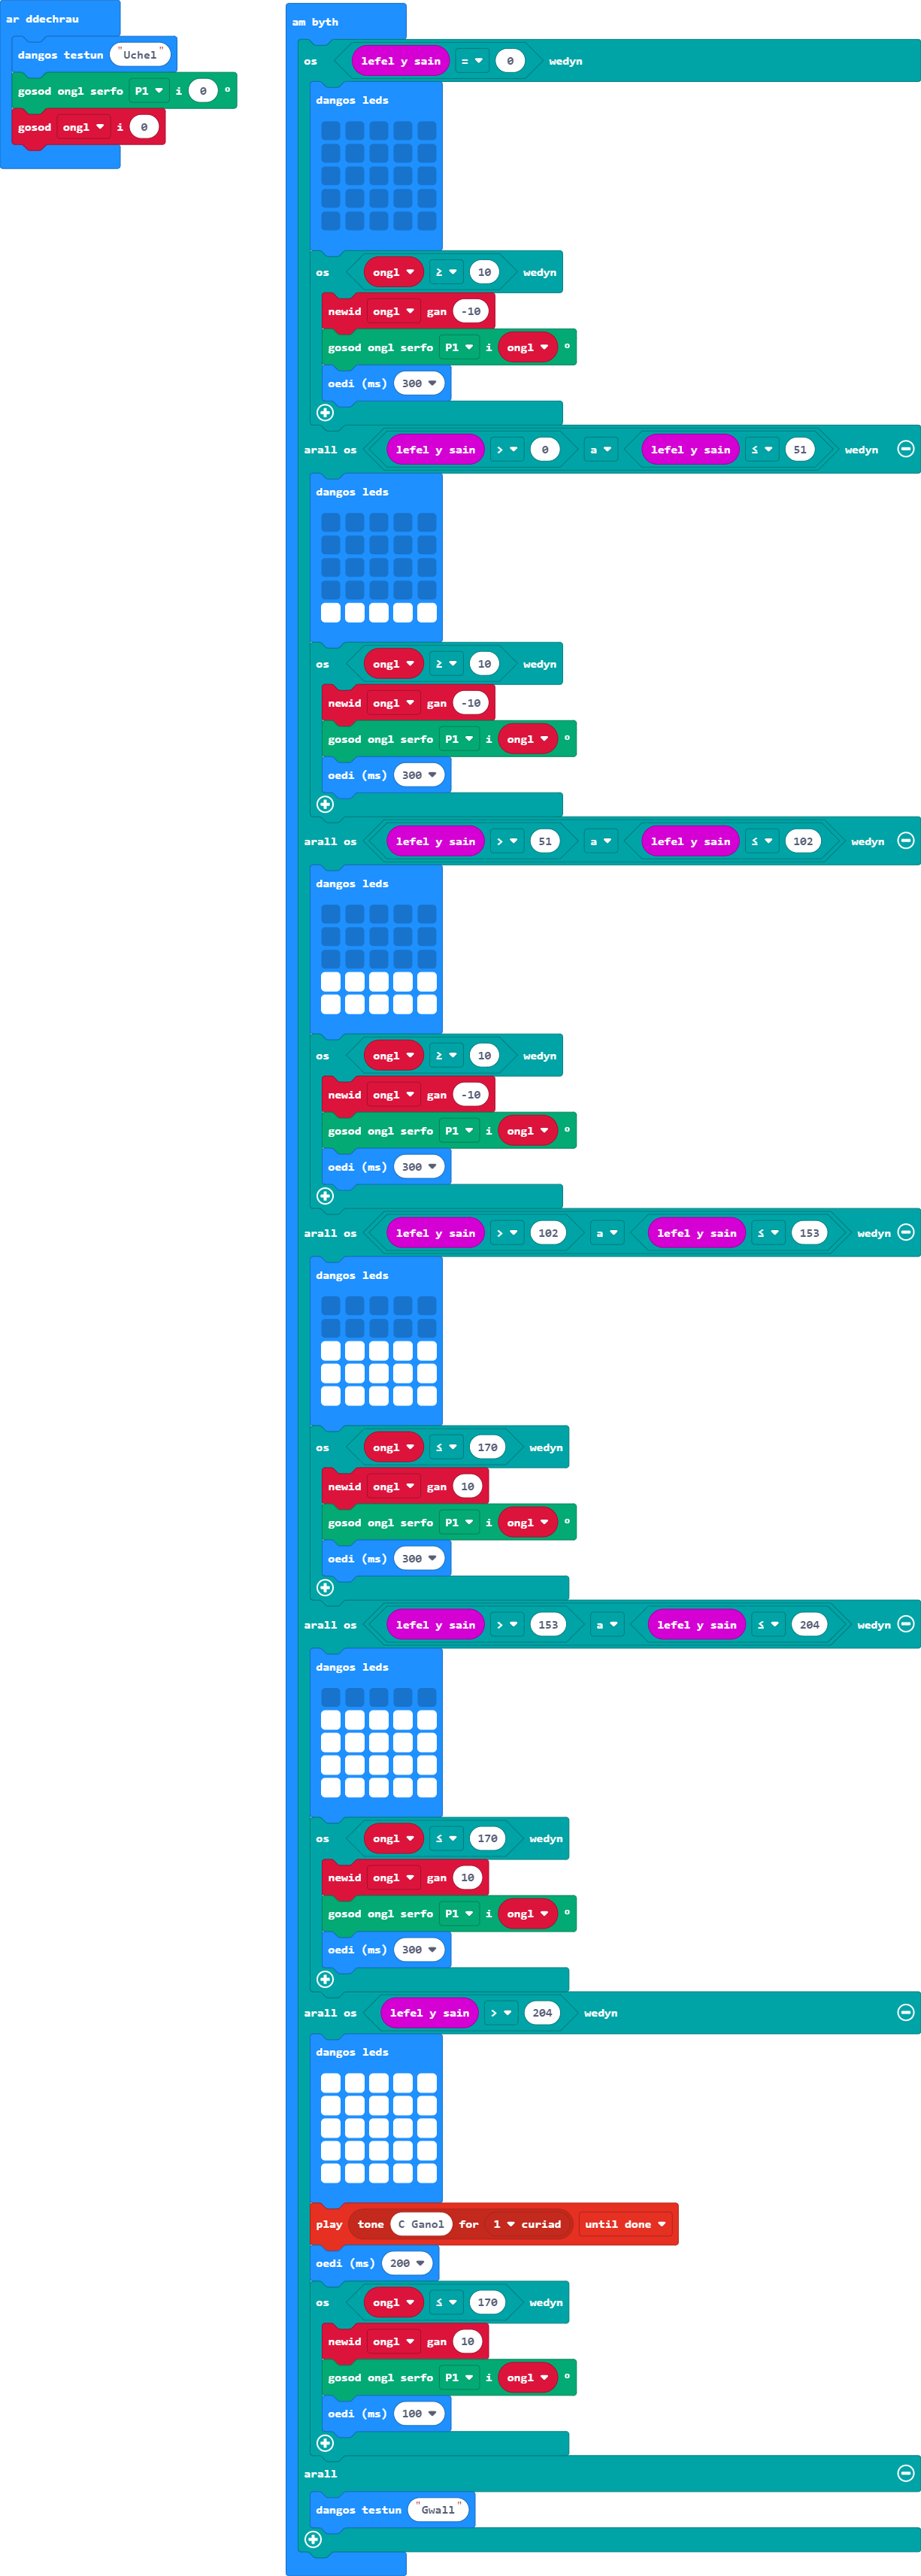
Ychwanegwch serfo lleoliad 180° at bin 1. Ewch ati i raglennu'r serfo i orffwys ar 0° tra bod lefel y sain yn llai na neu'n hafal i 102. Fel arall, mae angen iddo symud i 180°.
Gair o gyngor: Bydd angen i chi ddefnyddio'r estyniad i'r serfo.
Gallwn ddefnyddio'r holl osodiadau diofyn ar gyfer y serfo lleoliad i wneud hyn. Fodd bynnag, mae gosod y serfo i safle cychwyn (0° yn yr achos hwn) yn y bloc 'ar ddechrau' yn parhau i fod yn arfer da.
Bydd angen i chi osod ongl y serfo ym mhob os-/arall-datganiad .
Wrth brofi, cofiwch sicrhau eich bod yn rhoi amser i'r serfo gwblhau ei gylchdro - os ydych chi'n newid yr amod yn rhy gyflym, ni fydd yn ymddwyn yn y modd rydym ni'n ei ddisgwyl.
Pan fydd y serfo yn newid cyfeiriad, allwch chi sicrhau bod y serfo ddim ond yn symud 10° bob 300 milieiliad? Mae hyn yn lleihau'r straen ar y serfo, gan ei atal rhag torri - rhywbeth nad yw'r efelychydd yn ei efelychu.
Gair o gyngor: Bydd angen i chi sicrhau nad yw'r serfo yn ceisio troi o dan 0° neu dros 180° - gallai hyn dorri eich serfo.
Bydd angen i chi greu newidyn ar gyfer yr ongl - cofiwch osod hyn yn y bloc 'ar ddechrau'.
Gellir defnyddio'r newidyn newydd hwn i osod ongl y serfo - gan gynyddu neu leihau'r ongl 10°.
Wrth osod amodau eich os-datganiad, dylech ystyried y gwerthoedd i'w defnyddio - gan ein bod yn symud 10° ar y tro, ystyriwch ddefnyddio 10 a 170.
Bydd angen i'r os-datganiadau newydd hyn ddisodli'r blociau serfo sydd wedi'u gosod ym mhob datganiad 'os/arall'.
Gan fod saib 200 milieiliad eisoes yn y datganiad > 204, mae angen i ni addasu'r symudiad i gyfanswm o 300.
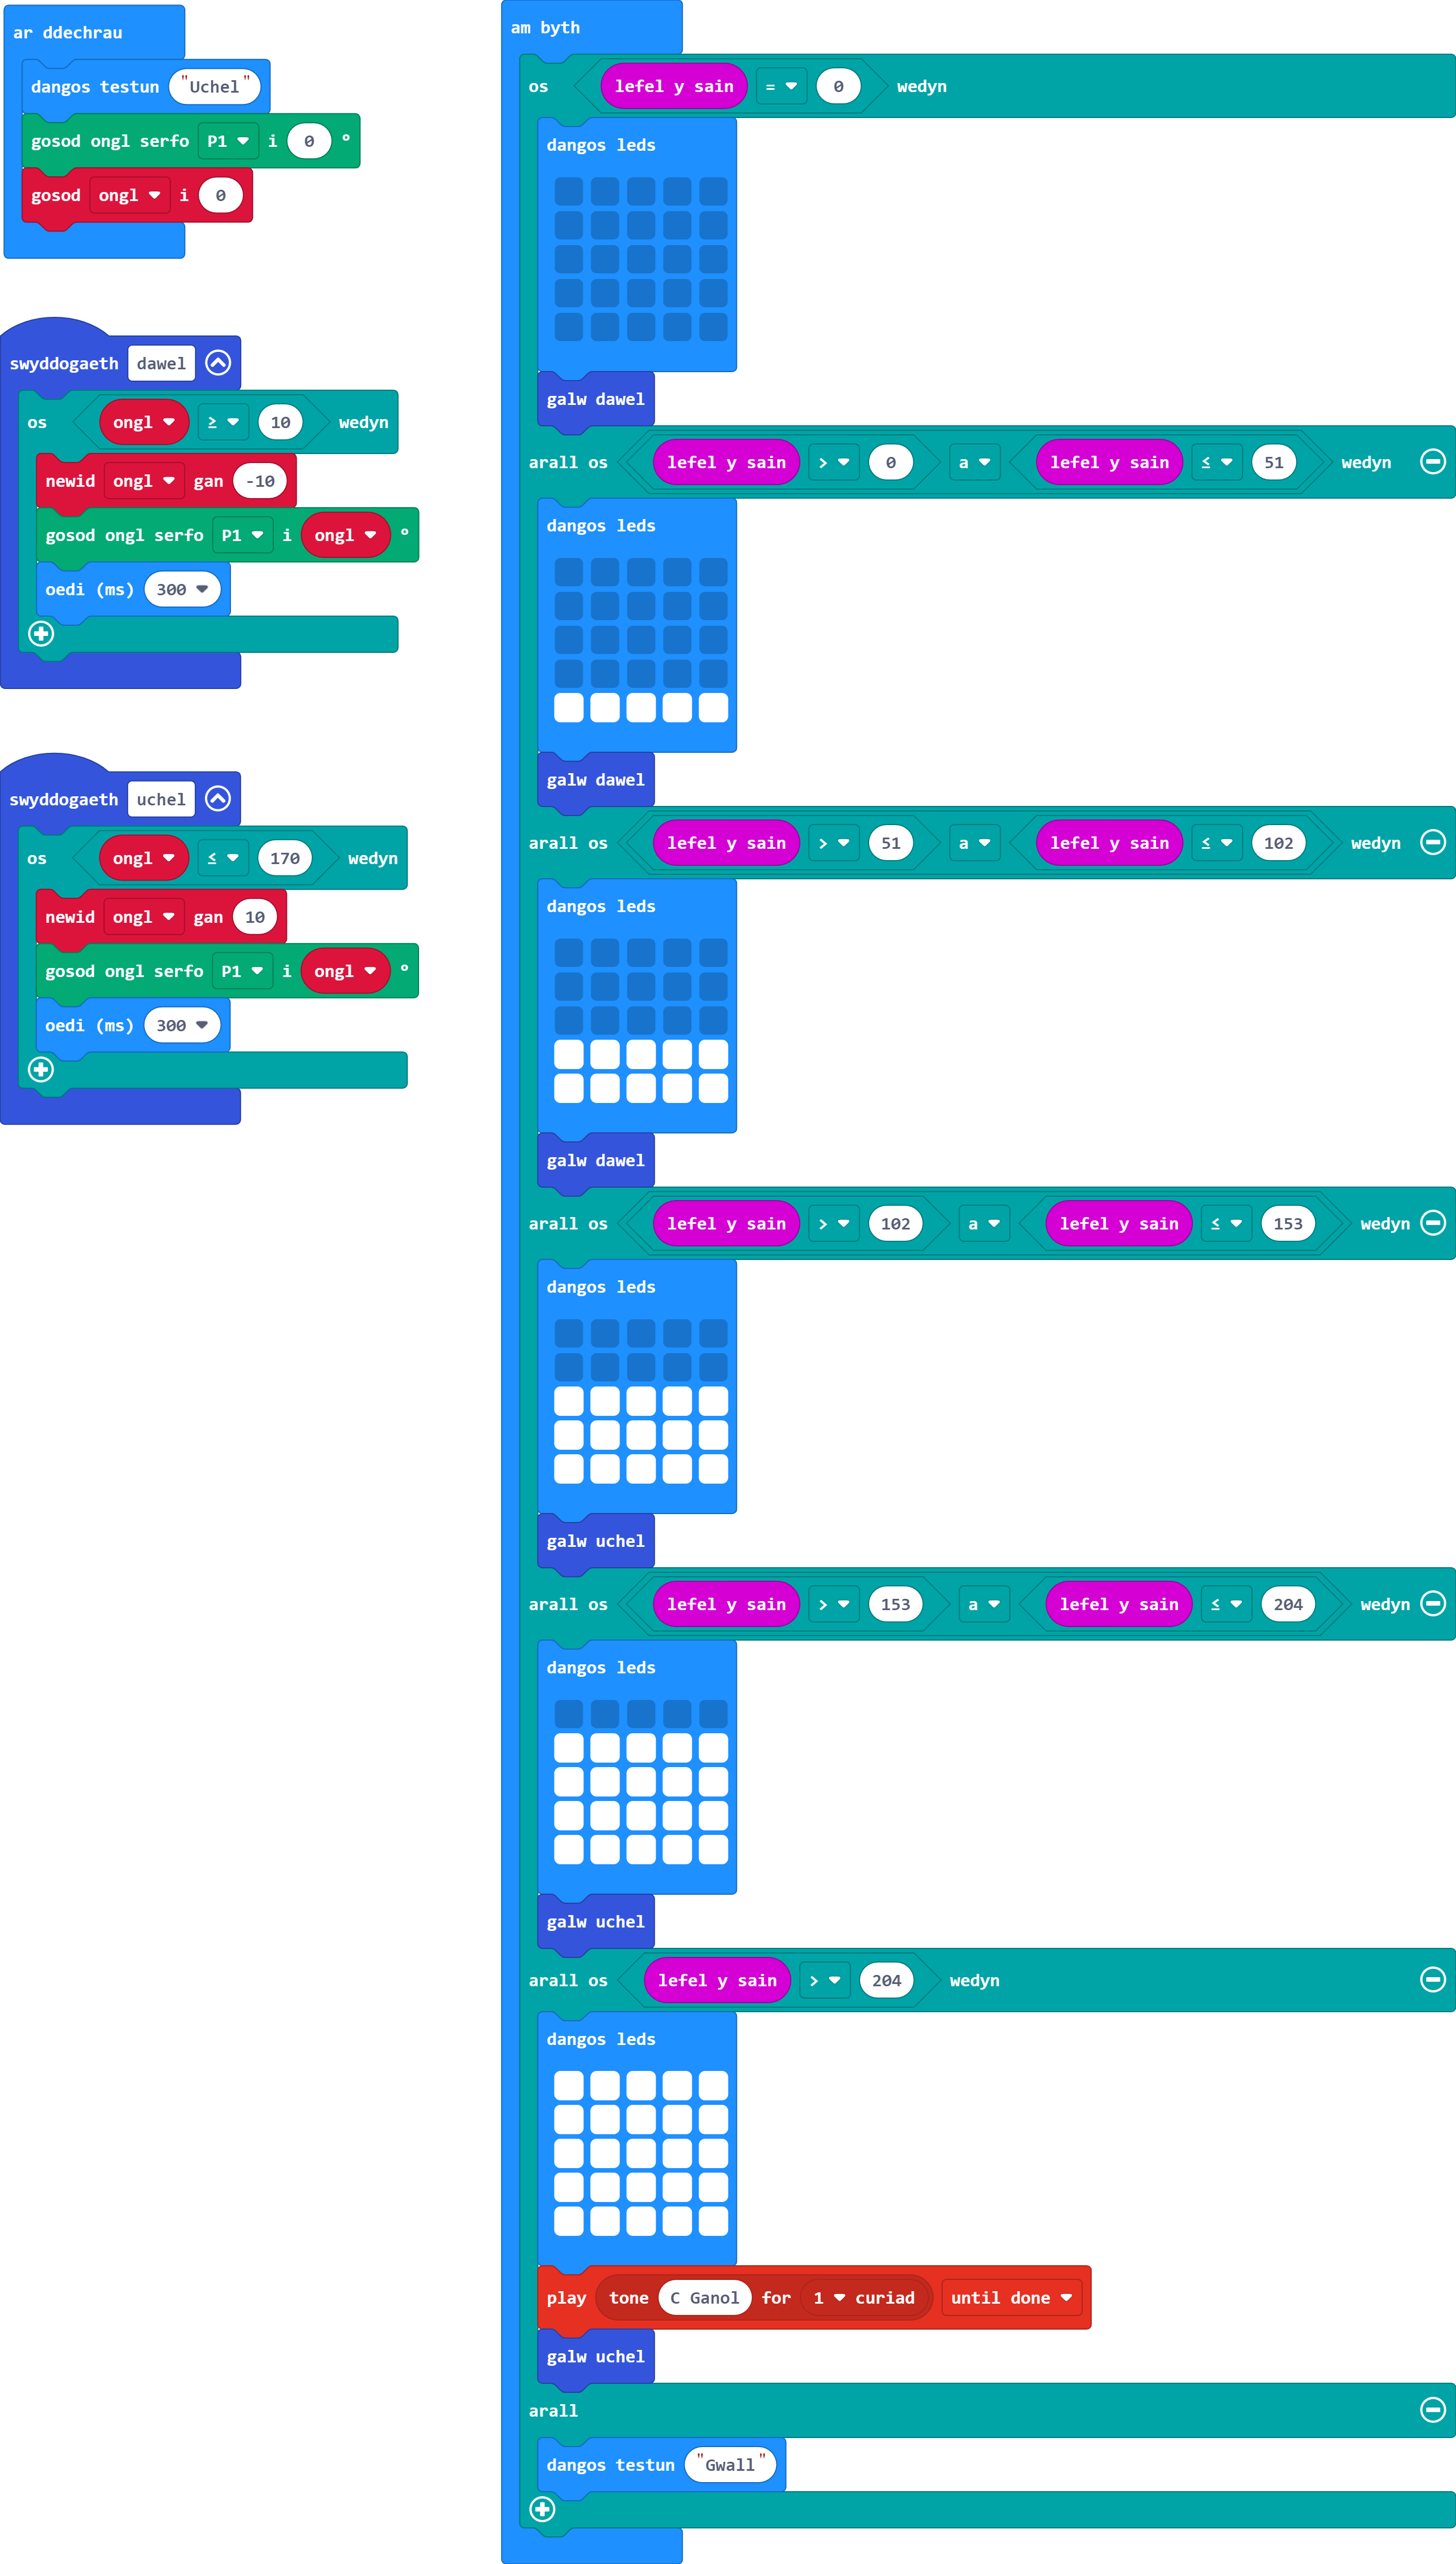
Er mwyn tacluso ein cod, gadewch i ni symud cyfarwyddiadau'r serfo i'w swyddogaethau eu hunain a'u galw pan fydd angen.
Gair o gyngor: Bydd angen un i ostwng yr ongl ac un i gynyddu'r ongl.
Cofiwch fod y ddewislen Swyddogaethau ar gael yn yr adran Uwch.
Er mwyn cael dwy swyddogaeth yn unig - tynnwch y saib 200 milieiliad o'r rhaglen larwm fel bod y rhaglen hon yn gallu defnyddio'r saib 300 milieiliad yn y swyddogaeth serfo.
Cyn dechrau'r ymarferiad hwn, rydym yn eich cynghori i ddyblygu eich rhaglen gan y byddwn yn dileu llawer o'r cod blaenorol.
Cam 1. Caewch eich rhaglen a dychwelyd i dudalen hafan makecode.microbit.org.
Cam 2. Cliciwch ar yr opsiwn gweld popeth wrth ymyl 'Fy Mhrosiectau'.
Cam 3. Dewiswch y ffeil rydych chi am ei dyblygu (dylai tic gwyrdd ymddangos ar y ffeil).
Cam 4. Cliciwch ar yr opsiwn dyblygu ar ochr dde uchaf y sgrin. Bydd hyn yn caniatáu i chi ddewis enw ar gyfer eich copi newydd.
Cam 5. Agorwch eich copi newydd a pharhau â'r her nesaf.
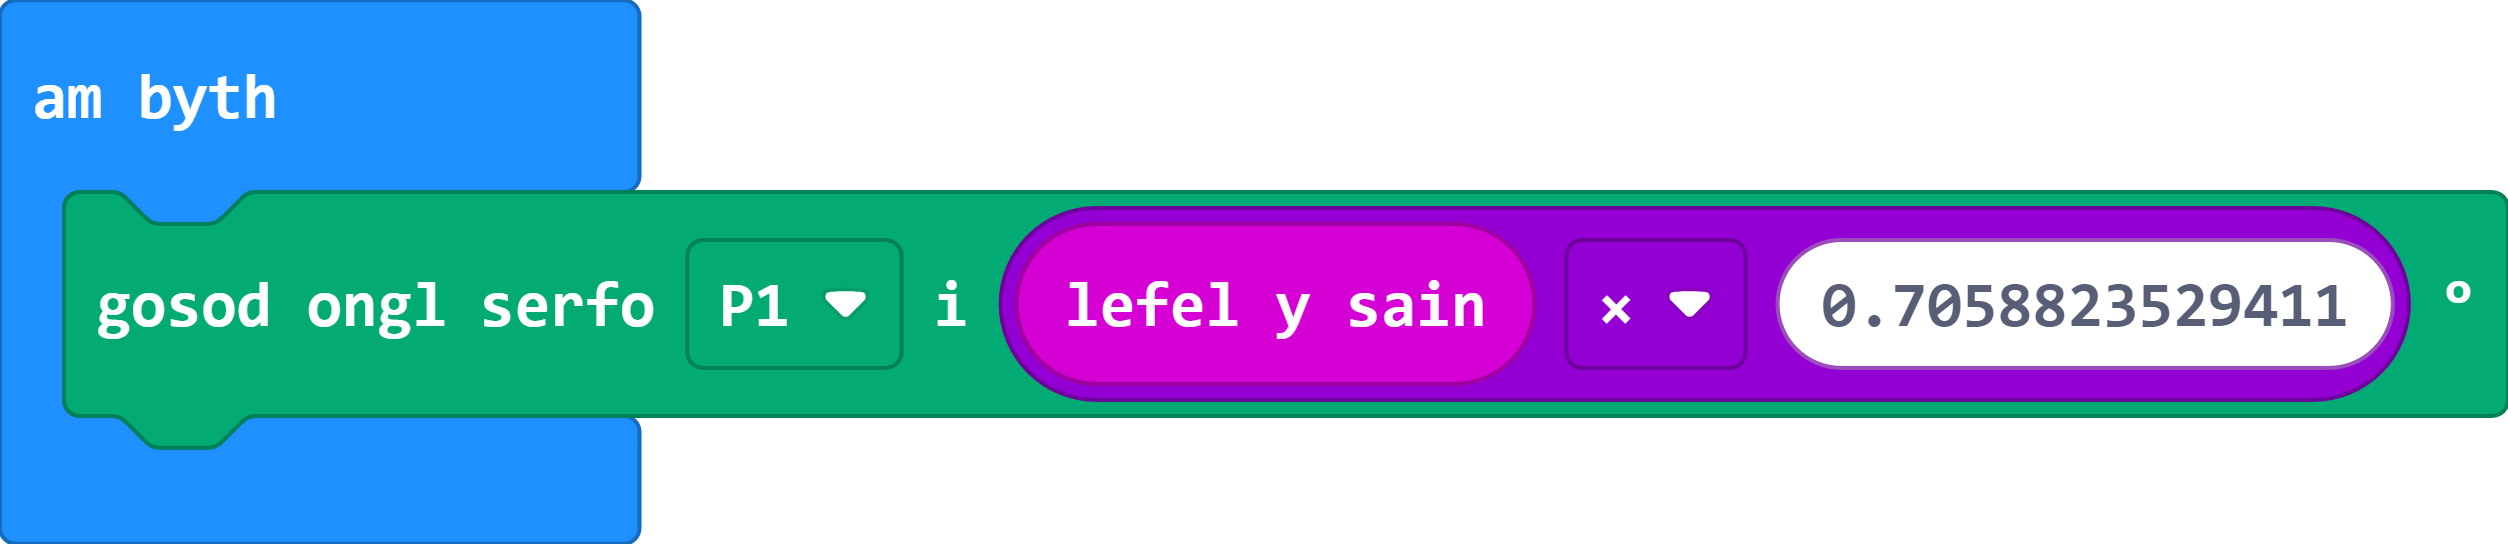
Yn hytrach na chael un gwerth yn penderfynu symudiad y serfo, gallwn wneud i'r serfo weithredu fel nodwydd ar fesurydd sain (fel y dangosir isod), gan symud i'r ongl gywir ar gyfer lefel y sain ar hyn o bryd.
Pwysig:Mae gennym ystod o 0° i 180° ar y serfo ond mae gan lefel y sain ystod o 0 i 255. Mae dwy ffordd o wneud hyn:
Gwneud y gwaith mathemateg ein hunain
Cyfrifwch y pellter y mae angen i'r mesurydd symud ar gyfer un uned o sain:
(180 ÷ 255) = 0.7058823529411°
Defnyddiwch y gwerth uchod gyda bloc Mathemateg y tu mewn i floc 'gosod serfo'.
Defnyddiwch y bloc 'map'
Mae'r bloc map yn caniatáu i ni fynd i mewn i'r ystod rydym ni'n ei mesur (lefel sain) sef 0 i 255, a'i newid i ystod y serfo, sef 0 i 180. Yna mae'r bloc yn gwneud yr holl gyfrifiadau i ni.
Mae angen i ni ddileu'r swyddogaethau rydym ni wedi'u creu ar gyfer y serfo o'n rhaglen. Bydd y blociau 'galw' yn diflannu'n awtomatig pan fydd eu swyddogaeth yn cael ei dileu.
Cadwch animeiddiad y mesurydd sgrin yn ei le.
Y cwbl sydd ei angen ar gyfer hyn yw un bloc 'gosod serfo' gan ddefnyddio'r dull a ddewiswyd o'r uchod.
Mae'r ymarferion isod wedi'u cynllunio i ehangu eich dealltwriaeth o serfos. Gweithgareddau i chi ymchwilio iddynt a'u harchwilio yw'r rhain - nid oes atebion ar gael.
Yn hytrach na defnyddio'r mesurydd i fesur lefel y sain, gallwch ei ddefnyddio i fesur cryfder signal radio, gan osod larwm os yw'r signal yn mynd yn rhy wan.
Gair o gyngor: Bydd angen i chi ddod o hyd i'r ystod o werthoedd ar gyfer cryfder y signal radio.
Ydych chi'n cofio'r rhaglen goleuadau traffig y gwnaethom ni ei chreu yn y sesiwn ddiwethaf? Nawr gallwch ychwanegu croesfan rheilffordd gyda serfo yn gweithredu fel y rhwystr.
Gair o gyngor: Gallwch gysylltu'r serfo i binnau 0, 1 neu 2 yn unig. Fodd bynnag, gallwch adleoli'r Neopicseli i rifau pin eraill (hyd at 16).
Gwers Fideo (yn Saesneg):
Ymarferion:
Ar gyfer y sesiwn hon byddwn yn creu rhaglen i reoli croesfan reilffordd. Mae hyn yn cynnwys adolygu cyfathrebu radio, datganiadau-os, newidynnau, swyddogaethau, Neopixels, a serfos.
Rydym yn argymell eich bod yn rhoi cynnig ar yr heriau hyn gyda'r golygydd safonol.
Fel sy'n wir am bob un o'n hymarferion, mae dysgwyr yn cwblhau un lefel cyn symud i'r nesaf. Oni wneir hynny, mae'n bosibl y bydd dysgwyr yn methu derbyn gwybodaeth neu'n hepgor cam hanfodol sy'n atal y rhaglen rhag gweithio.
Cliciwch ar bennawd pob her i gael y manylion.
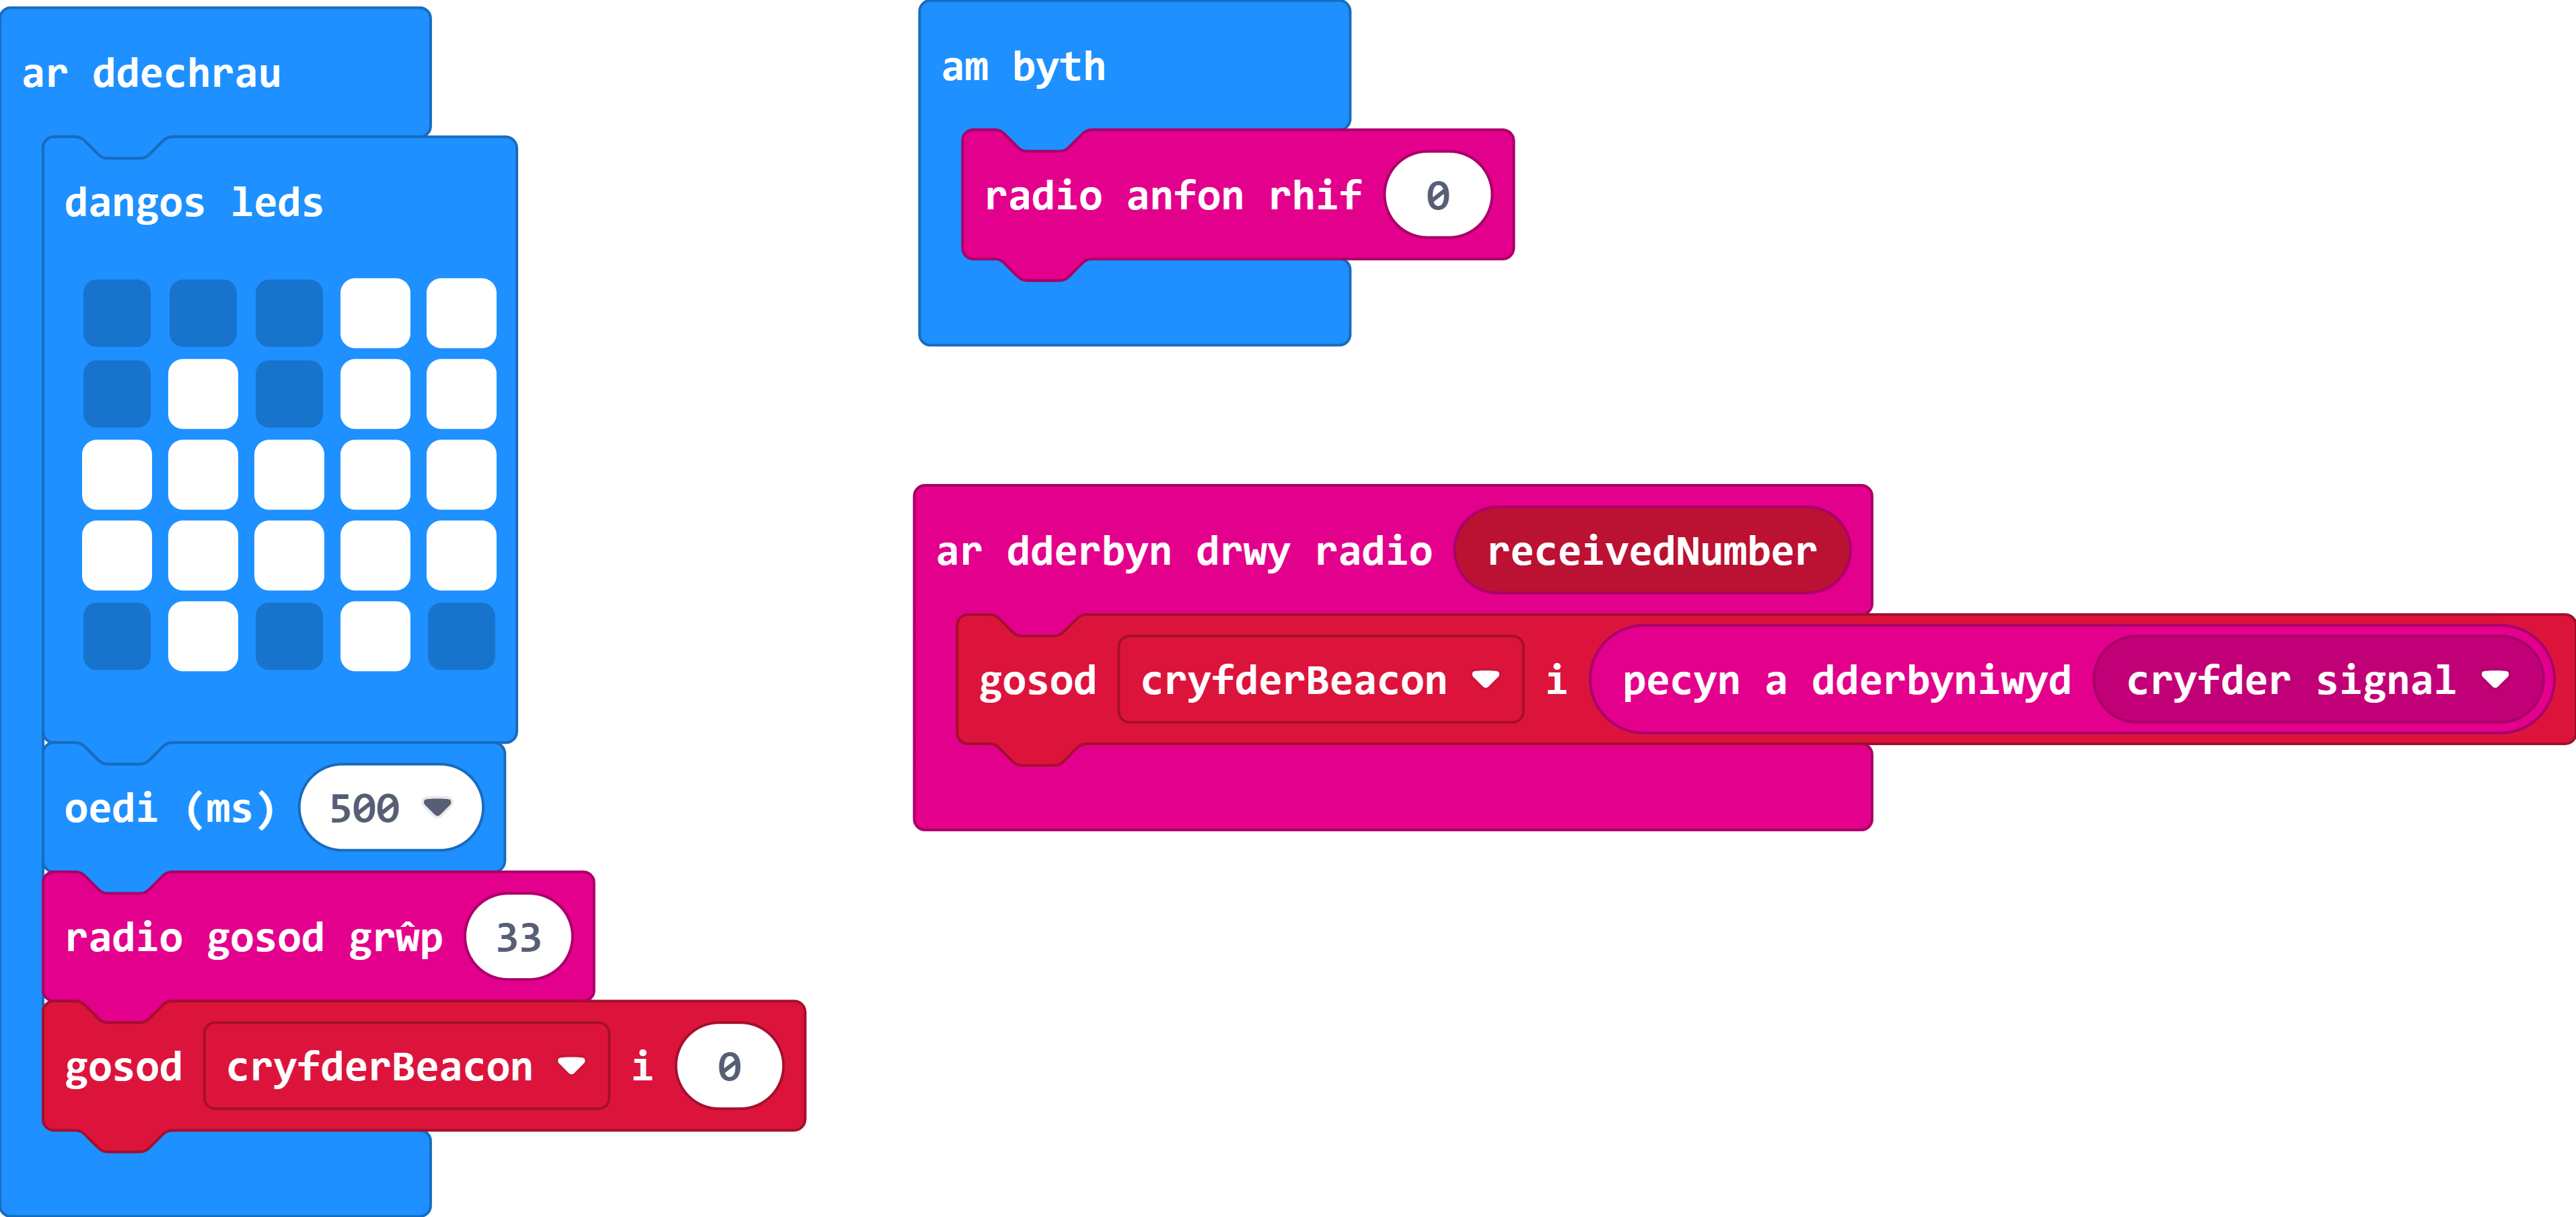
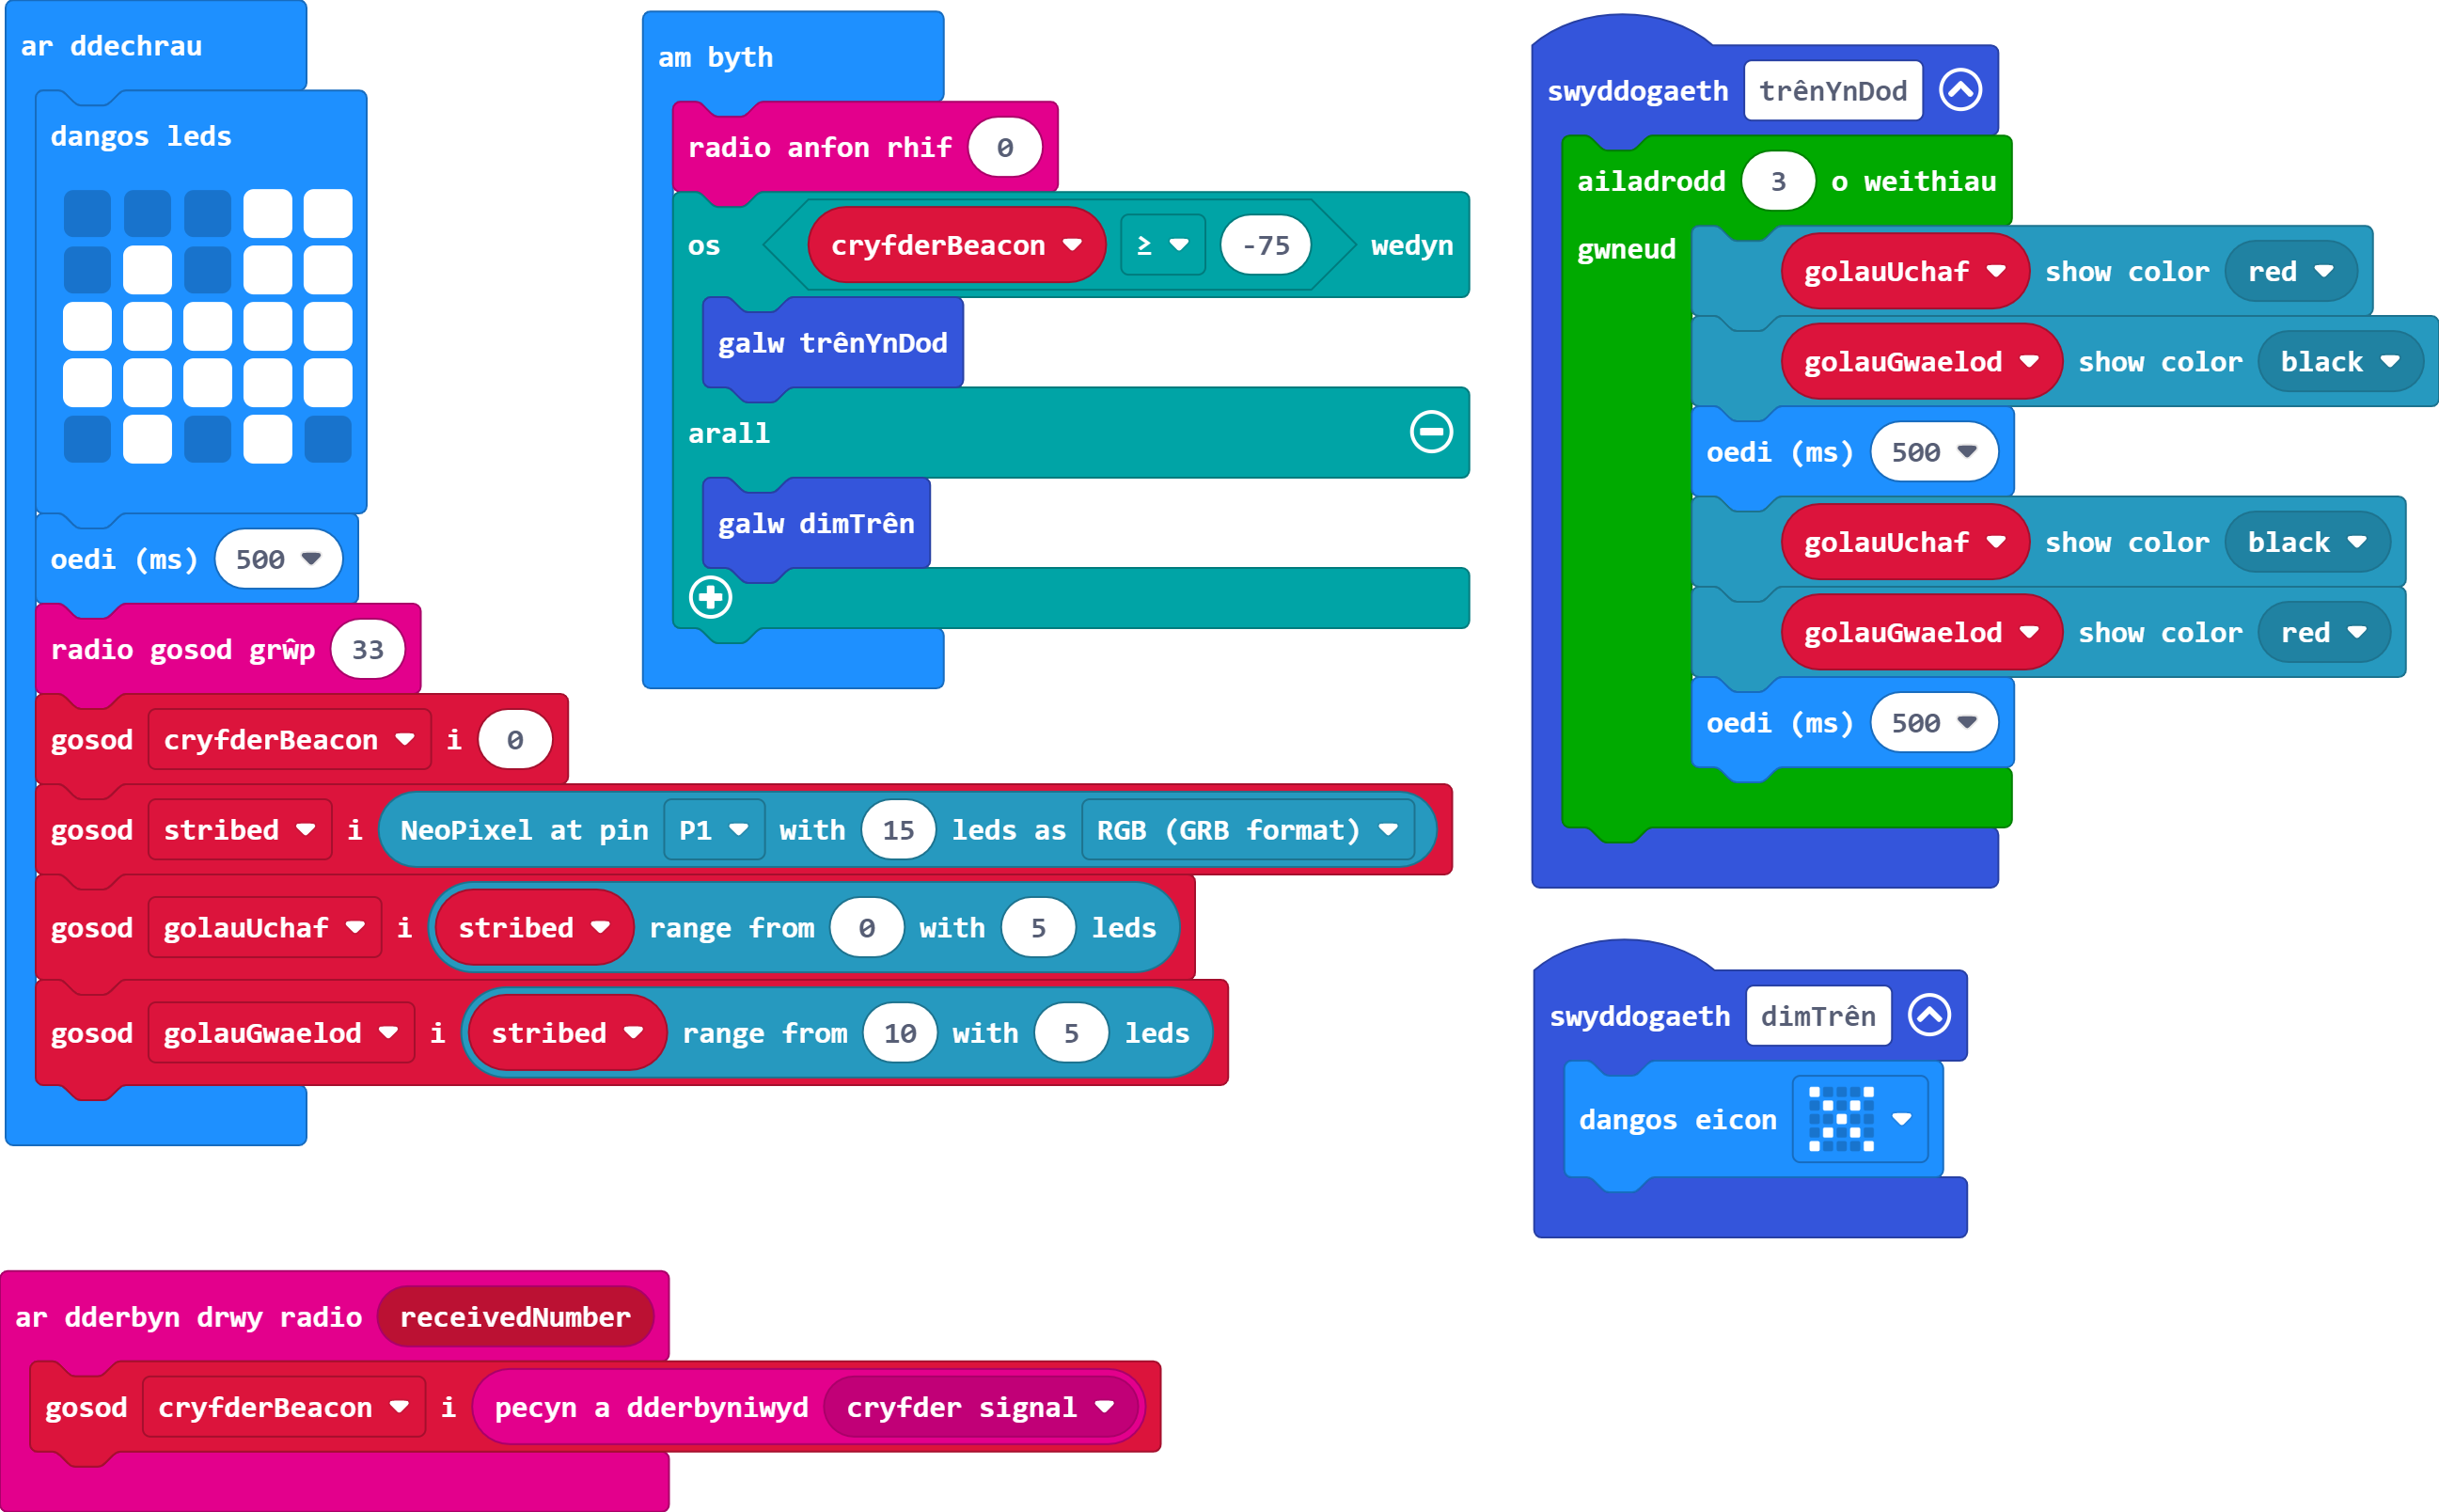
Ar gyfer yr ymarferion hyn, dychmygwch fod gennych chi un Micro:Bit i reoli'r groesfan tra bod un arall yn gweithio fel tywysydd ar y trên. Bydd y groesfan yn gwybod bod trên yn dod pan fydd cryfder signal y tywysydd yn cryfhau.
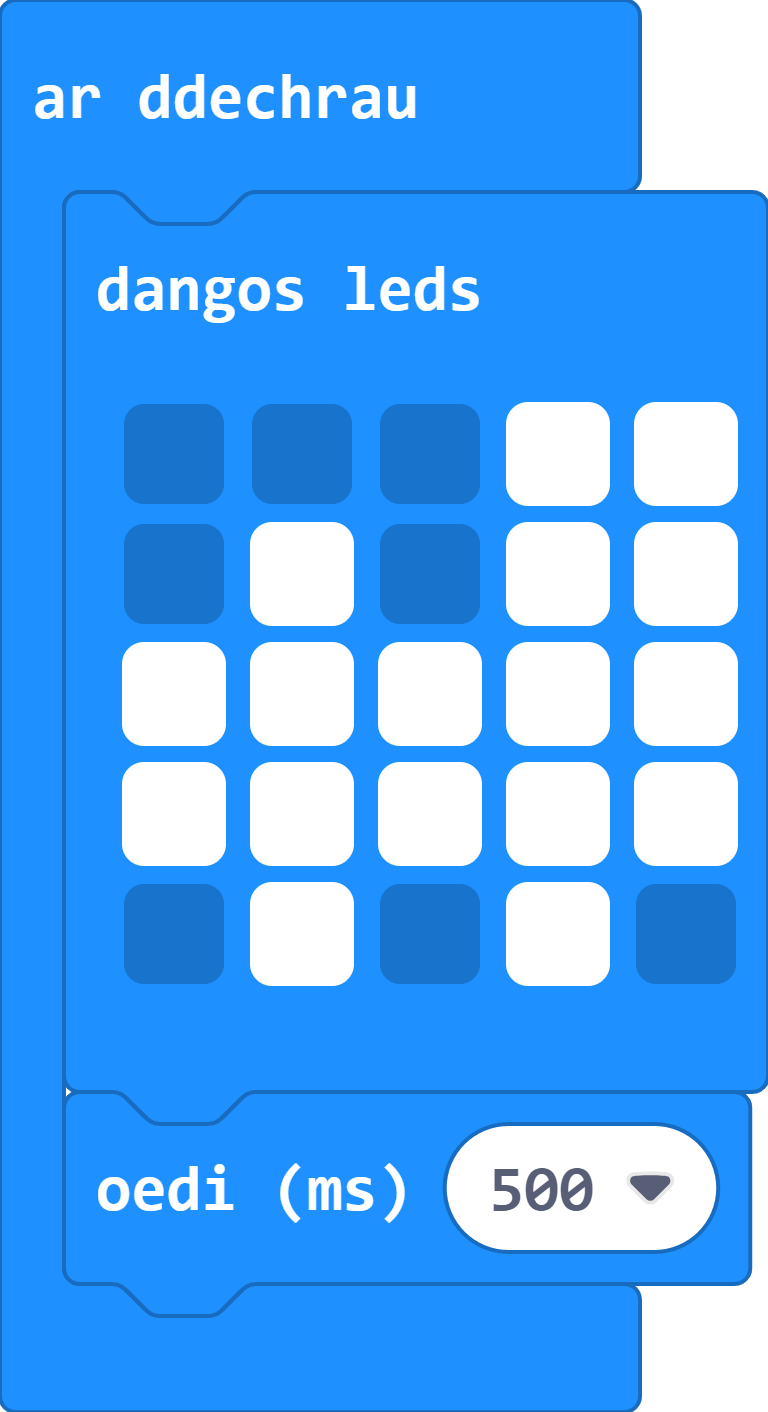
Defnyddiwch ddelwedd, animeiddiad a/neu destun i greu sgrin agoiadol sy'n ffordd o adnabod eich rhaglen.
Gair o gyngor: Os mai dim ond delwedd rydych chi'n ei defnyddio, cofiwch gynnwys oedi (500ms) er mwyn iddi aros ar y sgrin yn ddigon hir i'w gweld.
Ceisiwch beidio â gwneud i'r sgrin agoriadol gymryd gormod o amser, fel arall bydd hyn yn mynd yn rhwystredig yn ystod profion wrth i ni symud ymlaen.
Gwnewch i'r Micro:Bit anfon y rhif sero trwy radio o'r tu mewn i'r ddolen am byth.
Gair o gyngor: Peidiwch ag anghofio gosod grŵp radio i'ch Micro:Bit ei ddefnyddio.
Cewch hyd i'r blociau sydd eu hangen arnoch yn y ddewislen Radio.
Mae angen i chi sefydlu grŵp radio yn y dilyniant agoriadol.
Crëwch newidyn cryfder tywysydd a'i osod i'r cryfder signal sy'n cael ei dderbyn.
Gair o gyngor:: Er mwyn mesur cryfder y signal, mae angen i'r rhaglen dderbyn y rhif a anfonwyd yn gyntaf.
Dewiswch enw addas ar gyfer eich newidyn newydd. Mae rhai rhaglenni'n defnyddio llawer o newidynnau, ac mae'n fuddiol gallu adnabod pwrpas pob un yn gyflym.
Cofiwch osod eich newidyn newydd i 0 pan fydd y rhaglen yn dechrau - Mae hyn yn arfer da ar gyfer pan fyddwch chi'n dechrau dysgu ieithoedd rhaglennu sy'n seiliedig ar destun.
Bydd angen i chi osod eich newidyn newydd i werth cryfder signal a dderbynnir y tu mewn i floc 'ar dderbyn drwy radio'.
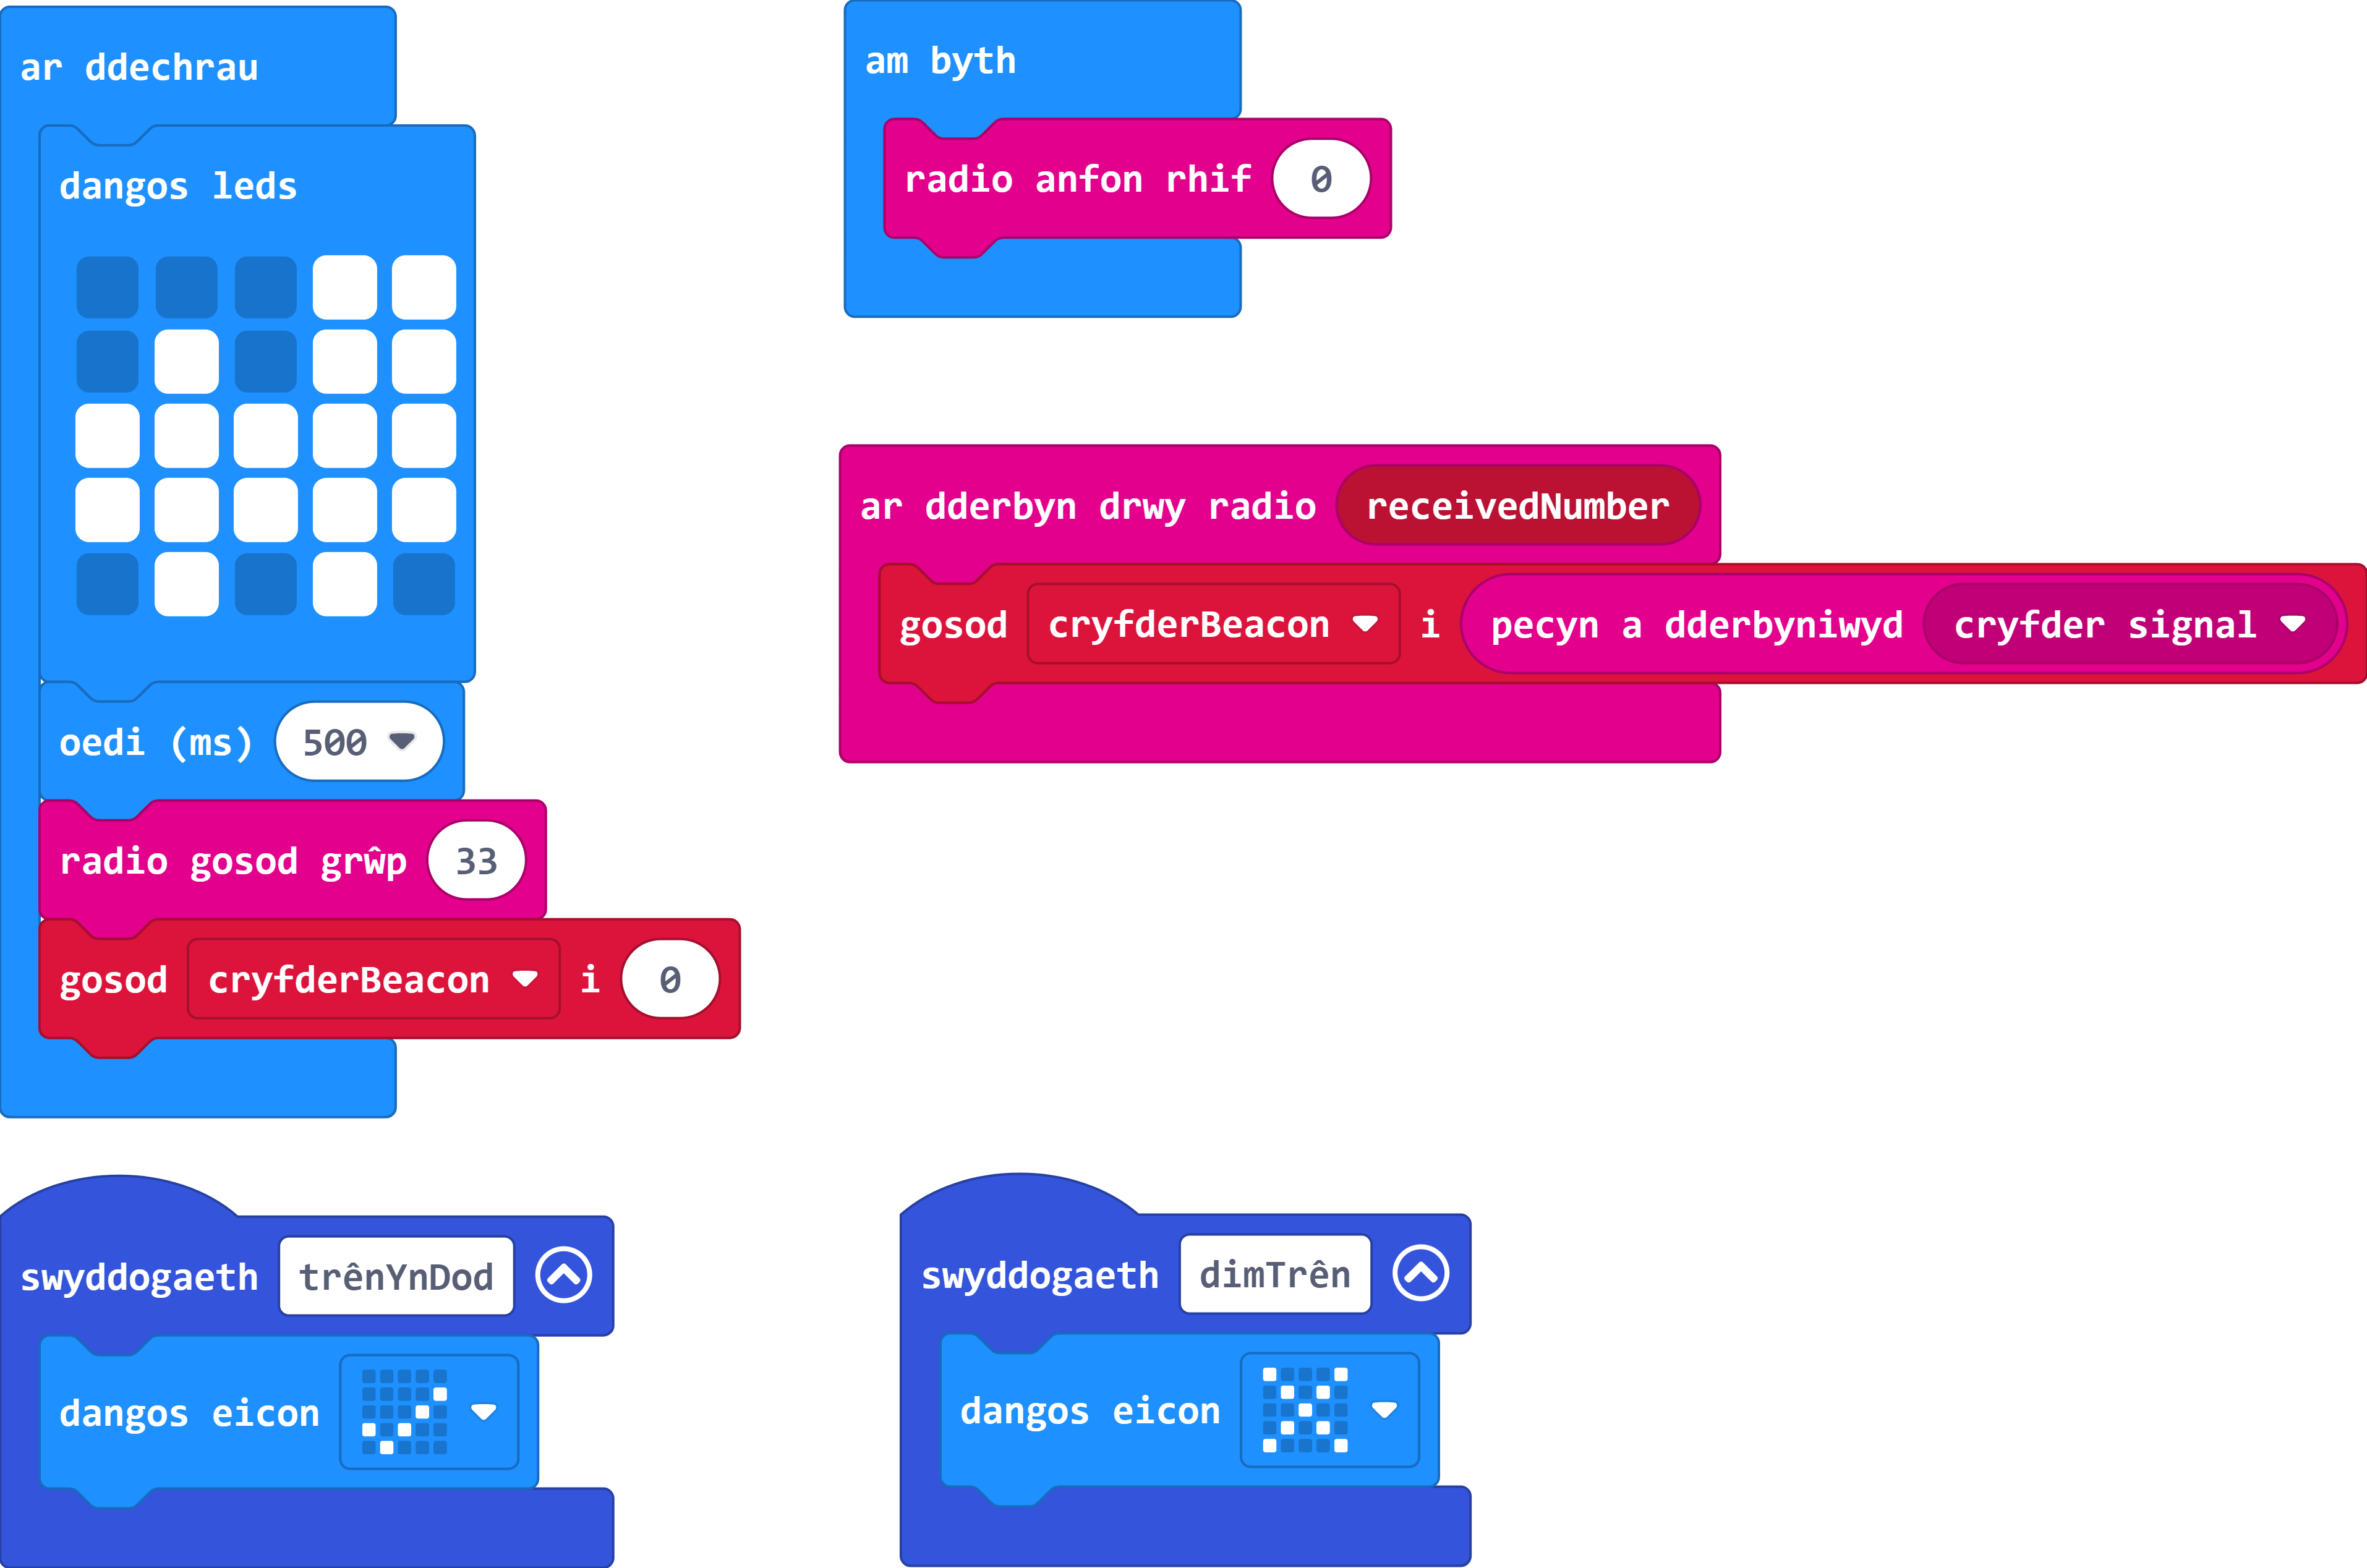
Nawr mae angen dwy swyddogaeth arnom, un ar gyfer y rhaglen pan fydd trên yn dod, a'r llall ar gyfer pan na fydd trên yn dod . Rhowch enw addas i bob swyddogaeth a rhoi delwedd wahanol ym mhob un.
Gair o gyngor: Ar gyfer profion yn unig mae'r delweddau ar hyn o bryd, felly bydd unrhyw un yn gwneud y tro.
Gellir dod o hyd i'r ddewislen Swyddogaethau yn yr adran Uwch.
Ni fydd y swyddogaethau hyn yn dangos wrth brofi, gan nad ydym wedi eu galw yn y rhaglen.
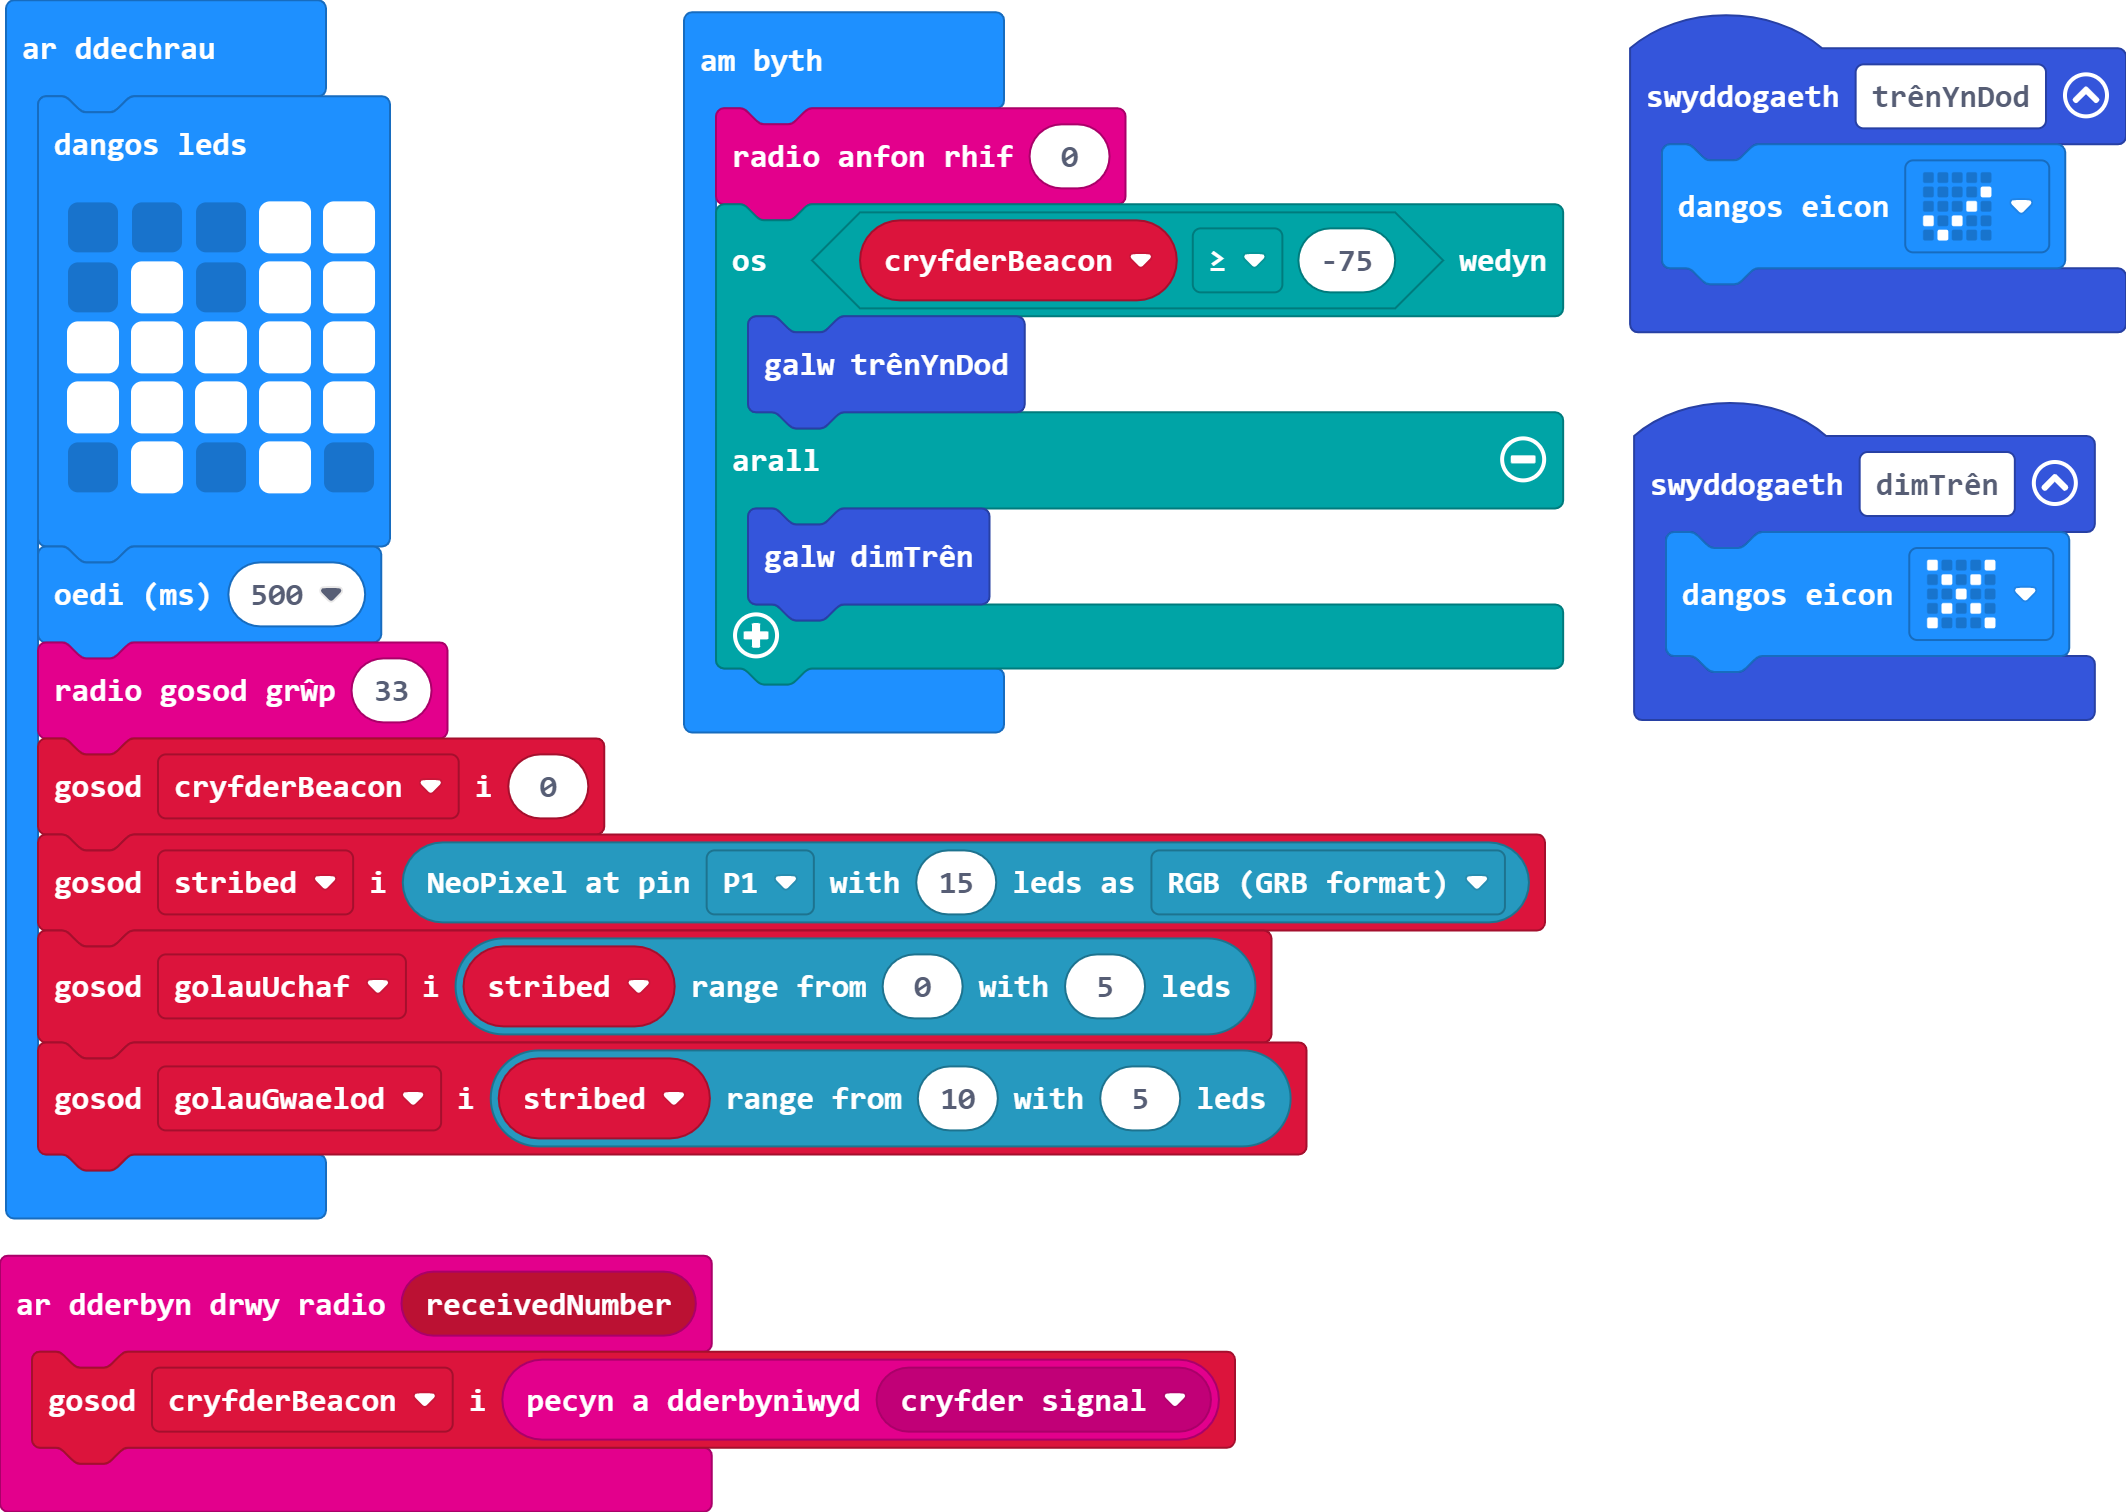
Galwch eich swyddogaeth ar gyfer pan fydd trên yn dod pan fydd cryfder y signal yn hafal i neu'n fwy na -75. Fel arall, galwch y swyddogaeth dim trên yn dod.
Gair o gyngor: Wrth wneud profion yn yr efelychydd, dylech drin y Micro:Bit uchaf fel rheolwr y groesfan a'r Micro:Bit isaf fel tywysydd y trên.
Bydd angen i chi greu datganiad OS ar gyfer hyn sy'n cymharu gwerth cryfder y tywysydd â -75.
Mae gan gryfder signal radio'r Micro:Bit yn yr efelychydd amrediad o -128 (signal gwannaf) i -42 (signal cryfaf).
Cofiwch fod nifer o symbolau mathemateg i ddewis ohonynt: = yn hafal i, < llai na, > yn fwy na, ≤ yn llai na neu'n hafal i, a ≥ yn fwy na neu'n hafal i.
Nawr mae angen i ni greu ein goleuadau croesi. Ar gyfer hyn rydym ni angen Neopixel wedi'i gysylltu â phin 1 wedi ei wneud o 15 LED.
Gair o gyngor: Bydd angen i chi ychwanegu'r estyniad Neopixel i'ch dewislen flociau.
Ewch yn ôl at Sesiwn Pedwar os ydych chi angen cofio sut i gael a defnyddio blociau estyniad Neopixel.
Bydd angen i chi newid y hyd diofyn o 24 i 15 LED.
Sefydlwch ddau amrediad, gydag enwau addas - un ar gyfer y 5 LED uchaf ac un arall ar gyfer y 5 LED isaf.
Gair o gyngor: Cofiwch fod cyfrif yn dechrau ar sero mewn cyfrifiadura.
Bydd yr amrediad cyntaf yn dechrau ar 0, tra bydd amrediad yr isaf yn dechrau ar 10.
Tynnwch y ddelwedd yn eich swyddogaeth ar gyfer pan fydd trên yn dod ac yn ei lle gosodwch raglen fydd yn rhoi'r goleuadau ymlaen a'u diffodd (bob yn ail rhwng y top a'r gwaelod) dair gwaith. Gosodwch saib o 500ms ar ôl rhoi bob golau ymlaen.
Gair o gyngor: Cofiwch fod gosod golau i ddu yn ei ddiffodd.
Bob tro mae golau yn cael ei roi ymlaen, mae angen i'r llall gael ei ddiffodd.
Gallwch ddefnyddio bloc 'ailadrodd 3 o weitiau' i fyrhau'r rhaglen.
Tynnwch y ddelwedd yn eich swyddogaeth ar gyfer pan nad yw trên yn agosáu a gosodwch raglen i sicrhau bod y goleuadau i gyd wedi'u diffodd.
Yn y swyddogaeth ar gyfer pan nad oes trên yn dod, bydd angen i chi osod ein dau amrediad golau ar ddu.
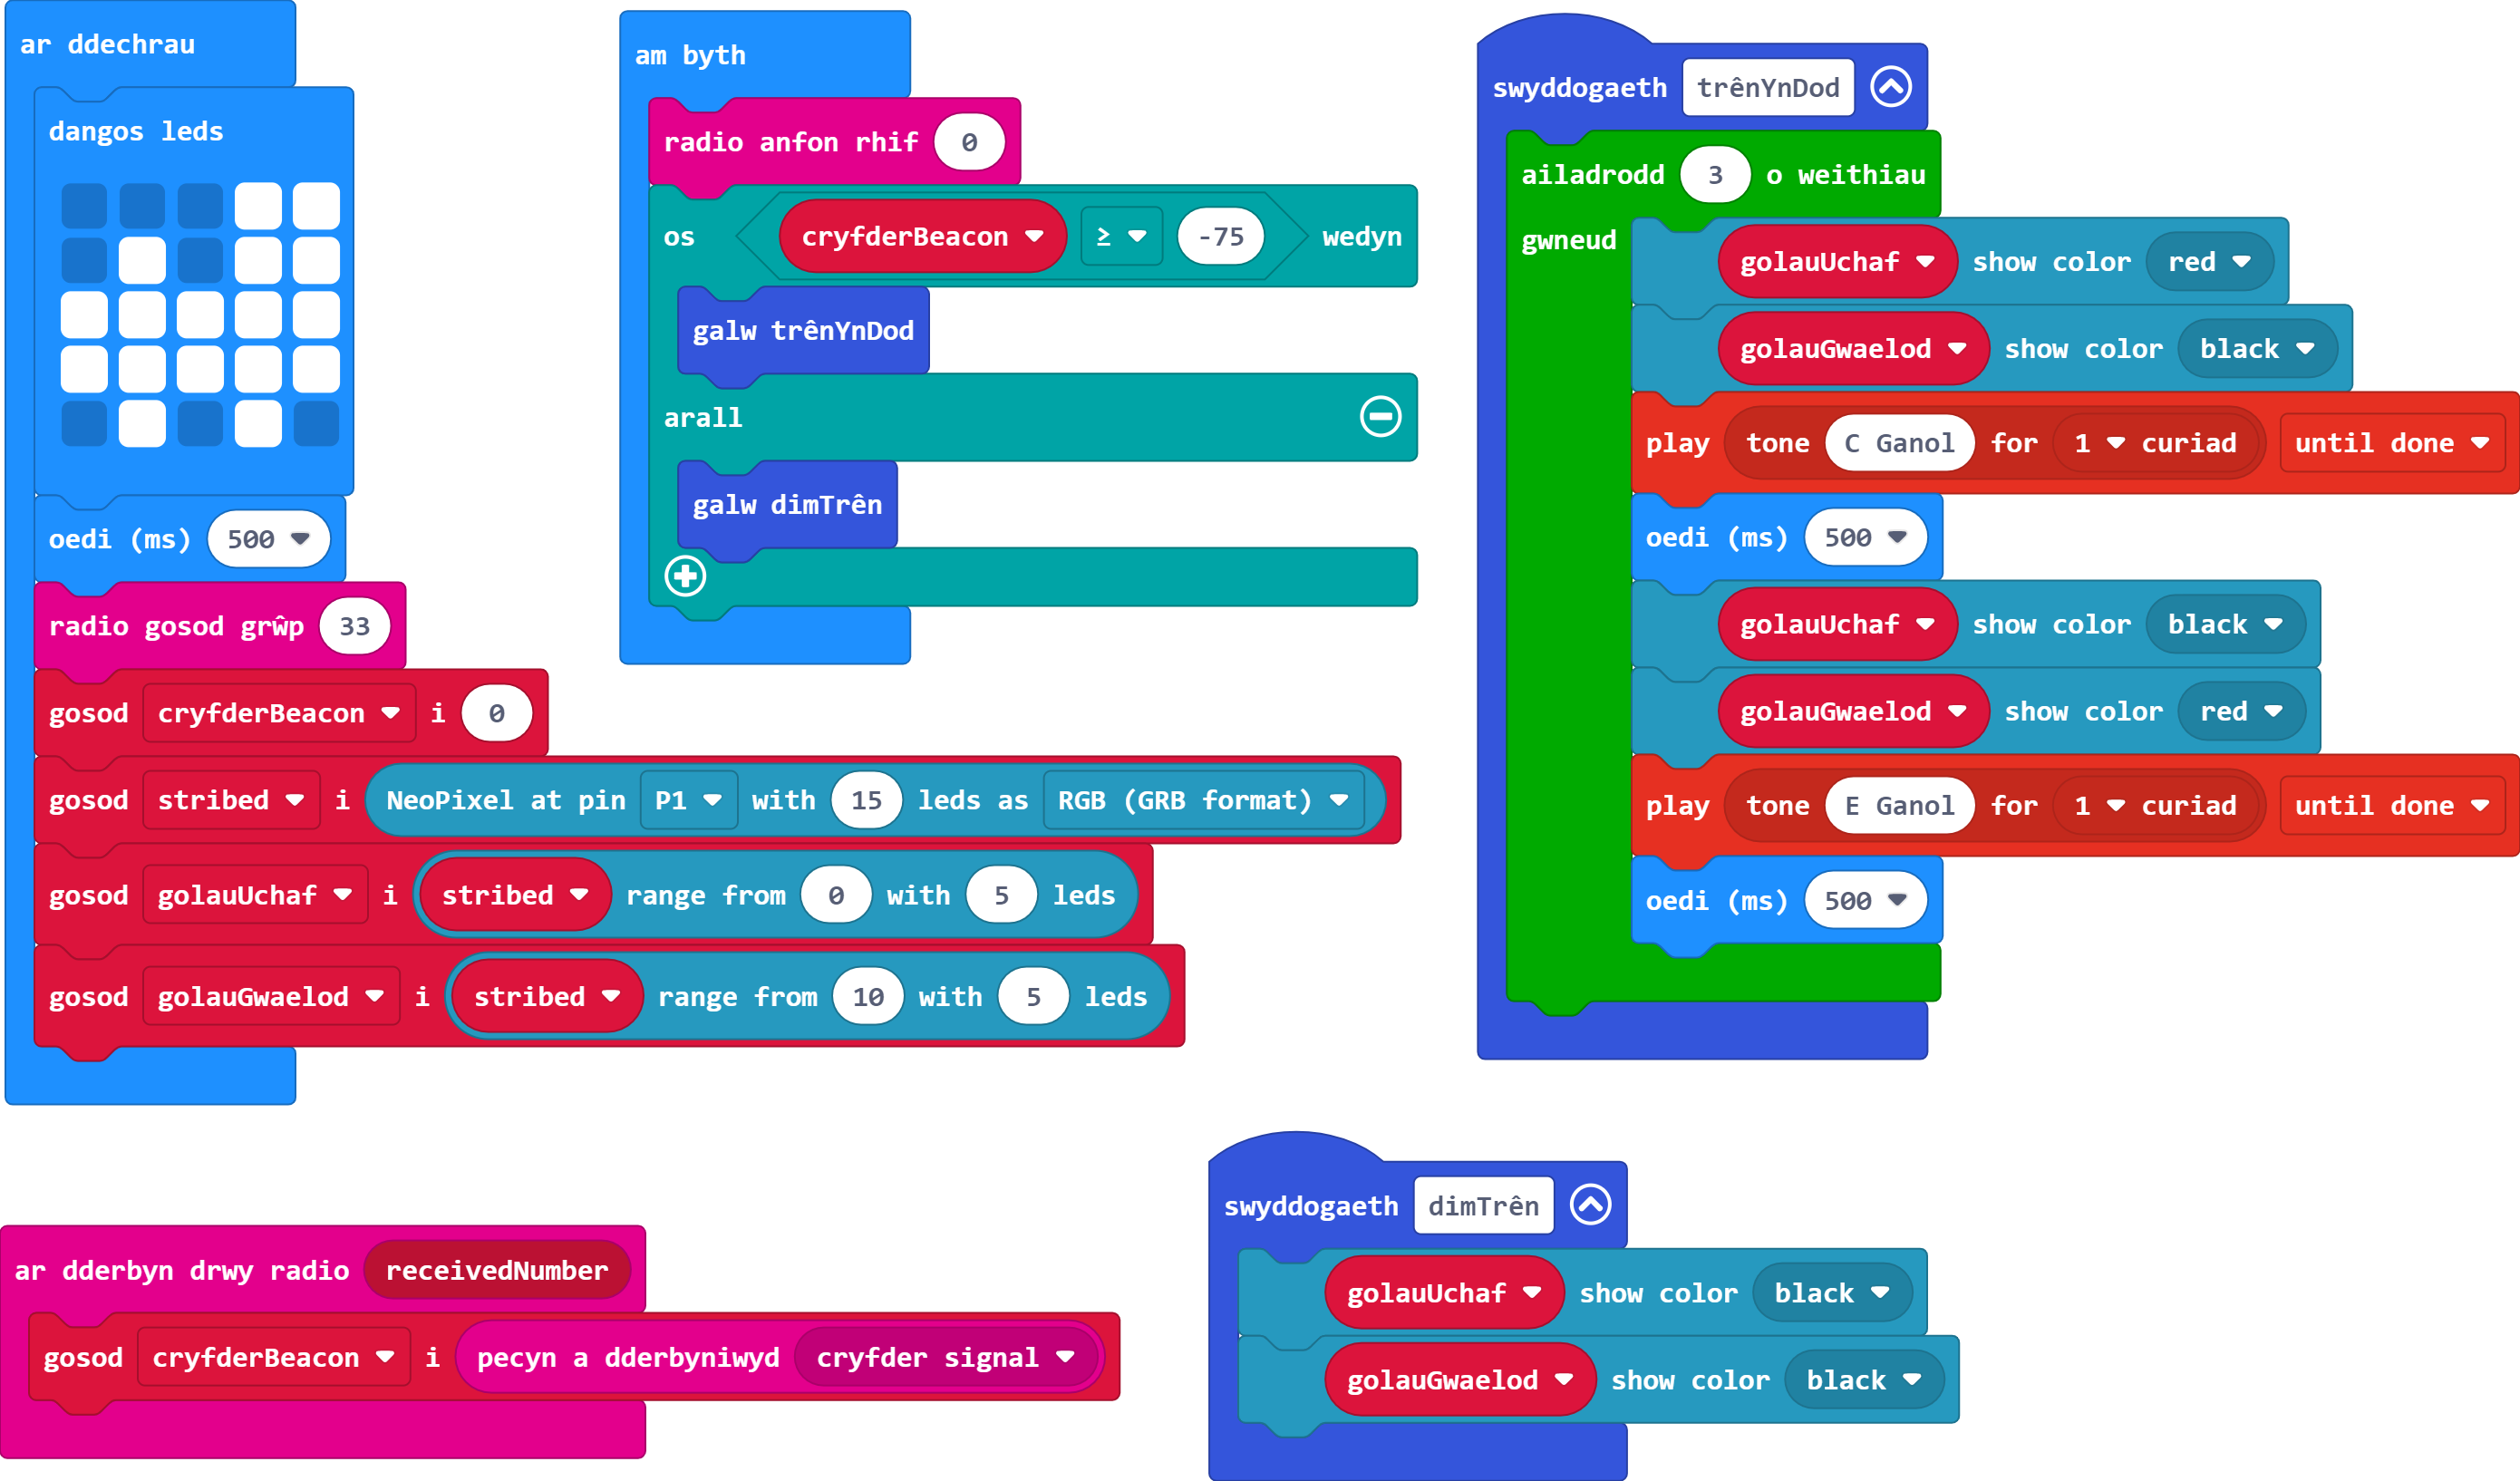
Gwnewch yn siŵr fod eich rhaglen yn chwarae nodyn C canol pan fydd y golau uchaf wedi ei roi ymlaen a nodyn E canol pan fydd y golau gwaelod wedi ei roi ymlaen. Dyma ein larwm i rybuddio gyrwyr a cherddwyr bod trên yn dod.
Gair o gyngor: Wrth brofi, gwnewch yn siŵr bod cryfder signal y Micro:Bit uchaf (ein 'croesfan') yn isel iawn neu gallai'r larymau ar y ddau Micro:Bit uno a/neu fod yn anghydamserol.
Dim ond 1 curiad y dylai'r nodau fod.
Gallwch newid y nodyn yn y bloc 'play tone'.
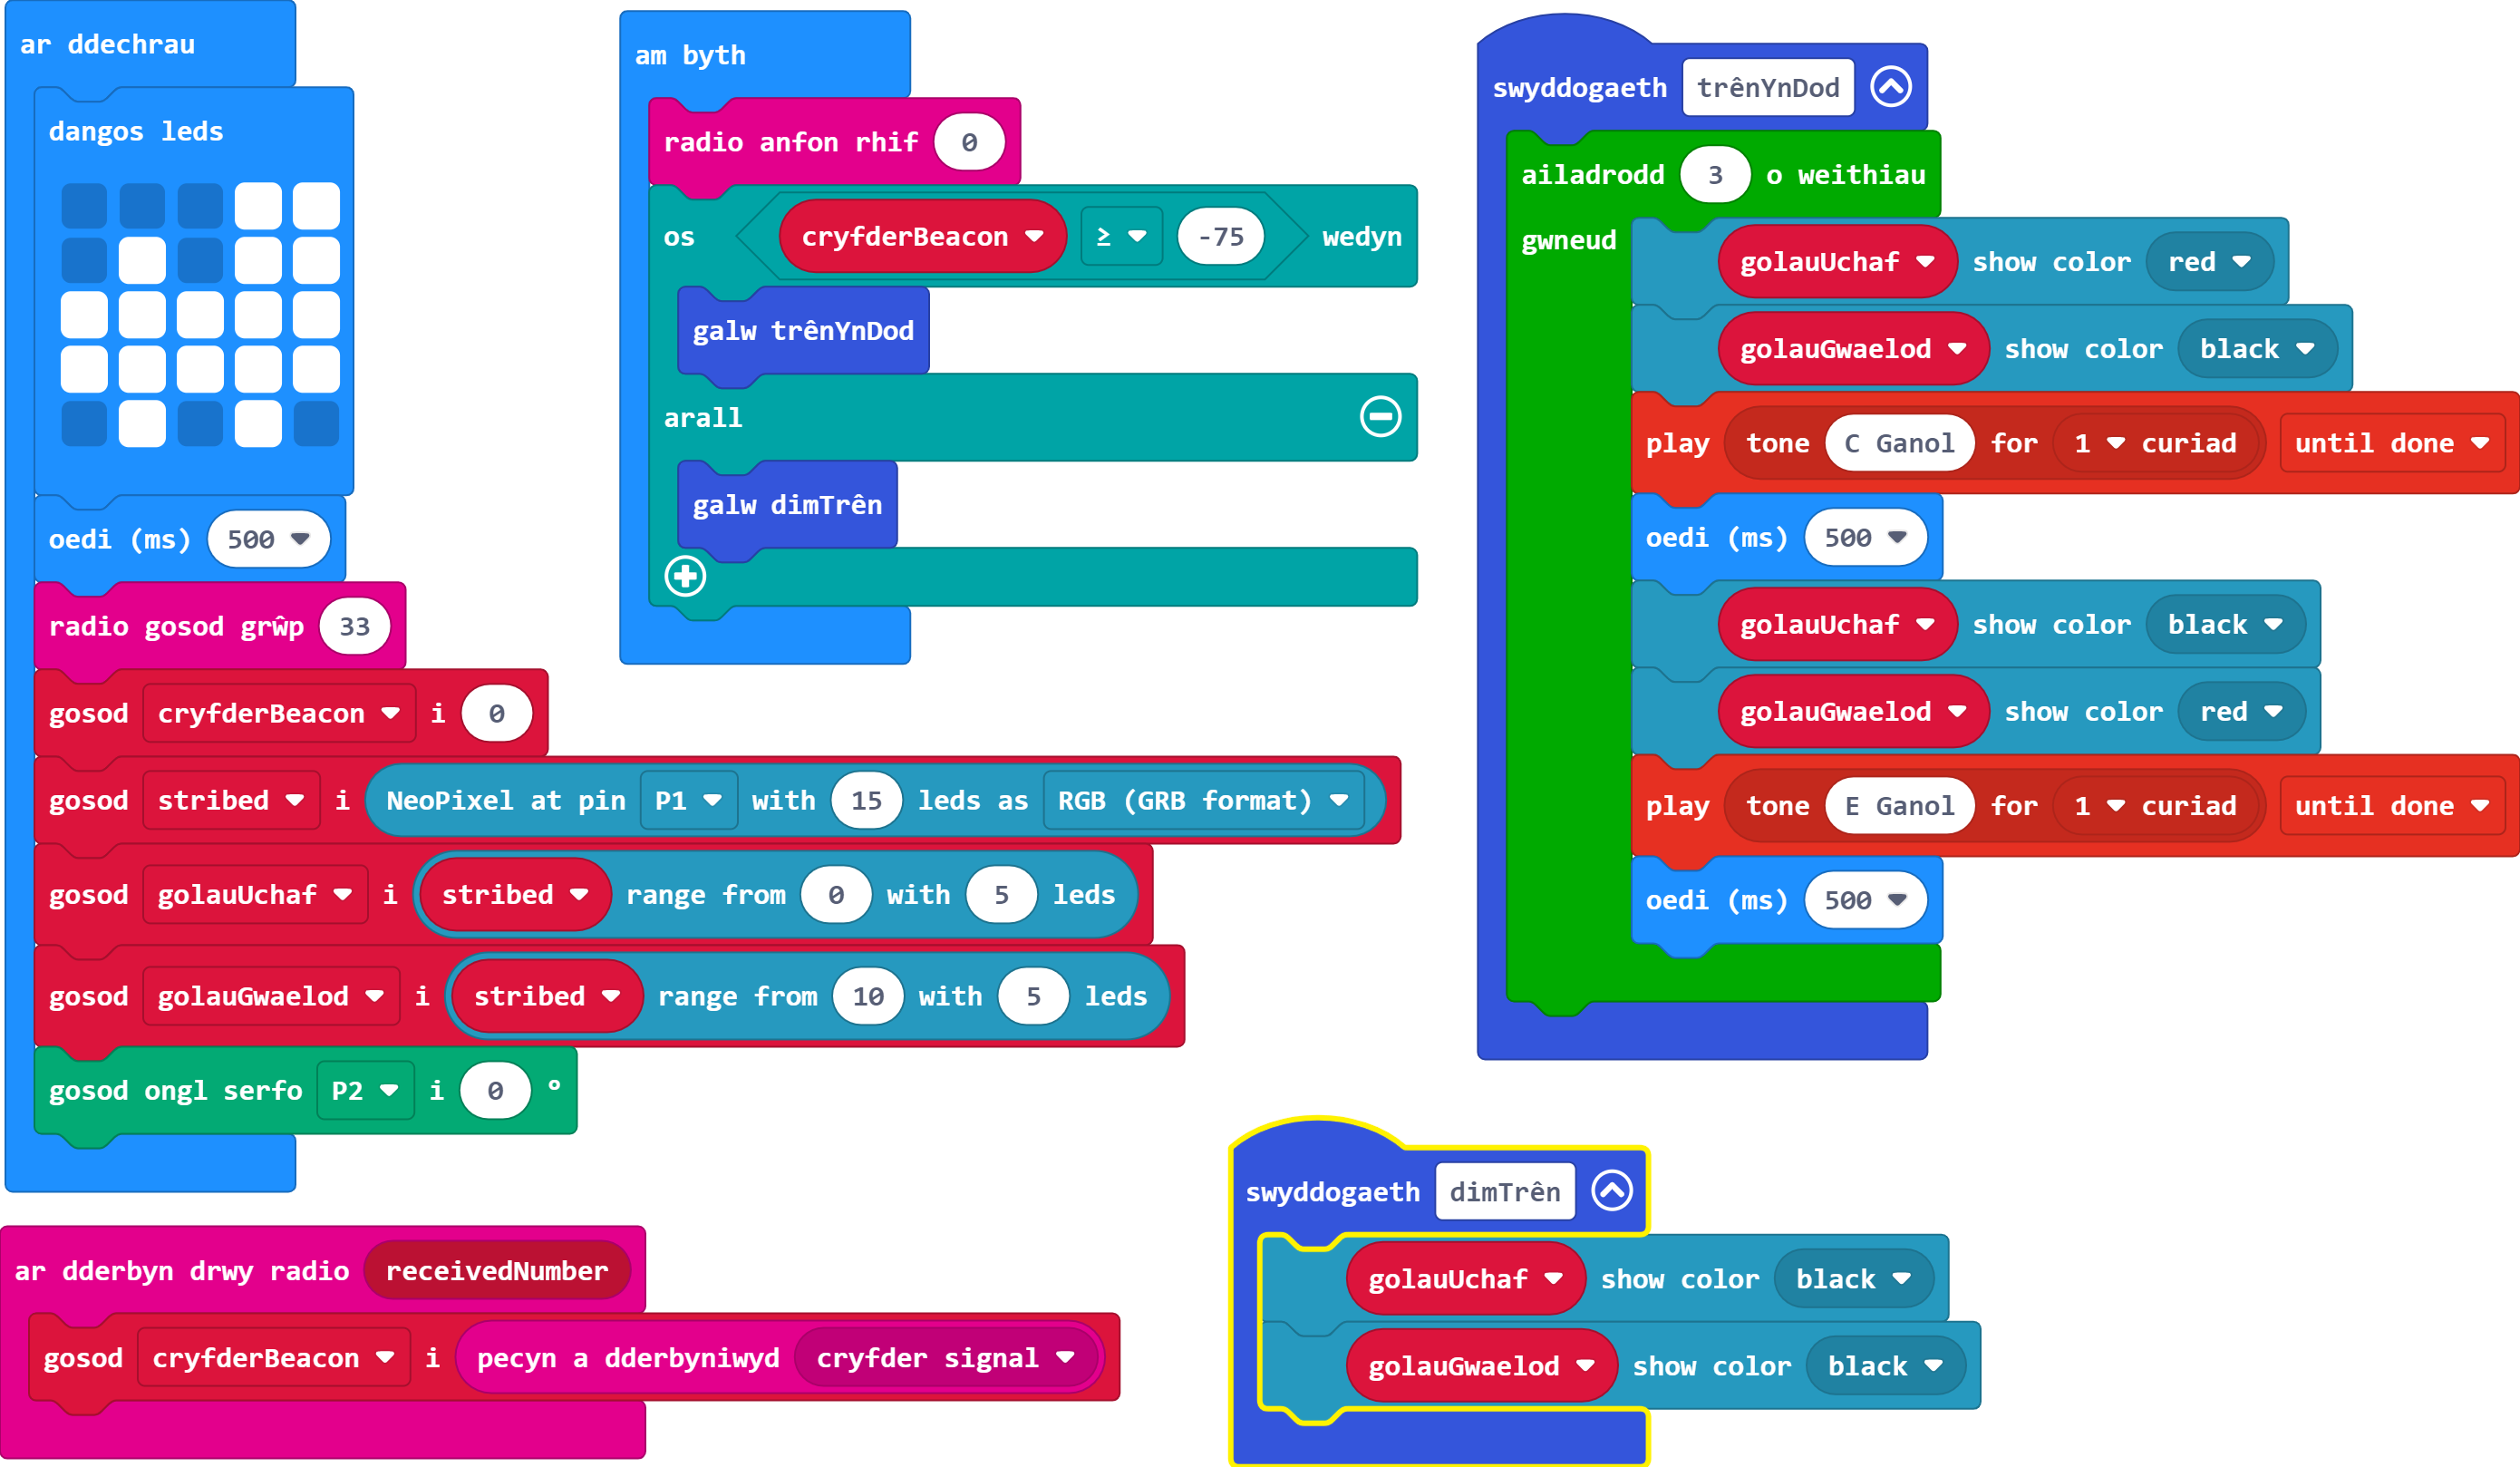
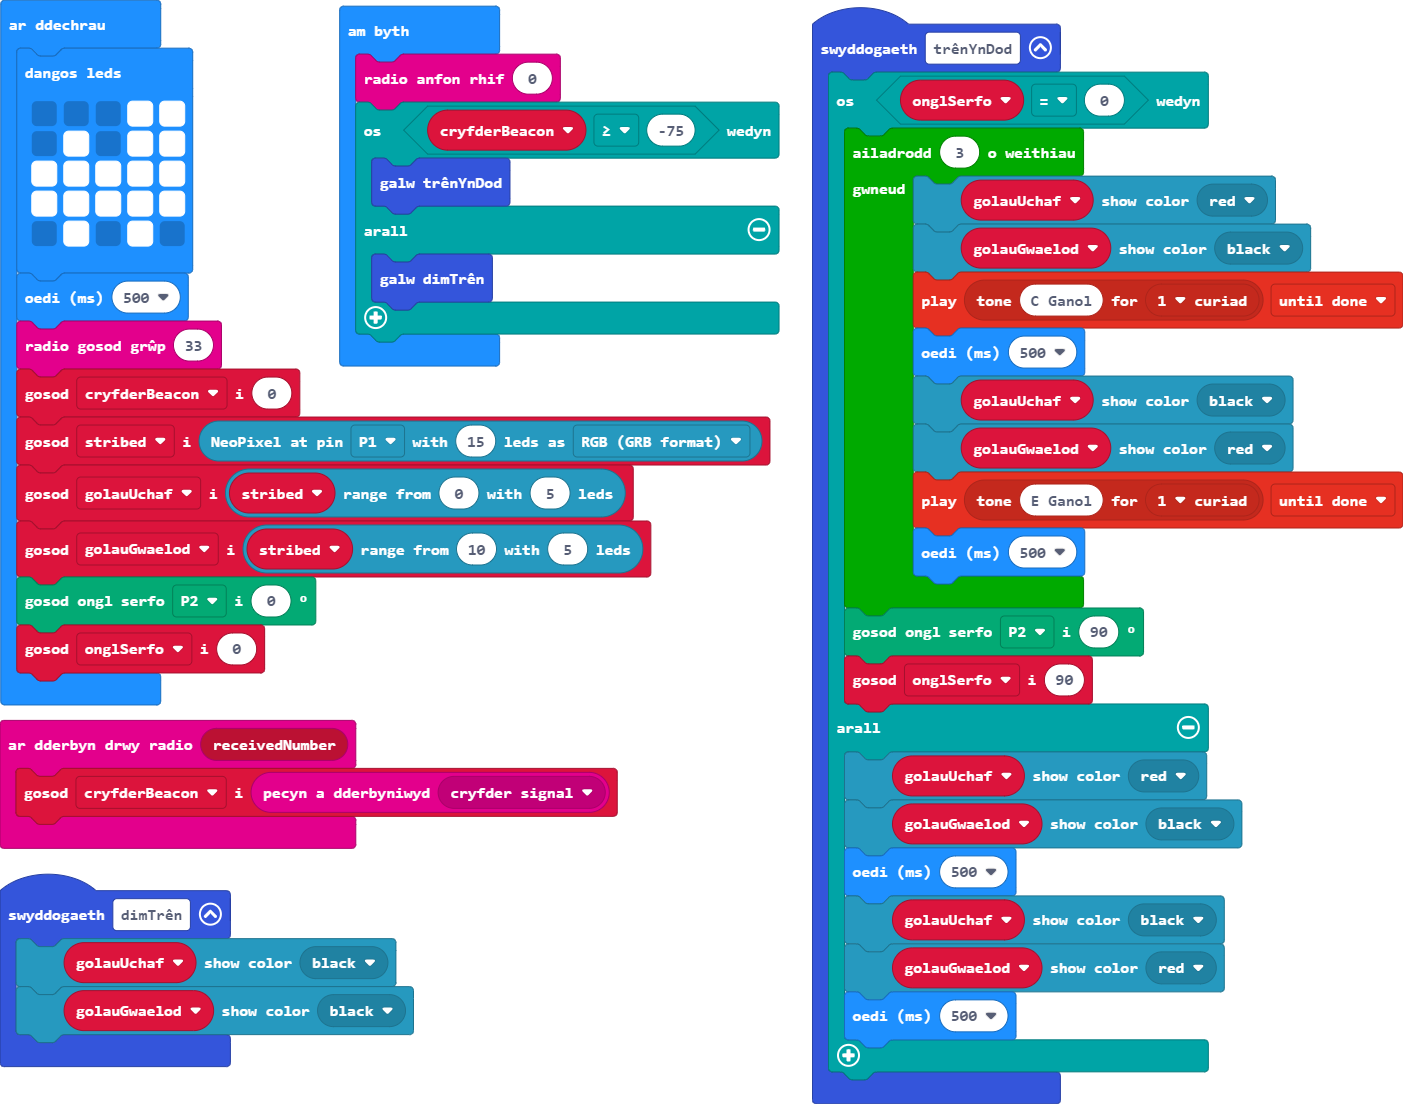
Ar gyfer rhwystr diogelwch croesfan y rheilffordd byddwn yn defnyddio serfo i reoli ei symudiad. Mae angen i hwn fod wedi ei gysylltu â phin 2 a bod yn y safle agored (0°) ar ddechrau'r rhaglen.
Gair o gyngor: Bydd hyn yn gofyn cael estyniad Servos.
Os ydych chi'n sownd, edrychwch yn ôl ar Sesiwn Pump.
Pan fydd trên yn agosáu, rydym am i'r goleuadau a'r larwm seinio dair gwaith ac yna i'r rhwystr diogelwch gau (symud i 90°).
Byddwch yn ofalus i beidio â rhoi'r cyfarwyddyd newydd hwn o fewn y ddolen ailadrodd.
Cofiwch mai ar bin 2 mae'r serfo.
Pan fo'r rhwystr diogelwch ar gau, mae angen i'r larwm stopio ac i'r goleuadau barhau i fflachio.
Gair o gyngor: Bydd arnoch chi angen ffordd i wirio ongl y serfo.
Bydd angen newidyn ongl serfo.
Bydd angen diweddaru'r newidyn newydd hwn bob tro mae'r rhwystr diogelwch yn agor neu'n cau.
Bydd angen diweddaru'r newidyn newydd hwn bob tro mae'r rhwystr diogelwch yn agor neu'n cau.
Pan fo'r rhwystr diogelwch ar gau, gwnewch i'r golau barhau i fflachio. Cyn belled â bod y rhwystr i lawr, bydd hyn yn dal i ailadrodd, felly does dim angen i chi ddefnyddio bloc ailadrodd yma.
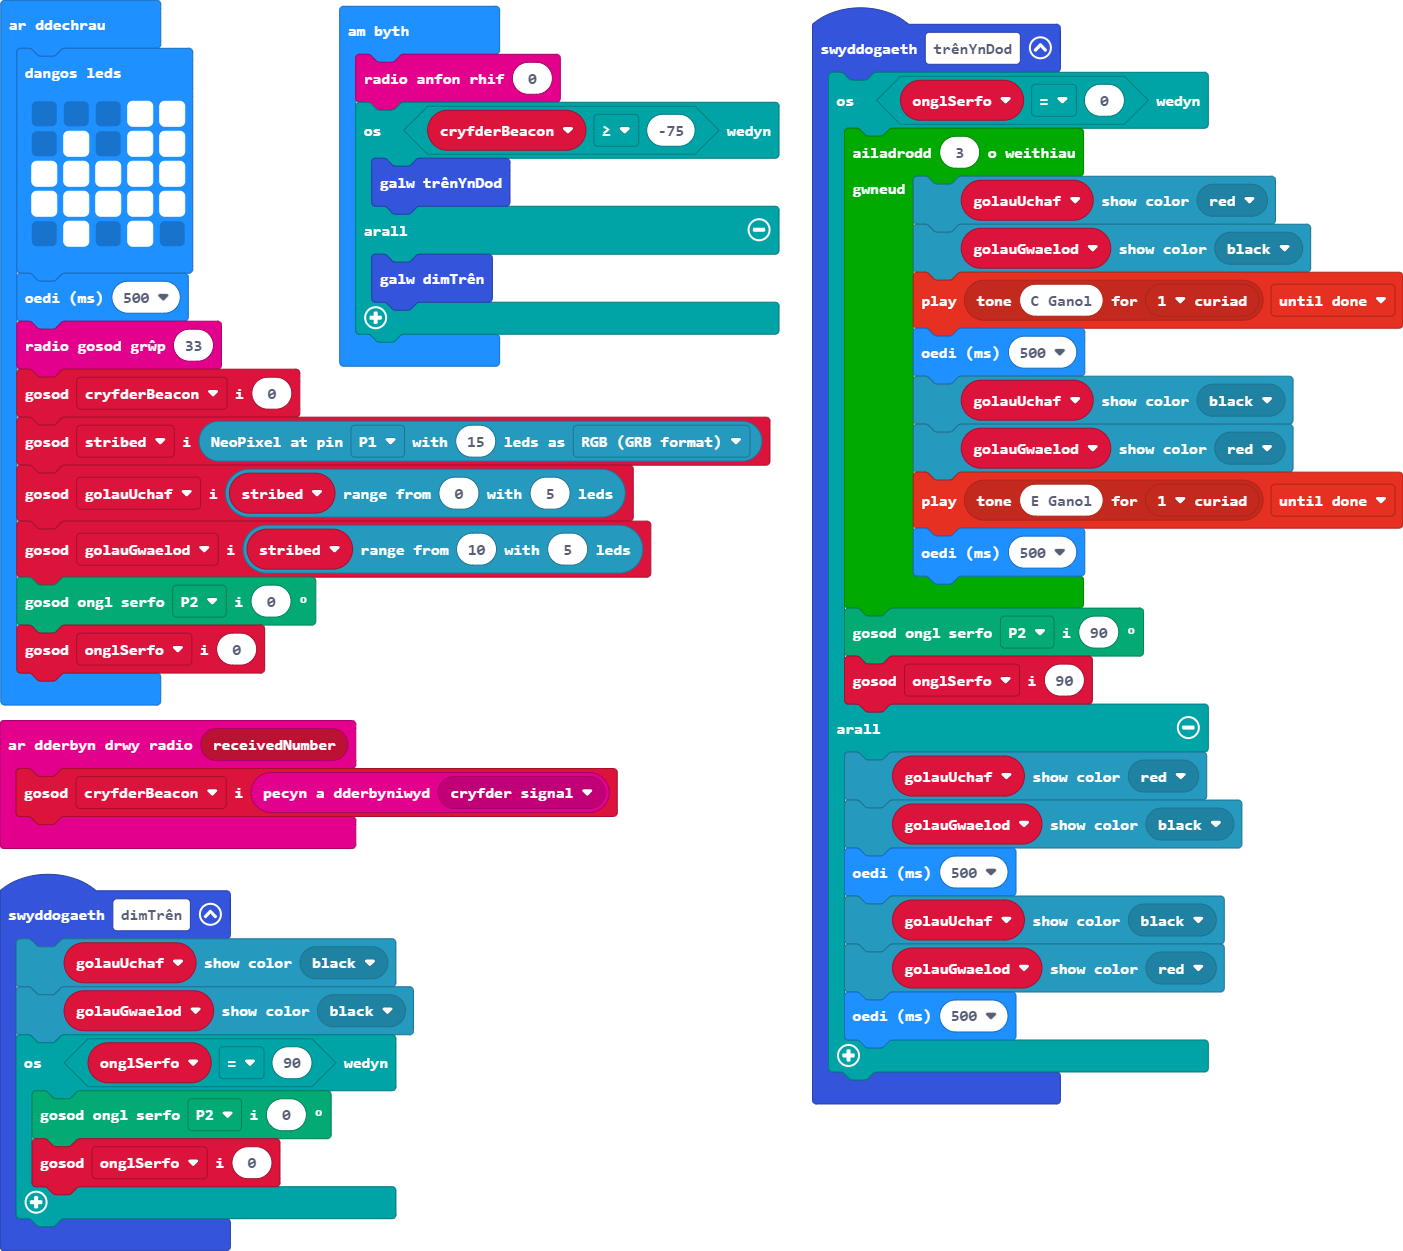
Ar ôl i'r trên fynd heibio ac i signal y tywysydd bylu i lai na 75 eto, rydym ni eisiau i'r rhwystr diogelwch agor (a mynd yn ôl i 0°).
Gair o gyngor: Cofiwch ailosod eich newidyn ongl newydd hefyd ar yr un pryd.
Gallwch ddefnyddio'r newidyn ongl i roi gwybod a oes angen agor y giât. Mae hyn yn groes i'r gwiriad rydym ni wedi'i wneud yn barod i weld a oes angen ei chau.
Peidiwch ag anghofio bod ein serfo wedi ei gysylltu i bin 2.
Ar hyn o bryd, mae'r serfo'n symud yn rhy gyflym. Gallai hyn achosi anaf i gerddwr neu niweidio cerbyd sy'n mynd heibio. Felly rydym ni angen i'r rhwystr diogelwch ostwng 5° bob 200ms. Pan fydd yn agor, mae'n fwy diogel mynd yn gyflymach - yn yr achos hwn 20° bob 300ms.
Gair o gyngor: Rhowch y ddau olau coch ymlaen yn llawn yn ystod y symudiadau yma gan y bydd y fflachio'n diffodd yn ystod y symudiadau hyn.
Bydd ar ein swyddogaeth ar gyfer pan fydd ein trên yn dod angen arall os-datganiad ar gyfer pan fydd y rhwystr diogelwch wedi ei gau yn rhannol.
Bydd angen i chi ddefnyddio'r newidyn ongl yn yr amodau mathemateg.
Cofiwch y gallwch hefyd ddefnyddio'r bloc Boole 'a' a ddangoswyd eisoes os hoffech chi wirio yn erbyn dau werth.
Creu swyddogaethau newydd ar gyfer y symudiadau agor a chau efallai. Ydy, mae'n bosib galw swyddogaeth o fewn swyddogaeth arall.
Wrth agor y rhwystr diogelwch, byddwch yn ymwybodol na ellir rhannu 90 gyda 20. Meddyliwch sut y gallwch sicrhau bod y rhwystr yn agor yn llawn heb fynd yn rhy bell a thorri'r serfo.
Mae'r adran hon yn weithgaredd ychwanegol i chi roi cynnig arno - bydd yn gyfle i chi wneud ychydig o waith adolygu yn ogystal â chyflwyno rhai blociau a thermau newydd i chi.
Fel sy'n wir am bob un o'n hymarferion, mae'n well cwblhau'r tasgau yn eu trefn.
Dewiswch bennawd i ehangu.
Ewch ati i greu rhaglen rholio dis sylfaenol ar eich Micro:Bit. Dylai hyn ddangos rhif ar hap rhwng 1 a 6 ar y sgrin pan gaiff ei ysgwyd.
Gair o gyngor: Cofiwch eich sgrin cychwyn.
Os ydych chi'n cael problemau, ewch yn ôl i sesiynau dau a thri.
Nid oes angen dolen am byth ar gyfer hyn.
Yn hytrach na dangos rhif, mae'r sgrin yn dangos y delweddau canlynol gan ddibynnu ar y gwerth a gafodd ei rolio.
Un
Dau
Tri
Pedwar
Pump
Chwech
Gair o gyngor: Bydd angen i chi greu newidyn er mwyn dal gwerth y dis ar ôl ei rolio.
Bydd angen os/arall os datganiad gwahanol ar gyfer pob gwerth posibl. Yna gallwch ddefnyddio'r arall-datganiad i ddal unrhyw gamgymeriadau.
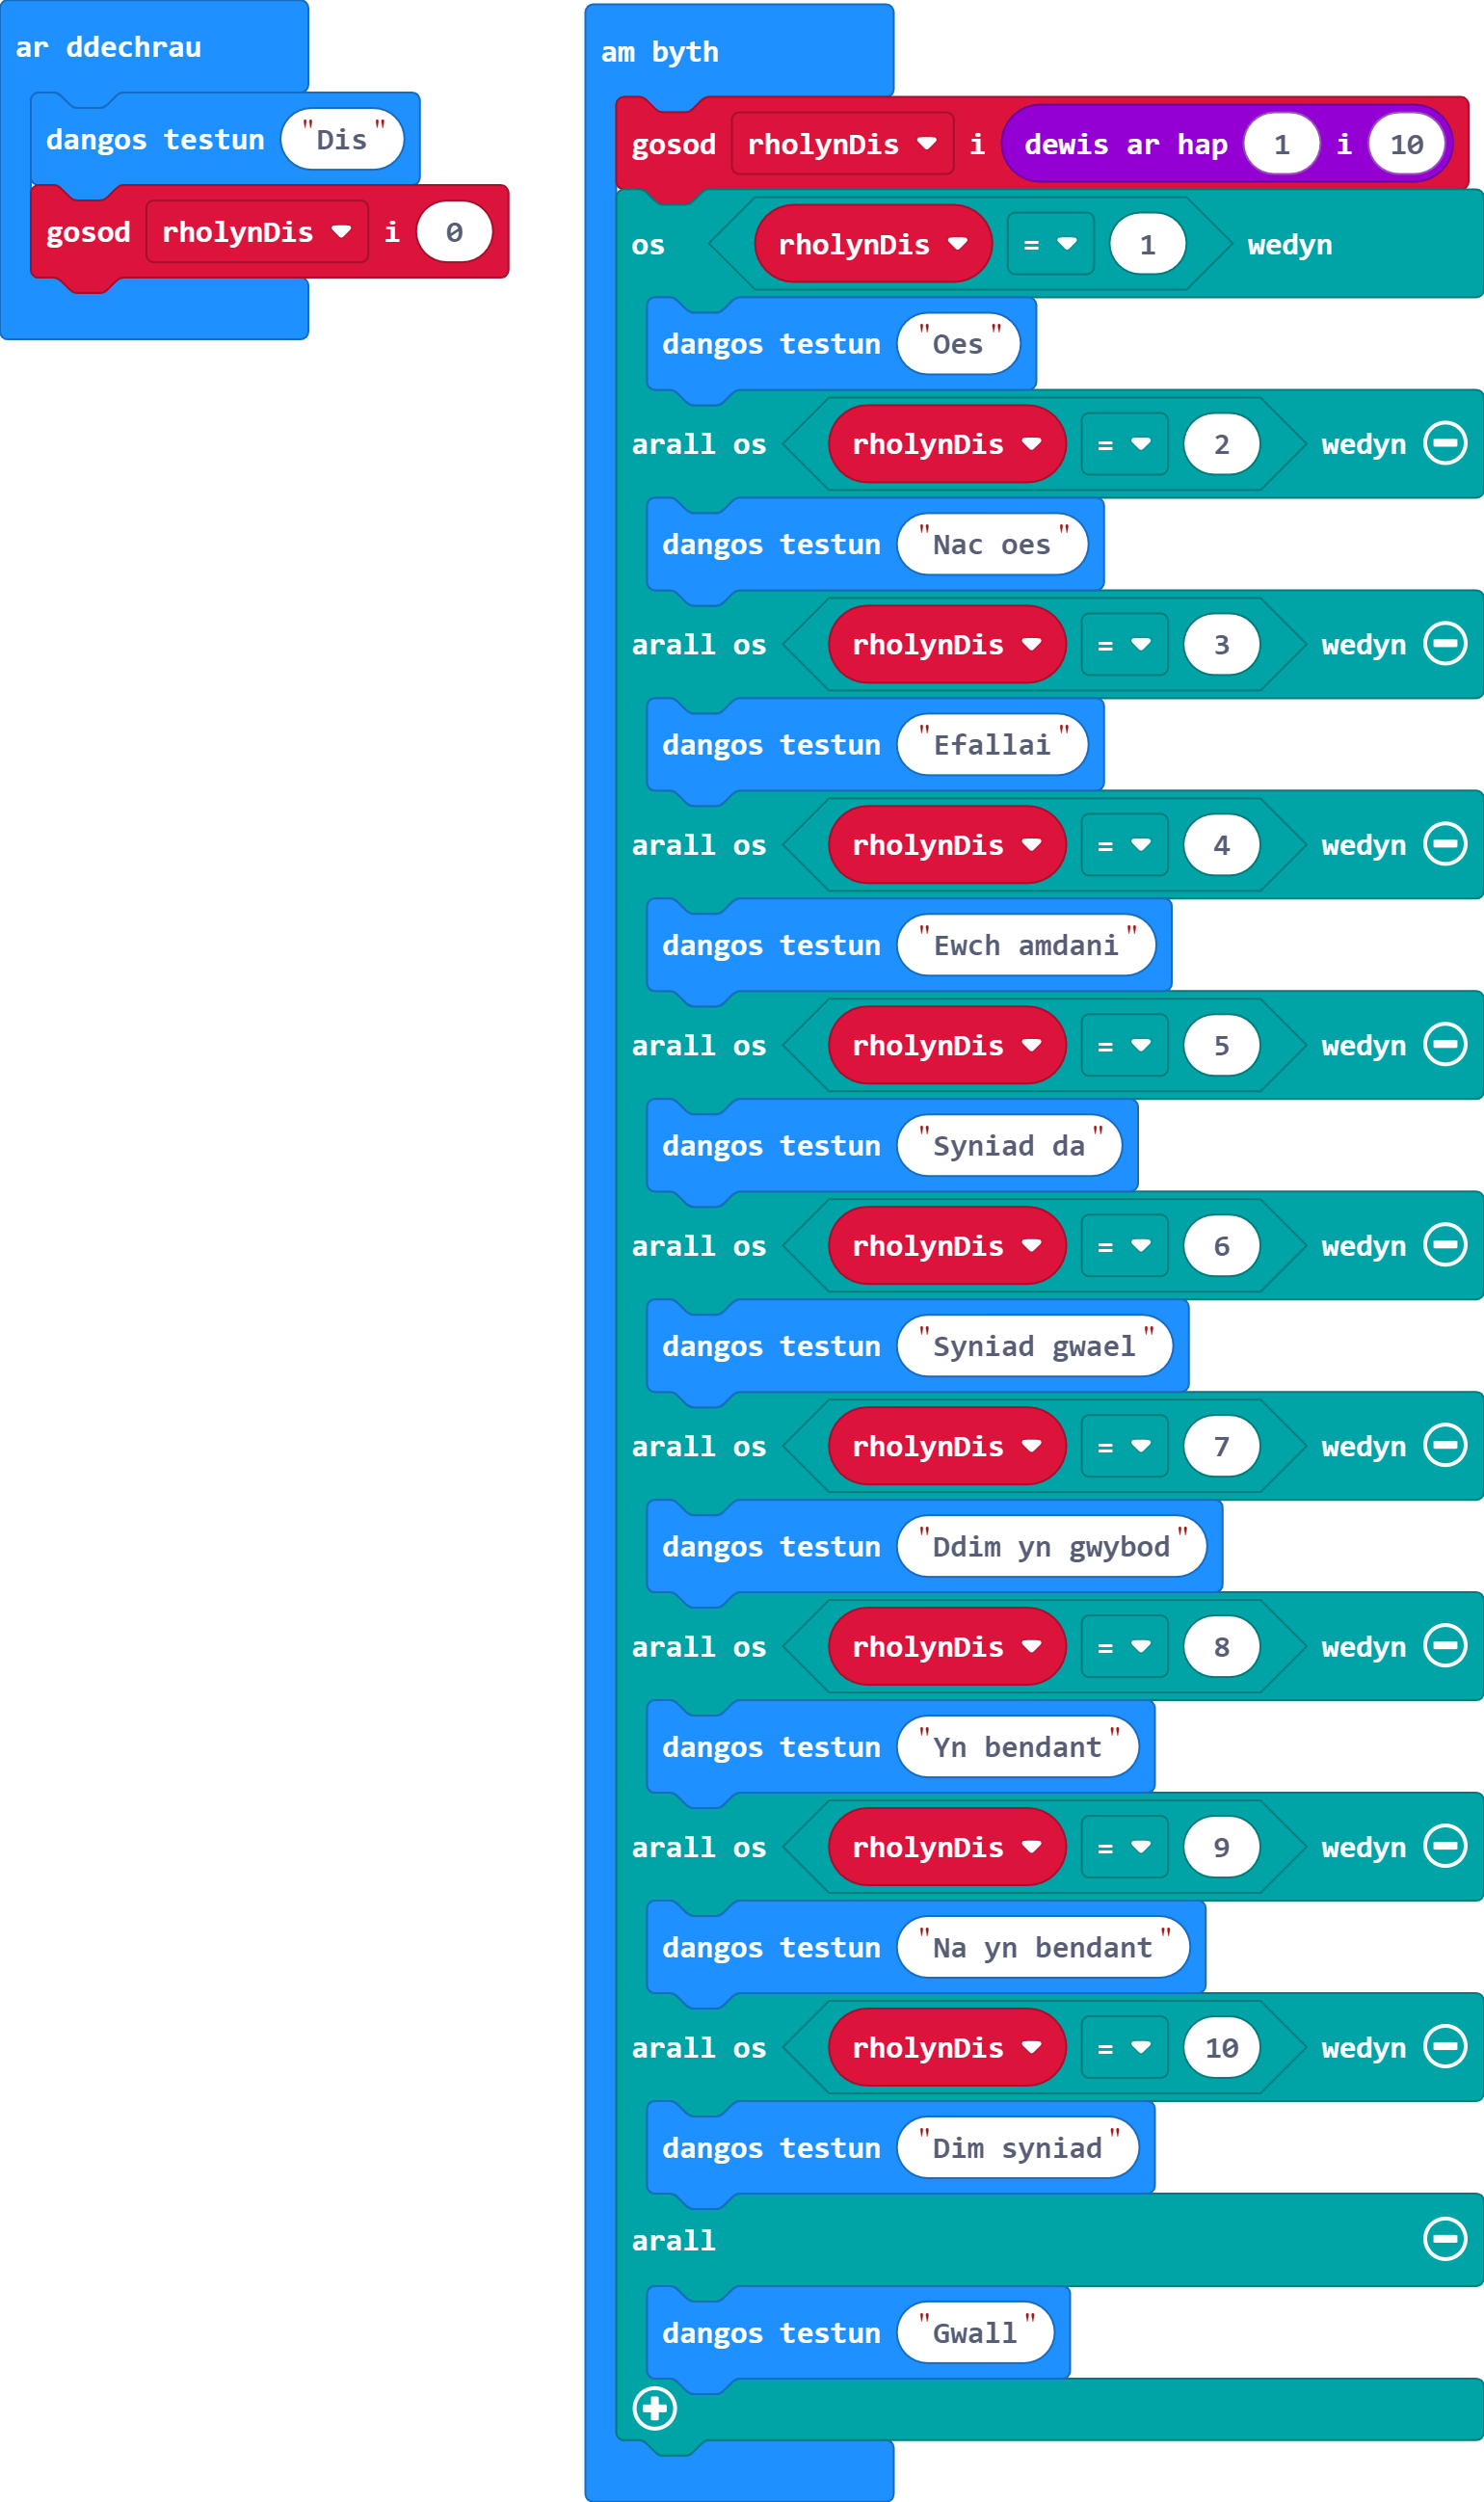
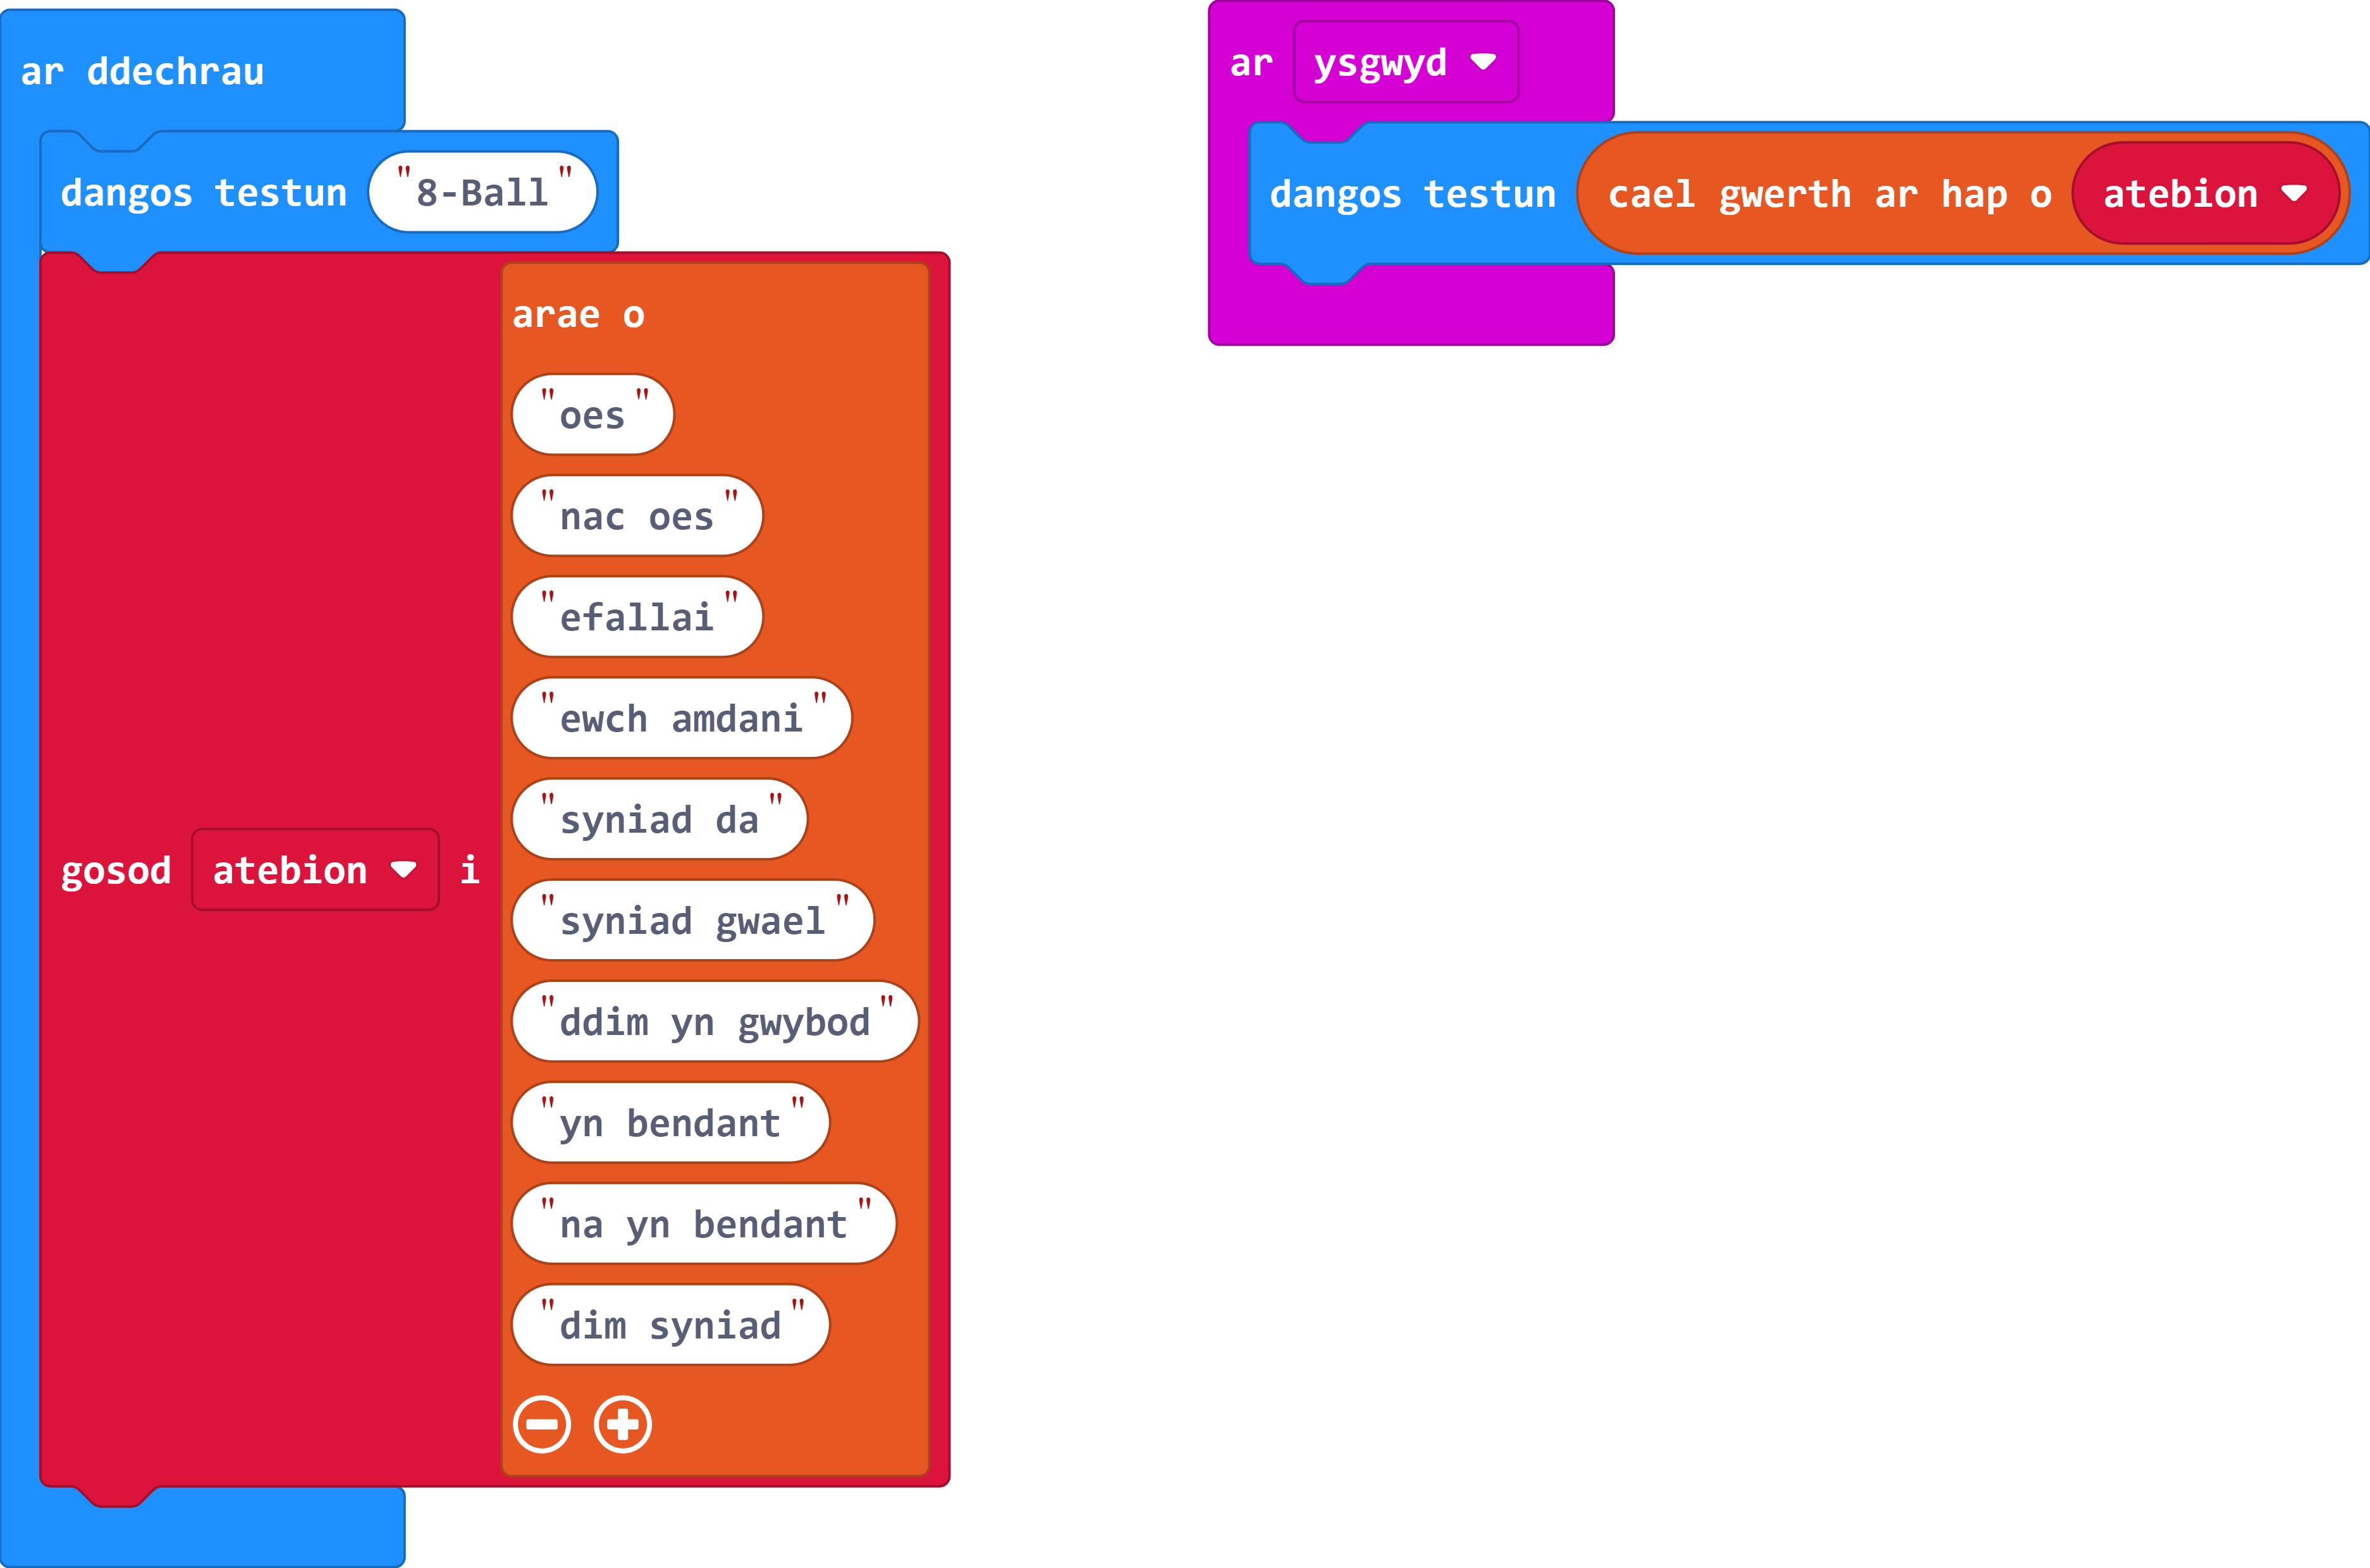
Mae Magic 8 Ball yn debyg i ddis, ond yn hytrach na chreu rhifau, mae'n creu atebion pan gaiff ei ysgwyd.
Yn hytrach na dangos rhifau yn eich rhaglen, ewch ati i wneud i Micro:Bit ddangos yr atebion oes, nac oes, efallai, ewch amdani, syniad da, syniad gwael, ddim yn gwybod, yn bendant, na yn bendant, a dim syniad.
Gair o gyngor: Mae 10 opsiwn erbyn hyn.
Ar gyfer y chwe opsiwn cyntaf gallwch chi ddisodli'r delweddau presennol.
Yna bydd angen i chi ychwanegu pedwar 'arall os' datganiad arall.
Cofiwch newid y swyddogaeth sy'n creu rhif ar hap i gael 10 opsiwn yn hytrach na 6.
Gallem fod wedi ymdrin â'r rhaglen hon mewn ffordd wahanol. Gallem fod wedi defnyddio rhywbeth o'r enw arae. Gellir dod o hyd i flociau arae yn y ddewislen Uwch.
Mae arae yn fath arbennig o newidyn. Yn hytrach na dal un darn o wybodaeth yn unig fel y newidynnau rydym wedi'u defnyddio, mae'n gallu dal rhestr o werthoedd/testunnau.
Yna gallwch alw gwerth o'r arae ar sail ei leoliad yn y rhestr. Fel sy'n wir am y rhan fwyaf o waith codio, mae rhifo eitemau yn y rhestr yn dechrau ar sero.
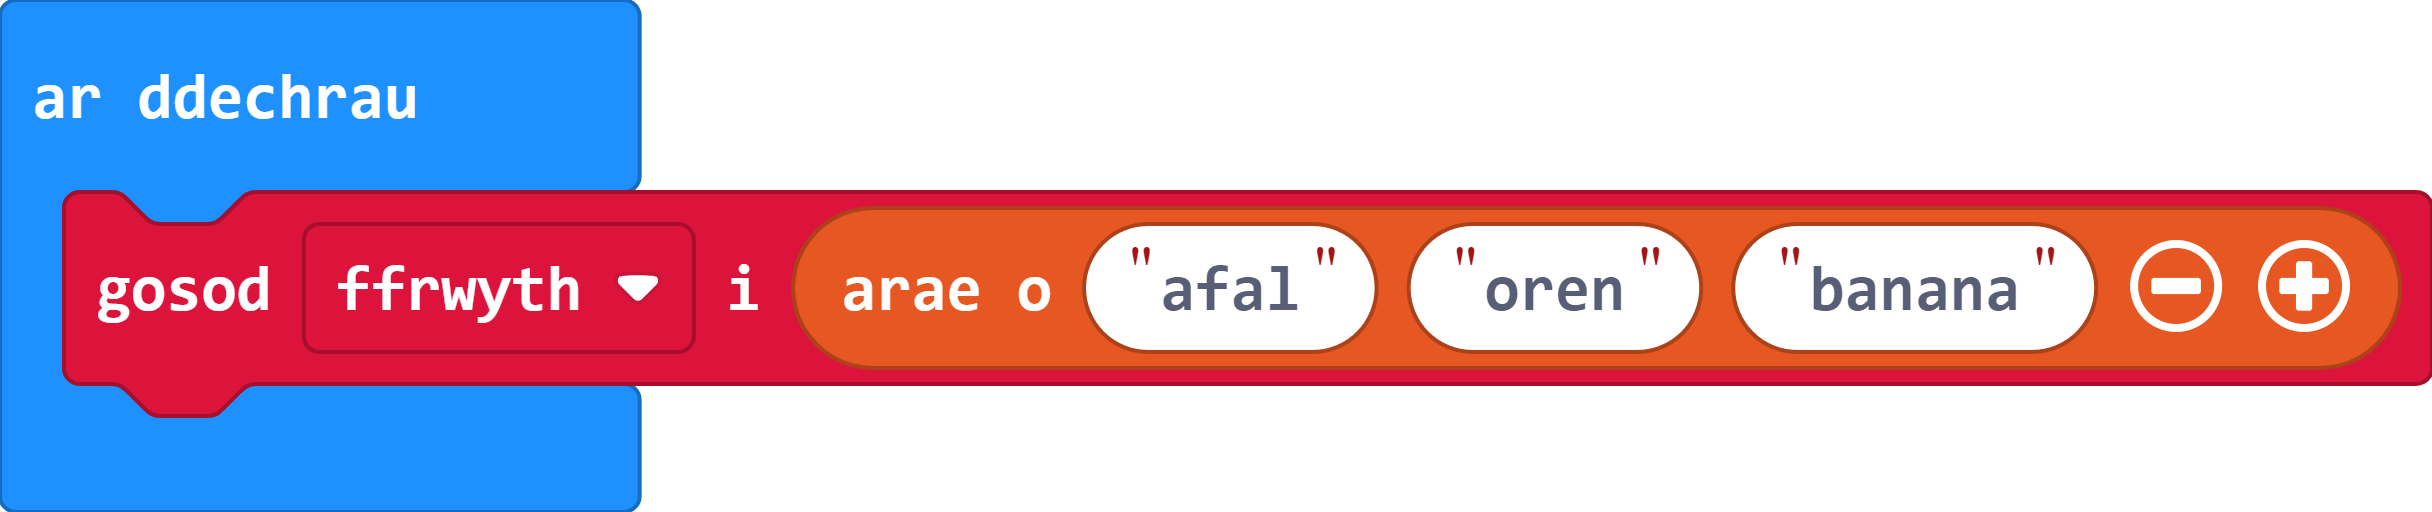
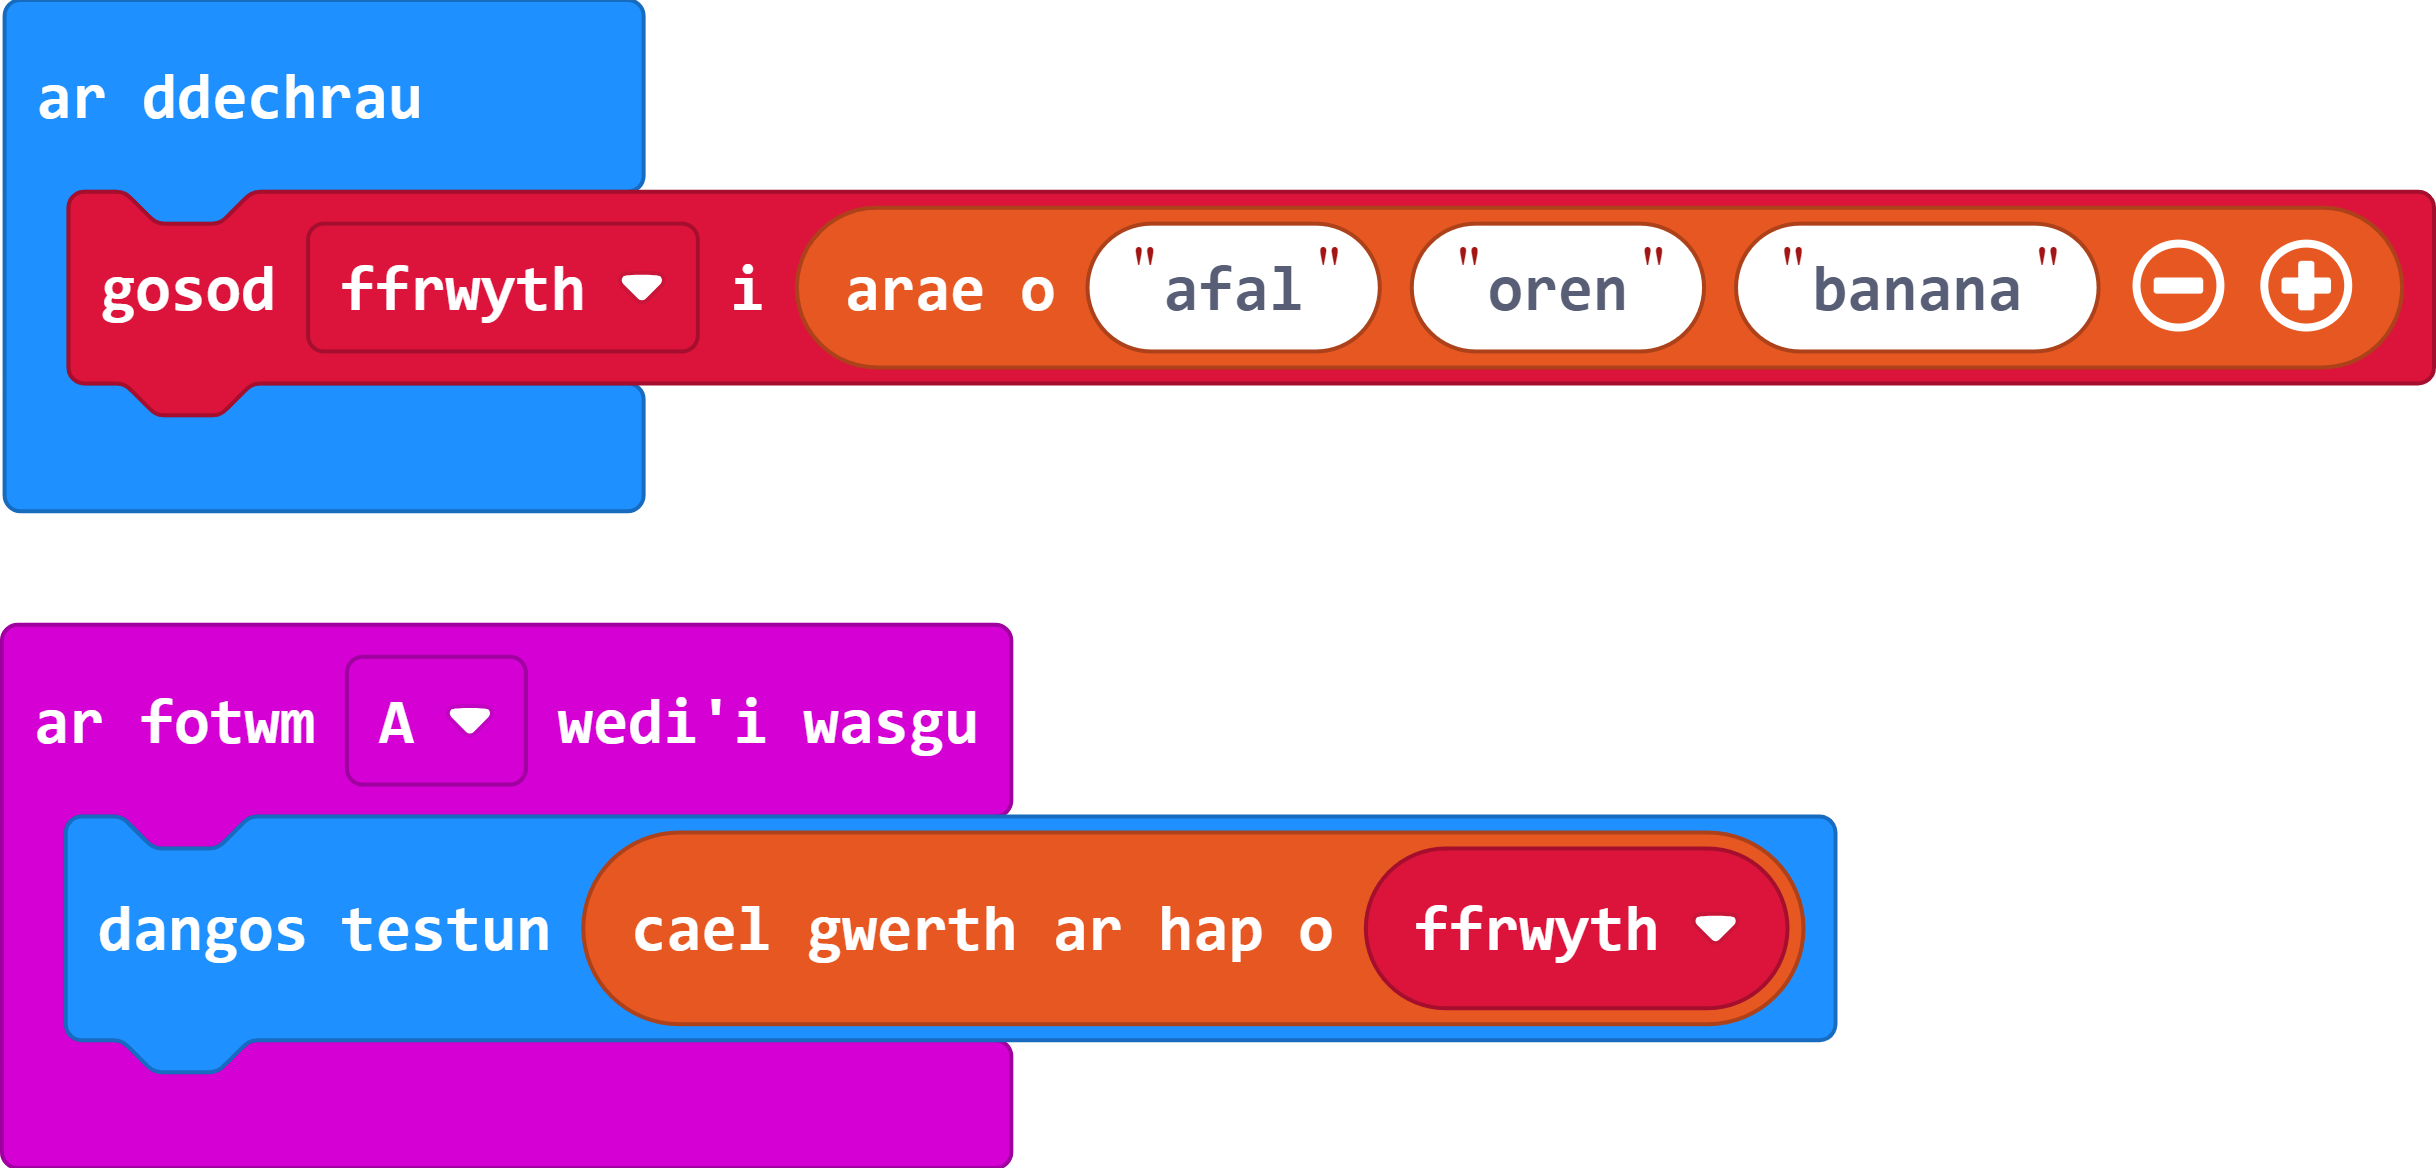
Enghraifft:
Gadewch i ni feddwl am ysgrifennu rhaglen sy'n dewis testun ar hap o restr sy'n cynnwys afal, oren, a banana pan fyddwn yn pwyso botwm A.
Fel sy'n wir am unrhyw newidyn, mae angen i ni osod yr arae yn yr adran 'ar ddechrau':
Gallwn ychwanegu neu dynnu eitemau o'r arae trwy ddefnyddio'r botymau plws a minws ar y bloc.
Er mwyn gwneud i'r sgrin ddangos eitem ar hap o'r arae, gallwn ddefnyddio'r bloc 'dangos testun' ynghyd â bloc arae 'cael gwerth ar hap o'.
Nawr mae gennym raglen gyflawn sy'n dewis eitem o'r rhestr ar hap a'i dangos ar y sgrin pan fyddwn yn pwyso botwm A.
Mae gan y rhaglen Magic-8 Ball un newidyn sydd â rhestr o testunnau gwahanol (yr atebion), felly gallem ddefnyddio arae a gwneud i'r rhaglen ddewis ar hap o restr yn hytrach na defnyddio os/arall os/arall datganiad mor fawr.
Pwysig: Ni ellir defnyddio araeau i ddisodli pob datganiad 'os' ac 'arall os'. Ar gyfer Makecode, gellir dim ond eu defnyddio ar gyfer rhestrau o testunnau neu rifau. Er enghraifft, ni allech ddefnyddio hyn ar gyfer y rhaglen ddis gyda delweddau gwahanol ar gyfer pob gwerth.
Newidiwch eich rhaglen Magic-8 Ball i ddefnyddio arae ar gyfer yr holl atebion posibl a dewis ar hap ohono pan gaiff ei ysgwyd.
Gair o gyngor: Gallech ddyblygu eich ffeil yn gyntaf er mwyn eu cymharu yn nes ymlaen.
Defnyddiwch y rhaglen rhestr ffrwythau enghreifftiol gan ddisodli'r ffrwythau ag atebion y Magic-8 Ball a ddarparwyd yn yr ymarferiad arian.
Cofiwch sicrhau eich bod yn defnyddio'r bloc rhestr testun, oherwydd bydd y fersiwn rhif yn creu gwall os ydych chi'n ychwanegu geiriau.
Cofiwch, gallwch ychwanegu mwy o eitemau at yr arae trwy ddefnyddio'r symbol plws ar y bloc sefydlu.
Ailenwch y rhestr gan ddewis rhywbeth sy'n fwy addas na ffrwythau.
Os nad ydych wedi gwneud hyn eisoes, ewch ati i ail-gynllunio'r dilyniant cychwyn ar gyfer y Magic-8 Ball yn hytrach na'r dis.
A chithau nawr wedi darganfod swyddogaethau ar hap trwy ddefnyddio araeau, gallwch greu nifer o bethau hynod ddifyr eraill. Dyma rai syniadau.
Swyddogaeth dewis gwirfoddolwr - gallwch greu arae sy'n cynnwys enwau pawb yn eich dosbarth, a'r tro nesaf nad oes neb yn gwirfoddoli, gallwch ei defnyddio i ddewis rhywun ar hap.
Rhaglen ysgrifennu creadigol - defnyddio cyfres o araeau i helpu i lunio syniad am stori. Er enghraifft, gallech ddatblygu swyddogaeth i greu lleoliad/genre/cymeriad/cynorthwydd ar hap.
Ap anhrefn siopa - rhowch eich rhestr siopa i mewn i arae ac yna defnyddiwch y swyddogaeth ar hap i benderfynu ar drefn eich siopa.
Gair o gyngor: Gallech wneud rhywfaint o waith ymchwil yn ymwneud â sut i waredu eitemau o arae ar ôl iddynt ymddangos.